Ultimate Guide to Train Lora in Kohya_ss (PDXL | SDXL | Illustrious)
This article may be a bit lengthy, but rest assured, it is well worth your time. I will also assume that you are already familiar with the process of installing Kohya locally. If you Don't know how to install kohya locally clickhere
-> What you need to start:
Obviously you'll need the checkpoint base model, download the safetensor file on this link :
PDXL | SDXL | Illustrious
The installation of kohya_ss that I recommend is the bmaltais version that comes with GUI :
The dataset of the character that you want to make the lora from.
i recommend 50 images of your character, you can use Birme if you want to crop your character / concept/style images to ratio 1024x1024, i recommend Birme because of its Bulk crop capabilities.
The config file of kohya, attached to this article. Named Pony.json for ponyv6 while SDXl_ILLUS.json is for (SDXL | Illustrious) has both share the same settings.
-> Run Kohya_ss:
Download the configuration files and move them to the following directory:
\kohya_ss\presets\lora\user_presetsAfter moving the configuration file, run
gui.batif you're on Windows. For Mac/Linux users, rungui.shinstead.Once the program is running, copy the local host URL:
http://127.0.0.1:7861Paste the URL into your browser to open the Kohya GUI.
-> Load Config Files:

Paste the path of the downloaded configuration file into the appropriate Box. In My case, the path is: C:\Users\CSP\Downloads\kohya_ss\presets\lora\user_presets
Once the configuration file is in place, click on the blue arrow to load the configuration, as shown in the image.
-> Prepare DataSet:
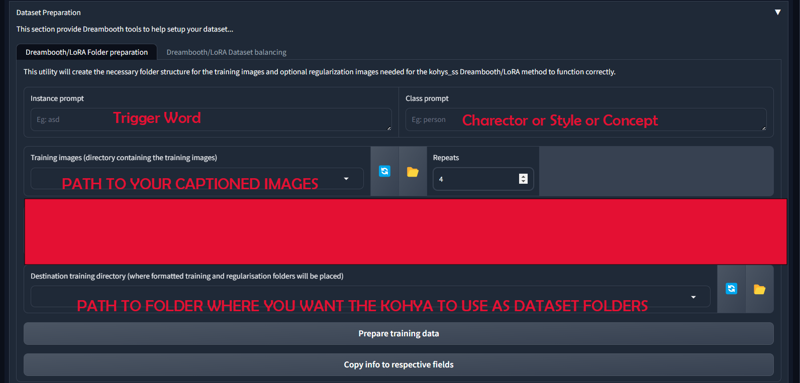
Important Folder Structure for Kohya Training
Kohya follows a strict folder structure, and placing files in the wrong folders can prevent training from starting or lead to failed training attempts.
Instance Prompt:
The instance prompt should be a short, easy-to-remember word that will activate the LORA model. Keep it simple and concise.Class Prompt:
The class prompt defines what you're training, such as a person (character), style (look and feel), or concept (objects, clothing, etc.).Training Images:
These should be properly captioned images used for training the model. Ensure that they are correctly formatted and labeled.Repeats:
The number of times the same image should be repeated within one epoch. For example, if you have 50 images and set repeats to 4, this will result in 200 steps within one epoch. It is recommended to leave this value at 4 repeats for consistency. I also recommend to keep the the training images to 50Regularization Images:
These are typically used for Dreambooth and are not needed for LORA training. Leave this field empty.Destination Folder:
This is the most critical folder in the training process. The destination folder is where Kohya will prepare and store the dataset for training. Ensure that this folder is correctly defined, as it will be used throughout the entire training process.
Next Steps:
Click "Prepare Training Dataset" to generate the dataset.
Click "Copy Info to Respective Fields" to automatically paste the dataset path into the corresponding fields. This step is crucial as it ensures accuracy and saves time by avoiding manual entry and preventing path errors.
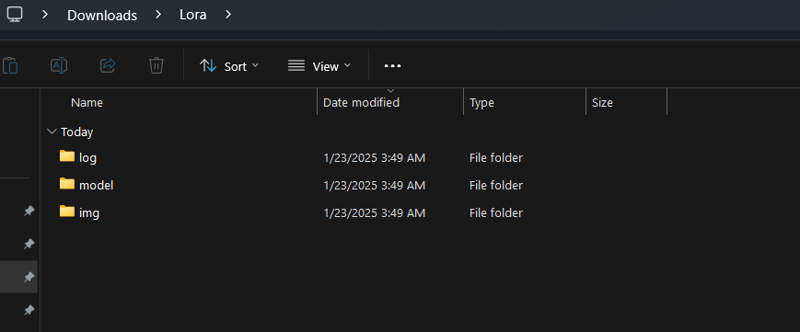
Destination Folder shall look like:
(Optional) Captioning Your Images : For those who wish to caption their images, follow these steps. However, if you are already familiar with image captioning, you may skip this section.
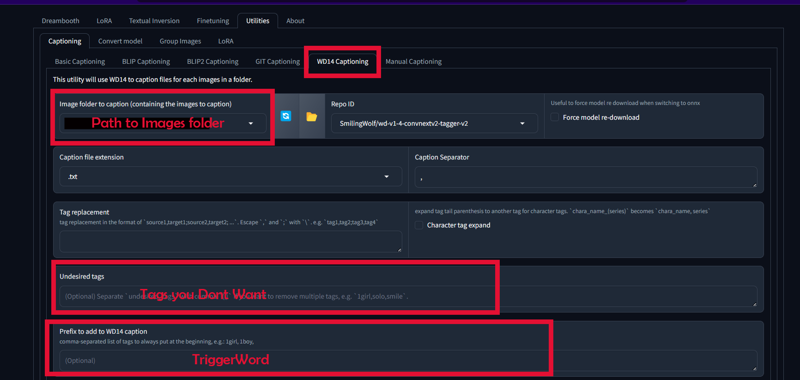
Click on the upper tab : Utilities > Captioning > WD14 Captioning
You only need to change 3 informations there :
- Image folder to caption (where the images files are located)
- Undesired tags (1girl, solo, what you don't want the WD14 to use as tags)
- Prefix to add to WD14 caption (this is the tagname to call the character)
And then, click on the button on the bottom of the kohya page : "Caption Images".
Note: it can take a little while for the first time as it will download the model to tag everything, look into the command dos to know what it is doing.
I left by default the Repo ID : SmilingWolf/wd-v1-4-convnextv2-tagger-v2
-> Training Parameters:
Although the configuration file automatically sets the training parameters, there are still some critical points that require attention:
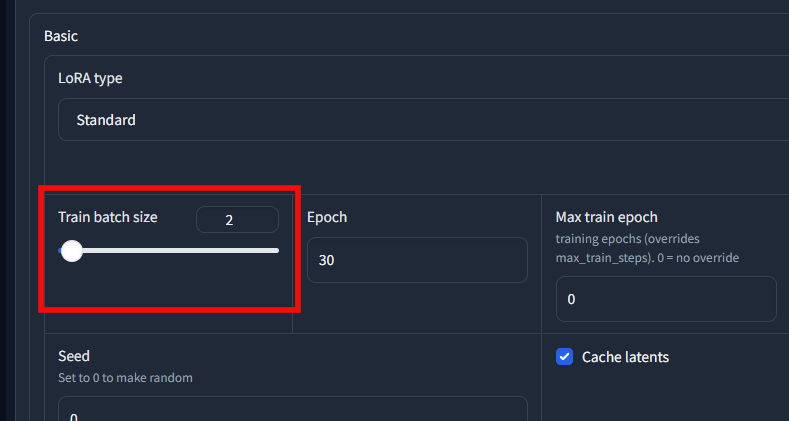
A maximum of 3000 steps or 30 epochs is recommended for optimal results.
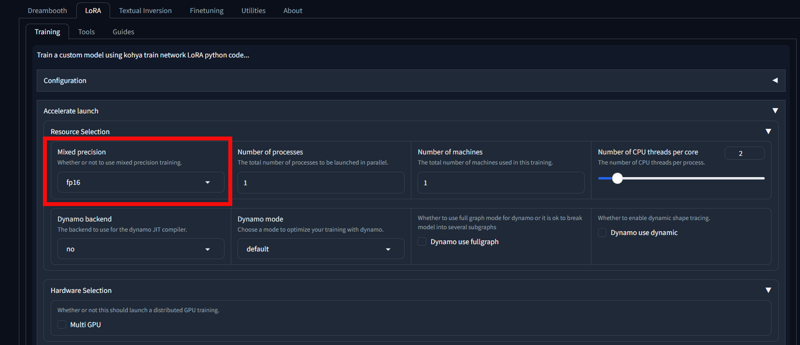
Use FP16 for systems with 8GB of VRAM, and BF16 for systems with 12GB of VRAM or more.
(if you have NVidia 30xx series or 40xx series use bf16)
Select the path of the base model (PDXL | SDXL | Illustrious)
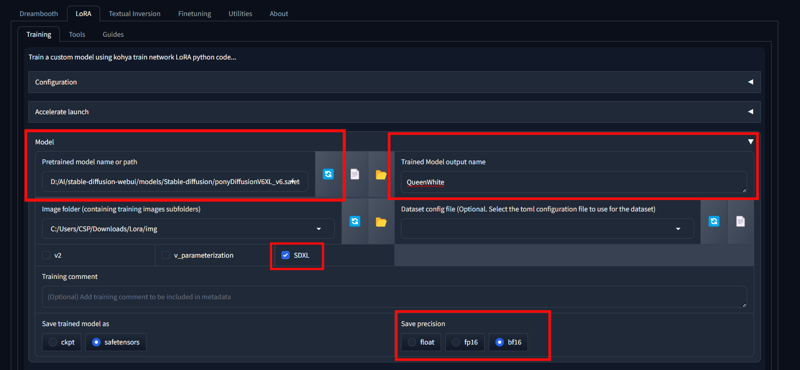
For 8GB of VRAM, maintain a batch size of 1-2. For 12GB of VRAM, use a batch size of 2-3. For systems with higher VRAM, a batch size of 5 or more can be used, depending on VRAM availability.

I have provided you with basic prompt structure :
score_9_up, score_8_up, score_8, 1 girl, looking at viewer, smile, parted lips, lips, standing, fullbody, --w 1024, --h 1024, --l 4.5, --s 27, --n nsfw nude
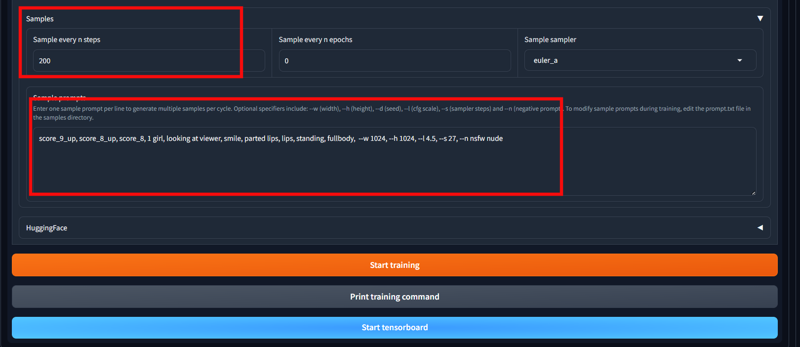
--w : Width
--h : Hight
--l: Cgf scale
--s: Sampling steps
--n: Negative Prompt
So you can pretty much change the prompt however you want for sampling, One thing will recommend is Keep the Sample ever n steps as it is because every 200 steps it will generate a image based on your prompt, which will help you keep track of the training state ie If training is going wrong or if training is getting overdone
Click on Start Training and enjoy
(with my Rtx 3060 12vram it took me around 6h of training for a perfect lora, so train when you don't require your computer, or at night if you have low vram)
Examples of this lora trainer :
-> Some technical part For People who want to know difference between Prodigy & Adafactor:
So Adafactor uses the parameter: scale_parameter=False relative_step=False warmup_init=False Adafactor is an adaptive learning rate optimizer, similar to Adam, but with reduced memory usage. It is particularly useful for training large models by maintaining lower memory requirements without sacrificing performance. Hence AdaFactor Allows a perfect traning with different unet, learning and text-encoder learning rateOn the Other Hand Prodigy uses the parameter decouple=True weight_decay=0.5 betas=0.9,0.99 use_bias_correction=False Prodigy" is a machine learning tool designed for annotating and training data with active learning. It's a fast and efficient way to create and refine training datasets for natural language processing (NLP), computer vision, and other machine learning tasks. Prodigy allows users to quickly label data, prioritize examples that are most useful for model improvement, and continuously update models as more data is annotated. This means unet, text-encoder, learning rate must be same. Else it will throw an error. The error is cased due to kohya_ss\venv\Lib\site-packages\prodigyopt Ln 145 if group_lr not in [lr, 0.0]: raise RuntimeError(f"Setting different lr values in different parameter groups is only supported for values of 0"-> Q/A
Q1. What are tools that can be utilized if you don't have enough vram?
A: Use Runpod for Lora, Checkpoint training, And Thinkdiffusion for using StableDiffusion, Comfyui via cloud.
Q2. Is it possible to train SD3 and Flux LoRA via Kohya?
A: Yes, it is possible, but training SD3 and Flux LoRA requires a significant amount of VRAM. You'll need a GPU with high VRAM or cloud services like RunPod to handle the training, which may not be sustainable for long-term use. For more efficient training, it’s recommended to use Civitai's LoRA trainer for SD3 and Flux LoRA. For SDXL, SD2, and SD1.5, training can be done locally, allowing you to save resources (Buzz) that can be allocated to other Civitai services, such as Flux image generation.
Q3. Do you need a similar article for LoRA training for Flux and SD3 via RunPod? (Comment)
A: While it is possible to train Flux and SD3 models via RunPod, I would not recommend this approach. Civitai's LoRA trainer offers a more efficient and optimized solution for training both SD3 and Flux models. Using Civitai for this purpose is a better option.
->Avoiding Common Errors:
Rename.py (Avoiding Confusions & Maintaining Organization):
Rename.py is a Python script that renames all image files in a specified folder to a sequential numbering format (e.g., 1, 2, 3, ..., n). It works on any number of images and keeps them in the same folder.
How It Works:
Run rename.py from anywhere.
When prompted, provide the path to the folder containing the images via.
The script will rename all the images in the folder to sequential numbers, starting from 1 up to the total number of images.
For example:
Original files: image1.jpg, image2.png, random_photo.jpeg
After running the script: 1.jpg, 2.png, 3.jpeg

ConvertToPng.py (Uniform image Extension .png):
convert_to_png.py is a Python script that leverages the beauty of Python to convert all images in a given folder to a uniform .png format. The script uses a GUI interface for simplicity, making it user-friendly and interactive.
How It Works
Run
convert_to_png.pyfrom anywhere.The script opens a GUI to prompt you for:
Source folder: The folder containing the images you want to convert.
Destination folder: The folder where the converted
.pngimages will be saved.
The script analyzes all image files in the source folder, regardless of their current extension (e.g.,
.jpg,.jpeg,.html,.htm, etc.).Converts each image to
.pngformat.Saves the converted images in the specified destination folder.
Features
File Format Support: Converts a wide range of image formats to
.png.Folder Independent: Works with files in any folder, whether local or external.
GUI-Based: No command-line work is needed; all inputs are handled through an easy-to-use interface.
Non-Destructive: Original images remain untouched in the source folder.
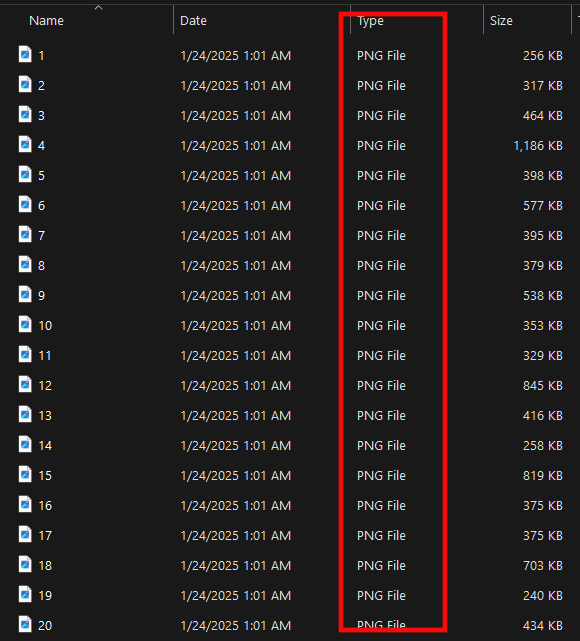
Important Note:
To ensure smooth operation and avoid dataset errors in Kohya, it is crucial for all images to have the same file extension. Mismatched extensions can lead to issues during processing. To address this, I’ve provided ConvertToPng.py, which converts all images in a folder to a uniform .png format, eliminating such errors.
Additionally, both ConvertToPng.py and Rename.py have been written by me. If you have any doubts or questions regarding these scripts or any part of this article, feel free to reach out to me via DM or Instagram.


.jpeg)