I have had 2 citvai users post training guides on how to make character packs / girlpacks and i wanted to highlight them where they could be seen and followed. You'll find both in here.
avenka tutorial
First thing's first. I'm not going to go over how to install the requirements. Obviously if you are here you have your preferred stable diffusion generator and are looking to make a multi-character LoRA. What I use is Kohya_SS. This ends the install portion of the writeup.
Step one is deciding on your desired content and gathering images for your dataset. Aspect ratio is unimportant. However, resolution is very important. We are going to be cropping hundreds of images for a good sized multi-character LoRA and you don't want to have to sift through the web for a replacement image if one or many will not work. Try to find or make the same number of images for each of your characters, you don't have to have the same number of images but it will make things easier in the future steps. Personally I aim for a minimum of 16 images each, so if you have 10 characters that's 160 images you'll be cropping. To make things easier you should get a head start on your file system so I suggest that wherever you plan on doing your training you lay the groundwork for your new LoRA and make an initial folder in a location similar to this..
D:\LoRA Training\grls
In this directory you are going to make 1 folder named LORA and 1 folder for each character. it should look something like this. (Ignore my shorthand naming)
Good so far? Great. Start getting/making you dataset. Put each image in the correct folder for the character in whatever manner you want. If you're able to focus on one character at a time that's great, if not you will likely have to prune some images out of some folders. Remember the end goal is to have the same number of images for each character to make things easier on you later.
Next up is cropping. So you have your images gathered and you have the same number per character. Good job, you're about 25% done, the next 50% is cropping. There are websites that you can use that will allow you to batch edit or you can load the folder into Automatic1111 and let it do most of the work but you may not get everything you want that way. Kohya does not require that all images be 512x512 so you shouldn't limit yourself on image size. It takes some time but I just use the windows photoviewer to crop my images. Let's use an image of Tuffnut from How to Train Your Dragon.
Open it in photoviewer and click the edit button on the top left
Then on the next menu click the "free" button that appears on the bottom.
Now you have a decision to make. Personally I almost always render in 3:4 ratio, and most programs like to train with 1:1 or 512x512. I suggest using 1:1 (aka square) or your preferred ratio.
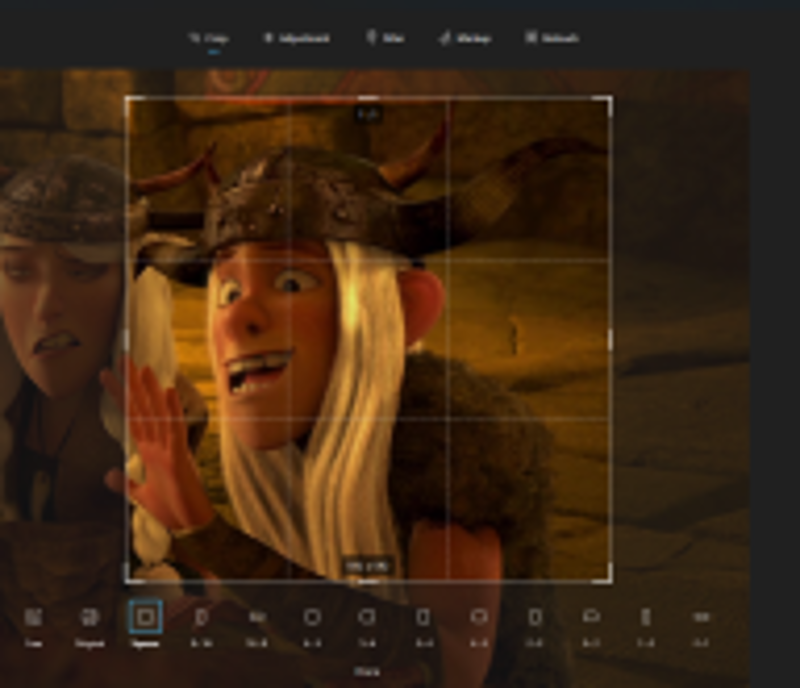
Crop the image so that you have as little background as possible but keep important parts of your character. Tuffnut has a helmet with wide horns which makes him hard to crop without some background noise. Be sure to get the face in every shot, Kohya is a Dreambooth program and likes faces even though it can handle other things too. You need to do this on all images which is why most people use batch editors because it is very time consuming to custom crop enough images for what we are doing but I like the control and flexibility of this method. After you have cropped the images for each character (or before you crop if you prefer) you should decide on your tag, select all images in a characters folder and rename them. They should now be named the same with numbers now. (I.E. Tuffnut (1).jpg) Do all of these things for all of your character folders. NOTE do not take any side under 512.
*Extra note* I've tested a couple different LoRA's since writing this and have found/realized that when you train with SD1.5 a.k.a. the default setting on the json I have loaded, you want 1:1 ratio. It will train on other ratios and you will get results, but they will be scewed because SD1.5 was made using 512x512. Kohya buckets setting will adjutst for larger images but they still need to be square.
So now you have your dataset right? Almost, you need to caption them. There's 2 ways to go about this and I've had luck both ways.
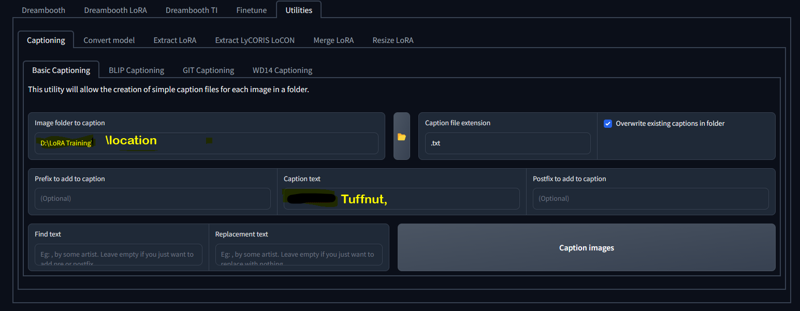
#1. caption your images with only your trigger. Like (Tuffnut,) I am simply in the habit of including the comma but it turns out that it is a good idea to do so. more on that in option 2. So if you decide to simply caption with only your trigger you can use basic captioning. I don't have Tuffnut ready to caption but I have been working on another so we'll use that screen grab.
The yellow text is the location of your images and the green text is how you want the captioned. Hitting caption on this screen will create a text file named just like each image that only reads "Tuffnut," Do this on all of your image folders with their respective triggers and you're done with this part, unless you want or need to use option...
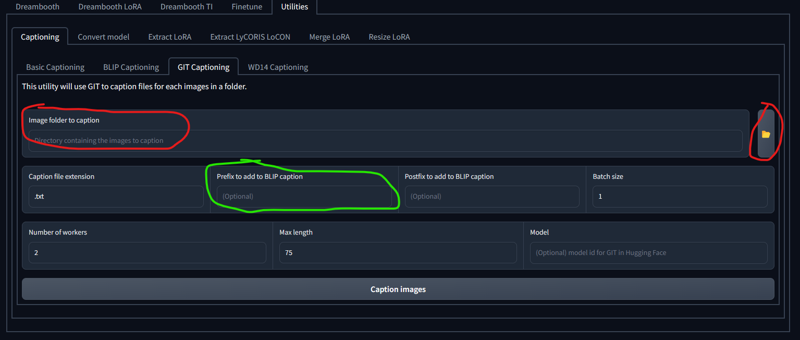
#2. Option 2 is blip or git captioning and is slightly more involved and is not as fast as basic. both work similarly but I've had better luck with GIT.
The red circle is your folder location just like before. The green circle is where you will put your trigger with a comma and no spaces. This is when the comma is important, it tells the program that your trigger is separate from all other text. Putting it as a prefix means it is the most important part also. Here's where it gets tricky though. I often see people debating on one thing that's always said about captioning but never explained as to why. I only recently figured it out myself. It's often said that you should not caption features that are a part of your character like "blonde hair".
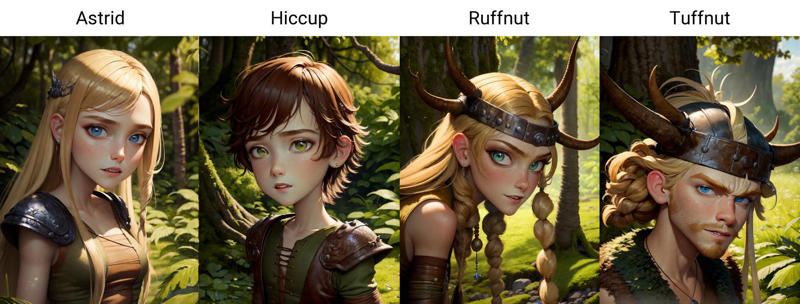
"But Tuffnut has blonde hair so I want my render of him to be blonde too. Why wouldn't I include blonde hair?" Well it's actually fairly simple when you look at what we're doing here, Ruffnut has blonde hair too, so does Astrid, and Fishlegs. If you have "blonde hair" tags on all those characters it's going to start fusing them. The training is called AI but there's not a lot of "I" involved really. It doesn't "know" that blonde hair does not include their face. There's an image tagged with blonde hair so it will use it and all other "blonde hair" images to render in automatic1111. So avoid all tags that might show up again on other characters, that's the better way to look at it rather than saying "don't use tags describing your character." The reason I say all of this is because if you let BLIP or GIT captioning do all the work, it might be fine, but you might need to edit all of the text files too if your finished LoRA starts fusing characters. This is why cropping is so important and can allow option 1 to work. If you have cropped out enough background noise then the trigger is all Kohya really needs. Whew, the hard part is over... Right?
Pretty much. The rest is sometimes just as time consuming but far less involved. I'm going to assume that you know the basic directory setup for Kohya_SS, if not there are some tutorials on the Github page you should check out.
Tally up your image count and divide 1500 by this number. The result is important so make Alexa do the math for you and remember what she says. (if the result is under 5, just use 5) Now in the past I have just dumped all of my dataset in the "img" folder inside of a folder named "#_FolderName" where # is the answer to our little math quiz and FolderName is whatever you want. Recently I've started doing it a little differently. Instead each trigger gets it's own folder inside the image folder named "#_Trigger" it should look like this
I know I said if under 5 use 5, I was testing something so pretend they all say 5.
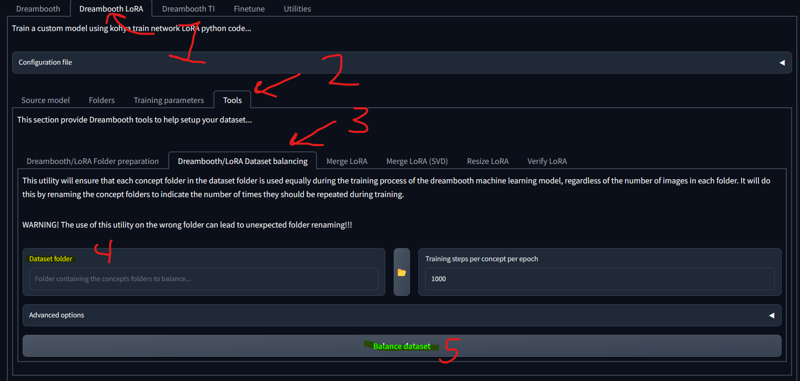
Edit- finally found better information on the above method (also a tool within Kohya) regarding the numbers for each folder. Where I numbered each folder here based on the total number of images in all folders, you need to number each folder for only the images contained within. Here the "3's" probably should have been more in the range of 37 making the training take significantly longer but then it is training each one for the full time. The tool is here and had I pointed it to this folder, it would have adjusted the numbers for me without any math.
(step 5 should actually be changing the 1000 if you want, you won't need 1000 steps this way but 500-1000 is your starting area probably. Characters seem to hit their sweet spot at about 750+.) As long as you have your /img folder set up with each concept / character contained inside of separate folders named like above it will correct your numbers.
This is great because the math is not actually (1500 / image count = repeats) this only gets you in the ballpark. The actual equation is
( (steps desired / image count) x 2 = repeats or folder number )
I have recently reworked a Lora containing some characters. I set the tool to 600 steps and it renumbered the folder to 30, the results are significantly better than any other method listed above. All images in one folder when you're training a few different concepts and set to 1000 steps will work fine, but for larger sets it will require much more steps and time.
Now you get to tell Kohya how to handle these. There should be a zip file attached called LoraBucketsAndFlips
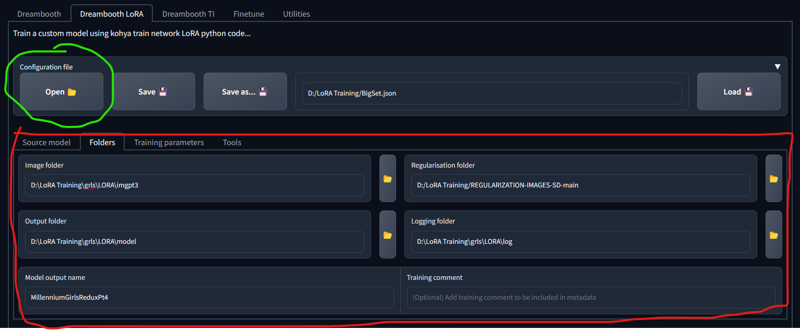
The green circle is used to open that json file. Once opened it will change a lot of setting including everything circled in red. Important you have to change all of the red items. I do not remember where I found my regularization images either and if that zip loads I'll include it too. I've read that you should make new ones for your dataset but I've used the same ones without incident on all my LoRA's. Once you have changed the regularization box to the location of your copy of them I suggest saving the config again so that the regularization box will always be right when you load it.
Edit I've found more/better information on regularization images, more on that at the end of the post.
Now the nitty gritty. The config file will change some things that you do not need to know about because, they just work for they way we have set up our data. The thing you should know is that I named it BucketsAndFlips because I made those 2 changes to the file I found.
Buckets is what makes it so that you can have 512x512 and 1280x1280 in the same set. When training in Automatic1111 you need all 512x512 but Kohya will adjust according to each image, there's actually a process in the terminal if you watch where it analyzes all of your images and makes a count of each size.
Flips means that it will train each image twice, forwards and backwards, not good if your character always has his sword in his left hand like Sephiroth, but good for someone like cloud who uses both hands. Keep that in mind if the direction matters and turn it off if so.
For most things you're ready to hit train and wait 15-ish minutes depending on your hardware. I usually wait 6-10 on my RTX3080 for most training. Then you just need to move your new LoRA tensors file over to your SD LoRA folder and test it out. You may need to recaption, or you may need to play with these settings and be more precise.
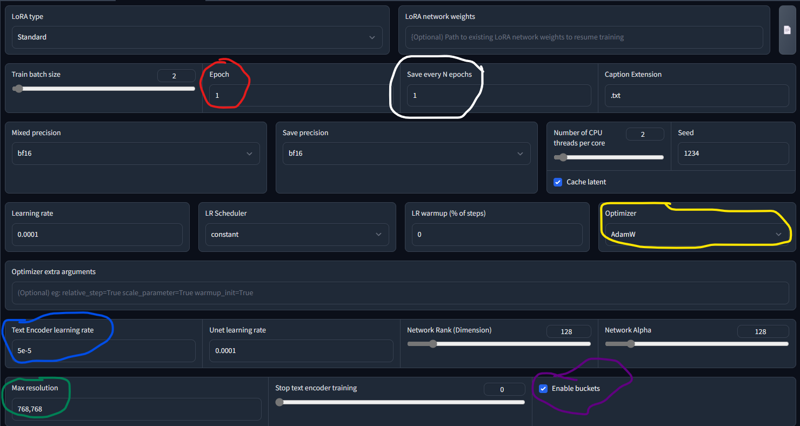
Oh I almost forgot. The yellow circle there's 2 options for use. Higher cards can use what's shown here with AdamW, lower end cards will need AdamW8bit. moving on.
(Red circle) Epoch, Every increase here will run the same training over again on top of what is done initially. For example if I change that to two, it will train like normal, then take that training and run it again on top of the first for another round.
(White Circle) if you raise epoch and leave save every NEpochs at 1, it will save a new tensor file at each training step. 2 would be 2 new LoRA's, 5 = 5 new LoRA's etc. I suggest if you want to be that precise and have the time (because it will take a lot of time) you change the blue circle to something like 1e-5. That's just another way to write 0.00001. Think of it like 1 in the 5th place behind a decimal if you're not a math person.
The Green circle can be 512x512 or 768x768 but again, I was testing and 512 will be what you want on lower cards anyway.
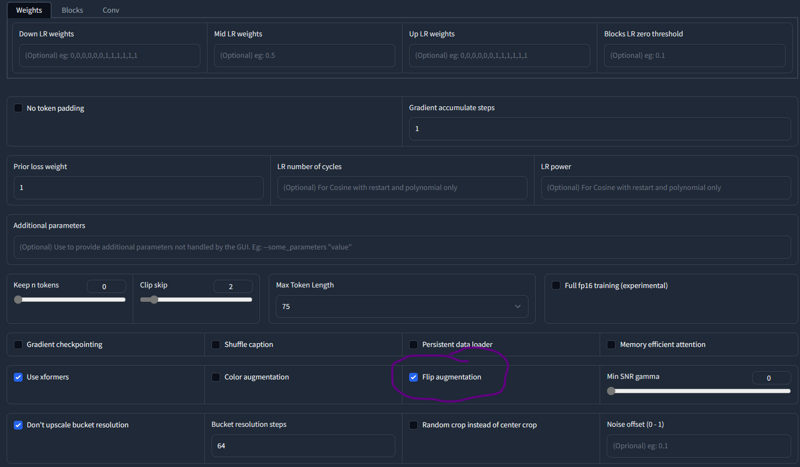
This last image is simply the location of the Flip Augmentation setting, remember the Sephiroth thing.
I hope I was clear enough to help someone out, I expect to see more multicharacter LoRA's being shared and even some people helping me to refine mine better with better information.
Happy training.
Added info for Regularization - It took some time and I actually found it by accident. Regularization images are actually quite simple but takes some time depending on your card. You can still use the provided images and it will improve your results, but if you want even more precision here's what you need to do.
In Automatic1111 (or your program) you need a single positive prompt of what you want. You want the variations generated with a very vague prompt. If you want you can simply do this, but you will have some pretty low quality images. The trick is to use negative prompts to get better quality, and keep the variations. So now you prompt out the things you don't want with the negatives, "poor quality, blurry, plain background, mutated limbs, deformed face, etc" These do not need to be highly detailed super renders, 20 steps at 512x512 using Euler A is completely fine, in fact better. Render your prompt in multiples and keep tweaking the prompt until you're happy with what it is giving you.
Once you're happy with the results you need to render as many images as you have training images. This means if you have 300 images you should render 100 batches of 3 images, try to render them all at once because it will be changing the image on every render and even though I can't back this statement up, I would assume there's less chance of repeating the same seed. After some time you'll have all your regularization images ready and if you hit save while the grid is selected it will save everything and you just need to move them to a folder within your training folder alongside your img, log, and model, folders. Plug that into your folders tab and you're set.
An amendment or supplemental piece of information.
Concerning the captioning portion of the post. If you look at the image of the basic captioning screen, you will see that there is a section with "find text" and "replacement text". Sometimes (and I forgot this on my most recent LoRA) in fact all of the time, BLIP and GIT captioning will start with your characters gender. Things like, "a woman", or "a naked woman", "a man", etc.
If you use GIT or BLIP you should at the very least look through a handful of text files and see how they start. Find the longest example like "a naked woman", not "a woman", start with the longer string. Copy and paste that string into the "find text" box with a space at the end but not beginning. Leave the "replacement text" box blank. Click the "overwrite existing captions in folder" box and click "caption images". As long as there is nothing typed into the other boxes for prefix/suffix the only thing that will happen is that it will take out any instance of "a naked woman". Now move on to "a woman", and do the same.
The reason for starting out with the longest string is for lines like "a woman wearing", if you take out a woman first you will be left with a caption starting with wearing and you can usually leave the item of clothing or jewelry in the caption but you want to be rid of things that will be in most text files, like "a woman wearing" in theory everything else will be different enough to not effect the results.
Also, I just trained again with all my images from all girls in one folder and it worked fine, the folder setup described above is mainly for modifying captions on the fly without changing what you already have.
randomizer89 tutorial
This was posted in the comments section of my girlpack index
A little guide from my experience:
nothing hard to do multi character LoRA, you just need to make everything like you do in 1 character LoRA but not in one folder,
every character is new folder with name <step count>_<character trigger word> like:
30_nyarlathotep
40_cthugha
45_hastur
you need to balance steps count by image count in foulder, more images less steps, on character subject to full learning you need like 2k steps/character in total to good quality(can be more).
P.S. you can add additional folder with all images you have from this 3 without any tagging with name of foulder is <step count> and made it like 20% of total step if you want to train style of title harder.
But why i don't do it this way?:
a) read (2);
b) i found a nicer using the ability to use multiple subjects into training, i train different dress,
https://civitai.com/models/76900?modelVersionId=87600 open "about this version" and you found something very strange,
really it's like same technique, but for dressing, it's not works perfect, but if it works this greatly expands the possibilities of using LoRA:
a) you can change designs of character;
b) with little prompt magic and 2 LoRAs you can dress different character into a dress of this one. Yes it possible i test it multiple times(firstly please test that my TW of this dress is works on main character, because sometimes it's not)
P.S. if you found it usable you can send me a little donation, link to donation on description of Kodomo no Jikan LoRA(prev link in post)
P.P.S. in this list i see few style LoRAs it's totally different, you just train model on frames from anime without any trigger words, and after it recreate characters by trigger words :) and i hate this way personally