Introduction
After nearly a year of effort, I have successfully built a fully automated pipeline for image collection, filtering, tagging, tags filtering, and model training. Initially, I had no intention of publishing this article due to the lengthy process, which would be cumbersome to explain. However, after noticing the trend towards closed-source development in the Illustrious XL model, I felt compelled to share this work. In my view, the ultimate goal of AI-driven art is for individuals to customize AI models according to their own aesthetic and creative vision, not to raise barriers that limit creativity. Therefore, I have decided to openly share my research and learning on constructing this fully automated model training pipeline, with the hope that others can use it to train AI models as well. In theory, this pipeline can be applied to training various AI art models, including SD 1.x, SDXL, FLUX, and LoRA. The following sections will provide a detailed explanation of each step in the training pipeline.
Framework of Pipeline
The overall framework of the pipeline is shown in Fig. 1. It consists of three main components: image processing, prompts processing, and training, each of which includes several subcomponents, which will be discussed in detail in the following sections.
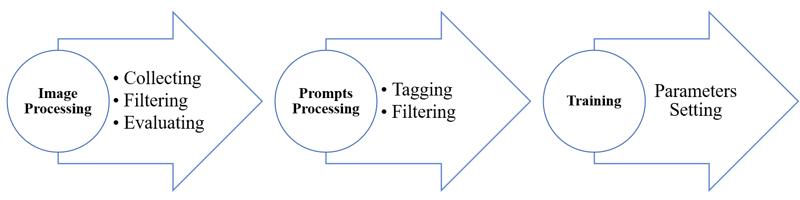
Fig. 1 Schematic of training pipeline
Image Processing
Image processing is divided into three parts: image collecting, filtering, and evaluating.
Collecting
Image collection is, of course, the first step, and it typically still requires manual intervention (i.e., mouse clicks) to complete. I usually use the Grabber software to collect image data from the Gelbooru and Sankaku image websites. Although the DeepGHS Team has recently created a dataset mirror based on these two sites, some mirrors currently do not support advanced search features (or perhaps I am not yet familiar with them), limiting image retrieval to specific ID ranges, which is not very convenient. Grabber, however, supports advanced search functionalities, so I still use this software for image collection. For Gelbooru, I typically use the following search command to perform advanced image retrieval:
target_character_name -video -animated_gif This command filters out videos and GIFs to obtain image data. For Sankaku, I use the following command to collect data:
target_character_name high_resolution -video -animated_gif -ai-createdThis command directly filters and downloads high-resolution, non-AI-generated images to the local system. The 'high_resolution' tag is automatically added by Sankaku's internal system based on image resolution, and it is generally stable and accurate. In contrast, the 'highres' and 'absurdres' tags on Gelbooru are manually applied and are not always reliable, so I typically avoid using these tags when searching for images on Gelbooru. Of course, image data can also be collected from websites like Pixiv and Pinterest. Once enough data is collected, you can proceed to the next step.
Image Filtering
The image filtering operation is a complex part. To ensure automated, accurate filtering and removal of low-quality data, multiple steps are typically required. In image filtering, I usually employ the following three processes:
Content Filtering
Resolution Filtering
Image Deduplicate
These three processes can actually be performed simultaneously. The waifuc toolkit developed by the DeepGHS Team Integrates all three functions. I typically follow the process outlined below for the first round of filtering:
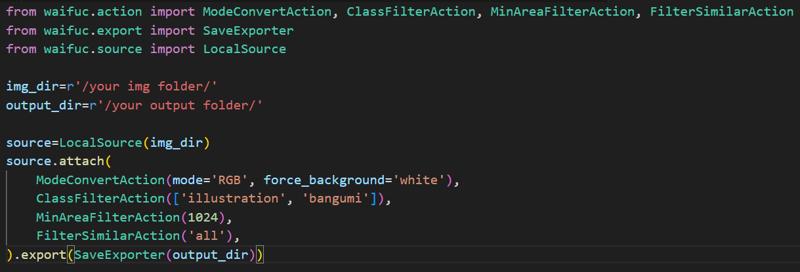
The ModeConvertAction function converts images in the img_dir directory and, for PNG images with no background, automatically adds a white background by setting the force_background parameter. Without this, images without backgrounds may cause an 'Image is truncated' error during training. The ClassFilterAction function then analyzes the image content, retaining only those identified as ‘illustration’ and ‘bangumi’. Next, the MinAreaFilterAction function retains images with a resolution of 1024x1024, deleting those with lower resolutions. Finally, the FilterSimilarAction function removes duplicate images from the remaining set. If training a character model, you can also use the CCIP metric method proposed by the DeepGHS Team to assess character similarity. To my knowledge, Illustrious XL also employs this evaluation method during training. I typically use the following code:
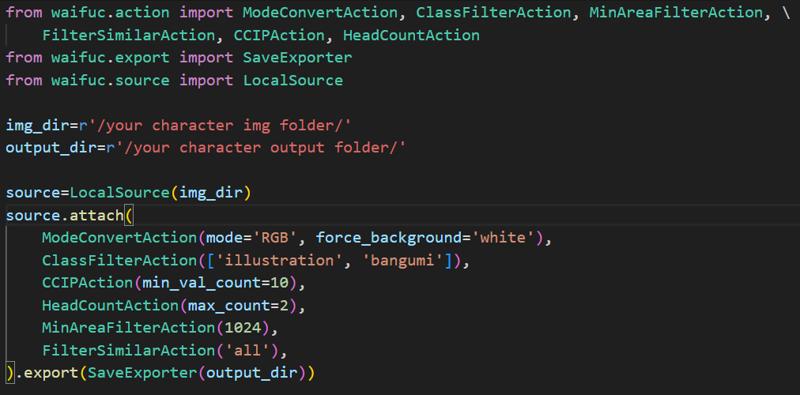
Unlike the previous deduplication code, this version includes two additional functions. The CCIPAction function evaluates 10 image samples using the CCIP metric, removing images that do not feature the specified character. The HeadCountAction function ensures that no more than two individuals appear in each image. After these operations, the dataset consists primarily of solo images of the specified character.
At this point, these steps complete the three filtering processes, and the workflow can proceed to the next stage.
Evaluating
From a technical perspective, image evaluating is the most complex part. Since image evaluating is a multi-dimensional issue, automating it typically requires using AI-based pre-trained evaluation models. While it is possible to train your own evaluation model, it requires significant time and effort. I spent considerable time researching this problem and ultimately decided against building an AI evaluation system from scratch, opting instead to use open-source pre-trained models for automated image evaluation. Currently, there are two main evaluation models for anime images: Aesthetic-Predictor-v2.5 and Aesthetic-Shadow. I have used both models, and while their predictions are generally accurate, I noticed a common drawback when testing multiple NSFW images: both models tend to assign low scores to high-quality NSFW images. When the aesthetic prediction threshold is set too high, the proportion of NSFW images in the remaining dataset decreases noticeably, which is not my intended outcome. Therefore, I do not use these models for image evaluation but instead utilize the pre-trained evaluation model from the imgutils toolkit developed by the DeepGHS Team. After testing several images, I found that while this model still misses some low-quality images, it provides a balanced evaluation of both SFW and NSFW images. I typically use the following method for batch image aesthetic evaluation:
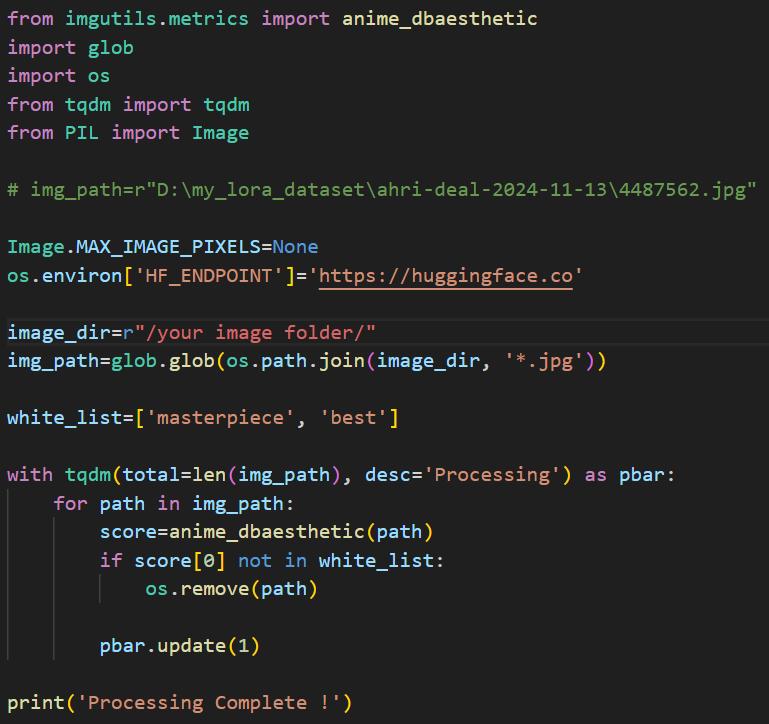
The paths of all JPG images in a specific folder are obtained using glob, and the whitelist is set to include 'masterpiece' and 'best'. If an image's evaluation result is not in the whitelist, it is deleted, thus retaining higher-quality images.
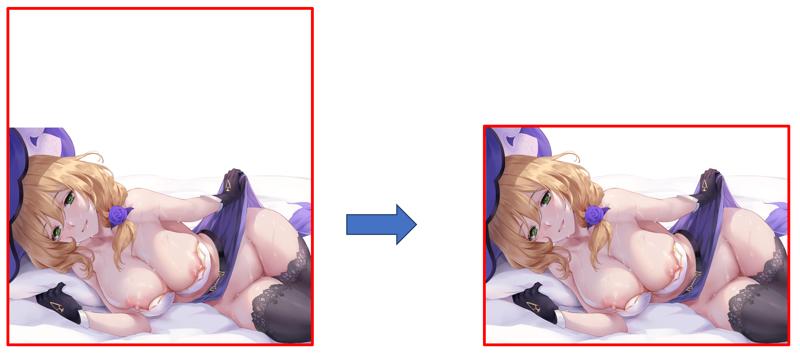
It is important to note that, after these automated evaluation steps, if you have sufficient time, you must still manually review the images. Trust me, when it comes to aesthetic evaluation and pattern recognition, no AI has yet surpassed the human brain. Using pre-trained evaluation models is merely a supplementary tool, allowing you to focus more time and effort on manually evaluating more complex images. Of course, if necessary, you should also crop the images to remove excessive blank space, as extreme aspect ratios can hinder bucketing during training. For example, consider the following cropping example:
After completing the above steps, your dataset should now consist only of high-quality images (for example, from an initial set of 10,000 images by Sakimichan, only about 500 may remain after filtering). At this point, the image preprocessing is fully complete, and you can proceed to the tagging stage.
Prompts Processing
The Prompts Processing stage is divided into two main parts: Tagging and Filtering.
Tagging
The tagging process is relatively straightforward. Several tagger models developed by SmilingWolf can effectively infer tags for any anime images. Alternatively, you can use Joytag,which achieves a good accuracy with an F1 score of 0.578 at 0.4 threshold. The imgutils toolkit also includes tagging feature with an automatic function to remove overlapping tags. For convenience, I use the following script to perform tagging:
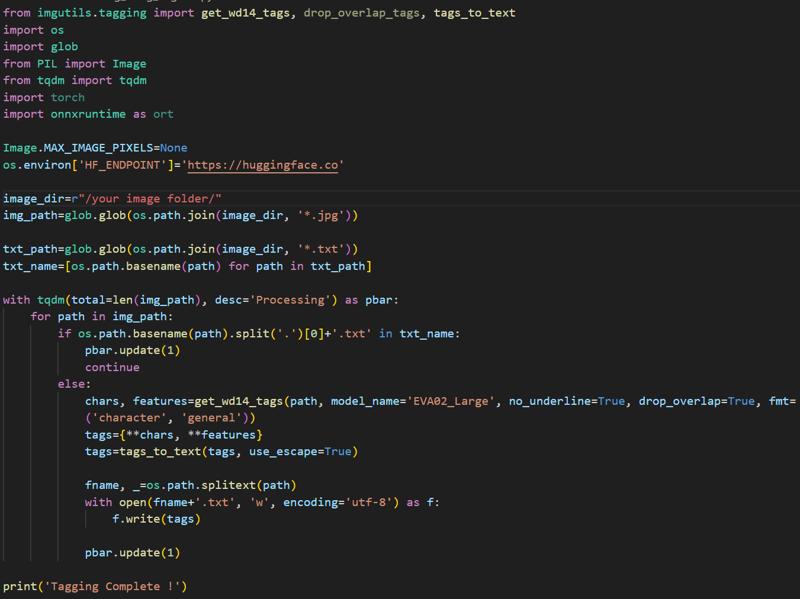
First, filter the images that already have corresponding txt files. Then, for images without prompts, perform both tagging and the removal of overlapping tags. Once this process is complete, you can proceed to the next step.
Tags Filtering
You may wonder why a filtering step is still necessary after removing overlapping tags during the tagging process. The reason is that all tagger models are not perfect and often produce inaccurate descriptions.
Case 1: Overlapping character count descriptors
You may have noticed that some images' tags include terms like 1girl, 2girls, 3girls, or 4boys. This is one of the bugs of the tagger models. These models calculate the confidence of each tag, and when the confidence of multiple character count descriptors exceeds a set threshold, they are all output simultaneously. This leads to inaccurate descriptions (e.g., how many girls and boys are in the image ?). To correct this, I have developed a function to address this issue, as manual correction is very time-consuming:
import re

def filter_multiple_human(tags):
    pattern=re.compile(r'^(\d+)(\+?)([a-zA-Z]+)$')

    max_counts={}

    for tag in tags:
        match=pattern.match(tag)
        if match:
            num_str, plus_sign, keyword=match.groups()
            num_val=int(num_str)
            is_plus=(plus_sign=='+')

            if keyword not in max_counts:
                max_counts[keyword]=(num_val, is_plus)
            else:
                old_num, old_plus=max_counts[keyword]

                should_update=False

                if not old_plus and is_plus:
                    should_update=True
                elif old_plus and is_plus:
                    if num_val>old_num:
                        should_update=True
                elif not old_plus and not is_plus:
                    if num_val>old_num:
                        should_update=True

                if should_update:
                    max_counts[keyword]=(num_val, is_plus)

    result=[]
    used_keyword=set()

    for tag in tags:
        match=pattern.match(tag)
        if not match:
            result.append(tag)
            continue

        num_str, plus_sign, keyword=match.groups()
        num_val=int(num_str)
        is_plus=(plus_sign=='+')

        max_num, max_is_plus=max_counts.get(keyword, (None, None))

        if (num_val==max_num) and (is_plus==max_is_plus) and (keyword not in used_keyword):
            result.append(tag)
            used_keyword.add(keyword)

    return result
This function uses regular expressions to search for tags with patterns like 1girl, 2girls, or 2boys, and then retains the tag with the largest character count. For example, if the tags include 1girl, 2girls, and 3boys, it will retain 2girls and 3boys. While this method is not perfect, it saves a significant amount of time and improves the accuracy of the descriptions.
Case 2: Overlapping size descriptors
You may also notice that some images' tags include conflicting terms like small breasts and large breasts, which can cause ambiguity in the image description (e.g., despite extensive AI training, the model still can't determine the actual breast size of the girl). To address this, I have developed another function to correct this issue, as manual correction is also time-consuming:
import re

def filter_size_tags(tags):
    size_rank_map={'tiny': 1, 'small': 2, 'medium': 3, 'large': 4, 'huge': 5, 'gigantic': 6}

    pattern=re.compile(r'^(tiny|small|medium|large|huge|gigantic)\s+(.+)$', re.IGNORECASE)

    max_size_for_part={}

    for tag in tags:
        match=pattern.match(tag)
        if match:
            size_word, part=match.groups()
            size_word=size_word.lower()
            if size_word in size_rank_map:
                rank=size_rank_map[size_word]

                if part not in max_size_for_part:
                    max_size_for_part[part]=(rank, size_word)
                else:
                    old_rank, _=max_size_for_part[part]
                    if rank>old_rank:
                        max_size_for_part[part]=(rank, size_word)

    result=[]
    used_part=set()
    for tag in tags:
        match=pattern.match(tag)
        if not match:
            result.append(tag)
        else:
            size_word, part=match.groups()
            size_word=size_word.lower()
            if part in max_size_for_part:
                max_rank, max_size_word=max_size_for_part[part]
                if size_word==max_size_word and part not in used_part:
                    result.append(tag)
                    used_part.add(part)
            else:
                result.append(tag)
    return result
This function uses regular expressions to identify tags with the format '{size adj} noun' and retains the tag with the largest size descriptor. For example, if the tags include large breasts, small breasts, large penis, and huge penis, it will retain large breasts and huge penis. Although this method is not entirely rigorous, it aligns with human preferences, as few would reject "large breasts"—larger is generally considered better. This significantly reduces the time required for manual tag processing.
Additionally, I create blacklists to remove tags that I consider irrelevant or unnecessary:

I also remove tags related to names, watermarks, and logos, while also processing rating tags:

After the above steps, the image tags will be more accurate without requiring significant time investment. Once these steps are completed, you can proceed to the training phase.
Training
For training, I use kohya's Stable Diffusion Project. This project offers a wide range of adjustable parameters. While you can use the GUI based on this project for training, it sometimes encounters bugs. Therefore, I typically write my own training script, as it allows for precise control over each parameter required for training.
Learning Rate Settings
Since there are many parameters to configure during training, only the most important ones are discussed here. The first key aspect is setting the learning rate for the model. An AI art model is primarily composed of three parts: Unet, CLIP (Text Encoder), and VAE. While Unet and VAE jointly determine the quality of the generated image, CLIP handles the mapping between prompts and Unet. Typically, fine-tuning the model involves only adjusting the Unet, leaving the other two parts unchanged. This is the approach used by Novel AI based on SD1.x. To achieve significant training results in a short period, I recommend also fine-tuning CLIP (Text Encoder), though the learning rate for CLIP should differ from that of Unet. I usually adjust the learning rate using the following empirical formula:
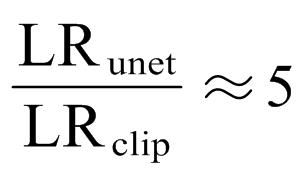
The learning rate for Unet is typically about five times that of CLIP (Text Encoder). For caution, you can increase this ratio to 10. Additionally, when setting the learning rate, I usually scale it based on the batch size, following the square root scaling rule:

Typically, for DreamBooth fine-tuning, the base_lr is set to 1e-6, while for LoRA fine-tuning, it is set to 1e-4.
Scheduler Settings
For the learning rate scheduler, I typically use the following two options: warmup_stable_decay and cosine_with_restarts.
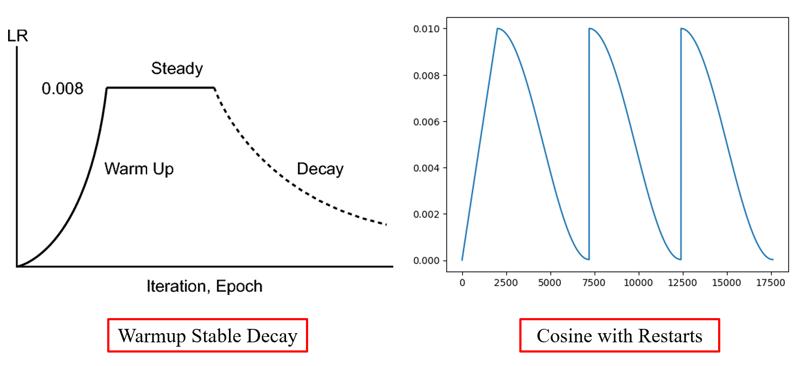
Community testing has suggested that warmup_stable_decay is more suitable for DreamBooth fine-tuning, while cosine_with_restarts works better for LoRA fine-tuning. I have not rigorously validated this conclusion, but I generally follow these findings: using warmup_stable_decay for DreamBooth fine-tuning and cosine_with_restarts for LoRA fine-tuning. For warmup_stable_decay, I typically use the following settings:
	--lr_scheduler="warmup_stable_decay" \
    --lr_decay_steps=0.5 \
    --lr_warmup_steps=0.1\
When using cosine_with_restarts, I typically opt for its variant, cosine_with_min_lr, which ensures the learning rate stabilizes at a minimum value rather than decreasing to zero. I usually use the following settings:
	--lr_scheduler="cosine_with_min_lr" \
    --lr_scheduler_min_lr_ratio=0.1 \
Optimizer Settings
For the optimizer, you can certainly choose the classic AdamW, or use an intelligent optimizer like Prodigy to bypass manual learning rate adjustments. I used to frequently train with Prodigy, but recently I discovered a new optimizer, ADOPT, which demonstrates excellent stability in video model training (with loss decreasing steadily throughout the process). I have yet to fully understand its underlying principles. Yesmix XL (illustrious) uses this optimizer, and my experience has been positive. To use this optimizer, simply apply the following settings:
    --optimizer_type="adopt.ADOPT" \
    --optimizer_args "decouple=True" \
Image Parameters Settings
For image-related training parameters, I typically use the following settings:
--resolution="1024,1024" \
--enable_bucket \
--min_bucket_reso=768 \
--max_bucket_reso=4320 \
--bucket_no_upscale \
--bucket_reso_steps=32 \
--multires_noise_iterations=6 \
--multires_noise_discount=0.3 \
--max_grad_norm=1.0 \
--huber_schedule='snr' \
--huber_c=0.1 \
--debiased_estimation_loss \
It is important to note that in SD 1.x model training, the value of '--bucket_reso_steps' must be set to 64, while for SDXL models, it can be set to 32. The '--min_bucket_reso' can be set to smaller values, such as 512 or 256, and '--max_bucket_reso' can be set to larger values, such as 999999. The '--huber_c' and '--huber_schedule' parameters control the Huber loss, and some community members have found that using Huber loss can slightly improve the quality of generated images. Additionally, I use '--debiased_estimation_loss' to bring the model's output closer to the original image. However, this setting typically conflicts with '--min_snr_gamma', so I do not enable this parameter.
Distributed training
When the dataset is large, you will need to use multiple GPUs for distributed training. Since the VRAM of a single GPU is limited, you cannot set a large batch size to improve training efficiency. In this case, distributed training is required. The relationship between batch size and the number of GPUs is as follows:

As seen, distributed training can be used to enhance training efficiency when necessary. I typically use the following command to initiate distributed training:
accelerate launch --num_processes $num_gpu \
                  --num_machines 1 \
                  --gpu_ids "0,1,2,3,..."
                  ~/your_training_scripts.py \
In this, '--num_processes' specifies the number of GPUs being used, and '--gpu_ids' should be filled with your GPU IDs, which can be viewed by running the 'nvidia-smi' command.
Tag Settings
During training, there are few settings related to tags. I typically use the following configuration:
--max_token_length=225 \
--shuffle_caption \
--keep_tokens=0 \
It is important to note that for image data described using natural language, it is recommended to disable the '--shuffle_caption' feature to avoid semantic confusion.
The above outlines some key parameter settings for model training. It is important to note that these settings are sufficient for training SD 1.x and SDXL models. However, for FLUX, which differs technically from the other two models, additional configurations are required. I will update these settings after further testing.
Appendix
After reviewing the above sections, you may have some ideas on building an automated training pipeline. I hope the information provided has been helpful. The reason I have included an appendix is to list additional operations and cutting-edge technologies not covered in the main sections. You may choose to browse the appendix content as needed.
Multilevel Captioning
This technique was first mentioned in the Illustrious XL paper. Although they did not disclose the related details, combining Danbooru tags and natural language descriptions for a single image is relatively straightforward. By using models developed by SmilingWolf and JoyCaption for joint description generation, this can be easily achieved. In my view, the key challenge of this technique is how to maintain accuracy in image descriptions while merging Danbooru tags and natural language into a unified description. Once this step is resolved, Multilevel captioning for images can be effectively implemented.
Dataset Distribution Analysis
The technique of dataset distribution analysis was not mentioned in the previous sections, as I have not yet found conclusive evidence to demonstrate that it positively impacts model training. While intuitively, balancing the dataset distribution might be beneficial in preventing the model from showing "bias", where it performs well on images described by certain tags but poorly on others, I have not focused extensively on this technique. I may explore and study it further in the future.