

It would be fantastic if we could have several excellent image-generation tools at our disposal! I believe many people have been constrained to just one tool due to issues like not knowing how to manage models, running out of hard drive space, or just being tired of frequently relocating local models. That’s why I wrote this—to provide you with the safest, simplest, and most intuitive way to enable model sharing among various image-generation tools.
A1111/Forge
Let’s start with A1111 or Forge. In my eyes, they remain the most popular image-generation tools among users, and they were also my starting point.
The model configuration methods for these two are exactly the same. If, like me, you use both Forge and A1111 and place the model files in the Forge folder, you only need to configure A1111 accordingly, and vice versa. In fact, the creators of these tools already considered the need for model management and sharing when developing them.
Here’s how to configure it:
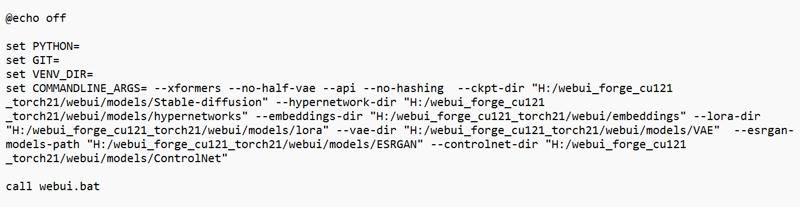
1-Locate your Forge/A1111 tool folder, and in the *.bat files, find webui-user.bat.
2-This is the tool’s startup script. Right-click and edit it. You’ll see the parameter set COMMANDLINE_ARGS=.
3-Simply append the model type and startup path after this parameter, as shown in the image. For example: --lora-dir ‘’H:/webui_forge_cu121_torch21/webui/models/lora‘’(Don’t worry, I’ll include the configuration file in the attachment.)" .
Of course, you can add more, but I just wanted to keep it simple.
Comfyui
ComfyUI is the image-generation tool with the most subfolders under the 'models' directory that I’ve ever seen. Due to the existence of custom nodes, everyone can create their own nodes, and each of these nodes can have its own subfolders within 'models.' As a result, it’s a bit of a chaotic farm. Fortunately, the locations of these subfolders can be easily customized.
In the folder ComfyUI_windows_portable\ComfyUI, there is a file named extra_model_paths.yaml.example. By default, it doesn’t function. Only when you rename the file to extra_model_paths.yaml will this configuration file take effect and guide ComfyUI to read the model paths from its configuration upon the next restart.
When you right-click and open it in Notepad for editing, you’ll see:
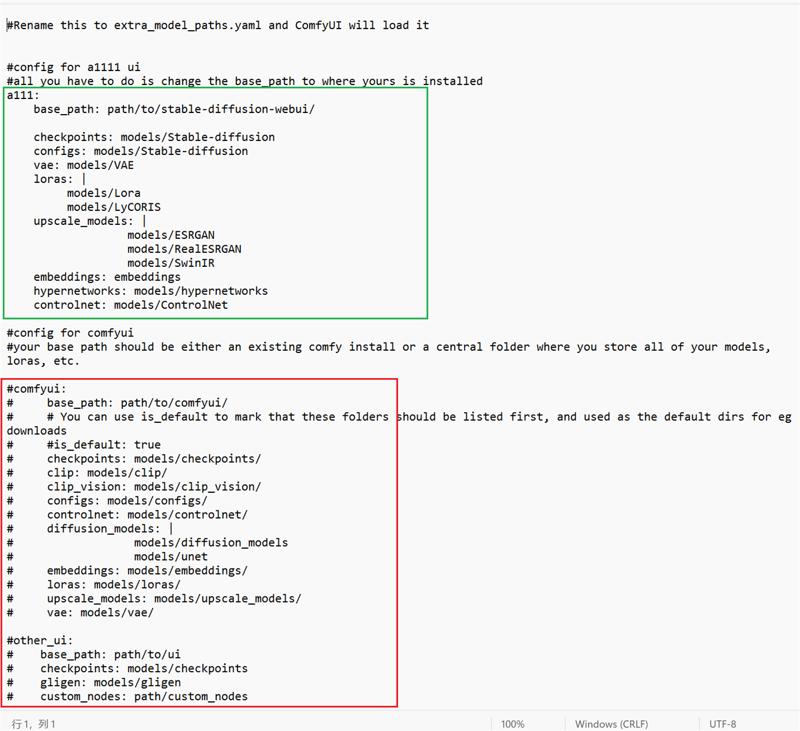 It seems the author has thoughtfully provided users with guidance on how to configure it. In the screenshot, the content marked with a red box by me is prefixed with a '#' symbol, meaning they are commented out and inactive. The content in the green box, without the '#' symbol, will be read and used when the tool restarts. We need to configure it correctly based on the locations of our local models, and it’s best to use copy and paste to avoid errors. Handwriting mistakes could prevent ComfyUI from launching properly.
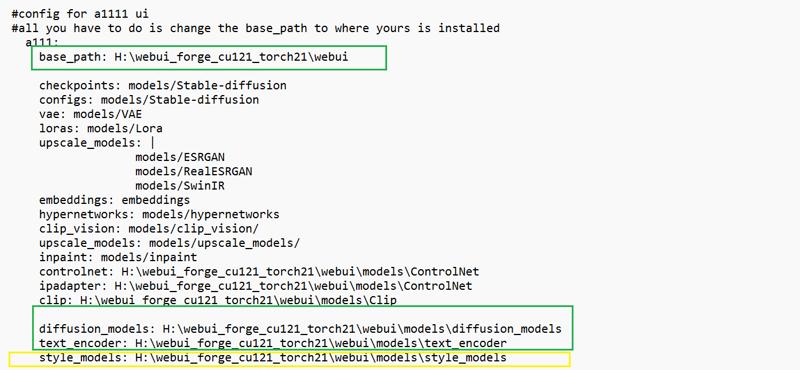 Continuing with the screenshot, in the green box, I’ve modified the content to reflect my local model paths.
Note that two writing formats are supported here.
The first is when you correctly fill in the base_path, and you can use 'models/Lora' to refer to the Lora folder under models, or directly write the full model path, such as 'H:\webui_forge_cu121_torch21\webui\models\Lora'.
No matter how many subfolders you have under models, you just need to copy and add a new line, then change it to the name of the corresponding subfolder.
For example, the folder for flux1-redux-dev.safetensors corresponds to the 'style_models' folder (marked with a yellow box in my annotations).
Swarmui
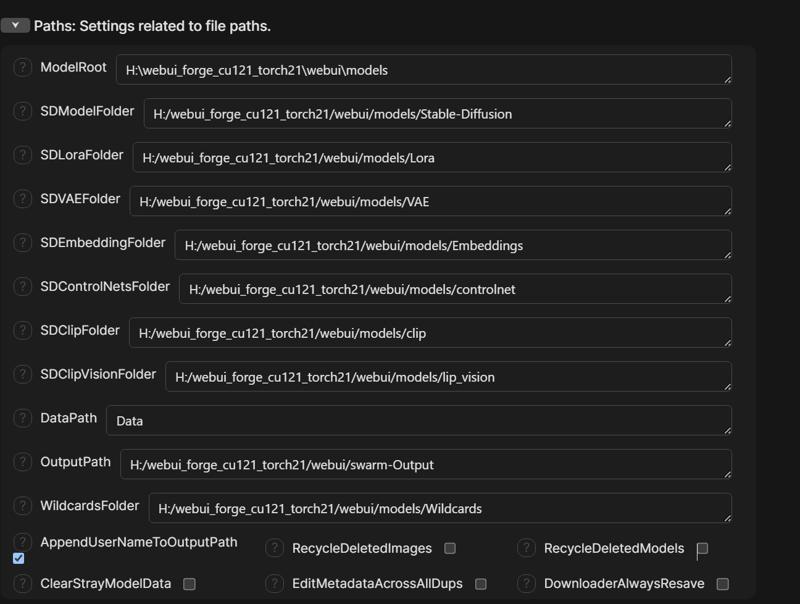
Modifying model paths in SwarmUI is extremely easy—provided you’re using this tool. Click on Server, go to Settings-Server, and the first thing you’ll see is the configuration panel.
Then, refer to the content in the screenshot and fill in the paths you want to modify. You don’t need to change paths you don’t want to share. Pay attention to the direction of the slashes; for the root directory, use '\'.
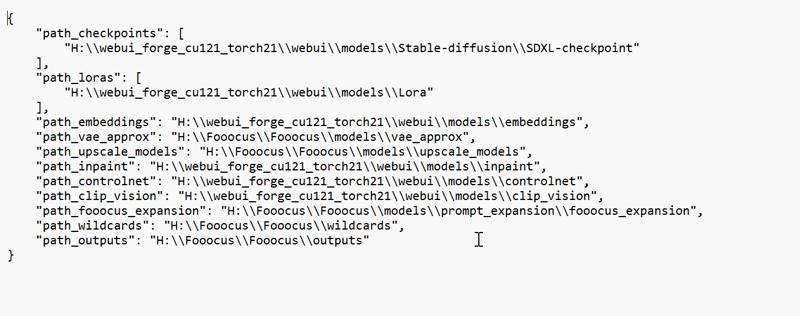
Fooocus
In the Fooocus folder, locate 'config.txt', then simply enter the direct path to the shared folder. After saving, Fooocus will automatically read the path upon the next launch.
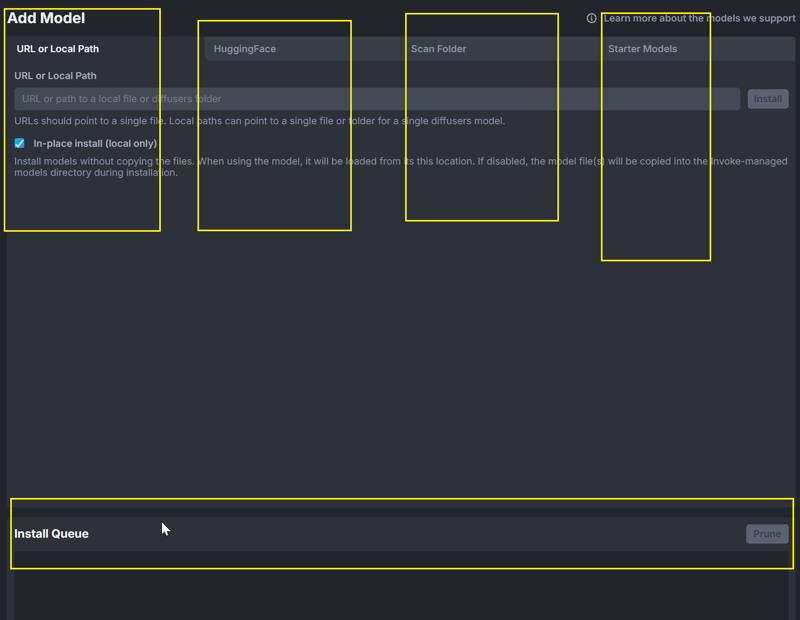
Invoke
Invoke’s model sharing method is very intuitive. Choose 'Scan Folder,' and it will scan your local models, then install them one by one. Sometimes the model installation might fail, depending on whether Invoke 'supports' it.
Thank you for reading this far. Please forgive any oversights, and you can correct my mistakes in the comments. Thank you!
The attachments contain the model path configuration files for each image-generation tool. If you plan to use them, please make sure to back up your original files first. And you’ll notice that not all models are shared in my path configuration setup. This is normal, and you don’t need to copy it exactly. Feel free to configure it according to your own needs.➚➚➚