
Foreword
First off, a massive thank you for all the support on Part 1 of this series!
Your feedback has been incredibly valuable, shaping the direction of this follow-up. Many of you shared fantastic insights, both in the comments and on Discord, inspiring me to experiment even further. So, let’s dive in and see what new tricks we can use to maximize our Blue Buzz!
Day Two and Beyond
With some initial buzz secured, it’s time to generate even better images.
Since today was more experimental, this article will be structured differently—it will include a breakdown of what I did, why I did it, and the results.
Daily Speedrun
First, I claimed all the buzz from the buzz dashboard as I could, before even generating anything.
Collected the 25 daily bonus from the generator.
Followed the challenge LoRA creator and two additional LoRA creators for 30 buzz.
Reacted to 50 images in the challenge gallery for 100 buzz.
With these quick actions, I earned 155 buzz before even generating an image!
Maximizing Image Generation
Challenge Preparation
Before diving into image generation, I took some strategic steps:
Checked the daily challenge, reviewed the LoRA, and took note of the best-performing images.
Selected a set of LoRAs and a base model that complemented each other well without adding too much cost.
Used Draft Mode to test out prompts that give me the results I wanted.
Draft Mode for Optimization
Instead of generating separate images as cheaply as possible, I activated Draft Mode, allowing me to generate 4 images per prompt for just 5 buzz. This helped me refine my prompts and see what worked best with my chosen assets.
Once I found an optimal prompt structure, I switched off Draft Mode and adjusted settings for cost efficiency, as covered in Part 1.
Posting for Maximum Exposure
Batch Generation and Strategic Posting
I generated images in batches of 4, using three LoRAs, for a total cost of 13 buzz per batch. After 5 batches, I selected my top 10 images.
Instead of posting them to my profile, I tried something different: Uploaded them directly to the LoRA’s model page. Why?
This supports the model creator, as they receive 50 buzz for every post by a unique user in their gallery.
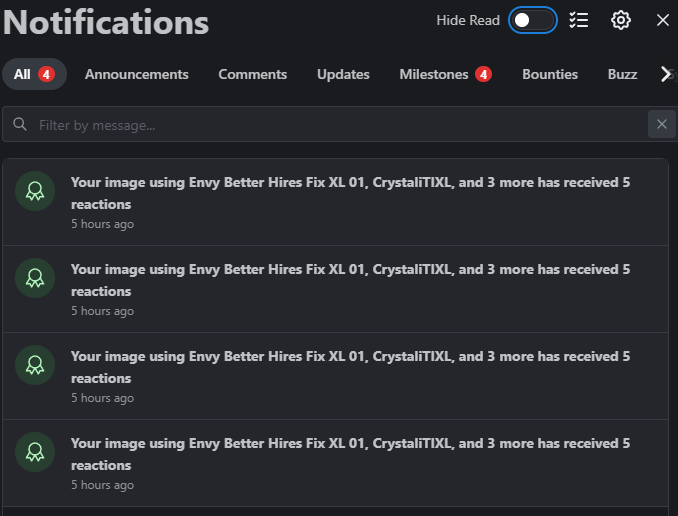
The creator gets a notification, increasing the likelihood they will react to my images.
More reactions mean more buzz! Each reaction grants 2 buzz, up to 100 per day.
Plus, I still received the 25 buzz for my first post of the day.

Doubling Visibility
Instead of submitting my images to the challenge directly from the model gallery, I tried a trick shared by another user:
Downloaded the 10 images from my model gallery post.
Re-uploaded them directly to the challenge.
This effectively created two separate posts featuring the same images, increasing their exposure on the Image Front Page.
For all intents and purposes on the site, these are the same images, and will not display twice on your profile.
However, it will still display two separate posts on your profile, giving a better overview of where reactions come from.
Plus, I still received the 200 buzz reward for submitting 10 images to the daily challenge.
Results: The Fruits of Our Labor
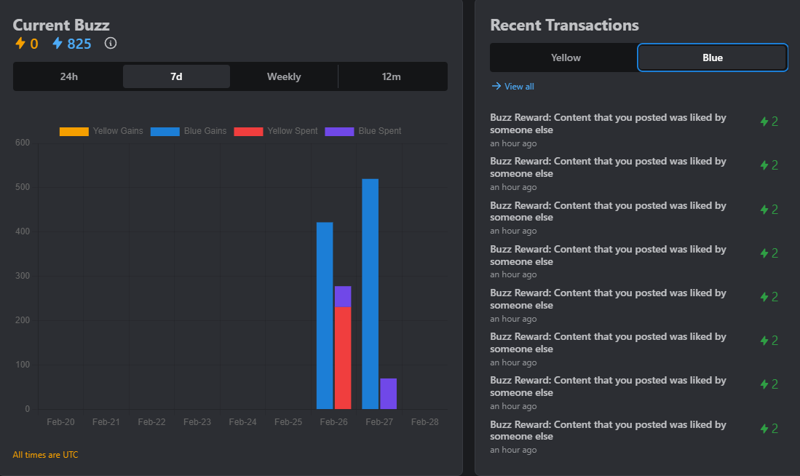
After waiting about 14 hours from my initial daily claim, here’s what happened:
Started the day with: 402 Blue Buzz (including leftover buzz from yesterday and overnight reactions).
Spent: 70 buzz.
Earned: 520 buzz.
Final total: 825 Blue Buzz.
Key Observations:
The majority of buzz was earned within the first hour after posting.
All reactions were on today’s images, with none on yesterday’s.
None of today’s images got fewer than 3 reactions.
Reaction breakdown:
65% from the challenge gallery post.
35% from the model gallery post.
Yesterday’s low-quality images received only 7 reactions, compared to 70 today.
Yesterday’s submissions got judged by CivBot (5 images), but none were high quality enough for podium consideration.
Today’s images received more reactions but were not judged by CivBot at all.
Conclusions & Next Steps
What Works Best for Buzz Farming?
Higher-quality images receive significantly more reactions (and thus, more buzz) compared to low-quality images.
Posting to a model gallery first generates extra reactions and directly supports creators.
Double-posting images (model gallery + challenge submission) maximizes visibility.
Optimizing cost with Draft Mode helps fine-tune prompts before generating high-quality final images.
Though we spent 50% more today, we also received 23% more buzz in rewards.
Future Plans
Test whether Face Fix & HiRes Fix lead to even higher buzz returns.
Investigate ways to generate reactions on older posts instead of simply increasing daily output.
Final Thoughts
By the numbers, today was a massive success! We nearly maxed out our possible 580 Blue Buzz cap, earning 520. The only thing holding us back was those last 30 missing reactions.
Instead of simply doubling our daily output (which would double our costs for only 30% more return), it may be smarter to find ways to drive engagement on past images.
For now, the best strategy is clear:
Focus on quality over quantity.
Optimize cost per image.
Post smartly in model galleries before submitting to challenges.
Let's see how far we can push this!
Stay tuned for Part 3.