[Updated on 18/03/2025 to reflect the rollback]
This article is for beginners who run out of buzz quickly via the on-site generator.
I want to share some tips that will enable you to use less buzz and hopefully help you to generate better quality images. My tips will be most useful for those who work with Illustrious.
When I first started I was shocked about the amount of image gens I needed to finally get an image that I liked. However, over time I have changed my approach to reduce the number of generations needed and decrease the amount of buzz I'm burning per gen.
The Quick Win
One of the biggest factors in terms of buzz cost per gen is the number of steps. There are some models and a Lora out there that can help you to reduce the steps:
WAI-CheapFast-ANI-NoobAI is a model that can generate images with very low steps. It is similar to models like the popular WAI-NSFW-illustrious-SDXL. You will notice some differences in terms of quality and prompt coherence, but WAI-CheapFast-ANI-NoobAI is overall a very solid option for generating high quality images.
Here some illustrative examples for 4 image outputs and using Euler A:
WAI-NSFW-illustrious-SDXL Model @ 20 steps: 12 buzz
WAI-CheapFast-ANI-NoobAI Model @ 12 steps: 7 buzz
12 steps in CheapFast seems to be equivalent to 20 steps in WAI-NSFW from my testing. This will lower your buzz by about 5 per generation, which is more than 40%.
This locks you to one checkpoint, but considering the amount you are saving it is worth giving it a try.
There is a Lora that can help you to generate with low steps with any SDXL checkpoint of your choice: Lightning/Hyper - 8step. Most if not all Illustrious models seem to use SDXL.
Straight off the bat you will be paying 1 buzz less by switching from 20 steps to 12 steps with Lightning/Hyper - 8step. And the difference gets bigger the more Loras you add to your generation and the more you increase the steps.
CAT - Citron Anime Treasure Checkpoint + 5 Loras @ 20 steps: 20 buzz
CAT - Citron Anime Treasure Checkpoint & Lightning/Hyper - 8step + 5 Loras @ 12 steps: 15 buzz
CAT - Citron Anime Treasure Checkpoint + 5 Loras @ 30 steps: 25 buzz
CAT - Citron Anime Treasure Checkpoint & Lightning/Hyper - 8step + 5 Loras @ 15 steps: 17 buzz
You can see that the savings can vary. In our examples we got savings between 25% to 32%! And I barely notice a difference in quality. When I try the same prompt, I get very similar results for both approaches. There is probably some quality trade-off but I barely notice it. You can just add Lightning/Hyper - 8step in your generator and switch the steps down to 12 to check if the estimate is lower than what you currently pay. Make sure to read the instructions on the checkpoint page to get your settings right, before using it. (TLDR: Set your sampler to "Euler A", set your CFG to 1.5 and set your steps to 12)
Quantity of images per generation
The more images you request in one generation, the more buzz it will cost you, therefore this is an obvious avenue for you to safe buzz. Many sites seem to favour 4 images per generation. I stuck with this for a long time but eventually changed to 2, as my buzz kept dipping closer to 0.
2 is now my default, no matter how high or low I'm running on buzz. Remember that we are not expecting something perfect on our first generation, so picking a quantity of 4 would be a waste. 2 images gives me enough information about how the LLM is interpreting my request, so I can then tweak it until I get what I'm after. (Note: LLM is a large language model. I'm basically referring to the AI)
Focus on getting a pilot
I will explain later how we will use img2img and hi-res to get to our ideal image. For now, we need to focus on the main subject of our image first. Keep in mind that there is a limit in terms of how much of our request the AI can interpret. It has an attention span (often referred to as a token limit), so by focusing on our main subject we can reduce the number of tags and resources (Loras). This way, we increase the chance that the LLM will get our main subject right. I highly recommend this approach when you want to generate something that is slightly more complex or specific.
Often your main subject will be a combination of a character (or several), their appearance, the art style and posture / concept / activity. Things you should see as secondary are the background and any intricate details in your character(s) or objects.
To tune out the background, I simply use the tag "white background" and "simple background". Make sure that you are not using other tags like "detailed background" and that you don't have "simple background" in your negative prompts.
This should help you to get a decent first image after only a few generations - that's your pilot.
Let's look at an example here:
This is an image that is generated when I prompt a character (using a Lora), a Pokemon, the concept of road cycling (using a Lora) and the background:
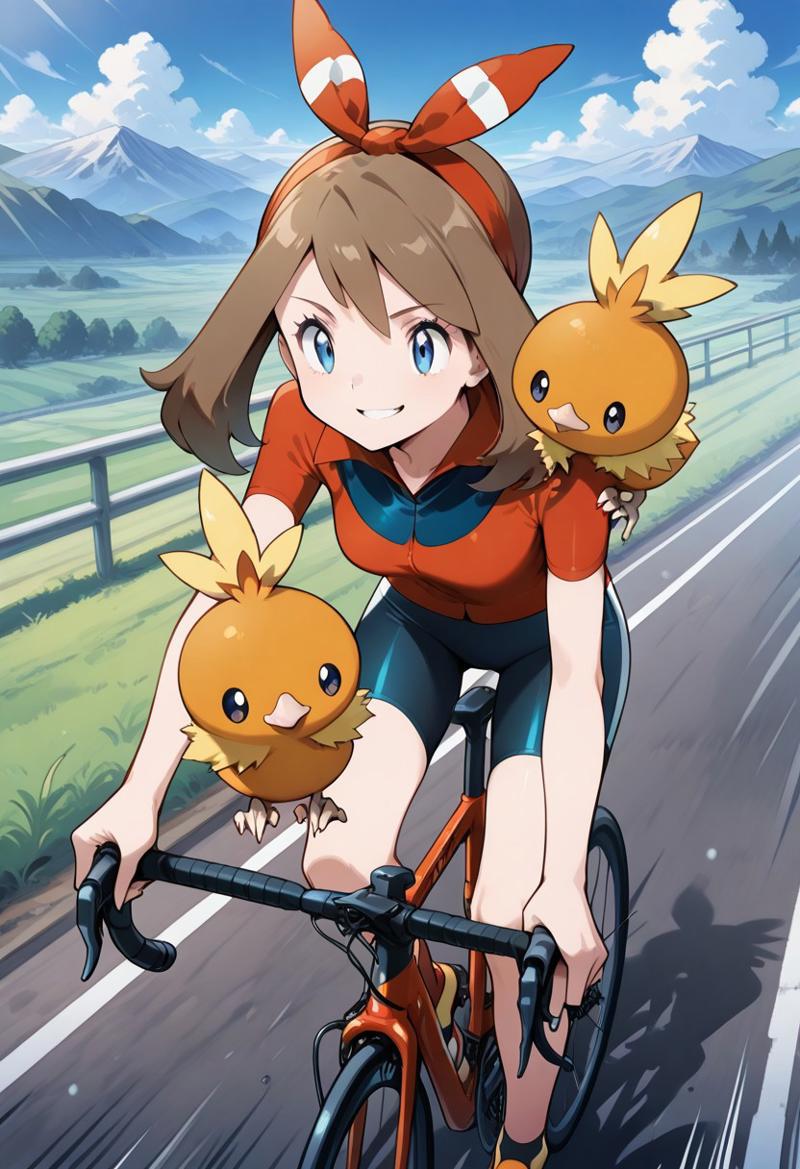
1girl, zzMay, may \(pokemon\), determined, smirk, (riding bicycle,road bicycle), handlebars, BREAK,torchic_\(pokemon\), on shoulder, motion lines, road, hills, grass, sky, clouds, from above, (masterpiece:1.2), (best quality:1.2), (very aesthetic:1.2), (absurdres:1.2), (detailed background),newest, ,sharp focus, perfect light, dynamic light, natural light, realistic, (heavy lines, black outline), ((intricate details)), (extremely detailed, finely detailed, beautiful detailed shading, beautiful, ultra-detailed, 8K wallpaper, vibrant colors), [high saturation], beautiful scenery, 2020s, very awa,This is the image I get when I prompt with a muted background:
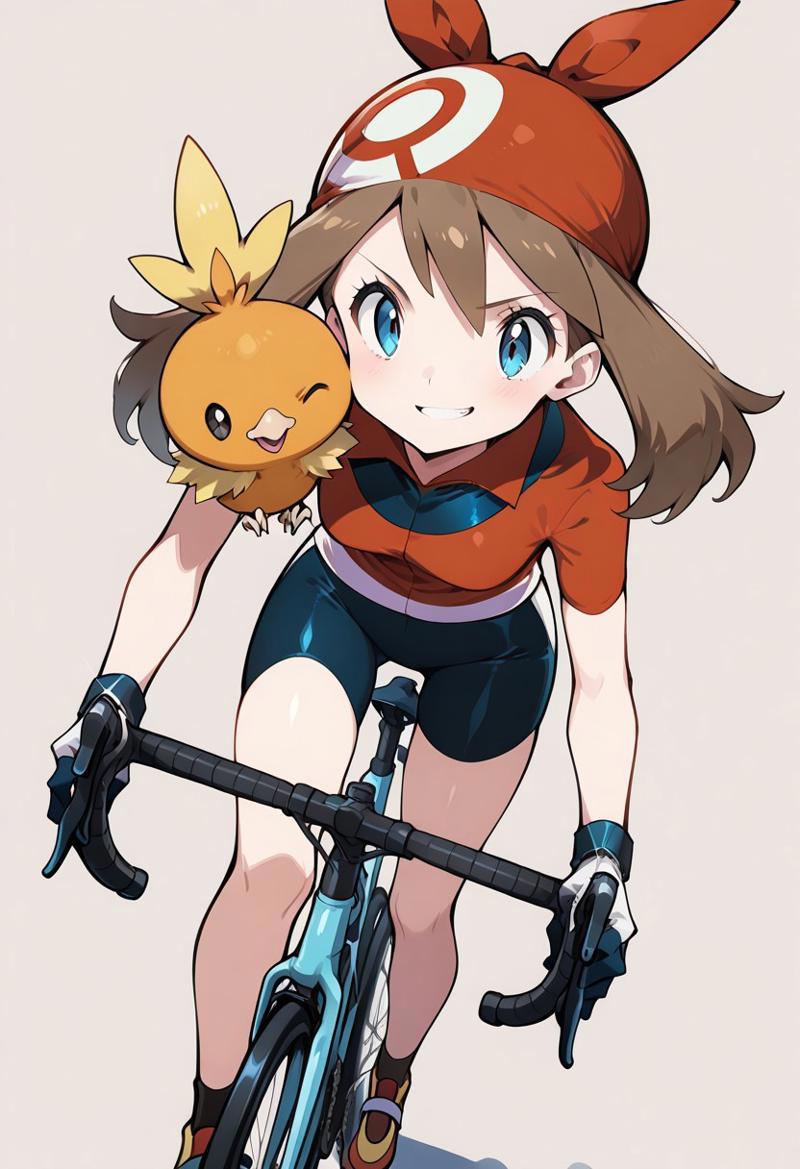
1girl, zzMay, may \(pokemon\), determined, smirk, (riding bicycle,road bicycle), handlebars, BREAK,torchic_\(pokemon\), on shoulder, white background, simple background, from above, (masterpiece:1.2), (best quality:1.2), (very aesthetic:1.2), (absurdres:1.2), (detailed background),newest, sharp focus, perfect light, dynamic light, (heavy lines, black outline), ((intricate details)), (beautiful detailed shading, beautiful, 8K wallpaper, vibrant colors), [high saturation], 2020s, very awa,The second prompt is shorter. I'm not mentioning any hills, road, sky and so on yet. I also left out quality tags that enhance the background such as "beautiful scenery" or "extremely detailed". As a result the LLM does a better job at getting my main subject right. The cycling posture is more convincing, the bandana is more true to the character design and it hasn't duplicated the Pokemon.
Img2Img to build on your pilot
Now to add the background, I can use img2img on my pilot. img2img allows you to create a new image that closely resembles the original one. You can adjust the denoise level to define how much of the original image you want to change. In our case we are requesting a big change, since we want to turn the white background into a road, hills and sky, so we will set it to 0.7.
We now need to change our prompt. It is important that your prompt describes the end result rather than the change you want it to make. So as a beginner you should leave your prompt as is, and then insert the tags relevant to the changes that you want (in our case road, hills and sky). Try to add them somewhere early in your prompt, so that the LLM prioritises it.
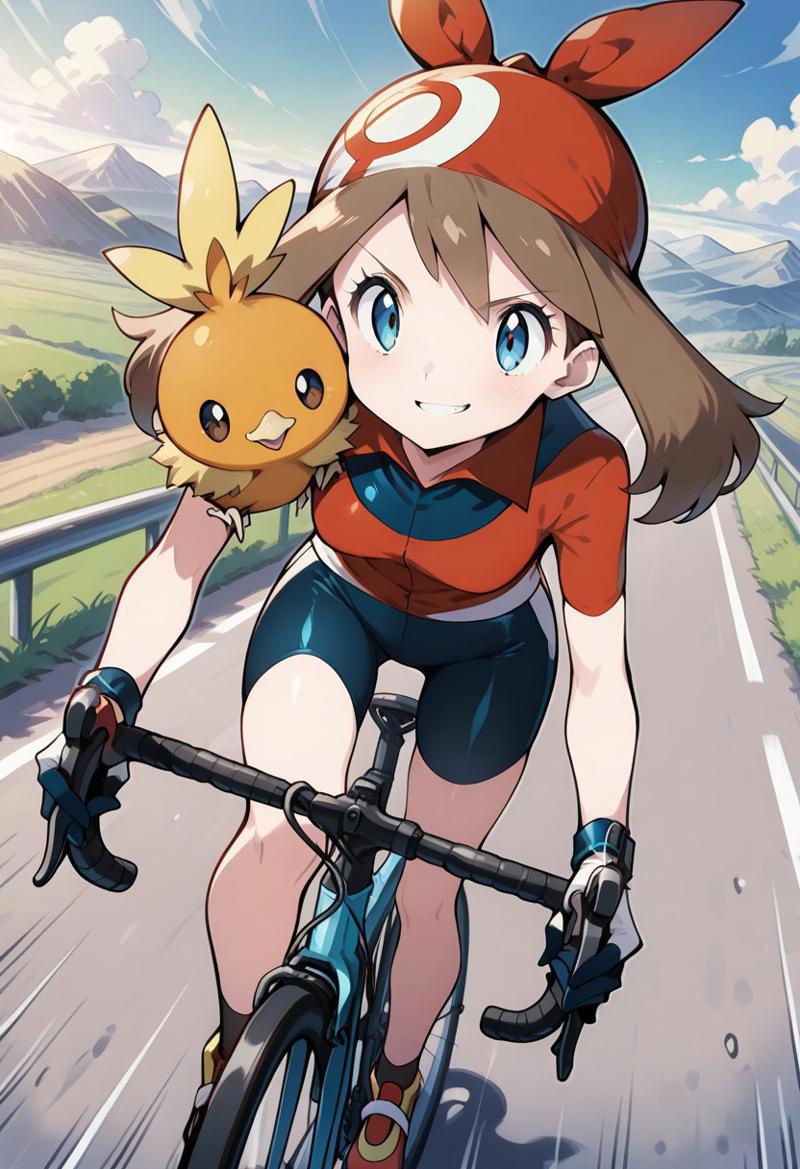
1girl, zzMay, may \(pokemon\), determined, smirk, (riding bicycle,road bicycle), handlebars, BREAK,torchic_\(pokemon\), on shoulder, motion lines, road, hills, grass, sky, clouds, from above, beautiful scenery, (masterpiece:1.2), (best quality:1.2), (very aesthetic:1.2), (absurdres:1.2), (detailed background),newest, ,sharp focus, perfect light, dynamic light, (heavy lines, black outline), ((intricate details)), (extremely detailed, finely detailed, beautiful detailed shading, ultra-detailed, 8K wallpaper, vibrant colors), [high saturation], 2020s, very awa,You can see the generation details here: https://civitai.com/images/61953498
The result looks much better than the first attempt where we bundled everything into one prompt. It is more difficult to achieve the same focus on the character by prompting without img2img. Whenever you struggle to get the character, posture or concept details right, you should consider trimming down your prompt to your main subject and fill out the rest via img2img.
This approach can also be used to add details to objects or clothing, once you got the main posture of your character right. For example you can use img2img to add "golden handle", "embellishments", "intricate details" and "glow" to a sword afterwards.
You can also use this approach to slightly tweak the art style by adding artist tags or Loras.
Use Hi-Res Fix to rescue imperfect images
I used to get very frustrated when I finally got an image right, only to notice some artifacts or obvious anatomical issues (too many fingers, toes, blurred face, wrong eyes, and so on...).
Hi-res fix helps you to address that. You can use it to refine an image and to remove obvious imperfections. Usually you leave your prompt as is and set the denoise level to something around 0.25, as we only want to make small refinements and don't want to divert too much from the original image. You want to set the quantity to 1 as you don't expect there to be significant difference between the image gens.
It sometimes helps to tweak the positive and negative prompt to include what you want (detailed eyes) or what you don't want (bad hands). Let's take a look at an example...
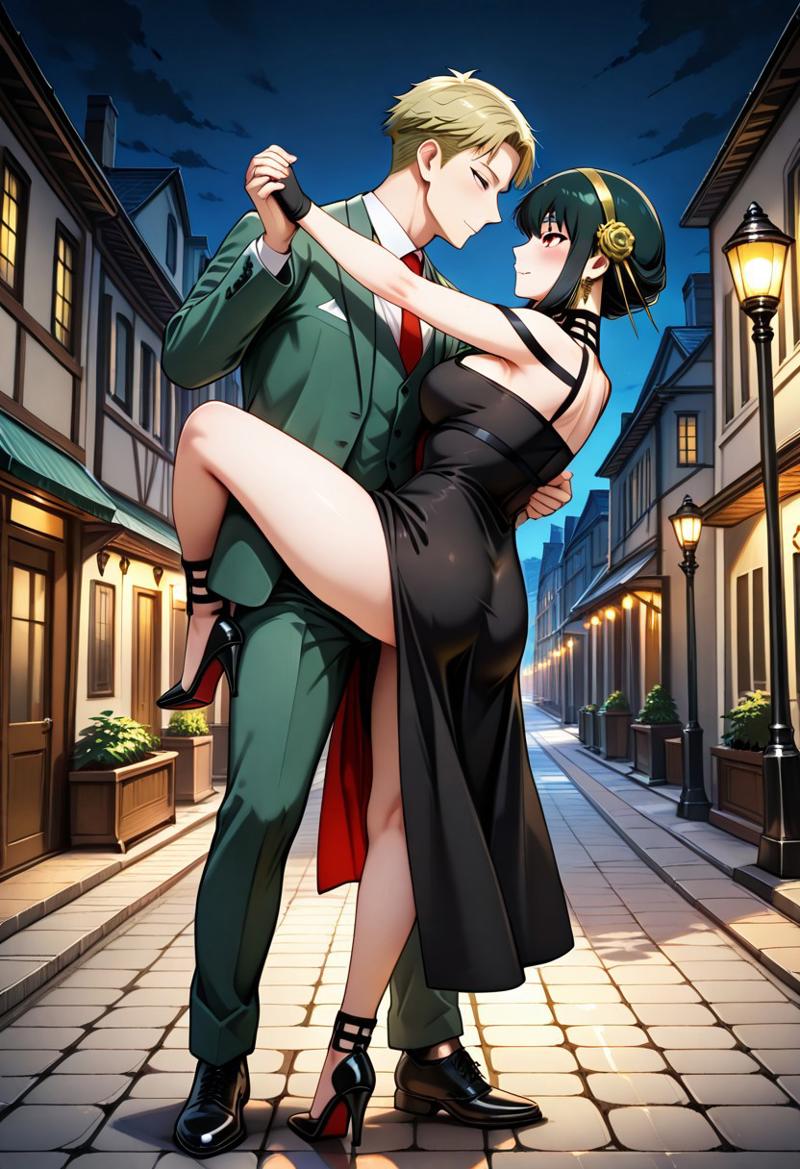
I am happy with the overall posture of the two characters in this image gen, but there are obvious issues with the faces of the characters.
After running it through the Hi-Res Fix, I get this:
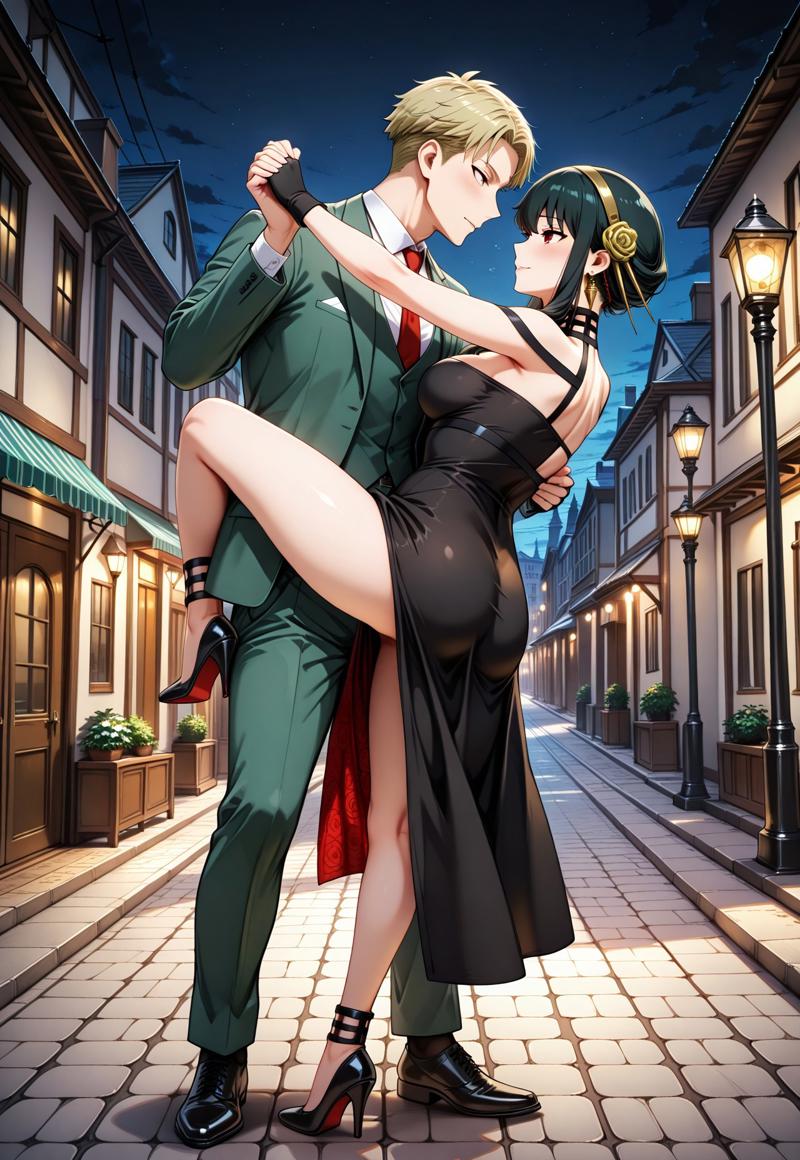
Full image details here: https://civitai.com/images/57661688
What now?
I hope my tips come in handy to anyone who is just figuring stuff out.
Please comment below if you find this guide helpful and feel free to share your own buzz-saving tricks :)
By sticking with these steps, I get by with my free blue buzz. I have a subscription, but since I don't rely on my yellow buzz anymore, I have started to tip more generously.
My rules for tipping are that
I always tip images that make me laugh or chuckle in real life.
I always tip images that I adore or that amaze me.
I always tip to models, LORAs and images that I enjoyed using.
I encourage anyone else to tip others as long as you can afford to do it.


