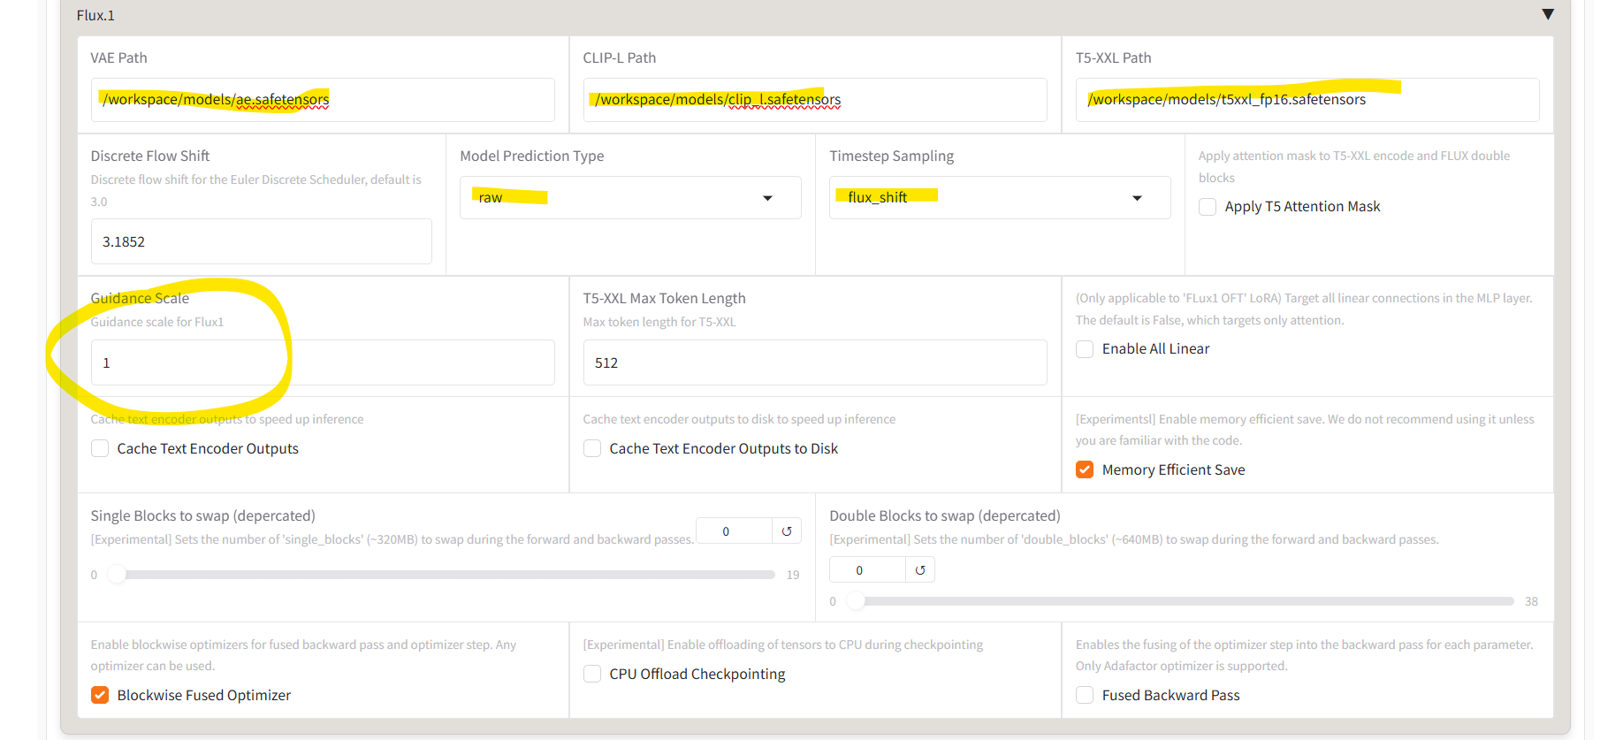
Last updated 3/29/2025. Updated template. Altered json config file to use flux_shift instead of sigmoid timestep sampling. I have tested and shift, flux shift, and sigmoid all seem to work, but I don't fully know the differences.
***As of the date of this article, I have published a template to use on runpod***:
https://www.runpod.io/console/explore/4v1euek6g0
I recommend the following settings:
GPU: A40 (48gb VRAM, 50GB RAM, 9 cpus) - note that some other variations are available but I've noticed that some other variations like the 10 cpu one doesn't seem to work the same as the 9 cpu one - the 12 cpu one worked. You rarely get these assigned randomly but the 9cpu one is the common one.)
Container storage: 40gb usually works but you may need 80-100gb if you are doing more than just kohya in your container. This storage is primarily used for temporary files by the system.Persistent storage/Volume storage: Create a 300gb+ volume in advance (from the storage tab) if doing checkpoints, 200gb+ for lora
Make sure to set your environment variable HF_TOKEN to your huggingface access token.
After launching the pod, you can check the jupyter password by going back to environment variables.
Before reading this article, I recommend that you know how to train LoRA in general. I recommend that you understand some basics: learn rate, epochs, steps, etc and that you know how to prepare your dataset images. This is a guide on a full Flux checkpoint/fineteune, NOT a LoRA.
Image Captioner: Flux uses natural language captions and not tags. I do recommend this autotagger/autocaptioner: https://github.com/jhc13/taggui
First determine if training a checkpoint is right for you. If not, you can still follow along this guide but instead of using the Dreambooth Tab you will need to use the Lora tab and may have some additional settings.
Style: LoRA
Character: LoRASingle Concept: LoRA
Multi-Concept/ complex changes: Checkpoint
Many people use the term finetuning for LoRAs, but when using kohya, a Finetune refers to training the whole model. You will need a minimum of 100gb of drive space and will probably need more to be safe just so you can have a couple of epochs saved at a time.
Due to the amount of space (and VRAM) it requires make sure this is what you are wanting before you begin.
a. Flux1.dev or Flux1.schnell: 23gb
b. text encoders+vae (clip-l + t5xxl) 10gb
c. each epoch will be 23gb plus another 40gb or so if you choose to use save states (which you should use). You can choose to only back up one or two epochs at a time to limit this.Determine whether you will train locally or if you will rent a GPU online using a service like runpod.
I prefer renting an A40 GPU on runpod which as of the date of this article is $.44/hour. This provides 48GB of VRAM. I will not be explaining how to use runpod. I recommend pausing now to go to their website and/or watch a youtube video about runpod. Essentially you can train everything from a remote pre-paid instance. My recommended settings are ~$12/day but you can terminate the pod at any time and the storage is ~$1/day until you terminate it.
I do not have the minimum VRAM requirements to finetune a Flux checkpoint. An A40 is sufficient and even though 48GB sounds like a lot compared to consumer cards with 8-16GB VRAM, an A40 still runs out of VRAM on some settings.
Once you have determined where you want to train and have your environment set up, you will need to download Kohya_ss.
See the top of this article for a link to a pre-made runpod template.
Installing Kohya is a bit difficult to do. Even if you manage to download the scripts and run the install batch/shell scripts you are likely going to run into many errors along the way.
Kohya is downloaded from github. There are many branches and the main branch does not currently support Flux. You need to install the Flux branch.
The main one I use is found here: https://github.com/bmaltais/kohya_ss/tree/sd3-flux.1You can clone the sd3 flux branch by using the following git:
git clone --recursive --single-branch --branch sd3-flux.1 https://github.com/bmaltais/kohya_ss.git
OR you can use the template I made above. This also includes scripts to install the flux models, vae, and text encoders.
Runpod is pre-paid. You'll need to put enough money on your account to run and pay for your storage. It will tell you how much per hour you are using. One pod for 24 hours is $12.
Starting a new pod from scratch and downloading everything takes around an hour. You can terminate a pod after you're done with it and keep all your stuff including the flux models on the persistent storage, but you will need to run the runpod install script each time you start up the pod. It may take 5+ minutes to install the python libraries you'll need. You can restart a pod without needing to reinstall.If you made it this far Congratulations! This was the hard part.
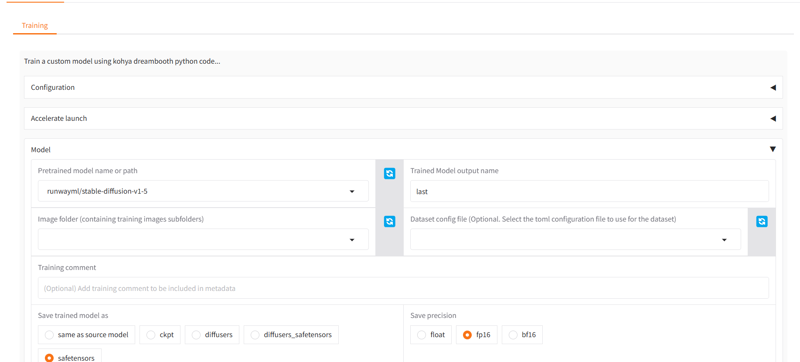
There are a few ways to use kohya. You can use just the command line to run scripts using config file, or you can use the GUI (Graphic User Interface).
This guide is not an intro to Kohya, you may need to read through other articles to learn all of the features. This will just be the basics and enough to start your training.
We will be training using the Dreambooth tab. Dreambooth is for training full checkpoints. Finetune is similar but has some slight differences. LoRA is just for the low rank adaptations and is not training the whole model.
To get started, download my config file myfirstfluxcheckpoint.json.
You can create a json file on your runpod and just paste the contents if its easier. Then from the configuration tab in kohya you paste the path of the json file and then hit the load button. This should load all of the settings into the GUI.
For a full list of settings you can see https://github.com/bmaltais/kohya_ss/wiki/LoRA-training-parameters
Please note that some of the settings like the noise settings may currently do nothing.I will go through the important settings soon, but first it is now time to prepare your dataset and upload it to runpod.
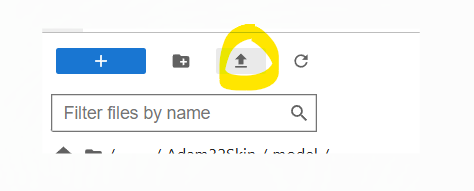
You can upload directly to the pod using this upload button. This is good for a zip file or for a set of images and captions as long as its not too big. A hundred megabytes maybe but a gigabyte may take a long time or fail.
You can upload to a dropbox or something, share the link and then use the commandline: wget http://www.url.com/item.zip
you can also use huggingface_hub from the command line. This guide will not teach you how to use huggingface_hub but you can read more about it here: https://github.com/huggingface/huggingface_hub
There are a few other command line items you may be able to use but I'm not too familiar with linux.
This guide will not explain captions, buckets, preparing your images, etc. I will assume you have done a training before using another method. That said, it is generally perfectly acceptable to train at a resolution of 512,512 for flux. You can generally get good results and it will go much faster. You may be surprised at the amount of details it can learn at this resolution.
You can use Kohya_ss's prepare dataset section to put your images in the correct directory format, or you can put them in the correct directories yourself.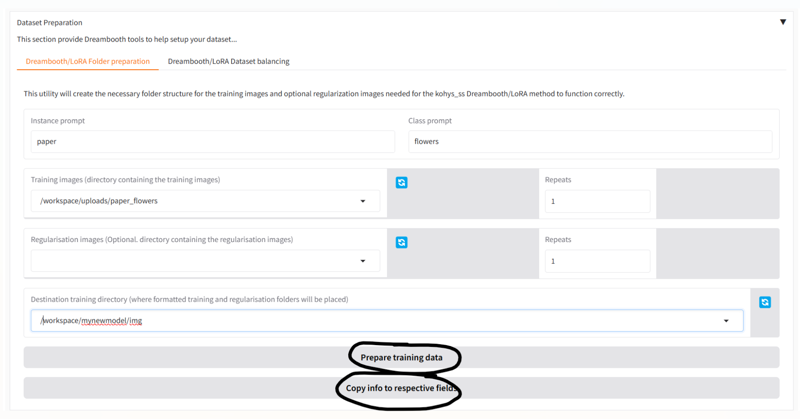
There are a few rules.
Kohya wants the directories to be in a certain format.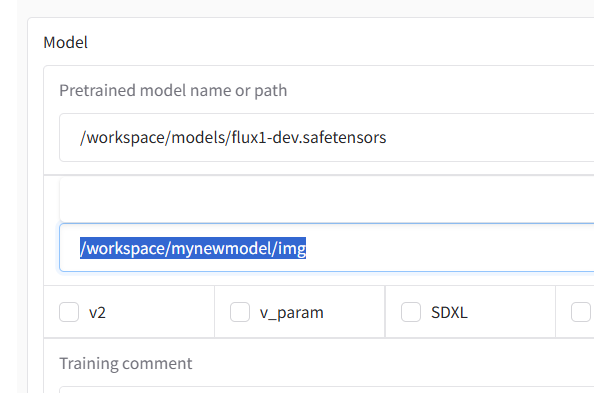
For Dreambooth and LoRA, you will have an image directory. You can name it whatever you like. Then inside that directory you must have a single or multiple subdirectories that contain the images you are training. In this example the images themselves should not be in /workspace/mynewmodel/img. (In the Finetune, they actually should be but we are not doing that tab).
Next, your subdirectory or subdirectories should be in the following format:
1_instance_prompt class_prompt
So drawing from the prior screenshot with the paper flowers, the example would create a subdirectory named 1_paper flowers. In this example Kohya will see the 1 and will do 1 repeat of each image in the folder. If it was named 4_paper flowers it would do 4. If it was not in the right format it would be skipped.
The instance and class prompts are not super important. It is mostly for:
a. organization - you can sort your concepts into different folders if you like to make them easier to remove concepts if you want to
b. balance - you can assign different repeats to different concepts, maybe you only have 10 images of one concept and 20 of another and you want them balanced, so you double the repeats of the 10 image folder.
You can put all your images in a single folder. 1 repeat is generally recommended.
So to recap, you will enter something like /workspace/mynewmodel/img in the image path line but your images will actually be in the subdirectories like:
/workspace/mynewmodel/img/1_paper flowers
/workspace/mynewmodel/img/2_glass flowers
/workspace/mynewmodel/img/1_real flowers
regularization images are not needed and may not be very helpful in flux.Important settings
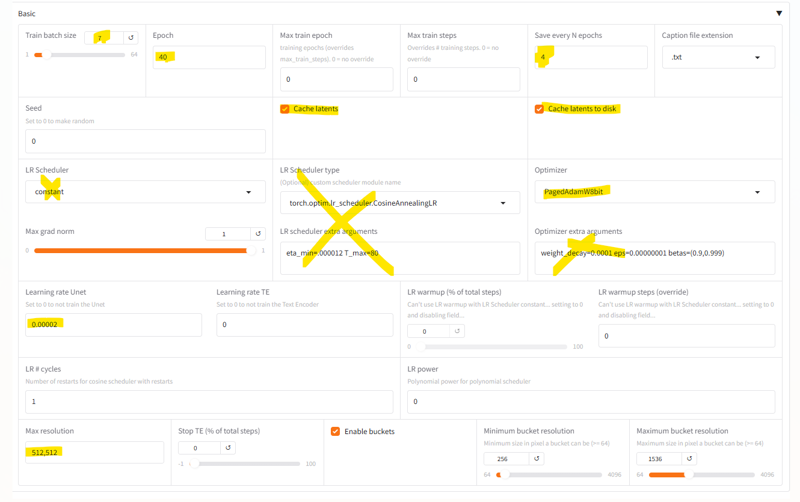

Basic settings:
Train Batch Settings: How many images to process at a time. This will affect VRAM a lot but generally helps speed up training. You can do 1 at a time or multiple at a time. Different optimizers may be able to do more or less. You probably cannot do more than 8 with any optimizer on a Dreambooth training session. I'm not going to make recommendations on how many to use, only what it is capable of. You can get many more than this on GPUs with higher VRAM or when training LoRA which takes less VRAM.
Save every N epochs: saving a 23gb checkpoint takes a few minutes. You want to spend more time training, not saving. That said you should probably try to save every 300-500 steps.
Caching latents to disk is going to help with VRAM
LR Scheduler and LR Scheduler Type are kind of up to you. You can actually manually input the name of the LR Scheduler Type in that text box if you want to use a different LR Scheduler or just leave it blank and use one of the ones on the left.
https://pytorch.org/docs/stable/optim.html#how-to-adjust-learning-rate has a list of schedulers if you scroll down.
Optimizer* unlike LR Scheduler Type kohya currently doesn't let you choose an unlisted optimizer. The list is pre-made in the GUI scripts. However there is a hack if you add one line to the GUI scripts and restart kohya (this is 100% optional)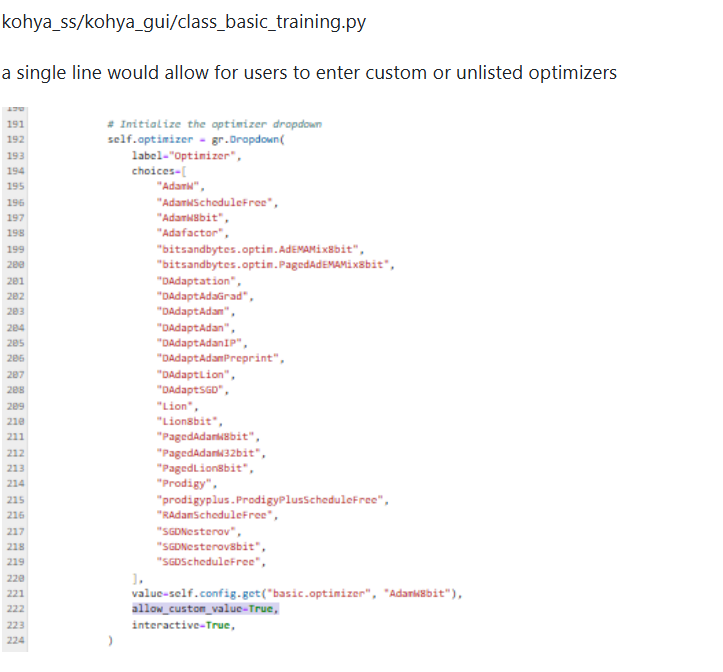
Some additional optimizers from bitsandbytes can be found here: https://huggingface.co/docs/bitsandbytes/en/reference/optim/optim_overview
There may also be additional optimizers you can install.
That said, not all of them work for Flux checkpoint training due to the very high VRAM requirements.
Of the ones listed above, almost none of them work. AdamW, Prodigy, and even AdamW8bit just use too much VRAM and you'll get out of memory issues that break your training.
Adafactor works, but I didn't get very good results over long training sessions and it was very sensitive to LR changes.
For Flux training, I highly recommend the Paged optimizers: PagedAdamW32bit, PagedAdamW8bit, PagedLion8bit. The way these work uses RAM to offset some of the VRAM requirements. This helps from running out of VRAM, I haven't gotten a single OOM error on these, though if you go too high they may just freeze your pod and you'll have to soft reset. They go surprisingly fast and don't really lose quality at all. PagedAdamW32bit uses more VRAM so you may need to drop the images/batch settings. It goes a second or two slower but I personally think the quality is slightly better.
LR - I have seen many sources saying 1e-06 (.000001) is the best setting but this was too low for me on AdamW. I went up to 2e-05 and found a good sweet spot and went even higher on some of my trainings. You can experiment a bit and ultimately will depend on what you're training and how much change you are actually introducing.
I do not recommend training the text encoder - Unlike SDXL, I do not recommend training the text encoders at this time until someone can write an article explaining more about what that training does. There are two text encoders and training them kind of makes your model overly reliant on input to the clip-l text encoder which isn't really the good one, and the t5 text encoder I've read can't really learn new words. Ultimately you will most likely do something screwy to your trigger words and it will probably learn the wrong thing. Its usually better to not train it at all. The civitai trainer doesn't allow training this either.
Resolution - 512,512 is actually pretty good. I did 1024,1024 for a couple months and then tried 512,512 and realized that it went way faster and still was learning what I wanted it too from my images. I haven't gone back to 1024 since due to the speed and quality.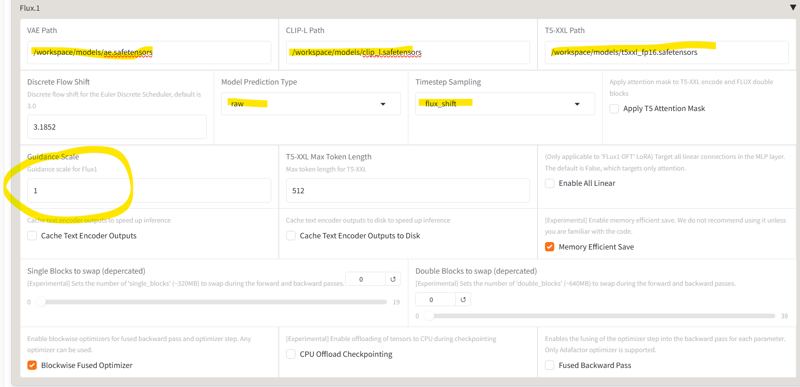
Paths - pretty simple, just make sure you are adding the "/" at the beginning of your paths.
Model Prediction Type and Timestep Sampling - If you don't set these correctly it can cause issues. While some guides say to use raw+sigmoid, I have found better results for flux when using "flux_shift" for the timestep sampling. "shift", "flux_shift", and "sigmoid" all work. I haven't tested the others. I don't know how to determine which one would work best. Also the discrete flow shift, I have no idea what it does. This was a recommended setting but you can probably leave this one as the default 3.0.
T5 Attention Mask - I am not truly sure what this does. I tried to train a concept on a slang word with a different meaning. T5xxl already knew the regular meaning. I'm not 100% sure it was this setting but I think the T5 attention mask setting seemed to prevent the slang concept from overriding the already known concept. When I removed the setting it seemed to learn it very well. So it may not be helpful.
Guidance Scale - This defaults to 3.5 but you should absolutely set it to 1 or you will get completely messed up training images. Experts may be able to use other settings but for everyone else I recommend only using 1. When you actually prompt your finished model you will use guidance scale 3.5 but for training you set this to 1.
Cache Text Encoders. For beginners with simple captions you can Cache the text encoders to lower the VRAM. But there is actually a really cool functionality for wildcards which I will explain soon. If you are going to use wildcards you will need to disable both of these settings.
Blockwise Fused Optimizer - I always set this for everything other than Adafactor which uses the Fused Backward Pass. I don't know if its needed for the Paged optimizers.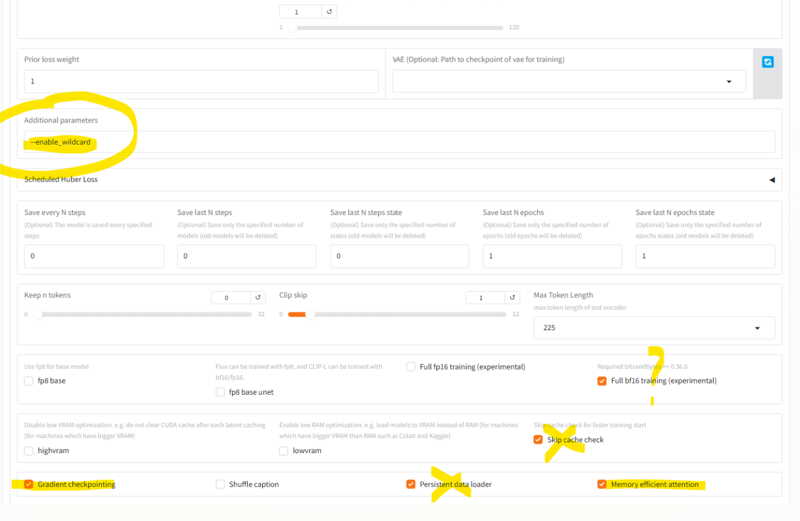
Now in the advanced settings, we're almost done.
Additional Parameters - there's a few things you could add here. Some things like masked loss may be worth looking into, but --enable_wildcard is one of the best ones I have found. This is really cool for captions and allows you to set multiple captions for a single image and then have the model randomly train on it each time. You can either have multiple lines of captions or you can use wildcard notation to use multiple words to choose from.
This could let you train simple captions and detailed captions for the same image and potentially get better prompting as a result.
You could do something like:
{manga|anime} style illustration of a {strong man|muscular saiyan|buff saiyajin|Goku} fighting {a green man with antenna|a namekian|Piccolo} on {a blue-green planet|planet Namek}.
\n
Anime image of Goku punching Piccolo in the face
This will randomly choose one of the two captions. Then if it chooses the top caption it will choose one term from each set to create the actual caption it will train with.
It will randomly pick each time through so it gets a different one each time. This may mean it has to do more epochs to learn each of those terms fully, but you will be able to prompt better once its completed.
--enable_wildcards only works with cache text encoder options turned off.
There are some more similar settings here (but this is my favorite) along with a detailed description of --enable_wildcards:
https://github.com/kohya-ss/sd-scripts/blob/main/docs/config_README-en.md
Another example:
https://github.com/kohya-ss/sd-scripts/issues/1643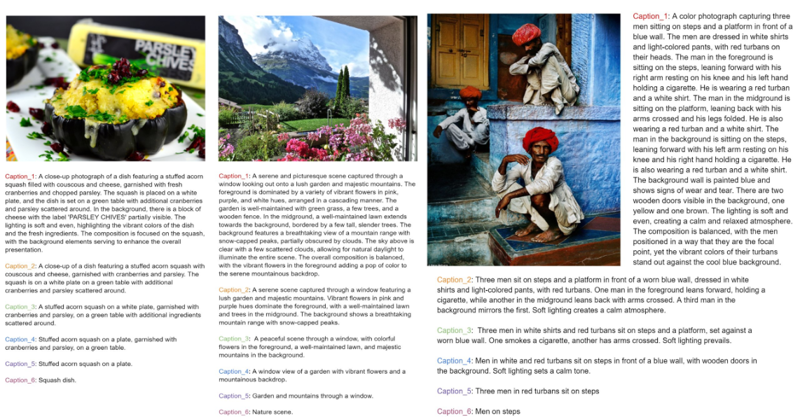
full BF16 training (the one in the screenshot) may not be needed when using Paged optimizers. It is supposed to help with VRAM management but the Paged optimizers are able to manage VRAM without out of memory errors breaking your training. When used I personally didn't notice a huge difference if any.
Gradient Checkpointing I've only ever trained with this setting checked. When I've unchecked it in the past it would just max out my VRAM and cause out of memory issues. I've not tried unchecking it with Paged optimizers to see if it could handle it and what it does. Everybody seems to use this setting checked.
Memory Efficient Attention - I've tried without this checked but don't know what it does. Its supposed to help with VRAM but I don't know what else it would affect. Typically recommended to use it checked.
Save every N steps, Save last N steps, Save last N steps state - I use this a lot for LoRA. In addition to saving every N epochs, you can also save every N steps. If you wanted to save a model every 100 steps you could do that. I don't really use these for checkpoints because of how big they are and how quickly that would max out my storage. I keep these at 0 for checkpoints but maybe 1 or 2 for LoRA.
Save last N epochs, Save last N epochs state - I use a setting of 1 here. Saving the epoch state is useful if you need to pause and pick back up where you left off. Saving the epoch and saving the training state both save a copy of the finetune's safetensors file which is itself a full finetune. model of 23gb each. You're getting 2 of them by doing this. Its a lot, but you are going to want at least the save state in case your training breaks or you want to change your settings. *with checkpoints, you can actually use these saved checkpoints back at the top in the Finetuned model path and continue training them. You sometimes have to do this to change the learn rate partway through training. I do not know if doing it this way is any better or worse than starting from a save state, but some settings cannot be changed if you want to pick up from a saved state like LR schedulers and LRs. But are changeable if using it as the actual finetune model you are training.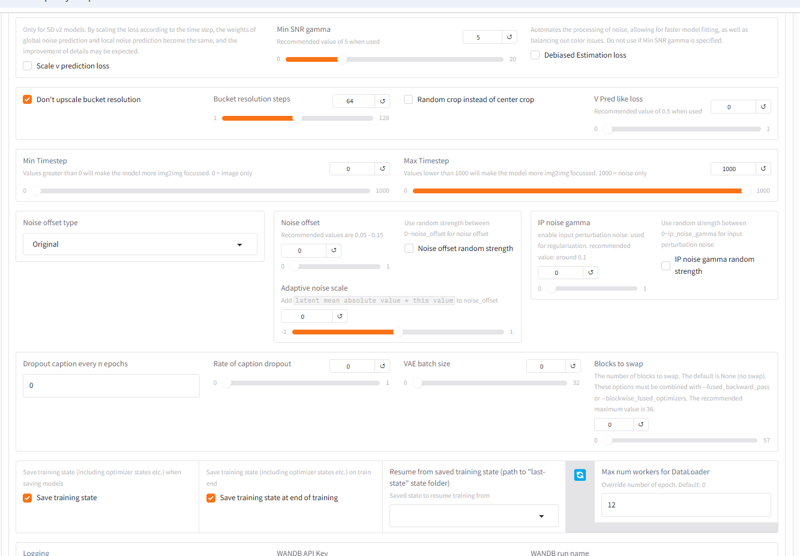
Many of the noise settings may not do anything yet for flux.
Blocks to Swap - This can help lower VRAM usage. This only really helps if you are getting out of memory issues. It will slow down your training a bit. It doesn't really need to be used with Paged optimizers because they have built in VRAM management that swaps with the system RAM more efficiently and faster.
Max num of data loader I don't know what this does. Default is probably fine at 0. I've not noticed any major differences when using this. One time I was having major VRAM OOM errors and setting this to 1 did seem to lower VRAM usage without significant loss of training speed. But I've started using Paged optimizers for Dreambooth training and its resolved my out of memory issues so I don't think it is really needed to set this to anything other than 0.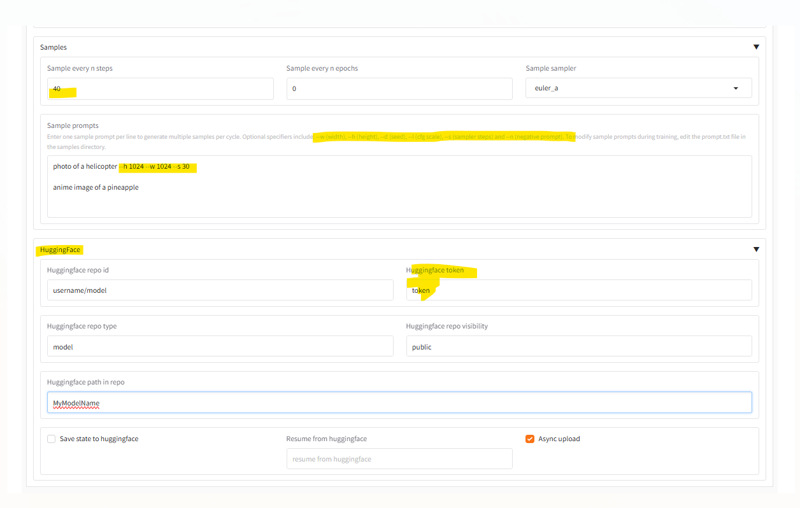
here is an example of samples.
Huggingface is recommended for uploading your model. You can download your model from runpod but downloads from the pod are pretty slow in your browser. LoRAs are fine but 23gb is probably too much to download this way. Uploading from runpod to Huggingface is actually pretty fast and can be done in 5-10 minutes.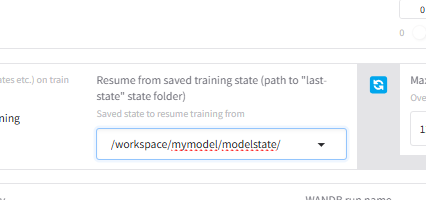
Lastly, if you have been saving your states as recommended, you can resume training by putting in the path of the save state directory (the whole directory) here.
Final words: During training, your initial samples may look normal and then slowly get bad over time. This seems to be a known issue with samples done while training in kohya.
If you get noise, black, or extremely bad samples right off the bad, this is an indicator of bad settings.
If you get normal samples at first that start to get very deformed after the first couple thousand steps, this does not always indicate that your model is bad. There is a known issue with samples. You should download your model and test it before judging if it is bad. The coders of Kohya are aware of it.Almost all of my models that I use did get extremely terrible samples after a few thousand steps that didn't end up being true to the actual model in any way.


