This is a full LORA training guide for Hunyuan Video
Disclaimer: this will be very, very long.
This article is written to help everyone to be able to train a Lora, so it covers topics from very basic: image finding, to advanced features: Training Parameters.
Preface:
Welcome to the comprehensive guide on training Lora, specifically tailored for Hunyuan Video. This detailed article aims to equip you with the knowledge and skills necessary to successfully train a Lora, regardless of your starting point. We will journey through a variety of topics, beginning with the fundamentals of image sourcing and gradually advancing to more intricate aspects, such as training parameters.
Our goal is to demystify the process and provide a clear, step-by-step approach to Lora training. Whether you are a complete novice or looking to refine your expertise, this guide will serve as a valuable resource on your learning path. Get ready to dive deep into the world of Lora training!
Requirements:
An Nvidia graphics card with a minimum of 8GB of VRAM.
A lot of RAM (16+) to speed up the training process.
And a lot of time to spare.
TOPIC 1: IMAGE
Everyone says quality is better than quantity, and I also agree with this point, but only to a certain extent. I'll explain why:
When it comes to Lora Training, the notion that you need a super high-resolution image is a bit of a mixed bag. It's absolutely essential for realistic Lora training, as you’ll want every little detail visible, like every pothole on a face. However, when it comes to training for Cartoon or Anime characters, high resolution isn't quite as critical. Instead, focus on sourcing a high-quality original image. From there, you can process and crop it into multiple buckets, using those refined images to create an impressive Lora. So, choose wisely and get creative!
For example, I want to train the character Chen Hai from Azur Lane, so here is what I did:
First, I find an image of Chen Hai from Azur Lane (it is best to use a solo image), then I use this website to find similar images.
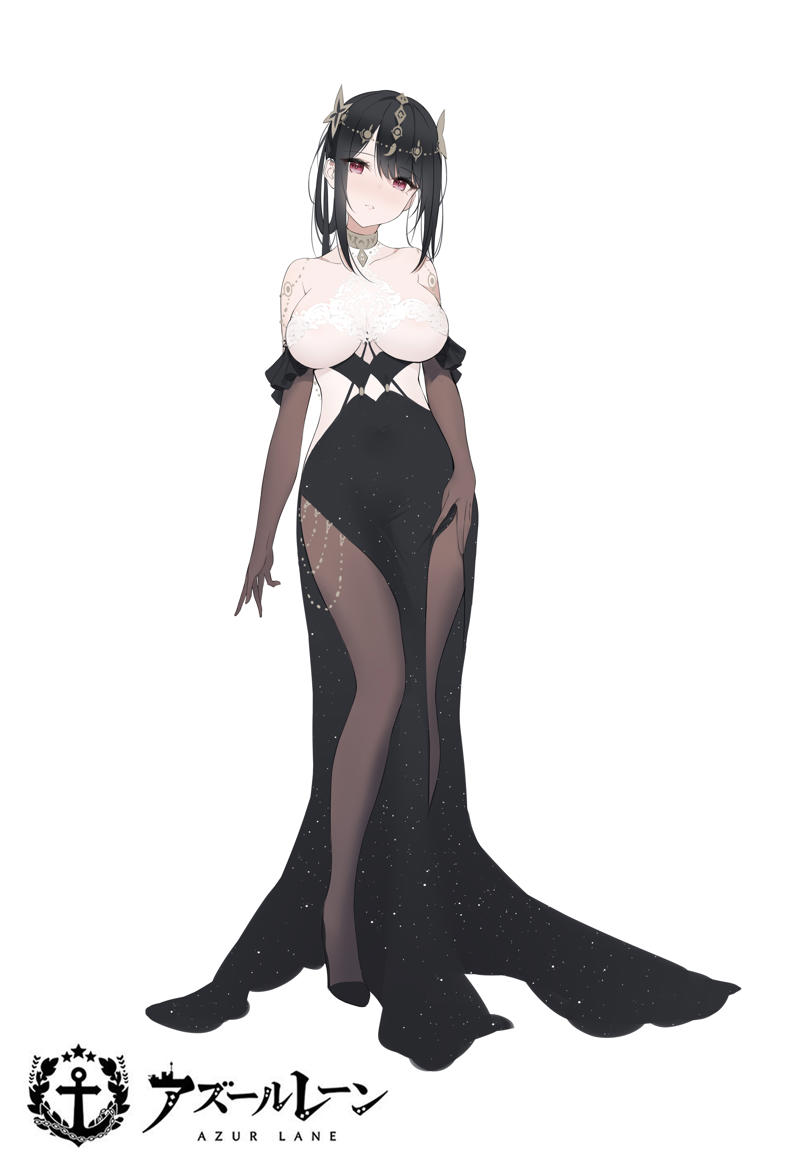
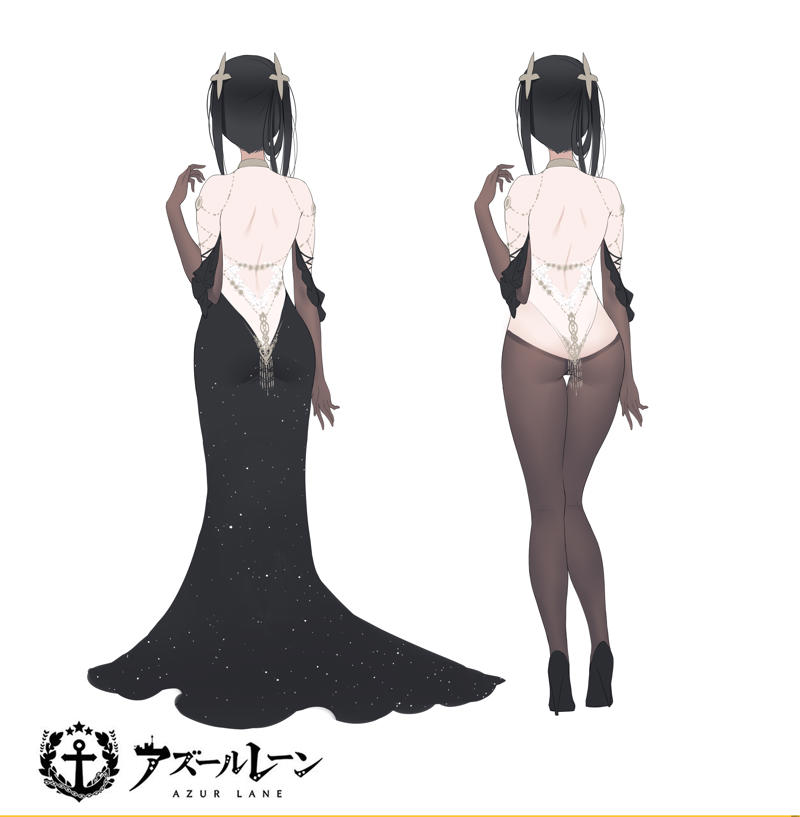
What I look for is a full body image from the front and the back. It is best if the same artist drew both versions, but you can use alternative art. Luckily, this character does have what I'm looking for:
Artist: 股间少女
However, what if there is no image describing the character from behind? You have 3 options to choose from:
1. Do not use a back view image.
- This option is ok, but it may have some problems if the character is complex (horns/wings). You can check this Lora with the training data to see how I dealt with it.
2. Use alternative art, as I mentioned before.
- If the styles are very different, it may introduce inconsistency.
3. Use AI to generate the back view image.
- This option is very advanced; you should skip.
- You can check this Lora to see how AI generated image affects the quality of the video.
With the front view and back view images, I cropped the subject into multiple buckets with resolution: [width, height], and aspect ratio: (width, height)
[960, 1707] (9:16);
[768, 1024] (3:4);
[1024,1024] (1:1);
[1024, 768] (4:3)
Note:
You can click this link to find the Chen Hai Lora and training dataset.
The aspect ratio is quite useful when you caption the image, I'll talk about it later.
What should I crop, you asked?
For the 9:16 aspect ratio, it should be a full-body image.
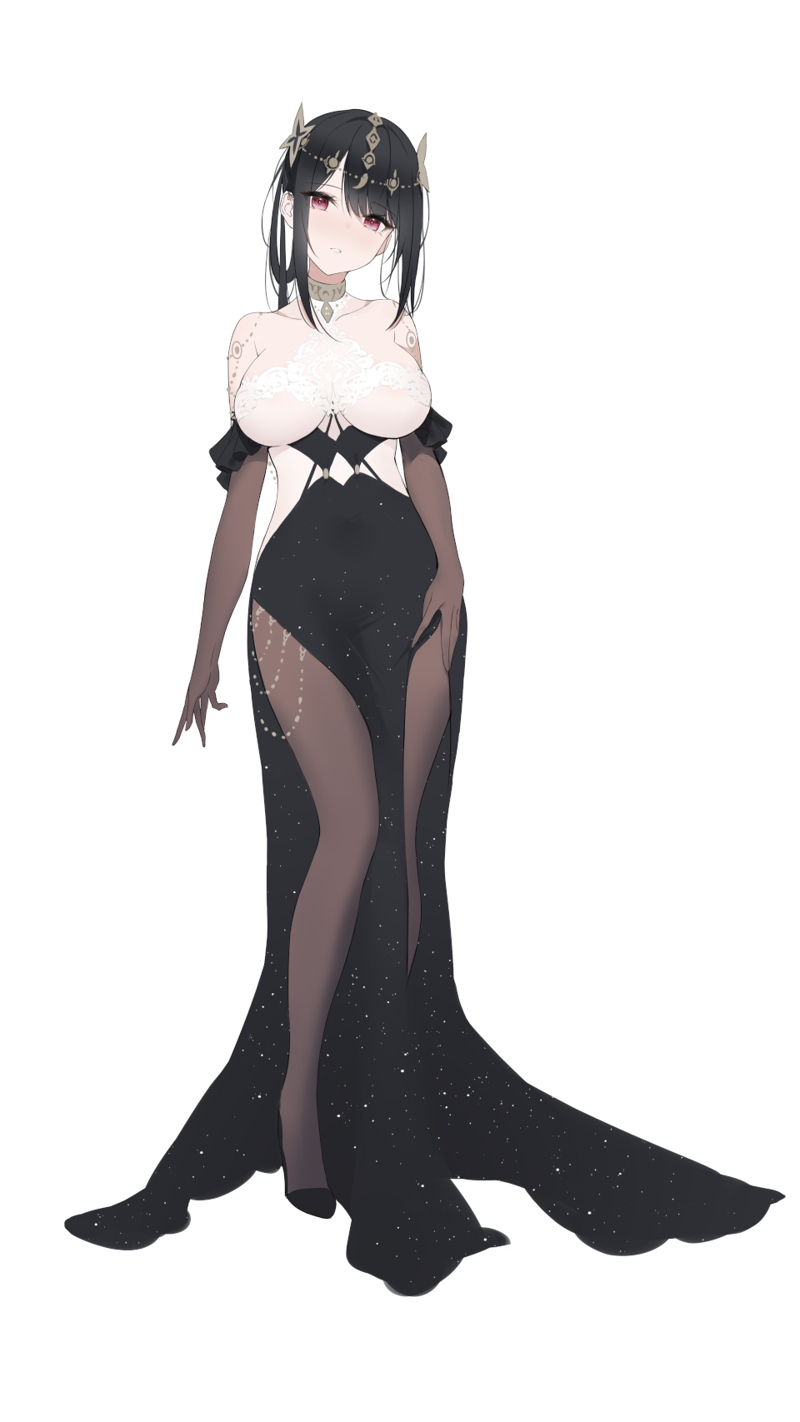
Caption: This is a digital anime-style illustration featuring alchenhai woman with black hair adorned with gold and white ornamental headpieces. She tilts her head to the right. She wears a white and black gown with intricate gold chains and lace details. She wears black curtain with detached sleeves. The background is plain white, putting full focus on her. The 9:16 front view image shows her full body, from head to toe.
For 1:1, focus on:
1. The head (front view and back view)
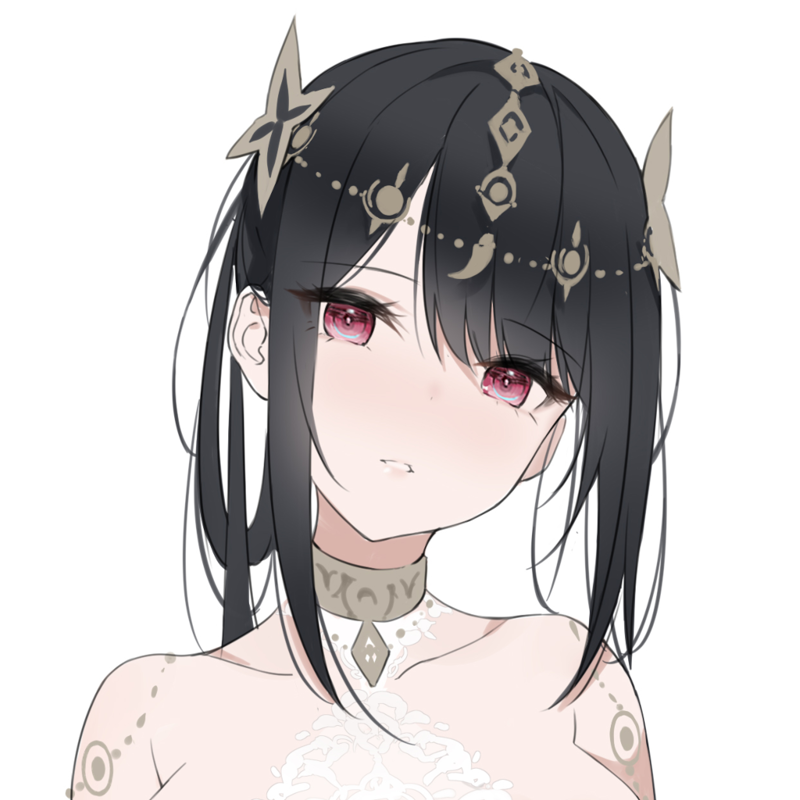
Caption: This is an illustration in a digital anime style featuring a headshot image of alchenhai woman with black hair adorned with gold and white ornamental headpieces. Her head is slightly tilted to the right. She wears a white and black gown with intricate gold chains and lace details. She wears black curtain with detached sleeves. The 1:1 front view image close up on the head.
2. The torso/body (front view and back view)
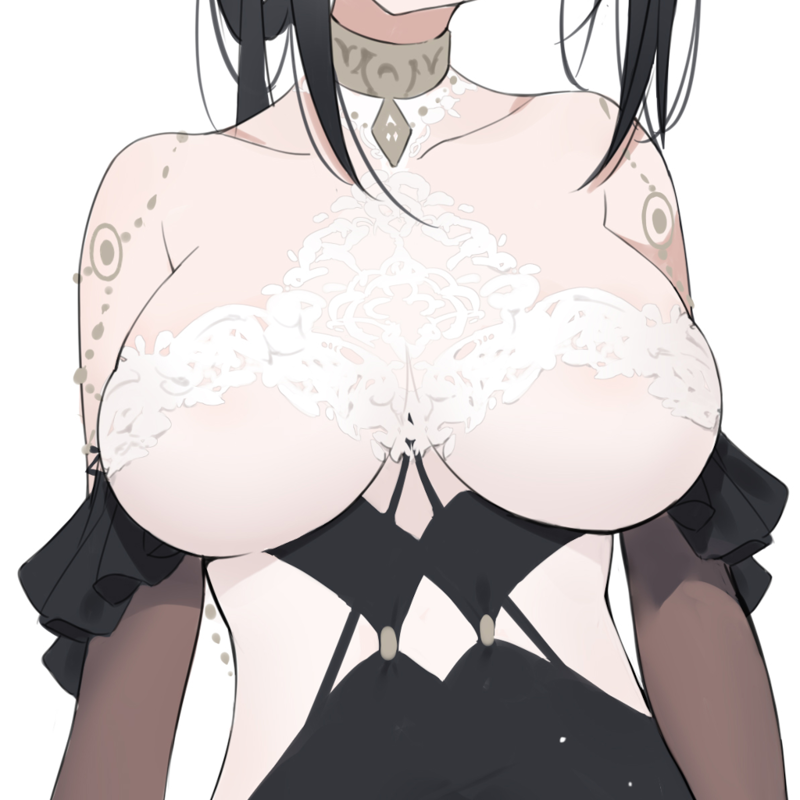
Caption: This is an illustration in a digital anime style featuring alchenhai woman with black hair. She wears a white and black gown with intricate gold chains and lace details. She wears black curtain with detached sleeves. The 1:1 front view image close up on her torso, with her head and legs cropped.
3. From waist up (front and back)
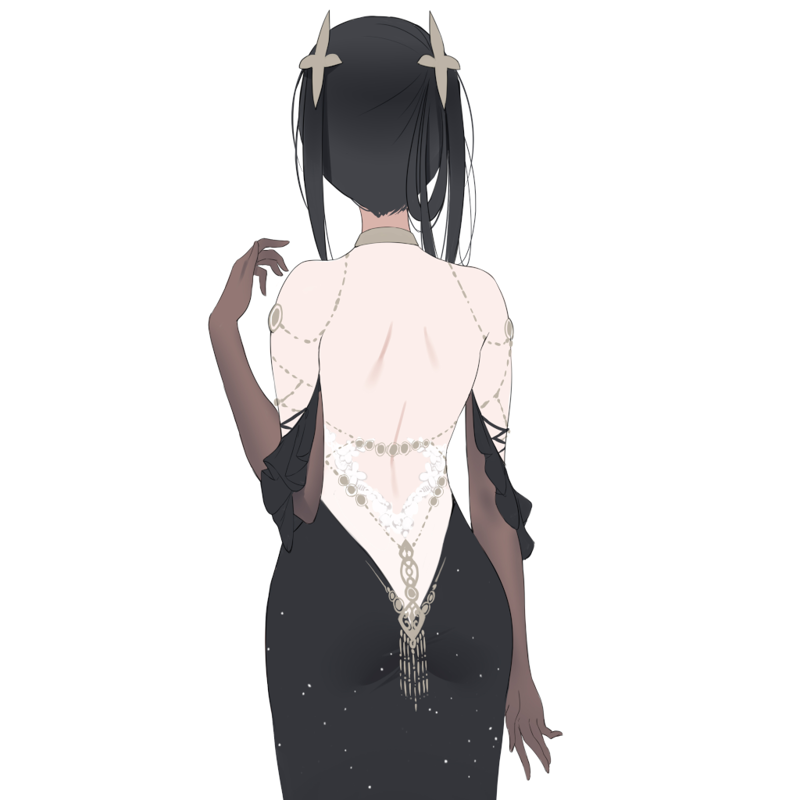
Caption: This is a digital anime-style illustration showcasing an alchenhai woman from behind. She has black hair embellished with gold and white ornamental headpieces. She wears a backless, white and black gown with intricate gold chains and lace details. She wears black curtain with detached sleeves. The 1:1 back view image centers on her torso, with the lower legs cropped.
3:4 and 4:3 are very similar.
1. The head
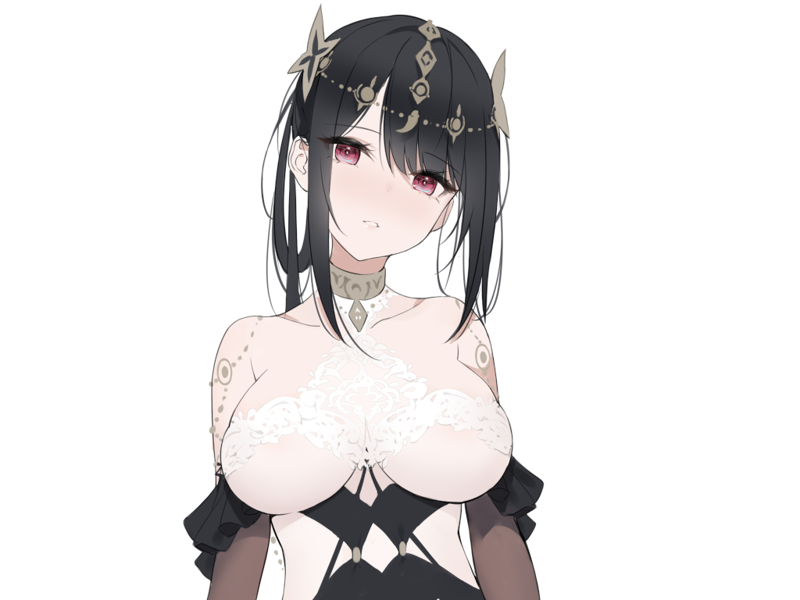
Caption: This is an illustration in a digital anime style featuring an alchenhai woman with black hair adorned with gold and white ornamental headpieces. Her head is slightly tilted to the right. She wears a white and black gown with intricate gold chains and lace details. She wears black curtain with detached sleeves. The 4:3 front view image illustrates the woman from the waist up.
2. The upper body
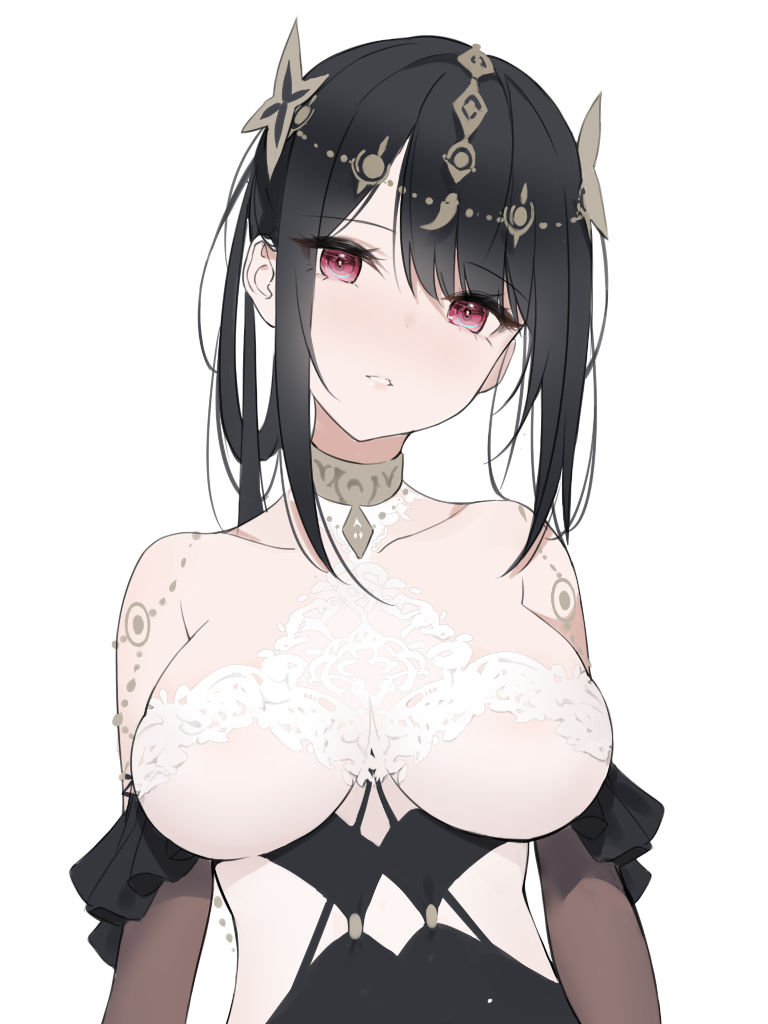
Caption: This is an illustration in a digital anime style featuring an alchenhai woman with black hair adorned with gold and white ornamental headpieces. Her head is slightly tilted to the right. She wears a white and black gown with intricate gold chains and lace details. She wears black curtain with detached sleeves. The 3:4 front view image illustrates the woman from the waist up.
3. The body but the head is cropped
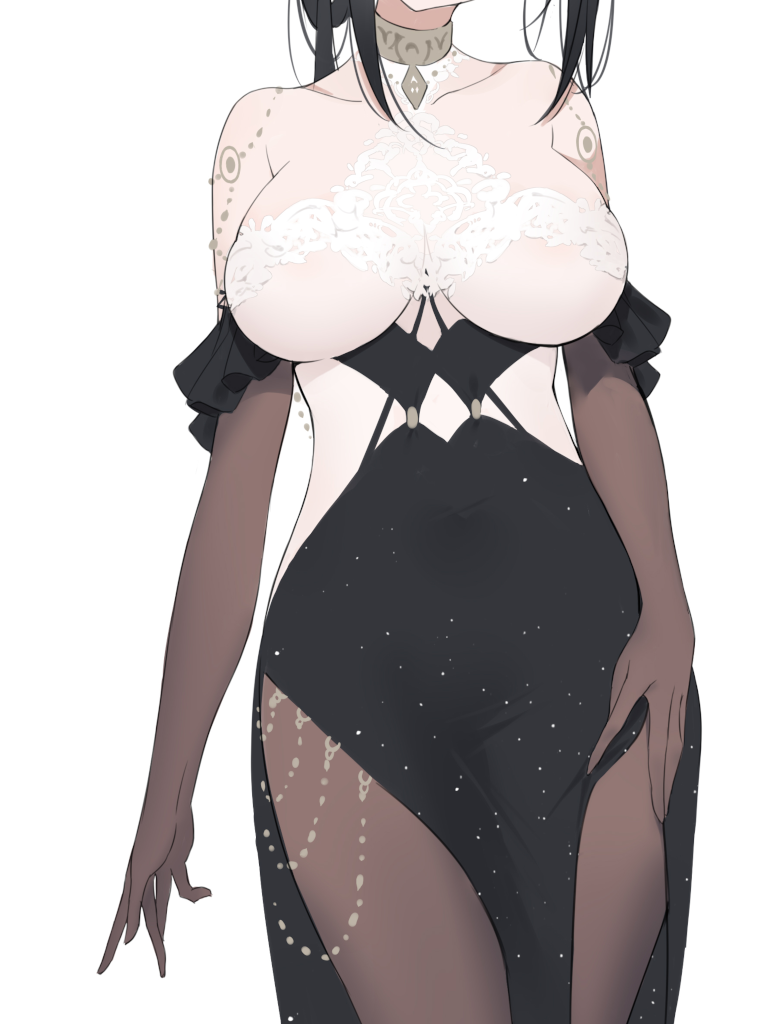
Caption: This is a digital anime-style illustration featuring alchenhai woman with black hair. She wears a white and black gown with intricate gold chains and lace details. She wears black curtain with detached sleeves. The 3:4 front view image with a white background has her head and lower legs cropped, focusing on her torso and thighs.
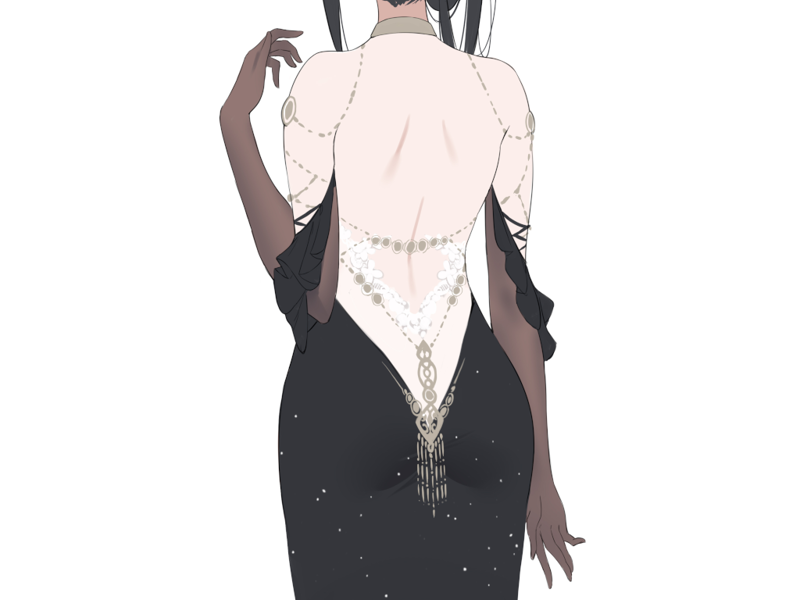
Caption: This is a digital anime-style illustration showcasing an alchenhai woman from behind. She has black hair embellished with gold and white ornamental headpieces. She wears a backless, white and black gown with intricate gold chains and lace details. She wears black curtain with detached sleeves. The 3:4 back view image centers on her torso, with the lower legs cropped.
If the character has small accessories, objects, or small details, crop them.
Artist: 云桑
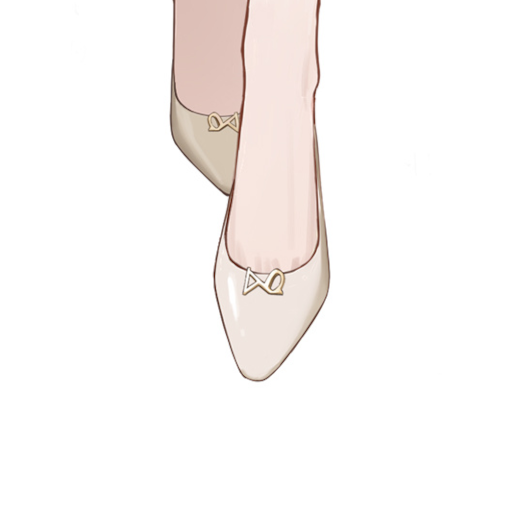
Caption: This digital illustration showcases a pair of elegant, cream-colored kmsagir woman's high heels with small bow accents. The 1:1 ratio image is top-down perspective, focusing on the shoes' front view, with the background a plain white.
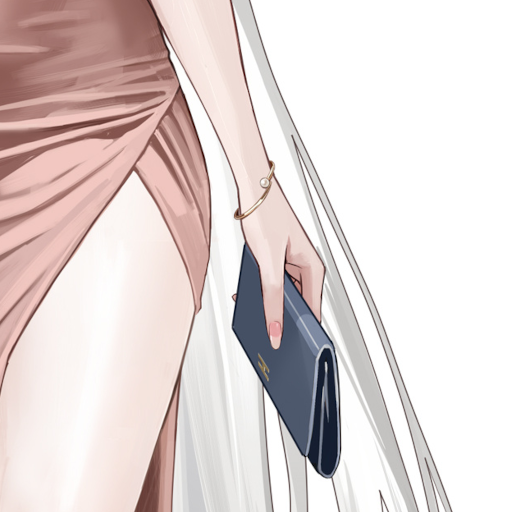
Caption: An anime digital illustration, showcasing close-up of kmsagir woman's hand holding a blue purse. The woman's wrist sports a delicate gold armlet with a pearl. She is dressed in a pink dress. The 1:1 image focusing on the hand and purse. The background is a clean, white void, emphasizing the subject. The woman has white hair.
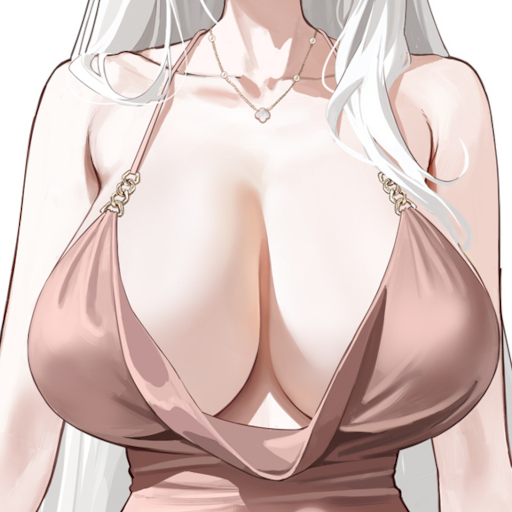
Caption: This digital artwork draws inspiration from anime and features a close-up view kmsagir woman's breasts. It presents a 1:1 aspect ratio cropped view from the front against a white backdrop. She is attired in a pink dress. Around her neck is a delicate gold necklace adorned with a small pendant.
That is everything you should know to find images and process them.
TOPIC 2: Captioning
I genuinely believe that the "heart" of Lora training lies in captioning. Each person has a unique perspective on how to caption an image and which tool to use. Therefore, I will share my approach in this tutorial. (I do captioning manually for Flux/Hunyuan Video)
To be brief, imagine captioning is like teaching a parrot what the name of a feature/object is. If you taught a parrot a new object with an used name, the parrot is likely to hallucinate, therefore, we taught the parrot a new object with a new name. So how do we name an feature?
For a person, we use their name. But if you have 2 friends with a similar name, you call them by the nickname, right? Well, unless you wanna call them by their full name, which is rude. And you used their appearance to tell them apart, so why not apply the same logic to captioning?
The woman's name is Chen Hai, there are many with that name already, so I call her alchenhai woman. How do I recognize her? By looking at her facial features (red eyes, V-line chin, mole under eye, ...) and physical traits (short hair, tall, fat, medium breasts, ...), I don't need to include them in the caption. So now every time we tell the parrot to find alchenhai woman, the parrot will find the woman with red eyes and medium breasts.
2 years later, you met the woman again, but oh my gosh, her hair is long, and she dyed it blue now, will the parrot recognize her? It depends on what you trained the parrot on. If you taught a parrot a woman with red eyes and medium breasts is alchenhai woman, the parrot will recognize her; but if you trained the parrot to identify her as a woman who has red eyes, medium breasts, and black hair, the parrot won't recognize her because she has blue hair now!
So TLDR, caption a woman with red eyes, medium breasts, and black hair as alchenhai woman if you don't want the parrot to have the ability to recognize different hair color; and train the parrot with alchenhai woman with black hair if you want the parrot to recognize the hair change too.
For an article of clothing, we use the clothing name; the more accurate the name, the better! If you don't recognize the clothing, try describing it: For example, i caption this dress as "white and black gown with intricate gold chains and lace details".
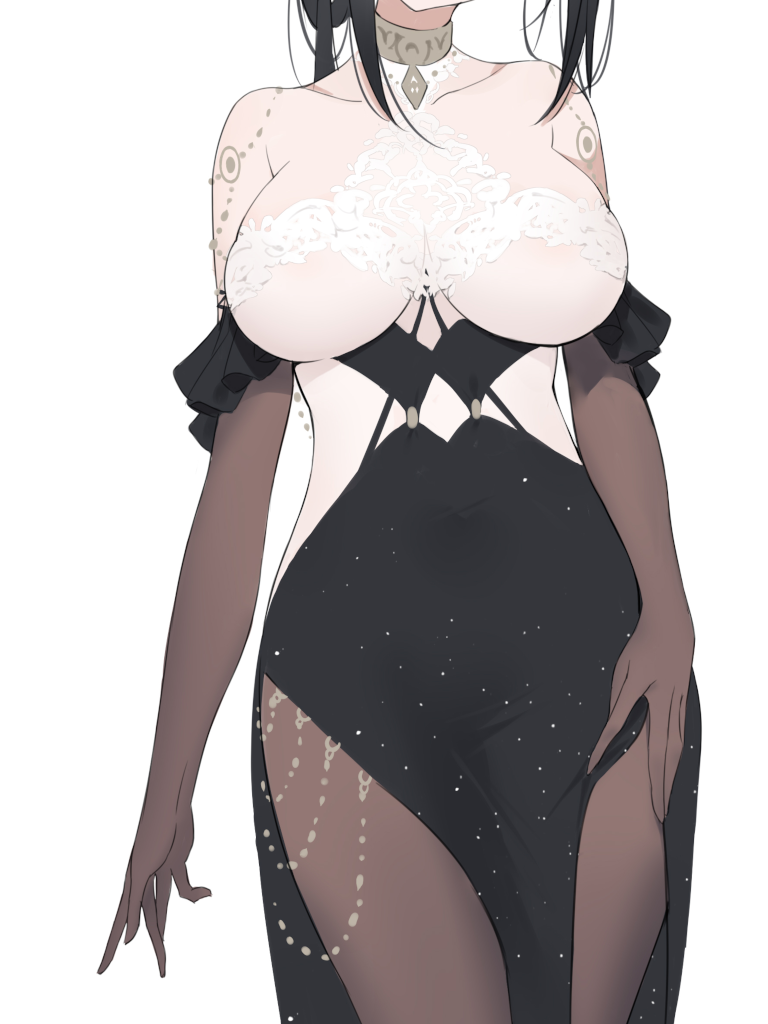
Well, this is a backless dress, but the "parrot" can't see it from behind, so I captioned it without "backless".
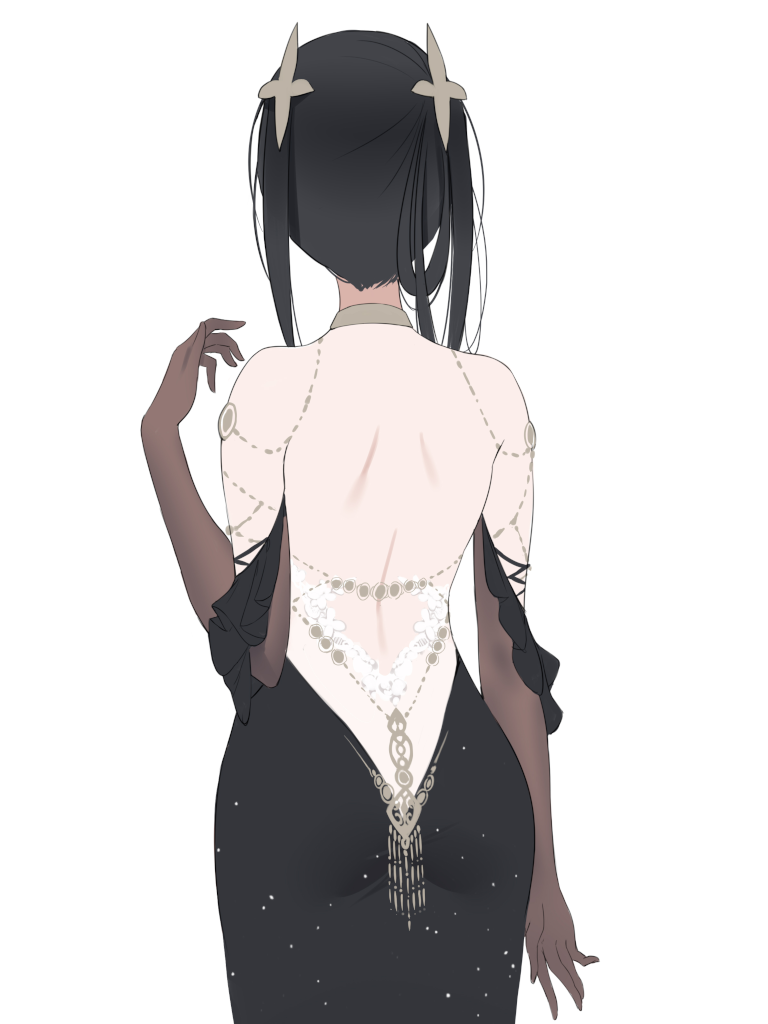
Now the back is visible, i should caption it as "white and black backless gown with intricate gold chains and lace details".
With these, you know how to caption characters and outfits. However, this is not sufficient for a good Lora.
First, you should caption everything in the background; don't remove the background because the current remove background technology doesn't return a good enough outline.

Source: From the anime series Azur Lane Slow Ahead.
Note: Remove background using Adobe Photoshop. The outline of the character is not ok!
You should also include the style [realistic, anime, cartoon]; the camera angle [headshot, profile, from side, from behind, front view, back view, ground level, low angle, below eye level, above eye level, ...]; aspect ratio [9:16, 16:9, 4:3, 3:4, 1:1] while making sure it is as short as possible.
For example, how do you caption this image style, angle, and aspect ratio?
Artist: Alice Vu (Sorry i cant find your X account)
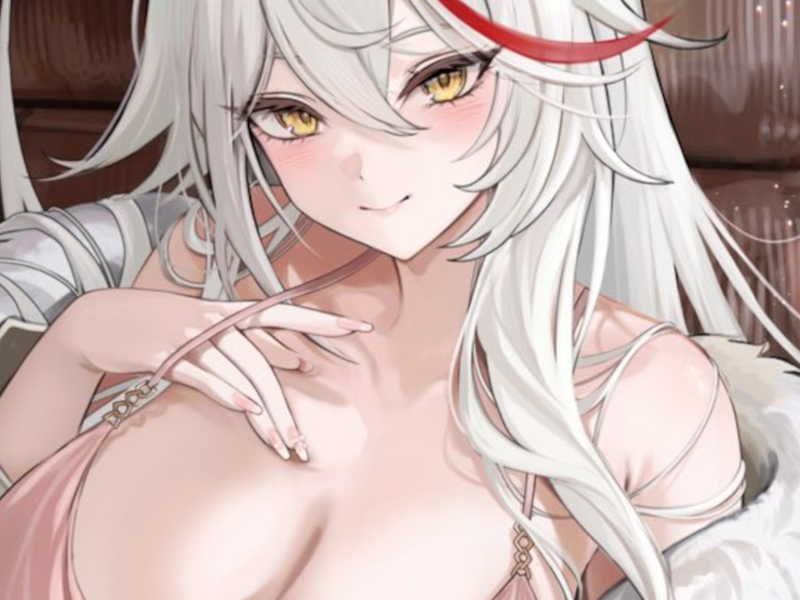
Caption: This is a digital anime-style drawing of a kmsagir woman with white hair, red streaked hair, and black horns. She is dressed in a pink dress and a beige fur coat. She has a slight smile and a flirtatious gaze. She ducts one hand below the drawstring, on her breasts. She leans back to the brown sofa. The 4:3 image is cropped focusing on her breasts. The camera angle is slightly above eye level.
P.S.: There is no perfect prompt, just a more efficient one. You can use ChatGPT or Grammarly to shorten to word count, use this prompt: "shorten without changing any noun" (they will fail if the prompt is nsfw).
TOPIC 3: Training
Currently, there are many tools to train a Hunyuan Video Lora. I use Musubi Tuner by Kohya-ss
I will explain the installation here; feel free to scroll down to the training parameters.
How to install:
As of 26/03/2025, there are 2 ways to install Musubi Tuner.
+ Install the release.
+ Git clone the repository.
{I'll just copy and paste the readme lol}
1. Download python. Python 3.10 or later is required (verified with 3.10).
2. Create a virtual environment and install PyTorch and torchvision matching your CUDA version.
Window: locate to the current folder, right click "open in terminal". In the terminal, type
python -m venv venvThen activate the virtual environment:
.\venv\scripts\activateNow download PyTorch 2.5.1 or later (see note).
pip install torch torchvision --index-url https://download.pytorch.org/whl/cu124Install the required dependencies using the following command:
pip install -r requirements.txtOptionally, you can use FlashAttention and SageAttention (for inference only; see SageAttention Installation for installation instructions).
Optional dependencies for additional features:
ascii-magicUsed for dataset verificationmatplotlibUsed for timestep visualizationtensorboardUsed for logging training progresswandbI used this for logging training progress -> MUST DOWNLOAD
pip install ascii-magic matplotlib tensorboard wandb
Additional step for people who read until here: Prodify for Lora training (no-brainer Lora training)
pip install prodigyopt
Access this repository: https://github.com/konstmish/prodigy
Download all the files in https://github.com/konstmish/prodigy/tree/main/prodigyopt
__init__.py
prodigy.py
prodigy_reference.py
Then go to the folder "modules" in your musubi tuner folder, and move the 3 files you just downloaded there.
Now download the models:
There are two ways to download the model.
Use the Official HunyuanVideo Model <- I use this
Download the model following the official README and place it in your chosen directory with the following structure:
  ckpts
    ├──hunyuan-video-t2v-720p
    │  ├──transformers
    │  ├──vae
    ├──text_encoder
    ├──text_encoder_2
    ├──...
Using ComfyUI Models for Text Encoder
This method is easier.
For DiT and VAE, use the HunyuanVideo models.
From https://huggingface.co/tencent/HunyuanVideo/tree/main/hunyuan-video-t2v-720p/transformers, download mp_rank_00_model_states.pt and place it in your chosen directory.
(Note: The fp8 model on the same page is unverified.)
If you are training with --fp8_base, you can use mp_rank_00_model_states_fp8.safetensors here instead of mp_rank_00_model_states.pt. (This file is unofficial and simply converts the weights to float8_e4m3fn.)
From https://huggingface.co/tencent/HunyuanVideo/tree/main/hunyuan-video-t2v-720p/vae, download pytorch_model.pt and place it in your chosen directory.
For the Text Encoder, use the models provided by ComfyUI. Refer to ComfyUI's page, from https://huggingface.co/Comfy-Org/HunyuanVideo_repackaged/tree/main/split_files/text_encoders, download llava_llama3_fp16.safetensors (Text Encoder 1, LLM) and clip_l.safetensors (Text Encoder 2, CLIP) and place them in your chosen directory.
(Note: The fp8 LLM model on the same page is unverified.)
After everything is done, you are close to training your first Lora. Now I will guide you on how to cache data and text encoder in Musubi Tuner.
Open the "data" folder in your Musubi Tuner main directory. In there, create a toml file "config.toml" open the config.toml file with an editor, I use visual code studio.
Copy and paste this into your config.toml:
[general]
batch_size = 1 # if possible, use 2, 4 or 6 (keep it 1 for 8GB VRAM)
enable_bucket = true
bucket_no_upscale = false
caption_extension = ".txt"
[[datasets]] # The first bucket
image_directory = "data/image169" # The path to the image folder, name it 169 for clarification
cache_directory = "data/cache169" # The path to the cache folder
resolution = [768, 1366] # The resolution of the image
num_repeats = 2 # Number of images x repeats in this dataset = other data
[[datasets]] # The second bucket
image_directory = "data/image34"
cache_directory = "data/cache34"
resolution = [768, 1024]
num_repeats = 2 # For example this has 4 images x 2 repeats = 8
[[datasets]]
image_directory = "data/image43"
cache_directory = "data/cache43"
resolution = [1024, 768]
num_repeats = 4 # For example this has 2 images x 4 repeats = 8
[[datasets]]
image_directory = "data/image11"
cache_directory = "data/cache11"
resolution = [1024, 1024]
num_repeats = 8 # For example this has 8 images x 1 repeats = 8
NOTE: You will have to change this file depending on your dataset.
Now in the "data" folder, create 4 folders: image169, image34, image43, and image11, and put the images and captions you prepared previously. The name of the image file and the txt file should be the same.
To cache the latent and text encoder, open the terminal in the main directory [musubi tuner], activate the virtual environment .
.\venv\scripts\activateAnd run these commands:
Cache Latents:
python cache_latents.py --dataset_config data/config.toml --vae HunyuanVideo/ckpts/hunyuan-video-t2v-720p/vae/pytorch_model.pt --vae_chunk_size 128 --vae_tiling --vae_spatial_tile_sample_min_size 128 --batch_size 64Cache Text Encoder:
python cache_text_encoder_outputs.py --dataset_config data/config.toml --text_encoder1 HunyuanVideo/ckpts/text_encoder --text_encoder2 HunyuanVideo/ckpts/text_encoder_2 --batch_size 128Note: You should check the model path. I downloaded and put the checkpoints in a folder "HunyuanVideo"
After caching Latents and Text Encoder, you can train the Lora by pasting this code in the command line:
accelerate launch --num_cpu_threads_per_process 32 --mixed_precision bf16 hv_train_network.py --dit HunyuanVideo/ckpts/hunyuan-video-t2v-720p/transformers/mp_rank_00_model_states_fp8.safetensors --dataset_config data/config.toml --mixed_precision bf16 --fp8_base --flash_attn --split_attn --gradient_checkpointing --gradient_accumulation_steps 2 --optimizer_type=modules.prodigy.Prodigy --learning_rate 1 --lr_scheduler_type=torch.optim.lr_scheduler.CosineAnnealingLR --optimizer_args betas=0.9,0.99 weight_decay=0.01 slice_p=11 decouple=True d_coef=0.5 beta3=None use_bias_correction=True --network_module networks.lora --network_dim 32 --network_alpha 32 --timestep_sampling sigmoid --discrete_flow_shift 1 --seed 2025 --save_every_n_epochs 5 --blocks_to_swap 32 --lr_scheduler_args T_max=4000 --max_train_epochs 200 --output_dir data/output --output_name alchenhai --log_with wandb --log_tracker_name alchenhai --wandb_api_key abunchoffunnynumberandletterthatidontwanttoshareonline
You will need to change a few things:
Change this to your HunyuanVideo checkpoint directory, mine is in the "HunyuanVideo" folder.
--dit HunyuanVideo/ckpts/hunyuan-video-t2v-720p/transformers/mp_rank_00_model_states_fp8.safetensors
Change --flash_attn to --xformers if you don't have flash attention.
Change 4000 to the number of steps in your training. Pro tips: wait a bit to copy the step.
--lr_scheduler_args T_max=4000
Change alchenhai to your Lora output name.
--output_name alchenhai
Change alchenhai to anything you like for your tracker name.
--log_tracker_name alchenhai
Create a wandb account and replace "abunchoffunnynumberandletterthatidontwanttoshareonline" with your api keys
--wandb_api_key abunchoffunnynumberandletterthatidontwanttoshareonline
After this, you can paste the edited command to train a Hunyuan Video Lora. At first, you will be prompted to log into your wandb account.
TOPIC 4: The Best Lora Models
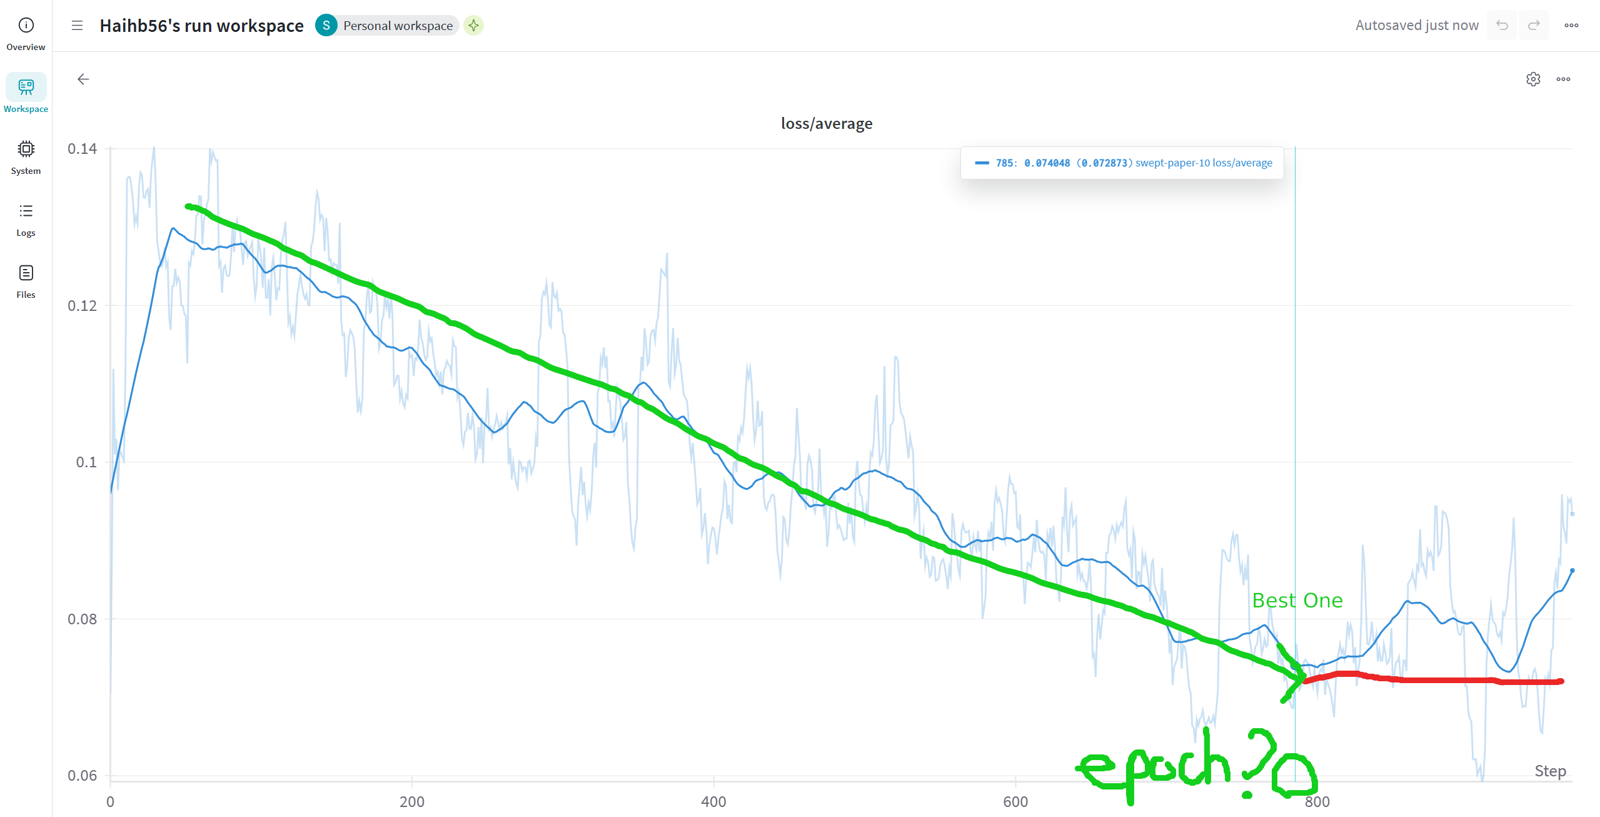
With the power of Prodigy Optimizer and Wandb, you can pinpoint the best Lora model quite easily.
DO THIS WHILE THE LORA IS TRAINING, DON'T WAIT UNTIL IT FINISHES.
Step 1: Open your wandb tracker (click the link or go to your wandb project)
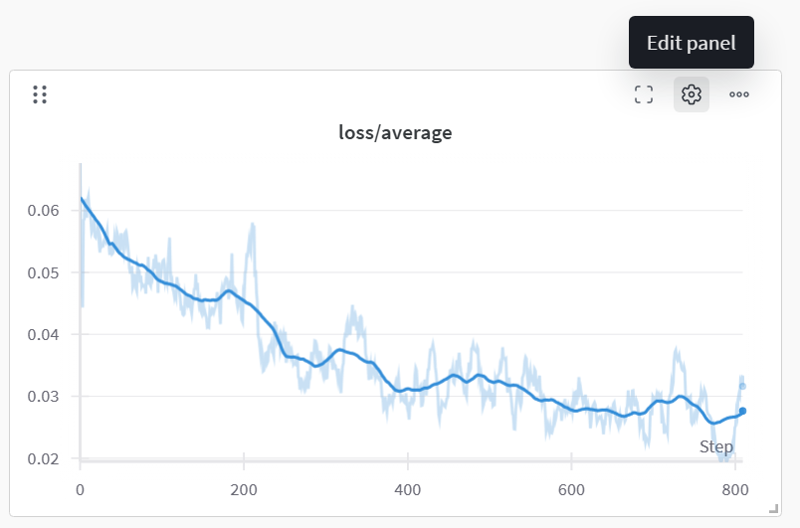
Step 2: Open the current runs and click the gear icon "Edit Panel" in the Loss/Average graph
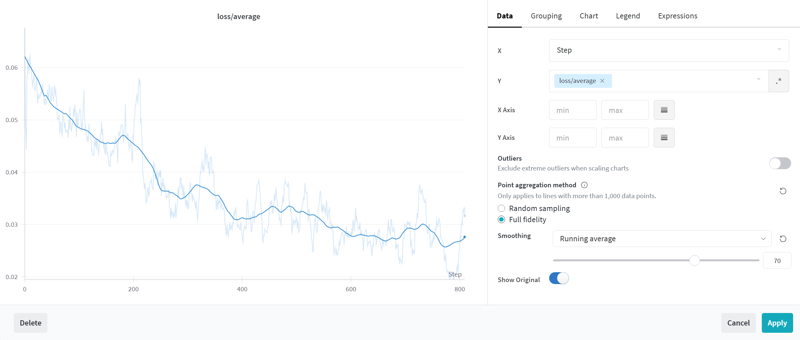
Step 3: In the data panel, scroll down and edit the "Smoothing" option, change it to "Running average" and move the slider to 70, then click apply.
How to pinpoint the "best" model?
Step 1: Look at your loss/average graph.
Step 2: Analyze the graph to see if it has stopped learning (The slope stopped going down after a few hundred steps). If the slope stopped going down, go to step 3. If it hasn't stopped, go back to step 1.
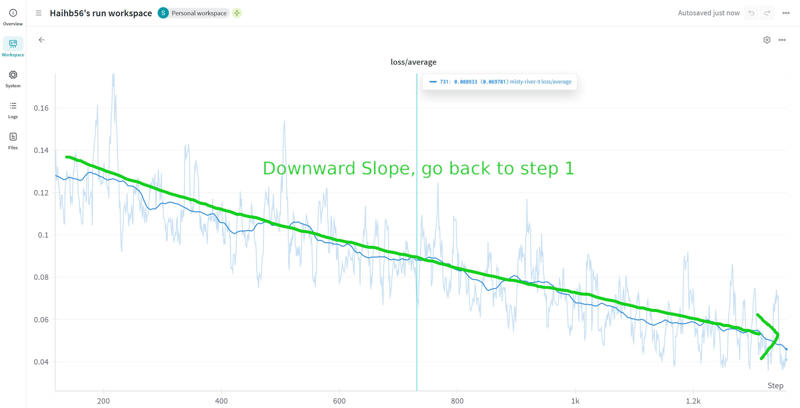
Step 3: Find the lowest point of the graph before it stops going down, and trace the step back to the nearest epoch.
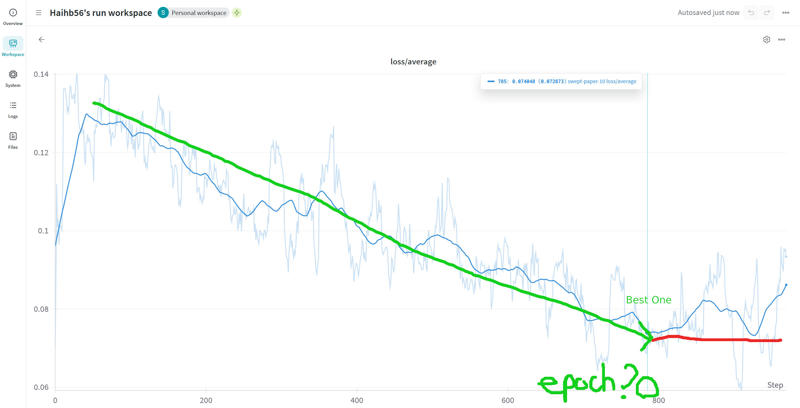
Step 4: Download the model at the nearest epoch, this should be the best model, you can stop the training now!
Conclusion:
Training a Lora model for Hunyuan Video is a multifaceted journey that combines creativity with technical expertise. Throughout this guide, we've covered everything from sourcing and processing high-quality images to crafting precise captions that effectively teach your model to recognize nuanced details. We've also walked through the setup and advanced configurations of Musubi Tuner, ensuring you have the right tools and environment for a successful training process.
Remember, every step—from image selection to tweaking training parameters—is an opportunity to fine-tune your model and push the boundaries of what it can achieve. Your careful attention to details like aspect ratios, caption consistency, and proper configuration is key to achieving a model that not only performs well but also aligns with your creative vision.
As you embark on your training journey, keep experimenting and adjusting your approach based on the feedback you see in your loss graphs and model outputs. Every iteration brings you closer to mastering Lora training.
Thank you for reading this comprehensive guide. Now, it's time to put your newfound knowledge into practice. Happy training, and may your models exceed your expectations!


