有不少人問 該怎麼做LORA 就整理成一篇文章
如果不知道怎麼做的 可參考看看
用Miss HOKUSAI 百日紅 sarusuberi 做實例
https://civitai.com/models/1361386/miss-hokusai-sarusuberi
1.先找圖片素材
建議網站:
2. 1個人物要穩定 需要5到10張圖片, 最好有各種角度 表情,如果要常用的衣服 可加上專用的TAG.
例如: A_kimono , A_bikini,
大小跟尺寸 比例 我沒有太在意, 一開始有去除背景.
但後來發現效果差不多.就沒去背了.
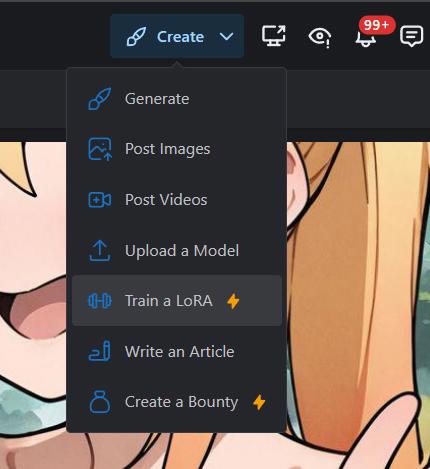
3.蒐集好足夠圖片後,就可以開始製作.選Create 的 Train a LoRA
4.選擇分類
Character = 人物角色
Style = 畫風 風格
Concept = 某概念 或 體位
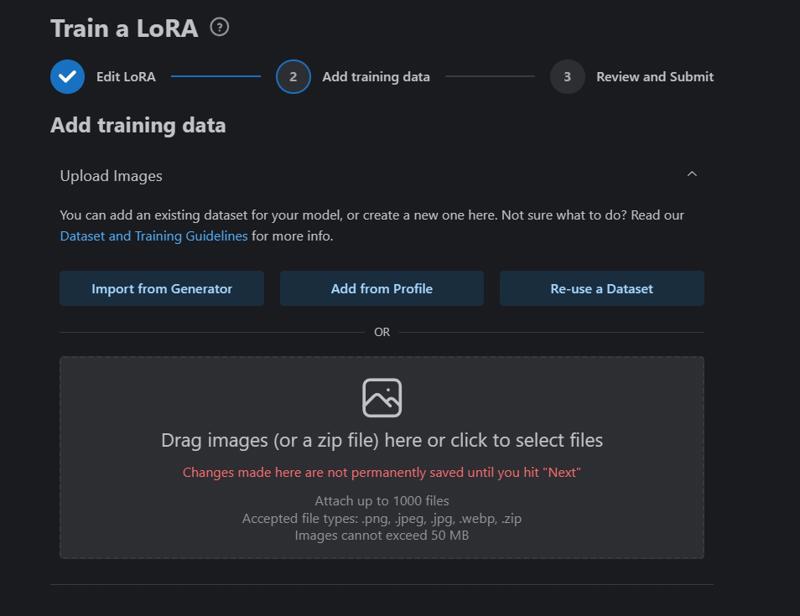
5.上傳圖片 把收集的圖片放進去. 少則20張 多則 1百多張. 角色越多.通常圖片越多.
但同樣角色 不需要蒐集太多張也可以.
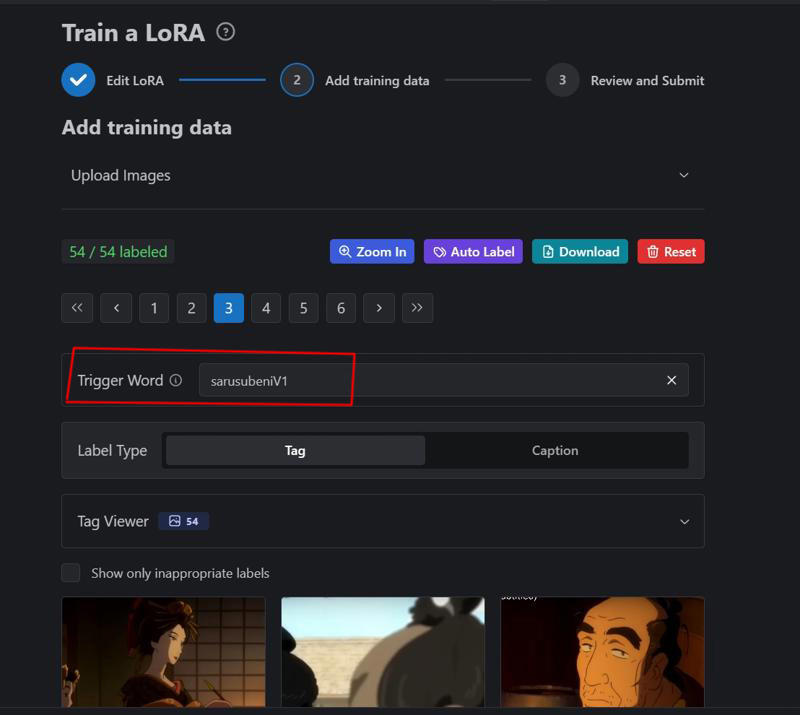
6. 設定 Trigger Word (觸發詞), 不一定要設 但感覺設了 效果較好.
記得不要跟 普通提詞 可能重複的文字. 最好是 玩全新的造詞.
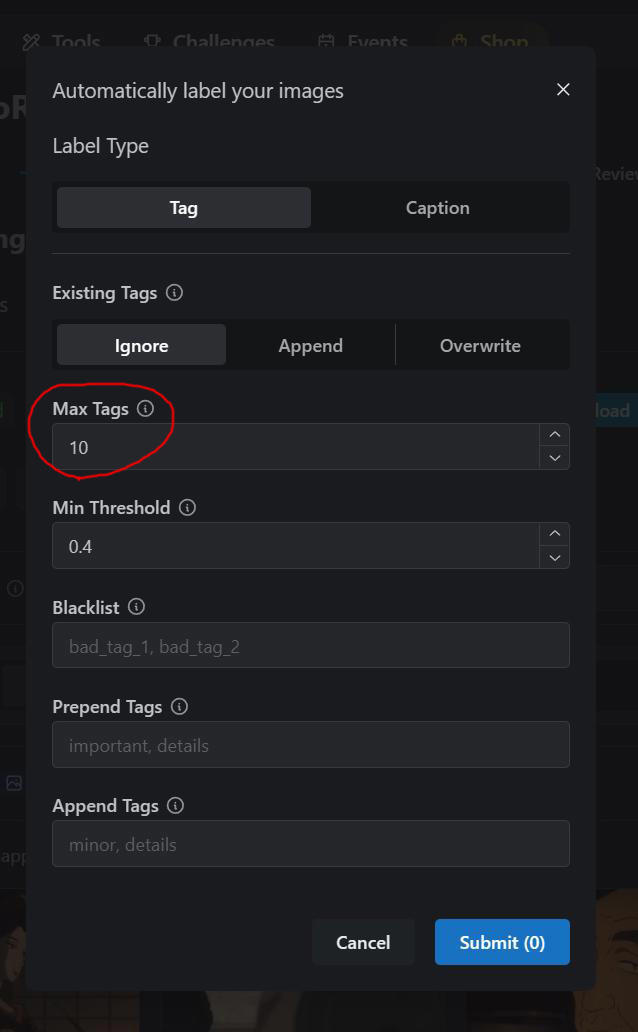
7.選擇Auto Label 自動提詞
系統會幫你 自動上標籤 TAG. Max Tags = 系統.最多幫你上多少個標籤, 通常我用原本設定10個
有時系統 會當機,一直無法結束. 需要用整理網頁 重上.
8.再來上個別人物的 專用 TAG. 例如 女主角 m_oei,
m 是這個作品的 第一個字母 後面接 人物拼音.
這樣就不會跟一般提詞重複.
如果一張圖片 同時有兩個人物 就放兩個.
例如 m_oei, m_hokusai,
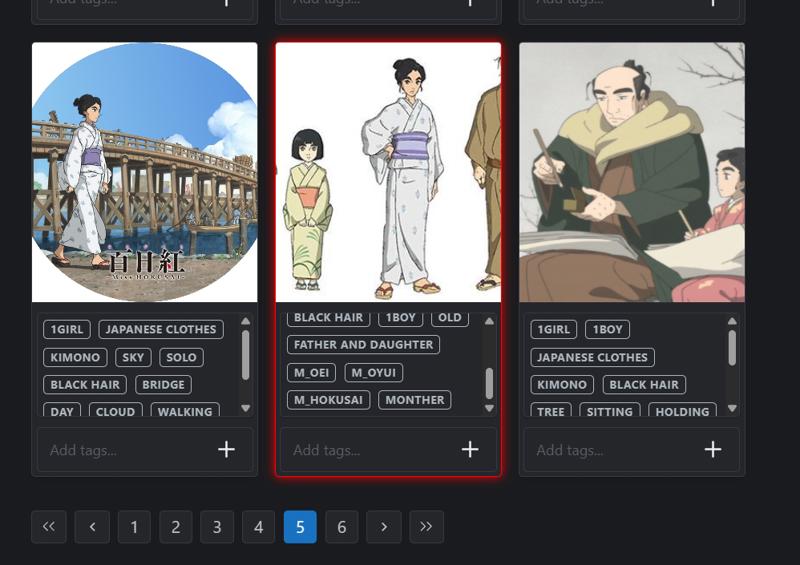
9. 出現紅色框 代表 這張圖 有系統 不能使用的題詞
例如 loli, shota, mother and daughter,
記得刪去 才能進行 下一步
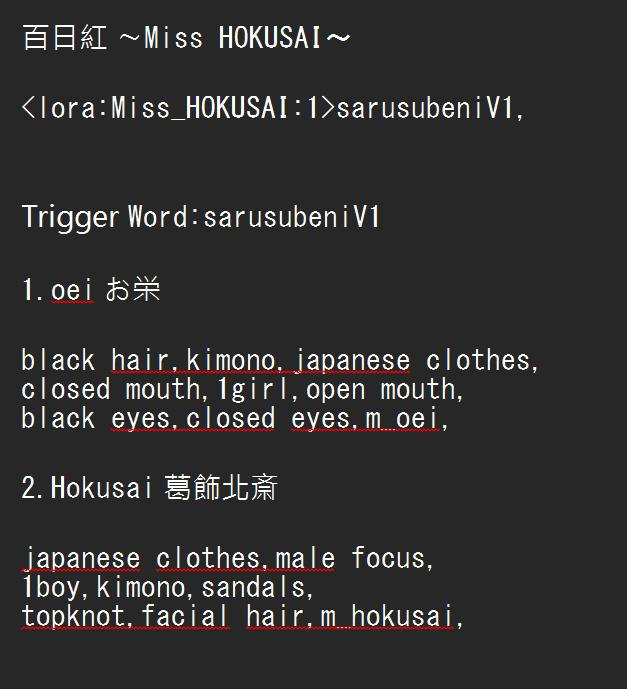
10.我習慣用文字 的記事本,把人物的 提詞 整理出來,
下次使用就 可以很快找到.
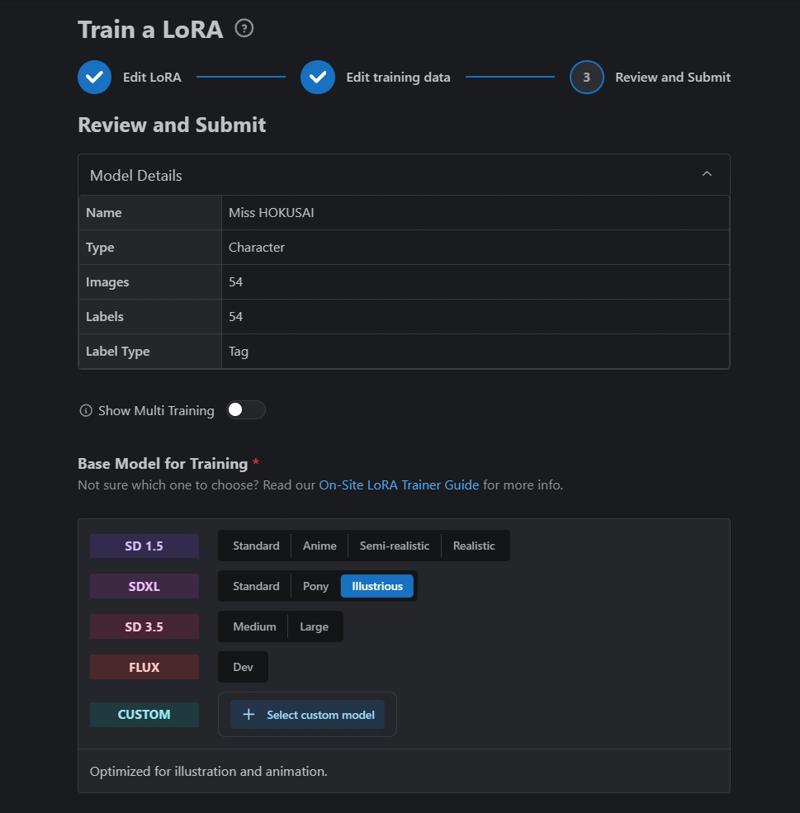
11.到最後一步 Base Model for Training 在這邊選擇 模型種類
SDXL 的 Illustrious ,
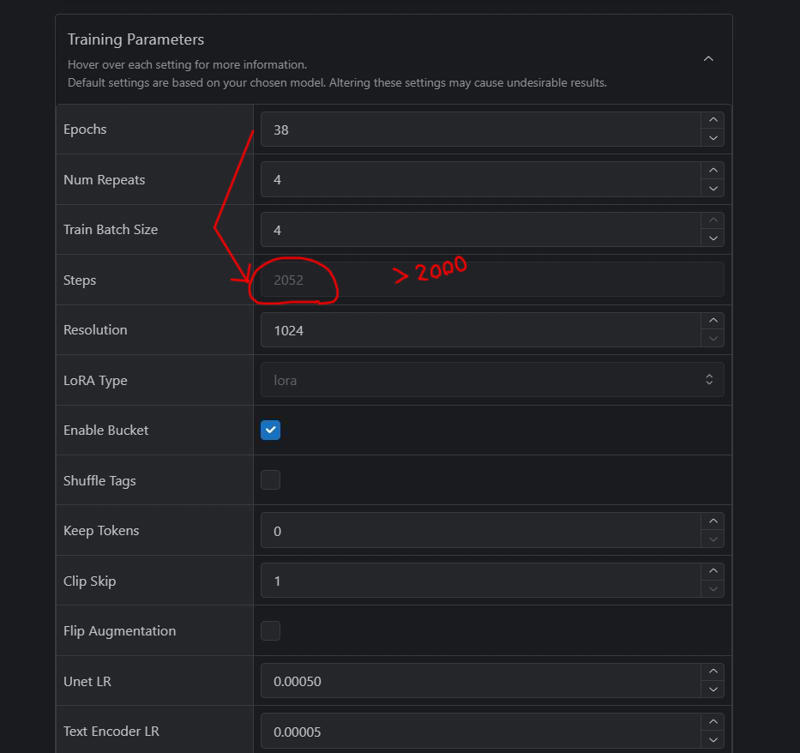
12.Teaing Parameters 這邊 我只調整 Epochs 大小
調高到 Steps > 2000 以前我用1500.但發現2000 效果比較好.
Clip Skip 選1
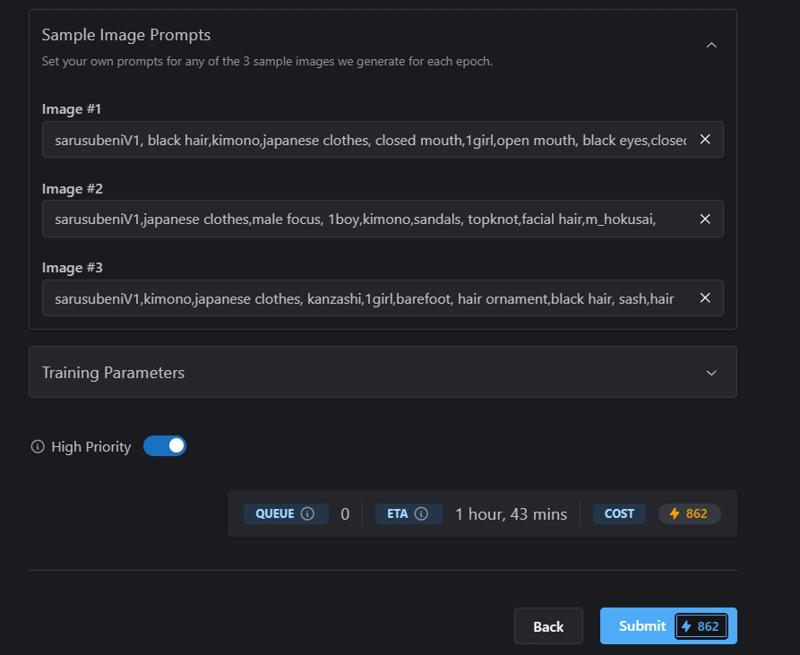
13.High Priority 我通常會點*(可能效果好一點,或是早一點訓練完成)
最終成本約860左右 之後按下Submit
等訓練完成即可.通常要一個小時左右.
14. Sample image Prompts
可以設三種 提詞 看預覽效果.通常放最重要的三個人物.
觸發詞 + 人物的提詞. 不寫也可以.系統會隨機生成內容.
PS. 收集圖片 跟 上TAG 分類 最花時間.其他還好.
Buzz 點數應該是用不太完. 所以不用太節省.
Concept 版本 的製作方式大致相同 有空再寫
~~~~~~~~~~~~
Experience in Creating an Illustrious LoRA (Character Edition)
Many people have asked how to create a LoRA, so I’ve compiled it into an article.
If you don’t know how to get started, feel free to take a look.
Using Miss Hokusai: Sarusuberi as an example:
https://civitai.com/models/1361386/miss-hokusai-sarusuberi
Gather Image Materials First
Recommended websites:Stabilizing a Character Requires 5 to 10 Images
It’s best to have various angles and expressions. If you want to include commonly used clothing, you can add specific tags.
For example: A_kimono, A_bikini.
I don’t pay too much attention to size, dimensions, or proportions. Initially, I removed backgrounds, but later I found the results were similar either way, so I stopped bothering with it.Once You’ve Collected Enough Images, Start Creating
Go to "Create" and select "Train a LoRA."Choose a Category
Character = Character role
Style = Art style
Concept = Specific concept or pose
Upload Images
Put the collected images in. Fewer images might be around 20, while more could be over 100. The more characters, the more images you’ll typically need.
However, for the same character, you don’t need to collect too many images.Set a Trigger Word
It’s not mandatory, but I feel setting one improves the results.
Make sure it’s not a common prompt that might overlap with others. It’s best to create a completely new word.Choose Auto Label
The system will automatically add tags for you. Max Tags determines how many tags the system assigns—usually, I stick with the default setting of 10.
Sometimes the system crashes and gets stuck. In that case, you’ll need to refresh the page and re-upload.Add Specific Tags for Individual Characters
For example, for the heroine: m_oei.
m is the first letter of the work, followed by the character’s name in pinyin. This avoids overlap with generic prompts.
If an image has two characters, add both tags.
For example: m_oei, m_hokusai.Red Boxes Indicate Problematic Tags
If a red box appears, it means the image has tags the system can’t use, like loli, shota, or mother and daughter.
Delete those tags to proceed to the next step.Keep a Text File for Tags
I like using a notepad to organize character prompts. It makes it quick to find them for future use.Final Step: Base Model for Training
Here, select the model type. For SDXL’s Illustrious, choose that.Training Parameters
I only adjust Epochs here. I increase it until Steps > 2000. I used to use 1500, but I found 2000 works better.
Set Clip Skip to 1.High Priority Option
I usually check this (it might improve results or speed up training).
The final cost is around 860. Then hit "Submit" and wait for training to finish—usually takes about an hour.Sample Image Prompts
You can set three prompts to preview the effect. I usually include the three most important characters.
Use the trigger word + character tags. If you don’t write anything, the system will generate random content.
P.S.
Collecting images and tagging them takes the most time. The rest is pretty straightforward.
Buzz points don’t seem to run out easily, so no need to skimp on them.

