

Edit 29.6.25:
The workflow is now even more easy :)
-Removed the SET/GET nodes, every node now connects with only the pipe.
-The "Loader" module now have all 3 prompts.
-The sample image changed a bit even with same settings, updated images and text to reflect the changes :)
Introduction:
Hello :)
I would like to share my beginner workflow from an complete beginner to other beginners in Comfyui. My plan is to share every workflow as its own article and explains as easy as I can how it works. I will use as few custom nodes as possible for it to not get overwhelming. I do however expect you to have an basic understanding on how ComfyUI works, how to install custom nodes, where to put checkpoints etc and that you have ComfyUI manager installed.
I primarily use SDXl-->Illustrious-->Animij, but the workflows should work with any SDXL and SD1.5 checkpoints, so far I have not used any specific SDXL nodes. They will NOT work out of the box with Flux.
Modular-workflows:
All are going to be modular. By this I mean that each group should be easy to connect together though the pipe. Each "node" has its own function.
No trickery:
The example images is not edited or run though other nodes other than shown in the article.
If you use the same settings and same workflow, you should get the same result.
Custom-Nodes:
When opening the workflow, it should prompt if you don’t have the right custom-nodes installed.
You can also go to Manager-->CustomNodesManager--->In Workflow to download them from the ComfyUI Manager.
The ones used here is:
-cg-image-filter
-ComfyUI-Easy-Use
My Hardware:
-Amd Ryzen 3700X
-Nvidia RTX 2060 (6GB)
-32GB RAM
-Windows 10
The Nodes:
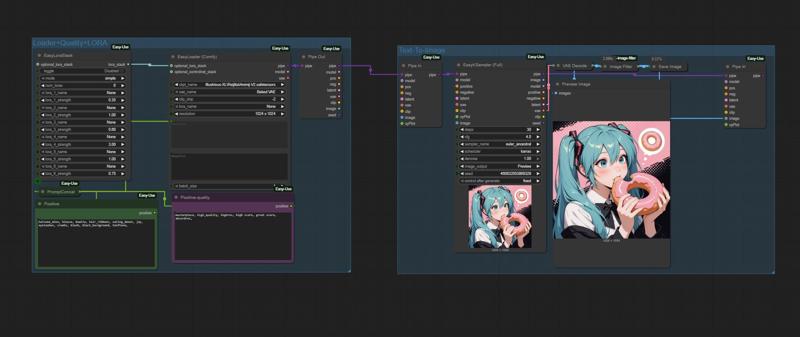
Loader+Quality+LORA: This is the main node/module for most of the workflows I use.
It has an LORA stacker, and an EasyLoader.
All 3 prompts are typed in here in their separate boxes. Quality and positive gets combined, the quality gets added first to the prompt string.Negative prompts and quality prompts are typed in here, they carry over to other nodes. It gets the positive prompt from a set of SET/GET nodes (think of them as an wireless connection). Everything is then sent though the Pipe to other nodes/modules.
Text-To-Image: This node/module gets the checkpoints and LORA`s from the Pipe. It has the positive prompt that gets sent back to the Loader though the SET/GET nodes.
An finished image is first sent to the "ImageFilter" that gives you an pop-up where you can select the image(s) before its saved. This is very handy if you generate more than 1 image at the same time and don’t want to save them all.
Everything also gets sent to an Pipe-IN, where the pipe from the KSampler and the finished image is connected so it can be connected easy to other nodes/modules
Files:
The zip file contains the sample image, the workflow and the 2 modules as separate workflows
Only the one named "Text-To-Image+LORA" will work, the two others with the separate modules wont work alone.
The workflow uses LazyNeg embedding in negative prompt
The model/checkpoint is Animijv2