
Here on Civitai is the "Bounty" section. In this section, users propose challenges, whether in image or model generation. It's always interesting because it offers excellent opportunities to practice.
So, I came across this bounty from @stygianwizard42 : workflow for the creation of sketch frames from video. This article details the workflows I implemented to address this request.
We will also see how we can go further with video manipulations.

The basic idea here is to manipulate a video by decomposing it into individual frames, then process all frames separately before finally recomposing the video from the processed frames.
This is not a very complex workflow however, depending on the lenght and resolution of the video, it will require huge ressources that might be too much for your computer configuration.
But there is a solution to this: split the initial video into shorter parts than can be processed separately.
So, I will propose you a simple workflow to split and recompose your videos. And in the main part, I will explain the main video manipulation workflow.
Basic video spliting and composition
Please, find the attached workflow:
Workflow 1 - video spliting.json
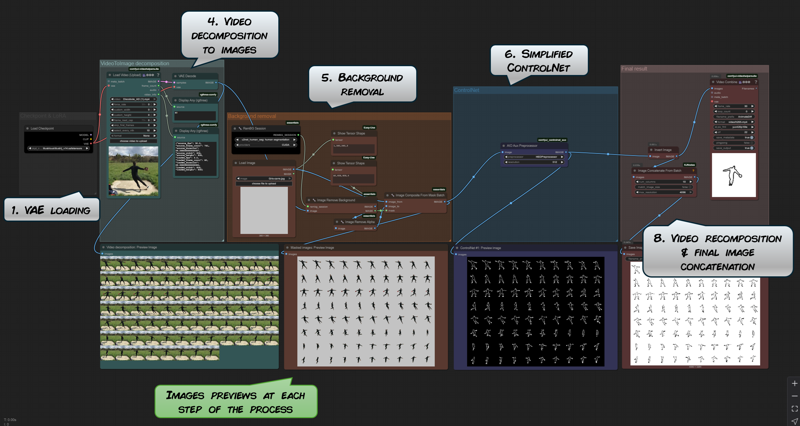
This is the complete workflow explained:
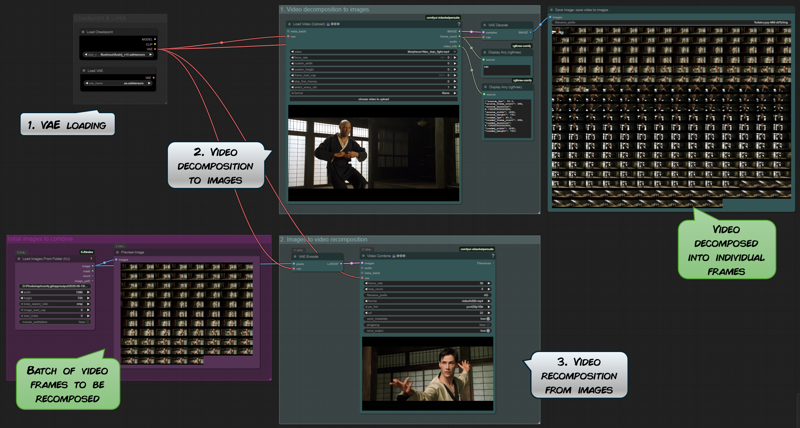
The video is based on two nodes from the custom comfyui-videohelpersuite collection.
The Load Video (upload) node breaks the video into frames and also provides important additional information about the video (such as frame rate and dimensions).
The Video Combine node performs the opposite operation: it recombines individual frames loaded from a folder to turn them into a video.
In the example above, the video shows the beginning of the fight between Morpheus and Neo (from the movie The Matrix). This allows us to precisely isolate Neo's first movements.
The main workflow explained
In the main workflow below, I assume that the video input is processed entirely. If your video cannot be processed entirely, please consider spliting it as explained above.
Please, find the attached workflow:
Workflow 2 - video decomposition.json
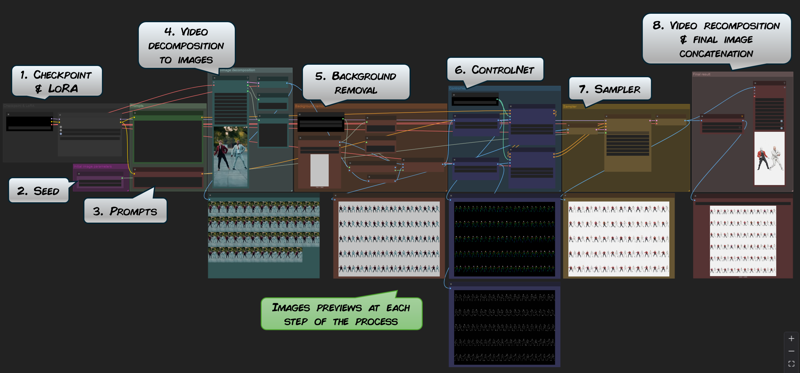
Steps 1. to 3. are pretty universal to all image generation.
Take note however that the seed and the prompt will be applied on all the frames of the video. So if your video has different parts requiring different and specific prompts (for instance if there are two different characters), this might be an issue. See below.
Step 4. is the video decomposition node.
It is the same as in the basic video spliting process explained above.
Depending on your need, and on the lenght of the video, you may wish to extract only a few frames, to build the rotoscope movement extraction, for instance, one frame out of 5 or ten.
This is the select_every_nth parameter in the Load video (Upload) node. If you set it to 1, then every frame will be extracted (which can take some time!).
Step 5. removes the background of the frames.
Depending on your needs and objectives, this step may be useless so don't hesitate to deactivate it.
Step 6. is where the ControlNet is defined.
Depending on the subject of your video, you may select different preprocessors. Here, you will need to experiment with the different parameters to find the best combination.
To get the best of the ControlNet step, there are several parameters to consider. First, the preprocessor to use. Here it depends on the subject of the video, if it as a character or not for instance.
Second, the strength and start/end percentage. The higher those values are, the closer the resulting picture will be to the frame but too high value may affect the result negatively.
And Third, it is possible to chain several ControlNets. In the workflow, I use two ControlNets to get the maximum result but most of the time, it is not necessary and one ControlNet should be enough.
Step 7. is the sampling part of the process.
It is a simple basic Img2Img process. Depending on your machine configuration, models and on the number of decomposed frames to process, this may take more or less time.
The denoise value is a very important parameter to consider here.
 The lower the denoise value, the closer the picture will be to the original frame. However, a higher value means the model has more freedom and that may results in higher variations between the resulting frames.
The challenge here is to find the right combination between the denoise value and the ControlNet parameters. The rule here is a higher denoise value (more freedom in the pictures) means more ControlNet (higher parameters).
Finding the proper combinaison, depending on the video, in a matter of experimentation.
And finally, 8. the last step of the workflow
It is where the final video is recomposed and the final assembly of the reprocessed frames are concatenated.
Examples
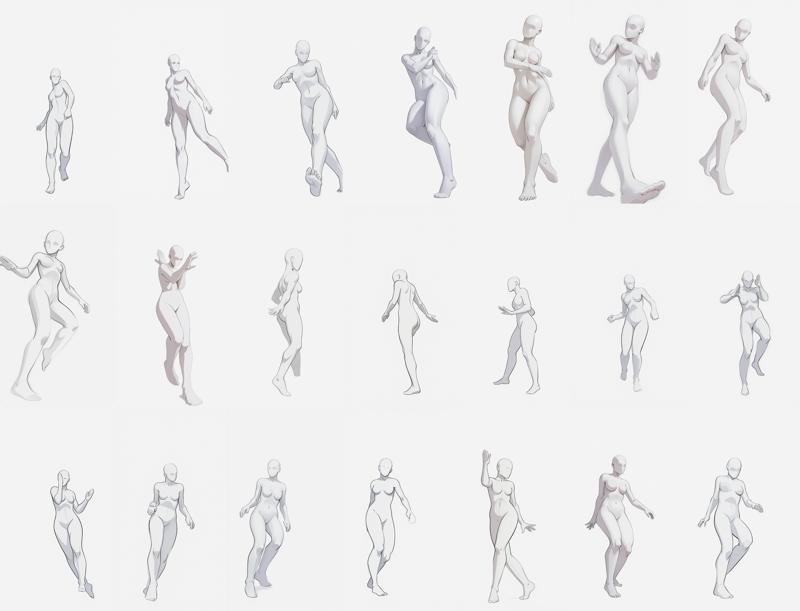
This workflow was designed to decompose character movements from video, as explained in the bounty mentioned above.
Here are some results I got.
First example on a very short video.
Some movements are poorly extracted, mainly because they are too swift in the video, which makes the character a little blurry in the decomposed images.
Nevertheless, I still find the result quite good.
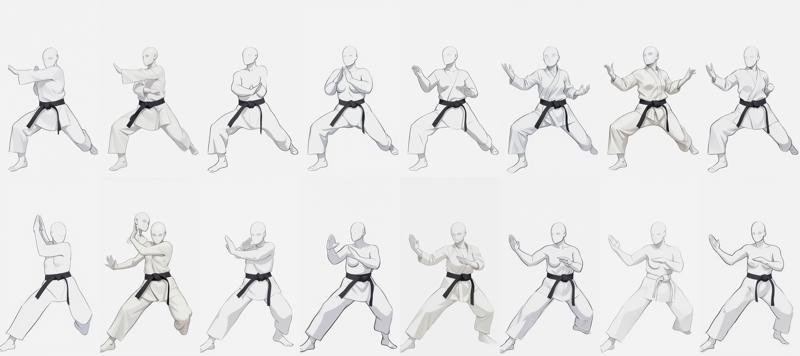
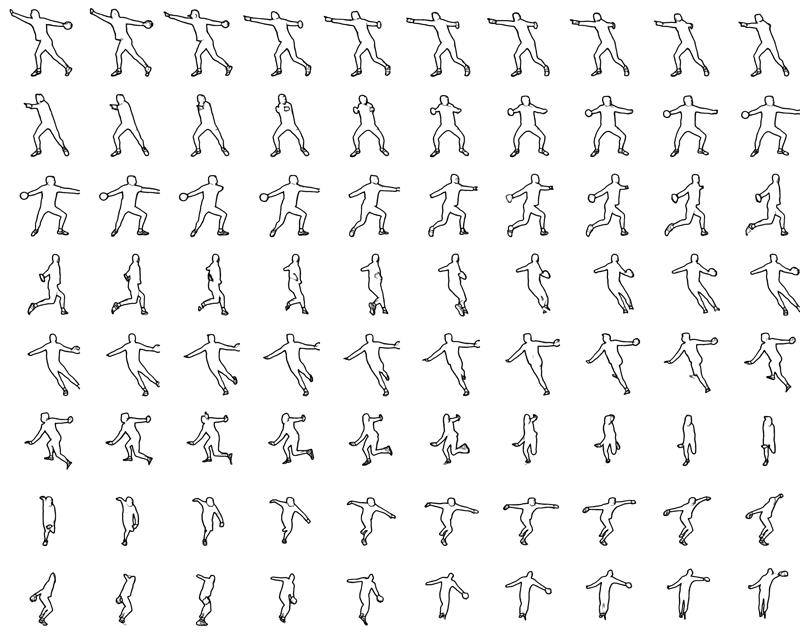
Second example: Shuffle dance
This time, I set a select_every_nth value in the Load Video (upload) node at step 4. This parameter enables you to select every nth frame from the video, effectively downsampling the frame rate. It actually select only one frame in a given number.
Here, movement pictures are extracted every 10 frames.
The extracted movements are much better here even if there are still some small artefacts in the pictures.
Simplified workflow
After several tries, it appears that the main workflow sometimes struggles at rendering properly the character position. Either it can't decide between a front or rear view, or the sampler just produce weird images.
But most of the time, it is okay up to the ControlNet at step 6. So, since the ControlNet preprocessors easily extract the character position, why not just work with them ? This is the purpose of the simplified workflow.
Please, find the attached workflow:
Workflow 3 - video decomposition - simplified workflow.json
Here, the important thing is to select the proper preprocessor. It will depends on the subject video.
The results are quite good. The silhouette of the character is well extracted:
Recomposition of a full video
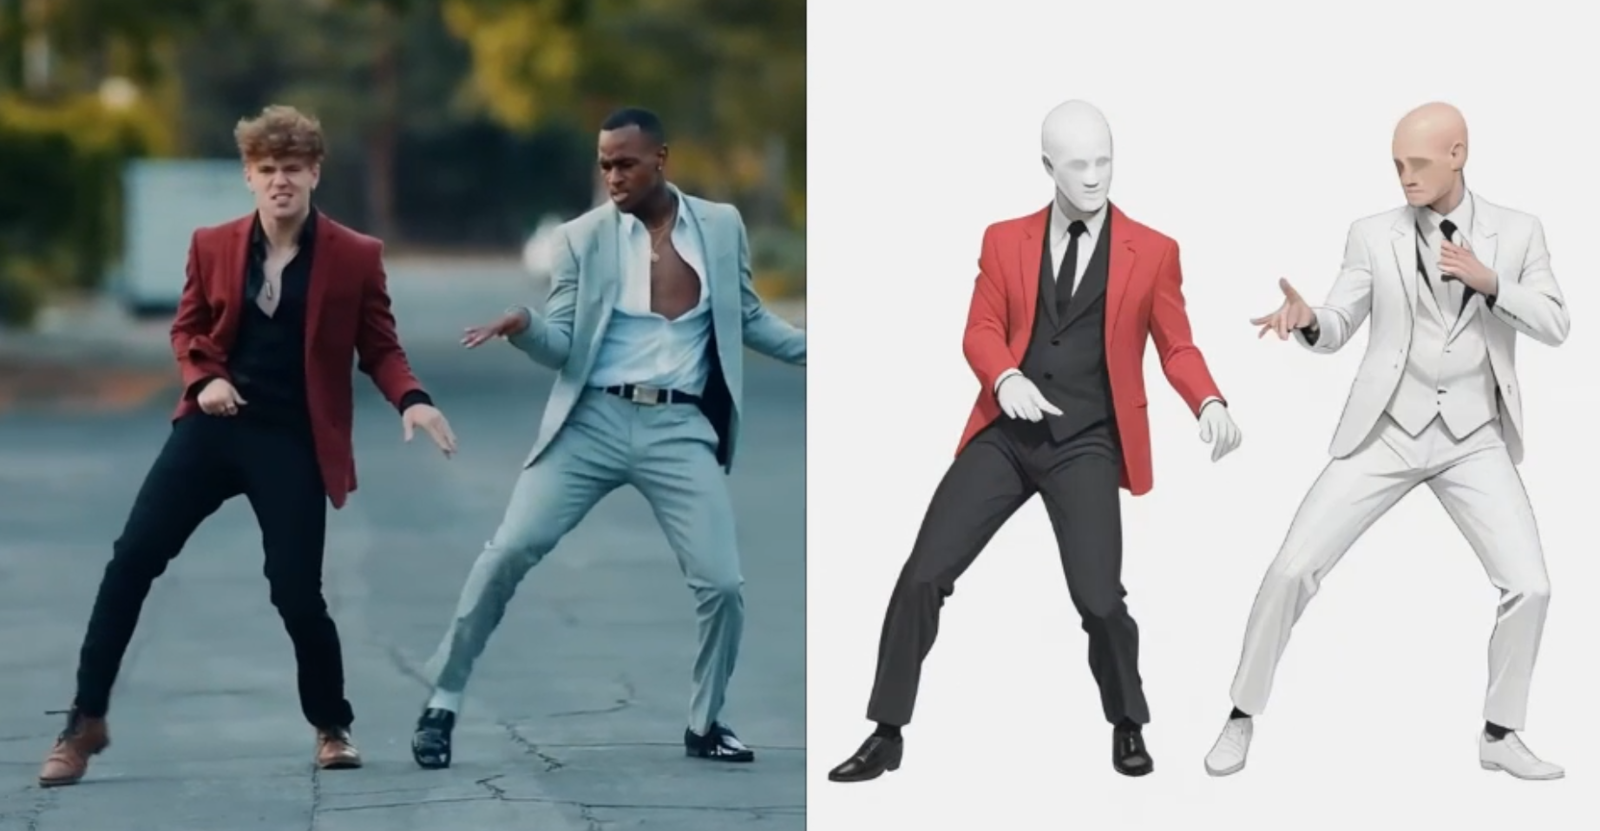
Let's try to go a bit further by reconstituting a full video, that is actually to process all frames from a video.
Original video from @ItsVikwhite (this guy is just amazing!). Music from the Bee Gees - Stayin'Alive.
Here, the recomposed video looks...good, I like the movements of the characters - especially the legs - but the overall thing is a bit odd actually. Let's say it is art!
Actually, the best way to achieve this kind of video restyling is to use AnimateDiff.
The main problem I have with animateDiff is that it is usable only with SD1.5 (or at least, I haven't found any model for anything but SD1.5) and for some reasons, I don't use SD1.5 at all...
To learn more about AnimateDiff, please check here: https://civitai.com/articles/2379/guide-comfyui-animatediff-guideworkflows-including-prompt-scheduling-an-inner-reflections-guide.
Limitations and problems
This workflow allows to extract movements from a video and compose a picture of them. The results are quite good (in my opinion) because we just get rid of the background and we just keep the basic shape of the character. So it is relatively easy.
I guess it also depends a lot on the video being processed so please, provide any feedback you may have in the comments below.
However, the result in producing a restyled video actually are not as good as I expected, mainly because of the problem we all have with AI generation: the difficulty to maintain consistency between two pictures, even when using same prompts, seed and LoRA. Here, since all frames are processed independently, each frames has its own design.
To enhance the final result, the restyled picture should show sober subjects: characters with simple features and clothes (or may be no clothes at all!), minimal or no background.
Background processing
Now that we have our video decomposition, let's try to go further again and have fun with some background processing. Here, we will try to restyle the background of the video and to reinsert the character on the original video background.
Please, find the attached workflow:
Workflow 4 - background extraction.json
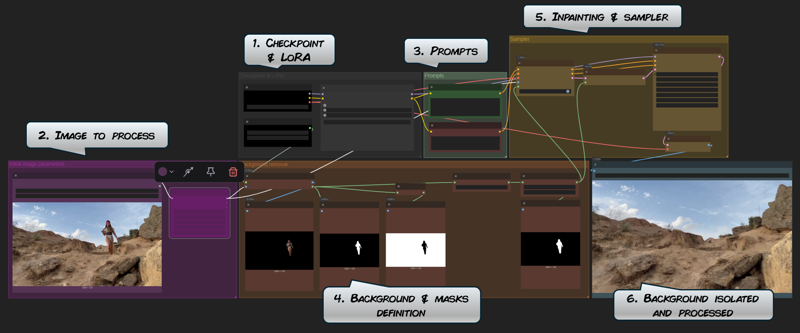
This workflow simply removes the character from the picture and inpaint it, so we can get a picture of the background itself.
The next workflow is:
Workflow 5 - background processing.json
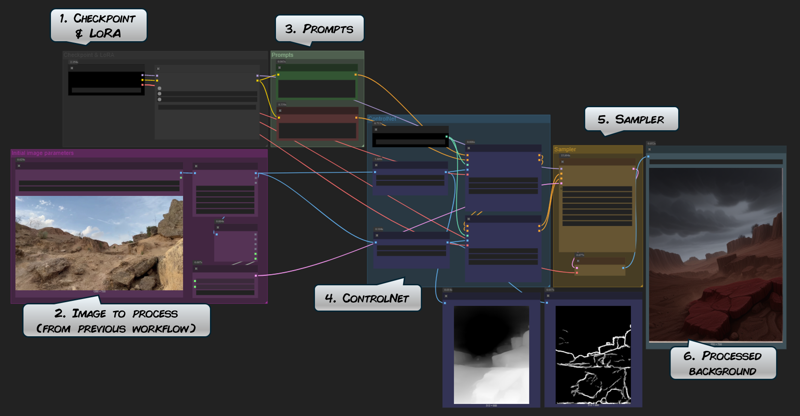
This workflow operate the output of the Workflow 4 to restyle it by using ControlNet. Here you can use different models & LoRAs to design a new background.
To ease manipulation, I chained those two workflows 4 and 5 into workflow 6.
Now we can recompose the video by merging the extracted character into the restyled background. This is what we can achieve:
In that recomposition, I just kept the character as it was in the original video. It is possible to modify the character as well off course, for this, check the differents steps above.
The result is not as good as I imagined in the first place.
First, the background is one fixed image, so this method won't fit if the background in the video is moving (zoom in/out, travellings, or any kind of camera movements) or dynamic (if there are some people walking behind for instance). It is possible to extract & process the background of each indivdual frame but we will soon face the same issue as for the character (see above).
And second, the original character always look...misplaced, even if the restyled background actually match the original. It would require a lot of work to have lights and shadows match properly the ones in the original video.
All of this could be useful if you can use specifically adapted video (simple characters, still background). It will also provide some interesting (well, I hope so :) workflows to process video, image, inpainting and background manipulations.
I hope that you will find this useful or interesting. Please, don't hesitate to give some feedback, possible improvements or may be requests in the comment section below.