Introduction
Achieving character consistency across multiple generations is an shall remain the Holy Grail of image generation. There are numerous descriptions of more or less complicated workflows out there, some of them involving simple tools like face-swappers and others requiring a complicated chain of tools which are sometimes quite difficult to use or have very high hardware requirements. Additionally, after trying quite a few of those workflows, I found many of the the results to be rather unsatisfactory.
Striving to create a beginner-friendly workflow that would yield acceptable results with as little effort as possible (and easily run on my five-year-old workstation with 32GB of RAM and a 8GB RTX2080 Super), I tried to come up with a process that only involves readily available and easy to use tools. After lots of trial and error, I finally succeeded with the workflow that is described in this article. This workflow involves a two-pass iterative approach and only requires the local installation of Forge (a tool that is probably already in use by most people reading this) with two additional plugins, as well as the Civitai LoRA trainer (if you want, you may also train locally, but I have found the results of the Civitai trainer to be superior, and of course, much faster - YMMV).
In this article, we'll be creating an SDXL LoRA for a realistic character which can, for example, be used as an artificial influencer, an artificial fashion model or whatever. I have not tested this workflow for non-realistic characters, but I don't really see any reason why it wouldn't work for cartoon, anime or pixar-style characters as well. You can download the result of my proof of concept (I named her "Ashley") including the final training dataset here: Artificial Character - Ashley
This workflow is by no means perfect, but it did the trick for me. Feel free to experiment with different settings, and please share your comments about any improvements you may find.
Limitations of this Workflow
Due to certain limitations of ReActor when it comes to eye color and skin details, it is quite difficult (if not impossible) to generate a character with freckles, wrinkles or an eye color other than blue and brown. However, I found a solution to this issue - a slightly modified workflow can achieve any eye color and freckles as well. I'll be describing this modification in the last chapter of this tutorial at the bottom of the page.
Also, I strongly recommend you read my separate article on dealing with possible skin artifacts when generating a character LoRa following this method, as it might save you a lot of frustation.
Prerequisites
You'll need the following things ready to use before we start:
Stable Diffusion WebUI Forge by Illyasviel
This tool will be used to generate the training dataset locally on your computer. Just download from GitHub and follow the installation instructions: https://github.com/lllyasviel/stable-diffusion-webui-forgeAn SDXL model to generate your character with
I generally use STOIQO Afrodite (which I also used for "Ashley") or Juggernaut, but any model that will be able to generate the kind of chacater you want will do. Please note that you should generate your character with the model that you'll intend to use with your finished character later, so if you want to go for a fashion model, choose a model that can generate fashion images, if you want nudes, go for a model that can do nudes, and so on.The ReActor extension by Gourieff
This plugin will be required to achieve face consistency across the first iteration. After running forge, go to "Extensions", "Install from URL" and paste the following URL into the field "git repository": https://github.com/Gourieff/sd-webui-reactor-sfw Hit "Install" and restart forge.The ADetailer extension by Bing-su
Not necessarily, required, but highly recommended to improve the quality of the second iteration training data. After running forge, go to "Extensions", "Install from URL" and paste the following URL into the field "git repository": https://github.com/Bing-su/adetailer Hit "Install" and restart forgeAt least 1000 Civitai Buzz
If you want to use the Civitai LoRA trainer, you'll be spending at least 1000 Buzz (if all goes well) for the training of two LoRAs. This Buzz can be yellow (paid) or blue (free), alternatively, you may also train the LoRAs locally or use a different training service. However, as Civitai is the easiest option, we will resort to using that for this tutorial.
Step 1: Establish the face
Once you have all your tools set up, we can start with the first step. Of course, you should have a general idea as to what your character should look like, but let's concentrate on the head for now. We will generate a series of upper-body shots and train a LoRA from them. In the second step, we will use this LoRA to generate a series of full-body images which we will then add to the training images of the first step and use the full set to generate the final full-body LoRA.
Before we get started, we'll need to set some base parameters in Forge. First of all, set the number of sampling steps. I have found 30 to work quite well with the models I use, the default of 20 usually gives slightly lower quality. Also, image resolution is an important factor for LoRA training - for my proof of concept, I used my default resolution of 720x960, however, if your machine can handle it, you should pick one of the resolutions listed here, as those resolutions are native to SDXL and will yield better results. Leave all other parameters unchanged.
Generate the base images
Our first task is to generate a single, close-up shot of the face of our character that will serve as a base for all subsequent generations. Many workflows are trying to force some kind of multi-angle "mugshot" using all kinds of techniques from prompting to controlnet, but I have found this to be unneccessary (other than that, I haven't really succeeded in getting good results with any of those techniques). When generating images with a consistent character, you'll most likely have them look directly at the camera or slightly to the side, so forget about profile views for now. The trick is to generate a 45° angle view (which can be prompted as "three-quarter view") of the face (the kind of picture you would attach to your CV when applying for a new job) and then use ReActor to generate a frontal view from the first image.
In your first prompt, ask for a "three-quarter view" and include all the head features (face, hair color, hair style, hair length, eye color, age, gender, ethnicity, etc.) into the prompt. For "Ashley", I have come up with this very simple initial prompt, as she is quite a random character:
three-quarter view, face of beautiful exotic 20yo woman, shoulder length straight hair, neutral expression, neutral grey backgroundBe sure to include the prompt for a neutral facial expression and a neutral background, as it will greatly facilitate the following steps.
Hint: if you keep getting frontal images, try adding "(three-quarter view:1.5)" to your positive and "front view" to your negative prompt - this mostly sorted it out for me.
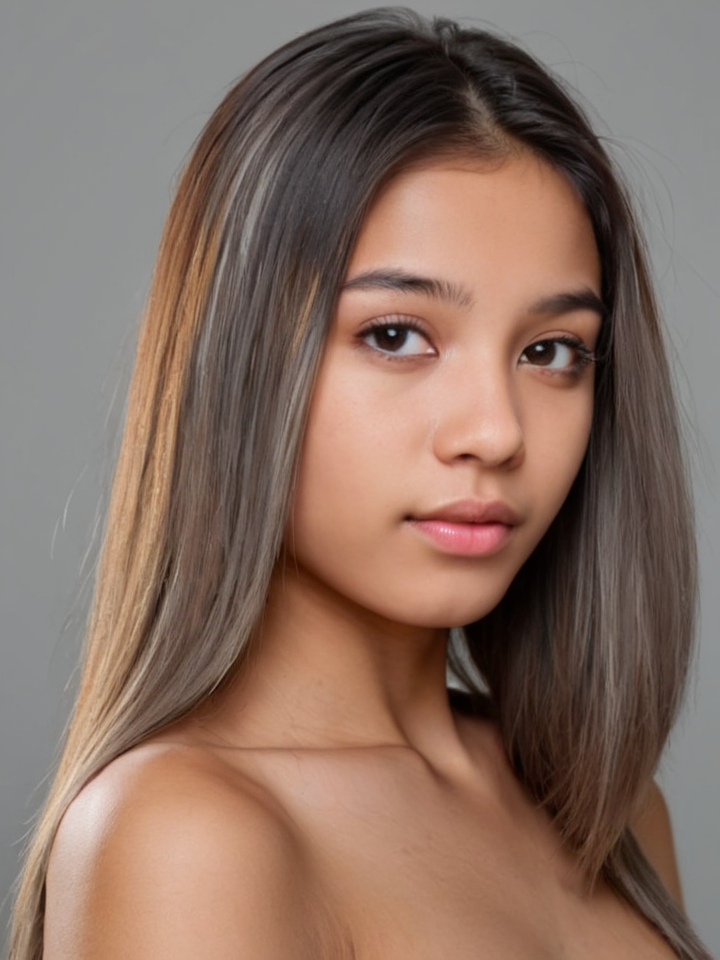
After a few generations (2 batches of 2 images each), I selected the following picture as the base for my character:

Important: Make sure that your selected base image does not contain any defects or artifacts, as those will carry over to all subsequent generations and may ruin your entire training dataset.
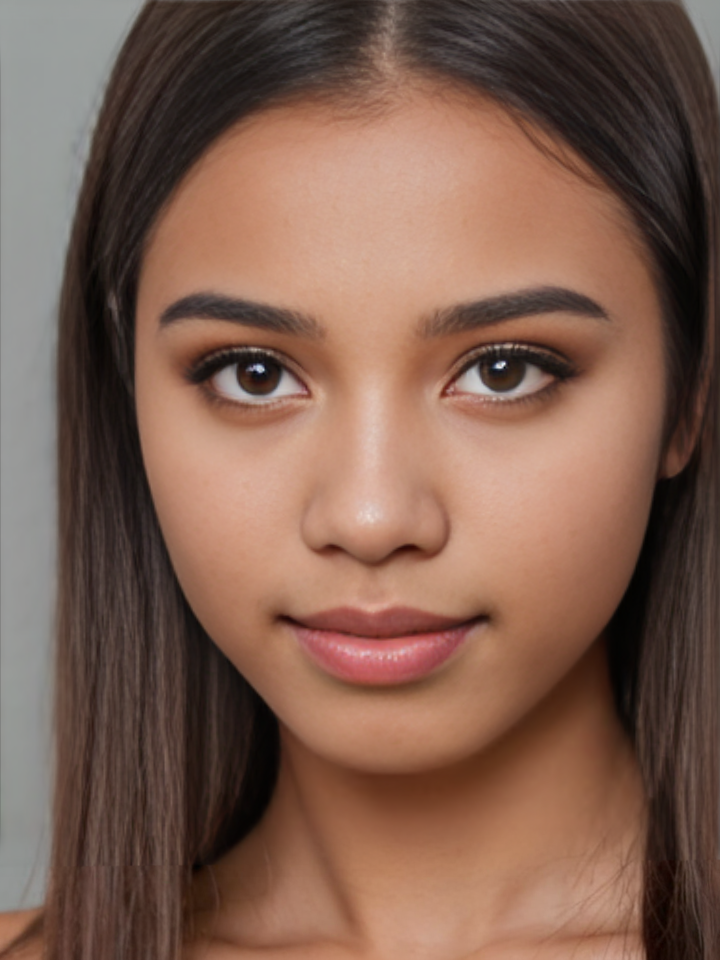
Now, save this image and load it into ReActor (make sure to enable ReActor by checking the box next to the header). With the help of ReActor, we are now going to generate a frontal image with the same face. After loading the image into ReActor and enabling it, replace "three-quarter view" from your prompt by "close-up front view" and generate a few images.
close-up front view, face of beautiful exotic 20yo woman, shoulder length straight hair, neutral expression, neutral grey backgroundCompare these images to the one you choose as the base image, and select one with the best similarity when it comes to your chosen facial features. Once again, make sure the image you select is completely free of defects or artifacts.
This is the one I chose for "Ashley":

We'll now use those two pictures in ReActor to generate a number of upper body shots.
Generate upper body shots
Now that we've got the face set, we should generate a number of upper-body shots in various angles and poses and with various different styles of clothing. Leave ReActor enabled and use your full base prompt - just enhance it with different angles, poses and facial expressions. Don't forget to also include upper-body features like breast size for female characters. Depending on the angle you are prompting for, load either the frontal base image or the three-quarter view base image into ReActor.
Hint: If you feel that your upper body shots include too much of the upper body, put "navel" into the negative prompt. This will most likely give you a perspective that will include head and chest only.
Here is an example prompt from my training dataset:
upper body portrait, beautiful exotic 20yo woman, shoulder length straight hair, wearing strapless top, medium breasts, smilingCave: You may feel inclined to also including full profile (side) views. However, I can promise you, you won't receive good results with ReActor (or any other face-swapping tool) which may easily ruin your training data. Actually, if you desperately want to include profile views into your training dataset, wait for the second iteration - it is going to be a lot easier there.
You may get a little creative here, we are aiming at 8 to 10 face and upper body images (including the two we generated initially) - yes, 8 to 10 are actually enough. If you need some inspiration, I have posted my full initial training dataset including the generation tags, so feel free to browse around to come up with prompt ideas.
Again, make sure the images you select do not contain any defects or artifacts, if hands are visible, make sure all fingers are present.
Train the face LoRA
Now that we've got our initial training dataset of 8 to 10 face and upper body images, it's time to train our model to consistently generate this face. For this, we'll train a LoRA which can be plugged into our base model whenever we want to generate images with our character.
The easiest way to train a LoRA is using the Civitai Generator (which is chargeable, but inexpensive), as it provides all the tools required to create a high-quality model from our images. If you are experienced at training LoRAs locally or on a different service, feel free to what you're accustomed to - for the sake of simplicty, I'll only describe the process on Civitai here.
First of all, zip up your 8 to 10 generated images. Next, hit the arrow next to the "Create" button at the top right of Civitai and select "Train a LoRA".
Now, select "Character" and enter a name for your LoRA. As this first LoRA we'll be generating is a face-only model, I named the model "AshleyAIFace". After hitting "Next" and acknowledging the Terms of Service, drag your zipped images into the box.
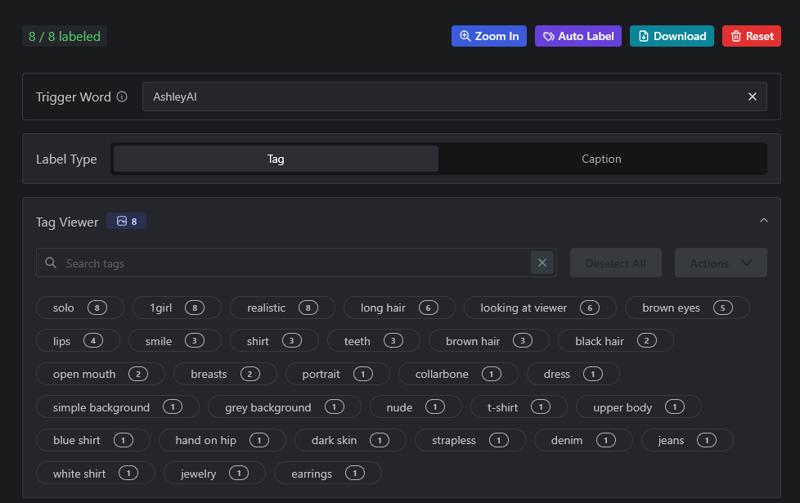
After your pictures have been uploaded, they will be displayed on the site. Next, hit the "Auto label" button at the top of the images, leave all settings unchanged and start the labelling process (this may take a while or sometimes fail completely - just try again, the labelling is free of charge).

Now, all our training images should be tagged with more or less keywords describing what's being shown in the pictures. In order to properly train our character, we need to remove all tags that describe the likeness of our character. Expand the "Tag Viewer" box and select all keywords that describe the character itself - including hair color, facial features, skin color, eye color etc. In the example below, we'd have to select "brown eyes", "brown hair", "black hair", and "dark skin". Now remove those tags by selecting "Actions" and "Remove selected". This will allow the model to learn those attributes from our training pictures.

Also, enter the name of your character into the "Trigger Word" input field, even though that's not strictly necessary. I just put in "AshleyAI" here.
Next, continue to the next page where we'll set up our training parameters. Select "SDXL Standard" as the base model and expand the "Training Paramters" box. Change "Epochs" to 20 and set "Num Repeats" so you'll end up with a value of around 1000 in the "Steps" field (this is automatically calculated based on Epochs, Num Repeats and Train Batch Size). Please note that ending up with more than 1000 steps will make your training more expensive.
Enable "Shuffle Tags" and "Flip Augmentation", set "Network Dim" to 16 and "Network Alpha" to 8 and choose "Prodigy" as the Optimizer. Leave all other parameters unchanged.
When you're done, hit the "Submit" button which will charge the displayed amount of Buzz from your account.
Now, wait until training has finished, which will usually take about one hour.
Step 2: Establish the body
Once training of your face Lora has finished, download the file for the 20-epoch-Lora (which you can find at the top of the list) and install it in forge (the .safetensors file goes into the /models/Lora directory). Finally, restart Forge or hit the reload button in your Lora tab. If you only intend to create upper body shots of your character, you're all set and able to use the Lora right away. However, if you also want to create full-body shots (or even nudes), I strongly recommend to proceed to the second step of this tutorial. Don't get me wrong, you'll still be able to create full body images using only the face lora, but you'll always have to take care of the body proportions and details to match in between generations; that's why I included this second step.
Generate full-body shots
First of all, you need to figure out at which weight you can use the face lora without distorting the entire image. If you have followed my instructions from above, a weight of 0.7 or 0.8 should be fine. Still, I recommend you generate a few test images to figure out at what weight your Lora works best.
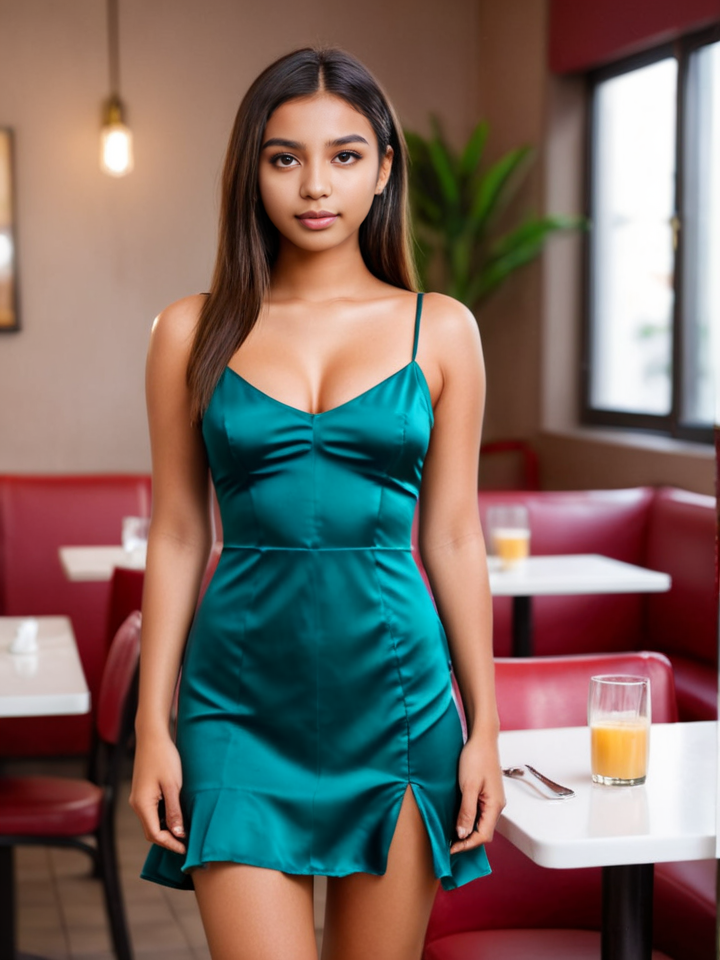
Now, disable ReActor (we won't need this anymore, the Lora will now take care of the facial features) and using your face lora, generate a few different full body shots in different settings, different poses and different clothes. You can refer to my example dataset for ideas, just make sure those pictures are as diverse as possible. When generating those images, include the full prompt you were using while creating the training images for the face lora in order to prevent your base model from deviating too far from the original look and include the description of body features such as body height, weight and breast size. I created the first full-body image from the following prompt:
<lora:AshleyAI:0.6> full body portrait front view of AshleyAI, 20yo beautiful exotic woman, shoulder length hair, medium breasts, wearing short silk dress, in restaurantThis resulted in the following image being generated:

Once again, generate at least 4 images per prompt and select the one, that most closely resembles the intended body type and face. I also recommend enabling ADetailer for the face (without any additional prompt) in order to greatly increase the quality of the rendered faces.
Generate about 8 to 10 full body shots and save them along with your training pictures for the face lora.
Train the full-body LoRA
Once you're done, zip up all the training images (including both the full body shots and the upper body/face pictures), upload them to the Civitai trainer (following exactly the same steps as for the face lora - upload the pictures, have them tagged, remove all tags describing characteristic features of your character, set the training parameters) and start training. Once finished, install the Lora and start generating images with your character.
What about NSFW?
Your Lora created following the steps above will be able to generate nude/NSFW images of your character, depending on the capabilities of your base model. NSFW is not really a capability of a character LoRa, but mainly a feature of your base model. If you want to use your character in NSFW context, use a good NSFW-capable base model and you'll be surprised about the good results.
Dealing with eye color and skin details
As you may have noticed when trying to use ReActor on a face that has an eye color other than blue or brown, ReActor will replace that eye color. The same is true for skin details like freckles or wrinkles, once ReActor swaps in your generated face, the details will be gone.
However, there is an easy solution to that, applicable during the first iteration of your LoRa training. When generating the training images for the face lora, simply ignore freckles and eye color. If you intend to have your final model to have lightly-colored eyes (green, gray etc.), prompt for blue eyes in your original face, in case of dark-colored eyes (brown, black etc.), prompt for brown eyes. Also, don't bother about freckles or wrinkles yet, as you can simply include them in your second iteration dataset.
Once you have your face lora trained, prompt for the desired skin details when creating the images for the second-iteration (full body) training dataset. Also, replace the eye color for the second-iteration dataset by either prompting for a different eye color (works quite well, but you'll have to fight the eye color from the face Lora) or simply use inpainting to replace the pupils.
Warning: If you use this method, don't re-use the images from the face Lora to train the full-body Lora (eye color and skin details won't match), but instead re-generate them with your enhanced prompt using the original face Lora.
Also, if you are experiencing issues with skin artifacts (particularly when dealing with freckles), please read my article on how to prevent that to save yourself from a lot of frustration.


.jpeg)