This guide is out of date with version 4.4 right now, guide will be updated to the new version in the next couple of days. There'll be a backup of the guide as of v4.3 here.
Step-By-Step Guide
ComfyUI - IMG2IMG All-in-One Workflow
This guide is for the IMG2IMG workflow you can find here.
Workflow description:
This workflow is can be used for Image to Image generation.
It let's you select an initial Input Image and then let's you decide if you'd like to do upscaling, detailing and/or image transfer to create a completely new image based on the composition, styling or features of the initial image.
You can find some basic examples of what you can use this workflow for under the "Scenarios"-section of this guide.
Prerequisites:
📦 Custom Nodes:
📂 Files:
VAE - sdxl_vae.safetensors
in models/vae
SAMLoader model for detailing - sam_vit_b_01ec64.pth
in models/sams
Upscale Model (My recommendation, Only required if you want to do upscaling)
4x Foolhardy Remacri - 4x_foolhardy_Remacri.pth
4x RealESRGAN Anime - RealESRGAN_x4plus_anime_6B.pth
in models/upscale_models
IPAdapter (Only required if you want to copy artstyle from images)
Clip-Vision - CLIP-ViT-bigG-14-laion2B-39B-b160k.safetensors (recommend to rename the model file)
in models/clip_vision
IPAdapter - noobIPAMARK1_mark1.safetensors
in models/ipadapter
ControlNet (My recommendations, only required if you want to do IMG2IMG Transfer)
Canny - noobaiXLControlnet_epsCanny.safetensors
Depth Midas v1.1 - noobaiXLControlnet_DepthMidasv11.safetensors
OpenPose - noobaiXLControlnet_epsOpenPose.safetensors (rename)
LineartAnime - noobaiXLControlnet_LineartAnime.safetensors
in models/controlnet
Detailer (My recommendations, only required if you want to do detailing)
Face - maskdetailer-seg.pt, 99coins_anime_girl_face_m_seg.pt
Eyes - Eyes.pt, Eyeful_v2-Paired.pt, PitEyeDetailer-v2-seg.pt
Nose - adetailerNose_.pt(works only/best with anthro noses)
Lips/Mouth - lips_v1.pt, adetailer2dMouth_v10.pt
Hands - hand_yolov8s.pt, hand_yolov9c.pt
Nipples - Nipple-yoro11x_seg.pt, nipples_yolov8s-seg.pt
Vagina - ntd11_anime-nsfw_segm_v3_pussy.pt, pussy_yolo11s_seg_best.pt
Penis - cockAndBallDetection2D_v20.pt
in models/ultralytics/bbox or models/ultralytics/segm (depending on the detailer model)
Recommendated Settings:
There are two settings that'll make your user experience at least a thousand percent better and i highly recommend doing these two small things.
Link visibility
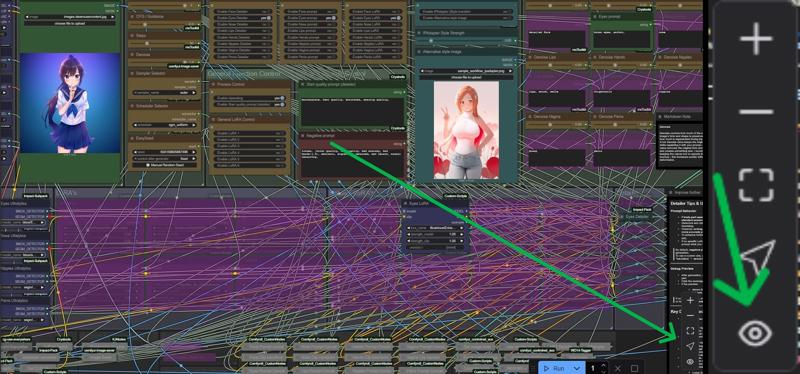
The first is to deactivate Link visibility, as you can see in the background of this Screenshot the links have gotten quite complex in their structure and i can't bother adding another 50 re-routes to make it clean. So i recommend toggling link visibility in the bottom right corner of your ComfyUI.
AutoCompleter
My second recommendation is to use the autocomplete settings from pythongosssss's custom-scripts plugin(required for this workflow). Simply go to your settings(cogwheel symbol, bottom left corner) and then navigate to the "pysssss"-option in the sidebar on the left.
Here activate the "Text AutocompleteEnabled" and "Auto-insert comma" as well as "Replace _ with space". I personally have Loras disabled since i'm using Lora loader instead of loading them via prompt. These are my complete settings:

Once you have set your preferences you can click on "Manage Custom Words".
Go to this model page and download the autotag list incl. aliases. Download the newest version and put the file with "merged" in the name somewhere on your pc.
After that you can click on "Manage Custom Words" and copy the path + filename and then press the "Load" button to the right. Once you do the preview should look like this:
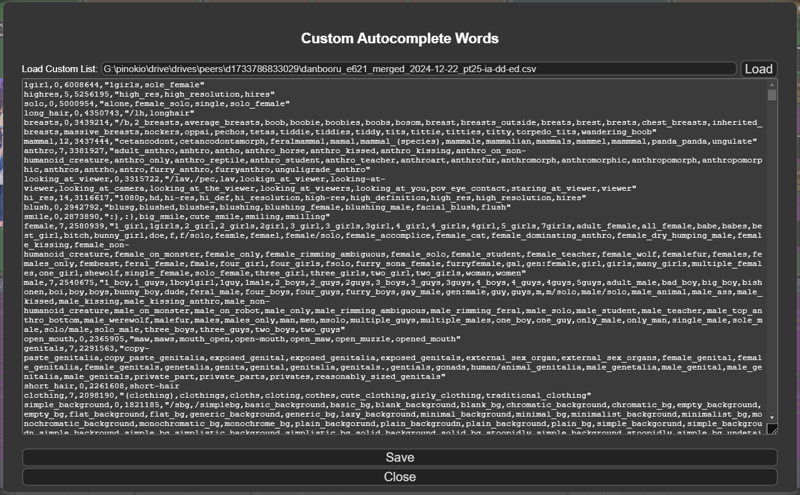
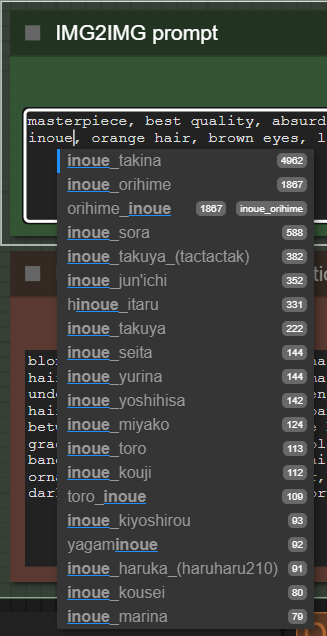
You now have an autocomplete system for your danbooru tags when creating images for illustrious & noobai. You now get suggestions for tags, artists and characters while also having aliases that automatically switch to the correct tag that the models were trained on for the best prompt accuary. It also automatically appends a comma and an empty space after every tag automatically which will be important once we talk about "start quality prompts" and IMG2IMG transfer later on in this guide. Here is a preview of how it can help you find the right tags:
General Term Explanation
Detailer (ADetailer)
The Detailer (often called ADetailer) is used to refine specific parts of an image after the initial generation. It detects body parts or facial features—like eyes, hands, or mouth—using object detection (usually with Ultralytics), and then re-renders those areas at higher quality using targeted prompts and LoRAs. It’s great for fixing anatomy issues or enhancing details like eye color or hand shape.
IPAdapter (Style/Composition Transfer)
IPAdapter is a tool for guiding the style, composition, or identity of your image using a reference image. It uses features from a CLIP model to influence the generation process without directly copying the reference. It’s ideal for tasks like transferring a specific pose, lighting, or even a person’s likeness into a new image while keeping your prompts in control.
ControlNet (IMG2IMG Transfer)
ControlNet is a powerful system that allows you to guide image generation using structural inputs like depth maps, poses, line art, or canny edges. It works in an img2img-like fashion—taking your base image and controlling how the new image is generated based on that structure. It’s extremely useful for tasks where you want consistent composition, pose, or layout across different generations.
HiRes Fix
HiRes Fix is a process that takes your generated image, after upscaling, and then re-renders it with a low denoise value to add detail, improve sharpness, and enhance overall quality at higher resolutions. This is not recommended at resolutions above 2048x3072(2x upscale with default settings) since it basically repaints the picture again.
Node Group Explanation
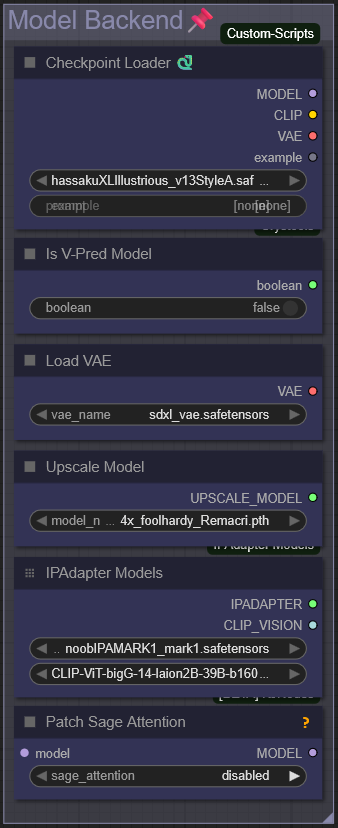
Model Backend
This is where you select the necessary models for each task in the workflow.
Most steps are pretty self-explanatory. If you're using a Checkpoint that was trained with V-Prediction, make sure to enable the "Is V-Pred Model" node.
You can stick with the default SDXL VAE or swap it out for one you prefer—totally up to you.
The Upscale Model does not determine how much the image will be upscaled. While that is usually the case we're using a factor slider later on in the workflow that allows you to adjust by how much the image will be upscaled regardless of what the Upscale Model says.
You only need to download and select the IPAdapter model and the corresponding CLIP model if you plan to use IPAdapter. If you're not sure what that is, check out the "IPAdapter" section further down in this guide.
The Patch Sage Attention node is for advanced users only. Installing Sage Attention and Triton on Windows can be tricky and time-consuming.
For image generation, the benefits are minor—around 2–3 seconds faster per image and slightly less VRAM used. It’s more useful for video generation, which isn’t covered here.
If you still want to try it, you can find a guide here.
All files needed to start generating—except for the Checkpoint—are listed in the Files section above.
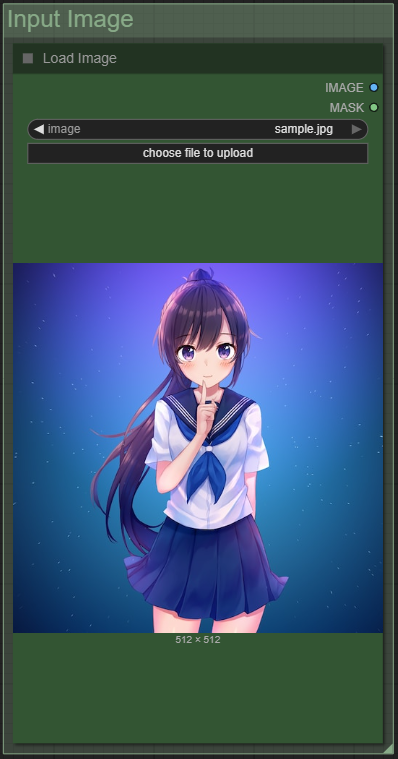
Input Image
This is where you select your input image for the entire process.
The original resolution doesn’t matter—you don’t need to resize, downscale, or upscale anything beforehand. If you’re only doing inpainting or detailing, the image will keep its original resolution. However, during img2img transfer (when generating a new image based on the input), the aspect ratio will be preserved, but the smallest side will be resized to 1024 pixels. This is because SDXL models and their derivatives were trained on 1024×1024 images, and outputs at this scale generally look the best—regardless of aspect ratio.
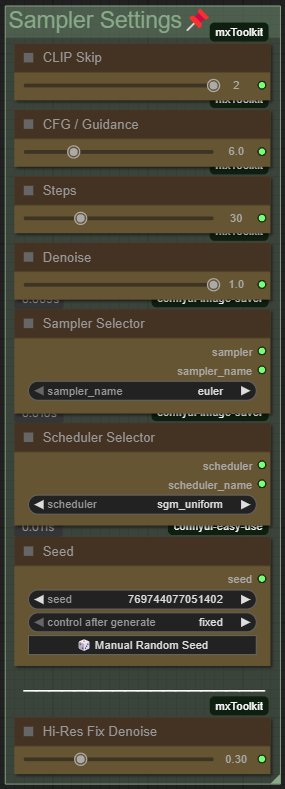
Sampler Settings
This is where you set the sampler settings for the workflow.
CLIP Skip, CFG/Guidance, Steps, Sampler, and Scheduler are applied globally—they affect both the detailer and the img2img transfer (if you decide to use it).
Denoise and Seed settings, on the other hand, are only used for the img2img transfer. That's because we'll have individual denoise controls for each body part later on in the "Detailer Prompts" group.
The "Hi-Res Fix Denoise" slider is only active when "Enable Hi-Res Fix" is turned on in the "General Function Control" group. It controls how much of the original image is overwritten—lower values mean fewer changes. Since a small amount of denoise is needed for the sampler to work properly, I recommend a value between 0.25 and 0.35.
Lower denoise values also reduce VRAM and GPU usage.
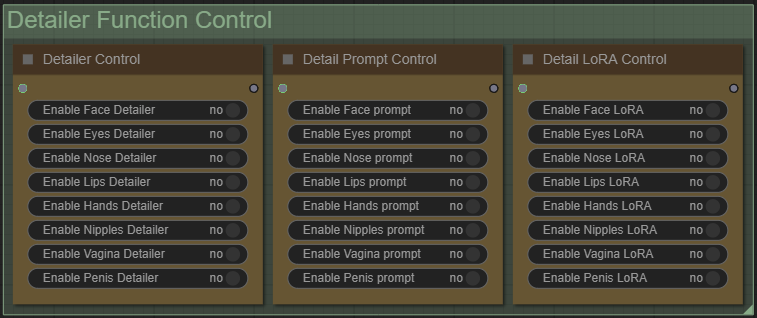
Detailer Function Control
In this section, you simply choose which detailer functionalities you'd like to use.
You can enable or disable each individual body part for detailing or inpainting. If you're not sure what detailing actually does, check out the "Detailer" group explanation further down in the guide.
You also have the option to activate a custom prompt and a LoRA for each specific body part. Prompts can be edited later in the "Detailer Prompts" group, while the LoRAs can be changed in the "Detailer LoRAs" group.
This setup lets you do things like change the eye color using a specific prompt and apply a higher denoise value just to that area. You could also use a LoRA specifically designed for improving hands during hand detailing to fix bad hands, for example.
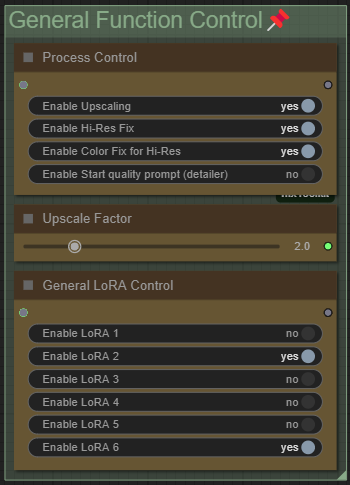
General Function Control
In this section, you can toggle some general features and processes.
Upscaling uses the model selected in the "Model Backend" group. If you're working with a high-res image and only using the detailer, it's best to turn upscaling off—otherwise, a 4096×4096 image could become 16384×16384. Higher resolutions also slow down the detailing process.
For img2img transfer, I recommend leaving upscaling on, since the input is resized to 1024 on the shortest side, and this helps bring it back up after generation.
You can enable Hi-Res Fix to resample the upscaled image with a low denoise value, repainting it for higher resolution and improved quality. It’s recommended to use "Color Fix" alongside it to preserve the original colors, as resampling can sometimes reduce contrast.
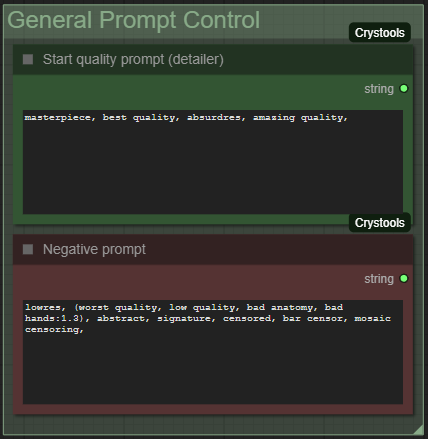
The Start Quality Prompt (in the upcoming "General Prompt Control" group) automatically prepends itself to every detailer prompt. It’s useful for checkpoints that need specific quality tags.
For example:
Start Prompt: masterpiece, best quality, absurdres,
Eyes Prompt: brown eyes
Resulting prompt: masterpiece, best quality, absurdres, brown eyes
Make sure it ends with a comma and a space for clean merging. You can preview it in the "Debug" group.
The Upscale Factor determines how much the image will be upscaled if upscaling is enabled—1.0 means no upscaling at all.
General LoRA Control toggles global LoRAs from the "LoRAs" group. These apply throughout the whole process—great for adding a consistent style or boosting details using a general detailer LoRA.
General Prompt Control
As mentioned in the "General Function Control" group, the Start Quality Prompt automatically prepends itself to all detailer prompts—this is completely optional and can be turned off in the previously mentioned group node.
The Negative Prompt, on the other hand, is used globally for both img2img transfer and all detailers, and is a required part of the workflow.
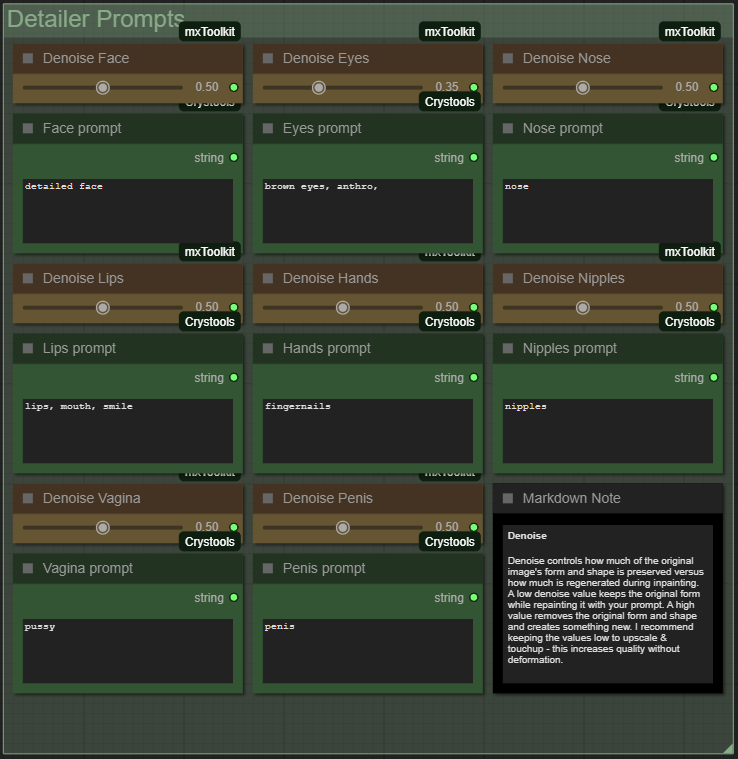
Detailer Prompts
In this section, you can prompt individual body parts. If you're not sure what the Detailer does, check out the General Term Explanation at the top of this guide.
These prompts tell the Detailer what to generate in the regions detected by the Ultralytics model. This is especially helpful if you want to enhance specific features—like changing nail polish color or eye color. It also works well when using a LoRA targeted at a particular body part, allowing you to apply the trigger word only where it's needed.
Another important setting here is the Denoise value.
Denoise controls how much of the original shape, form, and color will be replaced:
A higher value will completely overwrite the area.
A lower value will preserve the original form and just enhance it at higher resolution.
If the anatomy already looks good and you only want to improve quality, a Denoise value of 0.30 to 0.35 is recommended.
If the anatomy is off—like extra fingers—you can increase it to 0.50 or higher and see if the results improve.
As a general rule:
The higher the Denoise value, the more the Detailer will ignore what's already in that area.
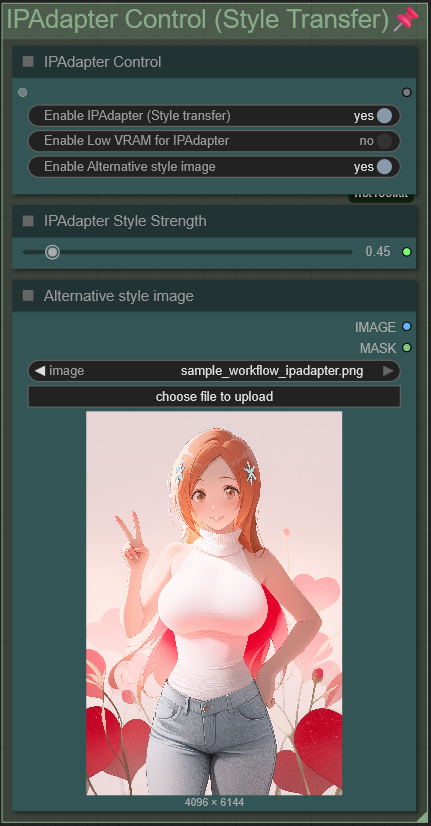
IPAdapter Control
If you're not sure what IPAdapter does, check out the General Term Explanation at the top of this guide. But in short: it allows you to transfer the style and/or composition of a reference image into your generated image. This works by injecting the visual "likeness" of the reference into the CLIP model during generation. It's especially useful in the img2img transfer group to preserve the original style, and even more so during detailing, where you want inpainted areas to match the original look.
We won't be using IPAdapter for composition copying, since that's handled more effectively with ControlNet during img2img transfer.
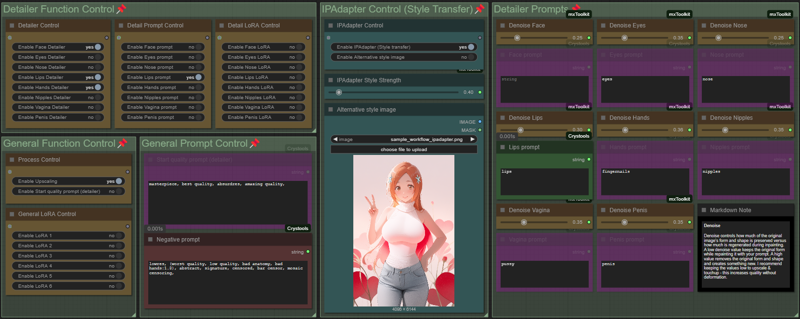
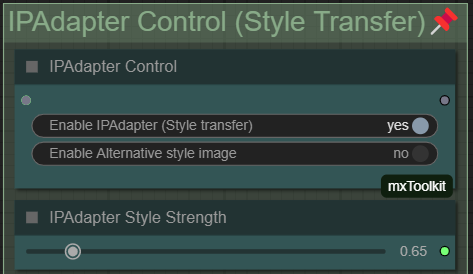
Enabling "Enable IPAdapter (Style Transfer)" turns on the IPAdapter feature. You can think of it like activating a LoRA—it’s most effective when used without other LoRAs and with a base model that doesn’t already have a strong built-in style. You can control how much influence the adapter has using the "IPAdapter Style Strength" slider.
By default, IPAdapter uses the original image you selected in the "Load Image" group at the start of the workflow. But if you enable "Alternative Style Image", you can choose a different reference image using the "Alternative Style Image" node. This is helpful when you're doing an img2img transfer but want the result to have a different style than the original.
If you enable the "Low VRAM" option alongside IPAdapter, your input image will be scaled down so that the smallest side is 512px. This helps reduce the amount of VRAM used when IPAdapter analyzes the image. This will reduce the quality of the IPAdapter results, so only use it if you have less than 12GB of VRAM and/or can’t run IPAdapter otherwise.
Important!
One downside of using IPAdapter is that it can be difficult to change the color palette of the image if its influence is set too high. This is because IPAdapter acts like a very aggressive LoRA—it essentially copies everything it sees in the reference image, including colors, composition, and lighting.
To work around this, you have a couple of options:
Add unwanted traits (like a specific hair color) to your negative prompt
Reduce the IPAdapter strength to lessen its influence
If you want more advanced control, head down to the "IPAdapter Tiled" node in the "Backend – IPAdapter" group. This is where you can fine-tune how IPAdapter behaves:
Change the
weight_type
Try switching from"strong style transfer"to"style transfer precise"or just"style transfer". These settings can significantly affect how tightly the final image follows the reference style.Adjust
start_atandend_atvalues
These define when in the generation process IPAdapter is active. For example, setting them to0.2and0.8applies the influence during the middle part of the generation rather than the entire time. This lets you preserve the overall style while still allowing changes—like a different hair color—outside that influence window.Modify the
combine_embedsmethod
This determines how the IPAdapter embedding is merged with the CLIP model. Options like"concat","average", or"norm average"affect how strongly IPAdapter overrides what your prompt specifies. If it’s overriding too much, switching methods might give you more balanced results.
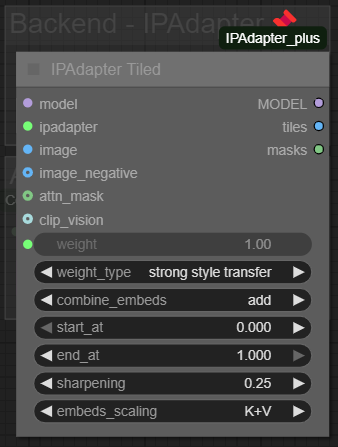
This node is explained in more detail here, where you can also review what each setting does.
IMG2IMG Transfer
This section lets you use any image as a base to create a new one with the same composition and elements, while still giving you creative control over what’s shown. In short, it allows you to recreate or "copy" an image with your own characters, styling, or prompts.
For examples, check out the "Replace Character in Image" scenario at the bottom of this guide.
Behind the scenes, this node group uses automatic interrogation of the original image with Danbooru tags to describe what’s visible. Then, ControlNet is used to lock in the composition and character placement.
If you're unfamiliar with ControlNet, refer to the General Term Explanation section at the top of the guide. For our use case, the important part is that you always match the ControlNet model with its corresponding preprocessor in the "ControlNet Models" node.
Let’s walk through the features in this group:
Enable IMG2IMG Transfer
This switches the workflow from detail-only mode to full img2img transfer. It lets you take the original image and re-create it with different characters, styles, or other visual changes—while keeping the overall composition and creating a completely new image instead of inpainting the original.
Use the "Low VRAM" option TOGETHER with IMG2IMG Transfer to reduce VRAM usage during pre-processing and when applying ControlNet. This can affect output quality - especially the anatomy of complicated poses, so only use it if you have 12GB VRAM or less, or if you want faster generation and are okay with lower quality.
Accuracy Slider (also known as ControlNet Strength)
This controls how much the original image influences the final result.
0 means no influence (the prompt takes full control).
1 locks in the original composition completely.
A good balance is usually around 0.50–0.60; I personally use 0.55.
If you’ve used ControlNet in A1111 WebUI, this is similar to choosing:
“My prompt is more important” (below 0.50),
“Balanced” (around 0.51–0.55),
or “ControlNet is more important” (above 0.55).
Be aware: setting the strength too high will limit your ability to change features like hairstyle, clothing, or proportions (e.g., height or bust size).
Also note: the effect depends on the ControlNet model and preprocessor you're using.
For example, the OpenPose preprocessor only creates a skeleton of the character’s pose—it doesn’t lock in features like hair or body proportions. This means you can increase accuracy/strength without losing flexibility in how your character looks.
However, OpenPose can struggle with complex poses or multiple characters, so keep that in mind depending on your image.
The IMG2IMG prompt is what gets prepended to the prompt generated from image interrogation. This is where you can add quality tags for the new image, as well as any character-specific or scene-specific details—like the name of the character you're swapping in, or the artist style you'd like to apply.
The "Exclude tags from interrogation" option lets you remove certain features from the automatic tag extraction.
By default, the interrogation process will try to identify everything in the original image—so even if you write a new prompt (e.g., a new character with different features), the system might still include the old tags from the image. If the weights align unfavorably, it could ignore parts of your new prompt and instead favor the extracted tags.
To avoid that, you can list the characteristics you want to exclude. For example, if the original image shows a girl with short black hair, blue eyes, and a school uniform, and you want to replace her with someone who has long orange hair, brown eyes, and is wearing pajamas, you would:
Write
"orange hair, brown eyes, long hair, pajamas"in the IMG2IMG promptAnd write
"short hair, black hair, blue eyes, school uniform"in the "Exclude tags from interrogation" field
This tells the workflow to leave those unwanted tags out of the final prompt.
To review the full prompt that will be used, check the "Debug" group—this is especially helpful for spotting leftover tags you might have missed.
For a full practical example, check the Scenario section at the end of this guide, where I walk through how to swap characters in an image step by step.
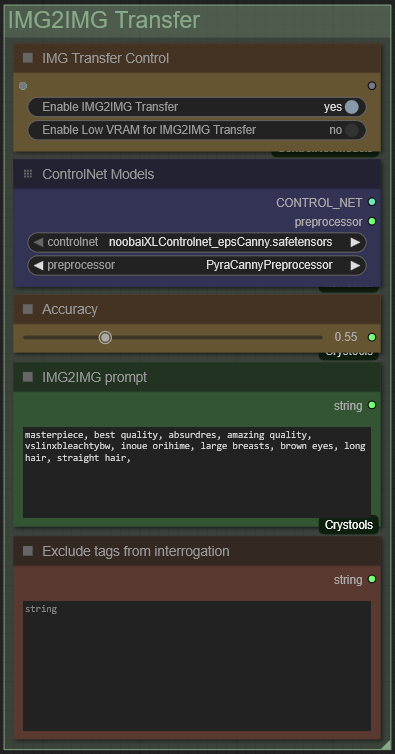
Important!
A crucial part of achieving good img2img transfer results is choosing the right ControlNet model and preprocessor.
At the beginning of this guide, you'll find the "Files" section where you can download all the ControlNet models I recommend for Illustrious-based models, including NoobAI and its derivatives.
Each preprocessor detects the structure of your image differently. As a general rule:
The more detailed the preprocessor, the more original features will be preserved.
This also means that if your source image has chibi-style features or a younger character design, it may be harder to significantly alter the body type without reducing ControlNet’s overall effectiveness.
For accurate preservation of the original look, I recommend:
CannyEdge or PyraCanny(More forgiving) as preprocessors, used with the Canny ControlNet model
AnimeLineArt preprocessor with the AnimeLineArt ControlNet model
If you want more flexibility in adjusting features like body proportions or facial details, consider using a depth-based preprocessor:
MiDaS-DepthMap or Depth Anything V2, paired with the DepthMiDaS V1.1 ControlNet model
For cases where you only care about the character's position—and not the background, clothing, or fine details—use:
OpenPose preprocessor with the OpenPose ControlNet model
This will give you a simple skeleton structure of the pose (including hand positions), leaving you maximum control over everything else in the image.
Tips on ControlNet Strength:
With less detailed preprocessors like OpenPose, you can increase ControlNet Strength (Accuracy) to better lock in the character’s pose.
For Canny and Depth, I recommend a strength of 0.51–0.58—this keeps the overall composition while still allowing changes to details.
If the output isn’t what you expected—like the pose being off or your prompt not taking effect—try a new seed before adjusting strength. Sometimes a bad seed is all it takes to throw things off.

You can see a preview of your generated pose/composition from the pre-processor in the "Debug"-Group if you click on the square in the "ControlNet Preview"-Node.
Before & After
This section lets you view the before and after of the generation process.
Depending on whether you have upscaling and/or Hi-Res Fix enabled, the preview will appear on the left. The image on the right shows the final result after all selected detailing processes have been applied. Once the right image appears, it has also been saved to your output folder.
If you want to preview the upscaled image before Hi-Res Fix is applied, check the "Pre-HiRes Fix" node in the Debug section.
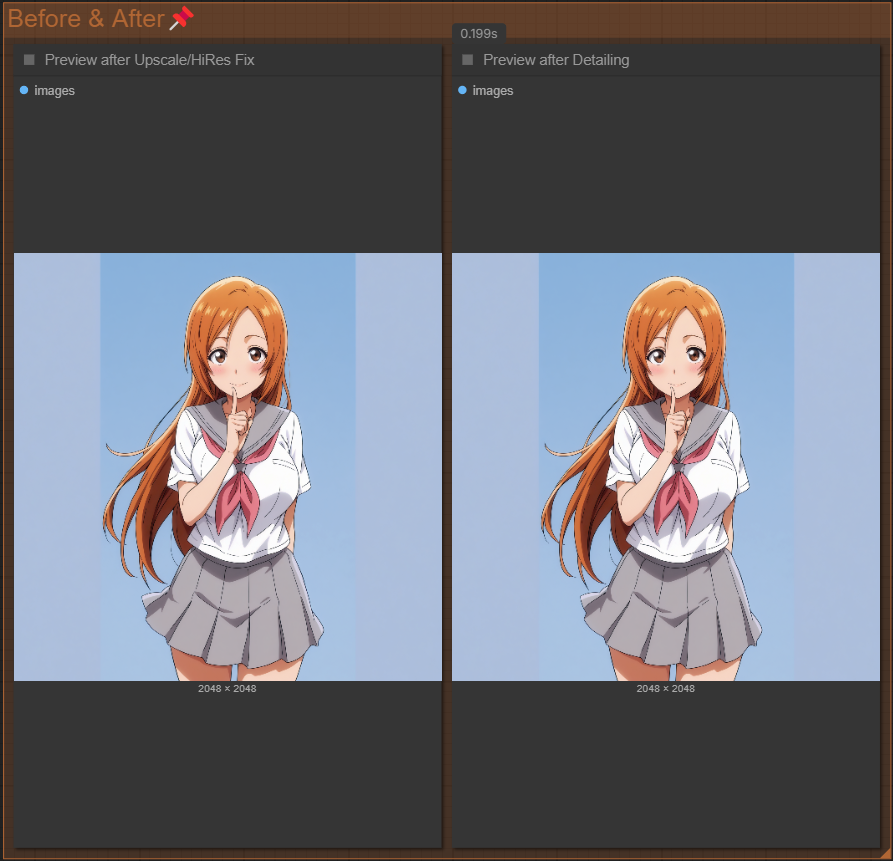
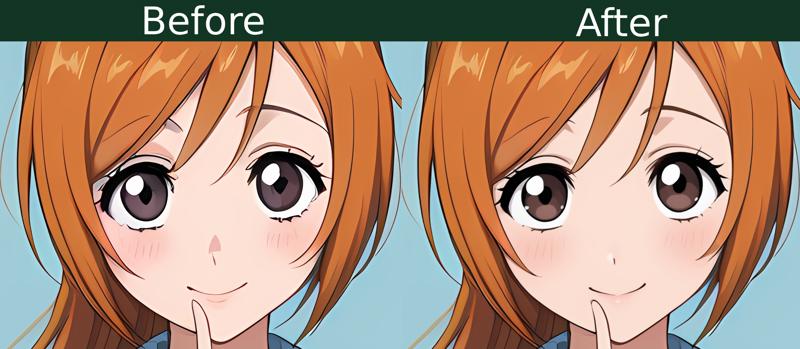
These are the results from using only the face detailer and face prompt with the default settings enabled:
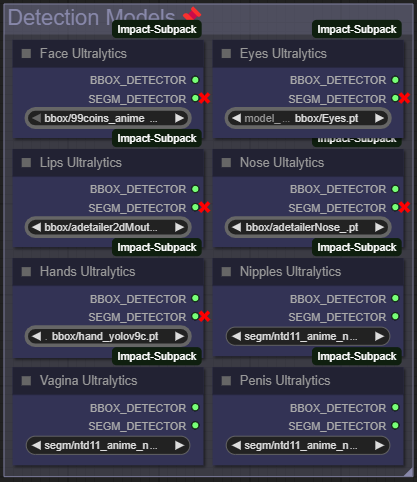
Detection Models
In this section, you select the detection models for each specific body part.
You can find my recommended models either in the "Files" section at the top of this guide or directly inside the workflow under "Recommended Ultralytics Model", located to the left of the layout. There are also many great options available on Civitai if you want to explore further.
You only need to load the Ultralytics models you plan to use—but keep in mind:
If you activate a detailer for a body part but haven’t selected a detection model for it, image generation will fail.
Ultralytics models are trained to detect specific body parts or features—like hands, faces, clothing, or tails—and are used to automatically mask those areas so the detailer knows where to inpaint. For more background on how this works, check the General Term Explanation at the top of the guide.
If you don’t plan to use the nose detailer, but want to use that slot for something else—like detecting headwear—you can absolutely swap it out. The node names themselves don’t really matter. What actually determines what gets detected is your Ultralytics model and the prompt you assign to that detailer in the Detailer Prompts section.
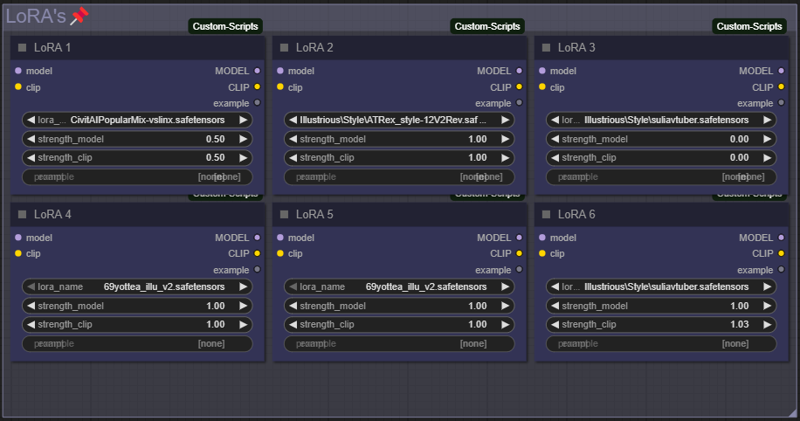
LoRA's
In this area, you can select general LoRAs to apply across the entire process. These LoRAs will be used for both image generation and all detailers, so they affect the whole workflow.
Only enable LoRAs here if you want to apply a consistent style or character to the entire image from start to finish.
If you're unsure about the difference between CLIP strength and model strength, it's best to keep both set to the same value for consistent results.
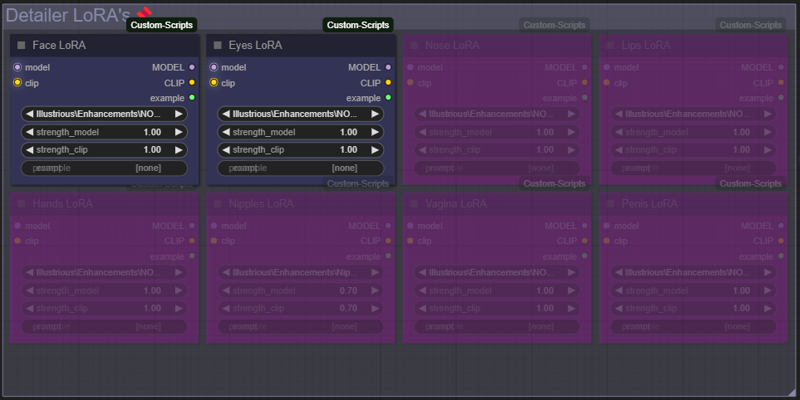
Detailer LoRA's
These detailer LoRAs are applied only to the specific body part being detailed. This is useful if you have a LoRA trained to enhance certain features—like eyes, hands, or other detailed areas.
If you want to improve quality but don’t have a LoRA tailored to that body part, you can also use a general detail-enhancer, which you’ll find in the "Recommended Detailer LoRAs" node inside the workflow.
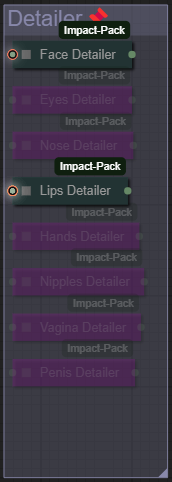
Detailer
This is where the detailing magic happens. The Ultralytics model detects the body part it was trained to recognize, and that area is then inpainted at the final resolution to fix blurry details, incorrect anatomy, or off colors.
Each detailer comes with recommended default settings, but you still have full control over CFG, sampler, scheduler, and steps via the "Sampler Settings" group at the top of the workflow.
The other key setting is the denoise value, which you can adjust in the "Detailer Prompts" group.
For a full breakdown of what each parameter does, check out the documentation here.
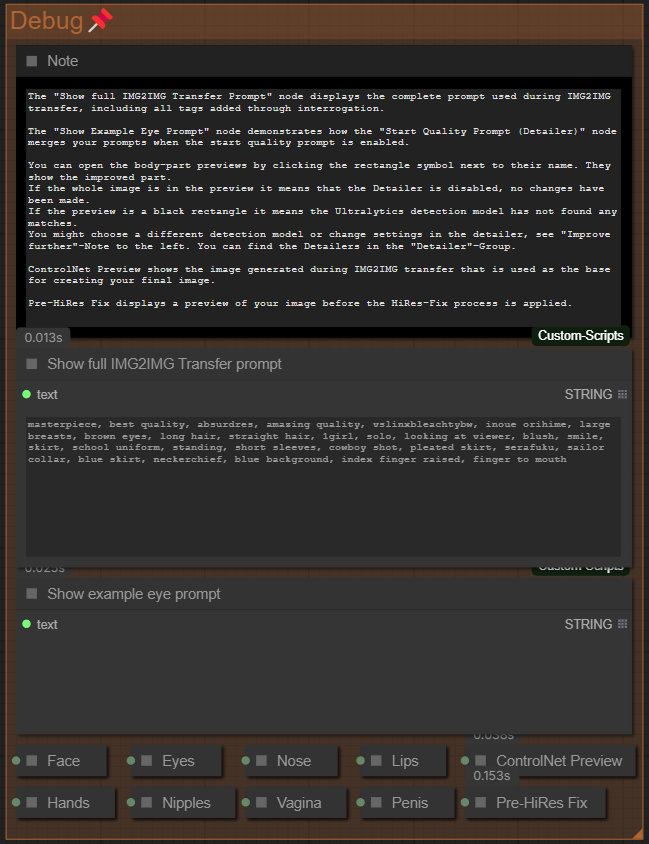
Debug
This section is here to help you analyze any issues that might come up during image generation.
The note inside the "Debug" group already provides a solid explanation of most of what's happening under the hood.
The "Show full IMG2IMG Transfer Prompt" node displays the combined result of your IMG2IMG transfer prompt and the interrogated prompt from your original image.
Use this to:
Check which tags were extracted from the original image
Remove unwanted tags by adding them to the "Exclude from Interrogation" node in the "IMG2IMG Transfer" group
Verify prompt formatting, especially making sure your IMG2IMG prompt ends with a comma and a space to ensure a clean, cohesive prompt
The "Show example eye prompt" node is especially useful if you're using the "Start Quality Prompt" from the "General Function Control" group. It shows how the prompts are being combined so you can better understand what the detailer is actually working with.
Next are all the Detailers for each body part. Here, you can check the individually processed sections of the image if you have detailers enabled. This allows you to spot any issues that might occur during detailing.
Clicking the rectangle next to a detailer’s name will show its preview:
If the preview shows the full image, the detailer wasn’t activated.
If the preview is completely black, the Ultralytics model didn’t detect any body parts matching what it was trained to find.
If that happens, try using a different detection model or adjusting the detailer’s parameters. For guidance, see the "Detailer Parameters" node located to the left.
ControlNet Preview shows the image generated during IMG2IMG transfer, which serves as the base for your final image.
Pre-HiRes Fix displays a preview of the image before the Hi-Res Fix process is applied.
Scenarios:
We will be using this sample image as the base for these examples:
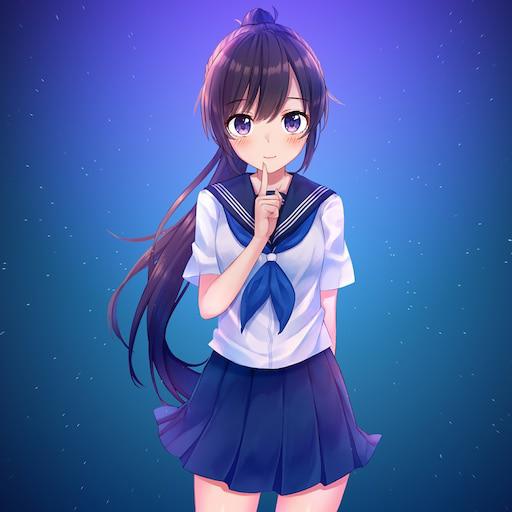
Detail features of image
If you simply want to detail an existing image, it's as easy as loading your image into the "Load Image" node, selecting the detailers you want to use, and enabling any other processes you'd like to include.
You can also generate a completely new image with a different character or style by exploring the "Replace Character in Image" or "Change Style" scenarios included in this guide.
For best results, I recommend using a neutral checkpoint—one that doesn’t have strong styling baked in. This helps preserve the original image more faithfully. Pairing it with IPAdapter further maintains the original style, making it much easier to apply detailing without needing to test multiple checkpoints or LoRAs to get the look right.
With just a few simple settings, you can dramatically improve image quality:
The results below show how blurry areas in the face and hands—often caused by upscaling—have been successfully fixed:
Replace character in image
The goal of this scenario is to generate an image that preserves the style of the original while changing the character. To do this, we’ll use IMG2IMG Transfer to create a new image with a custom prompt, and IPAdapter to transfer the original image’s style.
First, select a Checkpoint that doesn’t have heavy styling baked in. In this example, I’m using the NoobAICyberFix checkpoint—it has great anatomy and keeps styling minimal, which makes it a solid base for this kind of task.
Next, activate the IPAdapter and set a style strength. You may need to experiment with this value—IPAdapter tends to strongly copy the original color palette, which can make it difficult to change features like hair color if the strength is set too high.
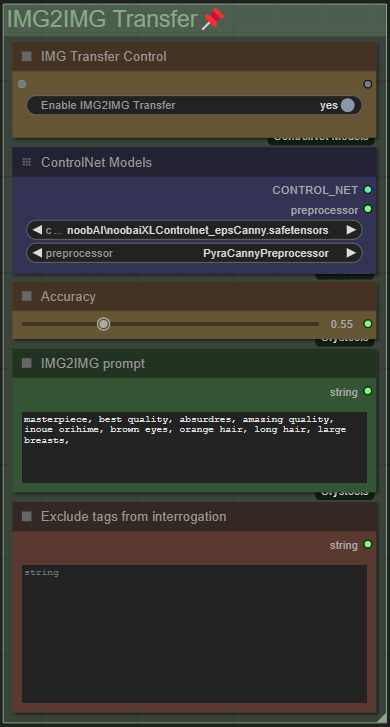
Next, we’ll activate the IMG2IMG Transfer and choose a Canny preprocessor along with a compatible ControlNet model. In this example, I’m using the PyraCanny PreProcessor, which gives a highly accurate representation of the original composition while still allowing for minor changes. I’ve set the accuracy (strength) to 0.55 for the first run to strike a balance between structure and flexibility.
Now I’ll add my IMG2IMG prompt, including some quality tags at the beginning. For this example, I want to swap the original character with Inoue Orihime from Bleach, so my prompt looks like this:
masterpiece, best quality, absurdres, amazing quality, inoue orihime, brown eyes, orange hair, long hair, large breasts,
The result after image generation looks like this:
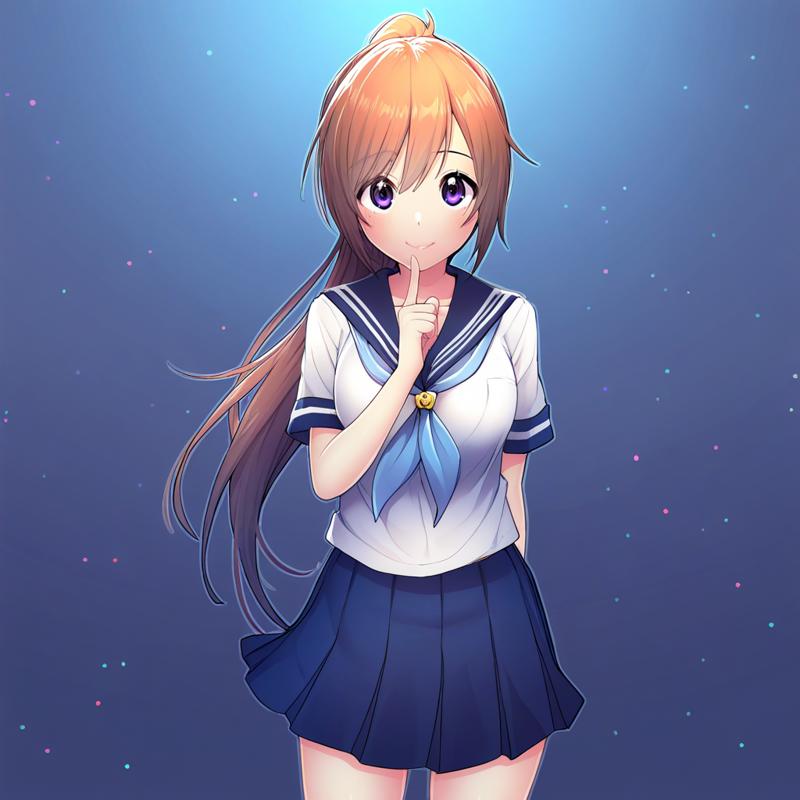
As we can see, the result already looks pretty good—but there are still a few issues, like some discoloration in the hair and the purple eyes, which don’t match the prompt.
The cause is easy to identify once we head down to the Debug section of the workflow and check the "Show full IMG2IMG Transfer Prompt" node. There, we can see the full prompt after interrogation, which looks like this:
masterpiece, best quality, absurdres, amazing quality, inoue orihime, brown eyes, orange hair, long hair, large breasts, 1girl, solo, long hair, looking at viewer, blush, smile, bangs, skirt, brown hair, school uniform, standing, purple eyes, ponytail, short sleeves, cowboy shot, pleated skirt, serafuku, sailor collar, blue skirt, neckerchief, blue background, index finger raised, finger to mouth
Clearly, some tags—like brown hair and purple eyes—are still being picked up from the original image. To fix this, I’ll add any tags I don’t want in the final result to the "Exclude Tags from Interrogation" node. This helps ensure the output sticks closer to my intended prompt.
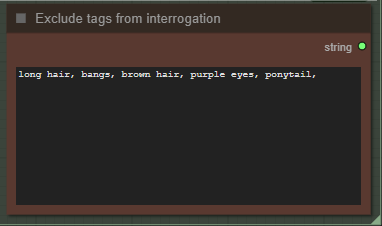
After adding this change my result would now look like this:
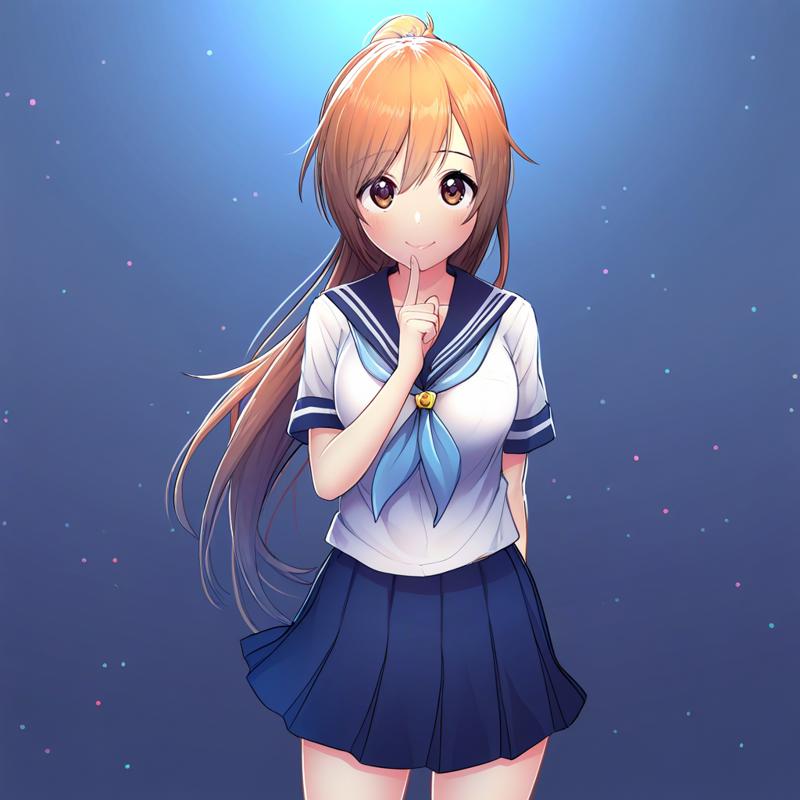
If I now want to change the hairstyle, I have a few options:
Decrease the Accuracy (Strength)
Lowering the ControlNet strength gives the model more freedom to follow your prompt rather than sticking closely to the original image.Switch to the OpenPose PreProcessor and ControlNet Model
Since this is a relatively simple pose, OpenPose can easily detect it. Using a less detailed preprocessor like OpenPose gives you more flexibility to change visual features such as hair, clothing, or body proportions.Explicitly prompt the desired hairstyle
Add the specific hairstyle you want directly to your prompt. This can help override details retained from the original image—especially when combined with reduced ControlNet strength.
Simply adding "straight hair" to the IMG2IMG prompt results in an output where the body proportions from the original image are preserved, but the hairstyle is updated:
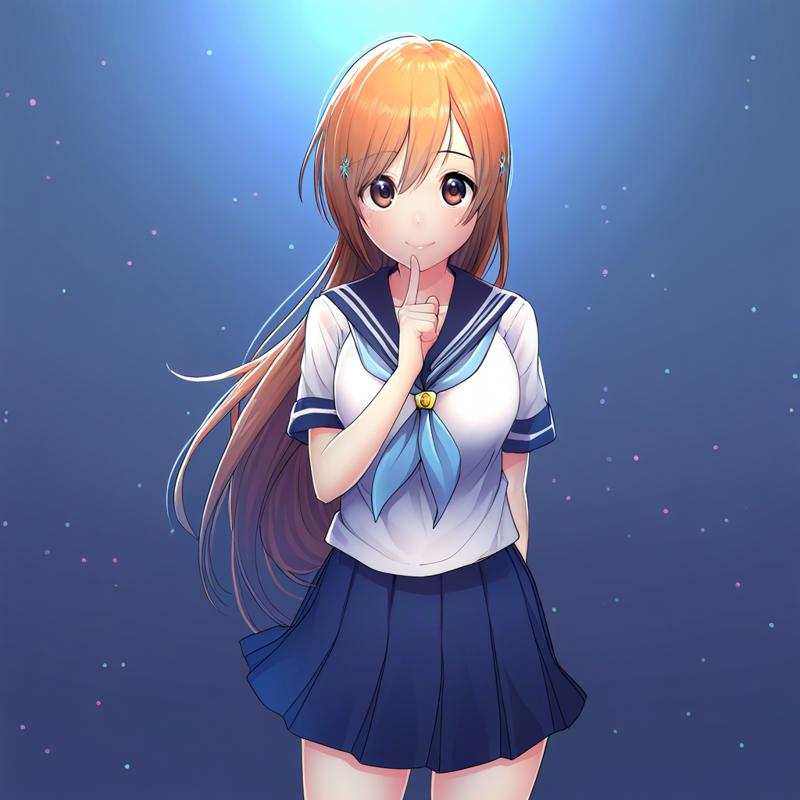
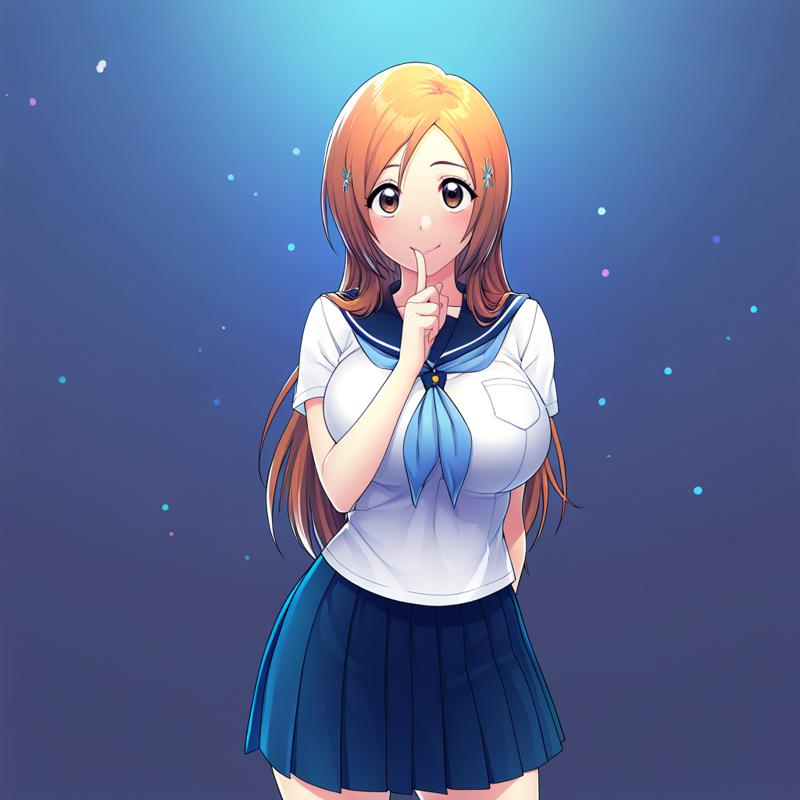
Switching the PreProcessor to OpenPosePreprocessor and using the OpenPose ControlNet model allows you to ignore the original body proportions entirely and focus solely on preserving the pose. This gives your checkpoint full freedom to depict the character according to how it was trained, without being constrained by the original image’s features:
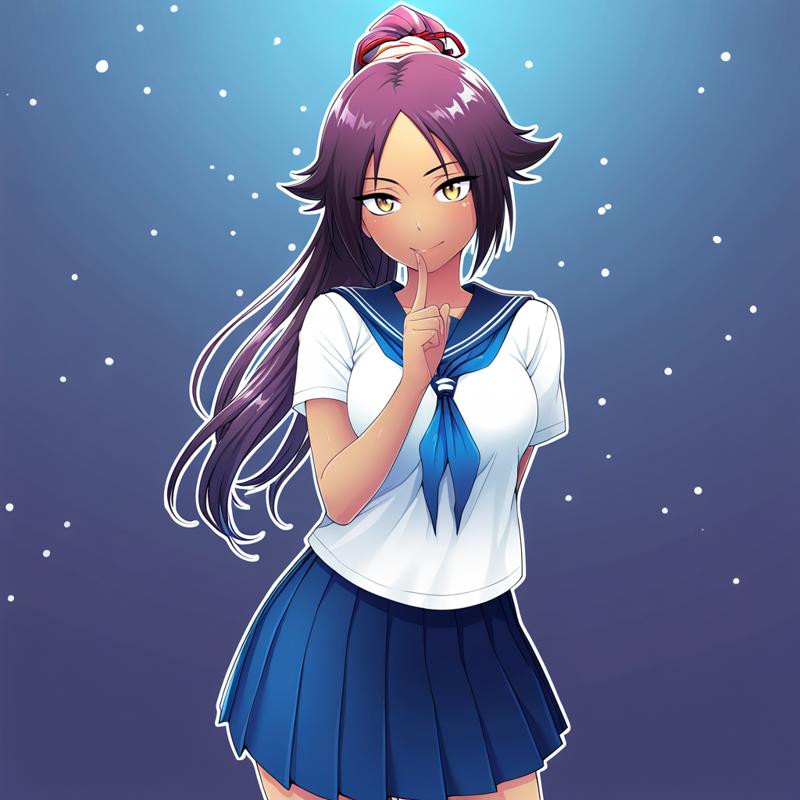
To show how easy it is to replace characters with this you can simply change inoue orihime, brown eyes, orange hair, long hair, large breasts, to shihouin yoruichi, yellow eyes, slit pupils, medium breasts, and the result would look like this (using OpenPose for ControlNet):
Change style of image
Changing the style of an entire image is incredibly easy with this workflow.
Start by selecting all the processes you want to include—like upscaling, detailers, and any other enhancements—then simply activate the IMG2IMG Transfer function.
If your only goal is to recreate the image in a different style, I recommend the following:
Leave the "Exclude Tags from Interrogation" node empty
Add only the default quality tags from your checkpoint or LoRAs to the IMG2IMG prompt
Use a high-accuracy preprocessor, such as CannyEdgePreprocessor, along with the Canny ControlNet model
If you want to faithfully replicate the composition without changing anything else, increase the ControlNet Accuracy (Strength). I usually set it to 0.55, but in this case—since I want to copy everything exactly—I’ve increased it to 0.65.
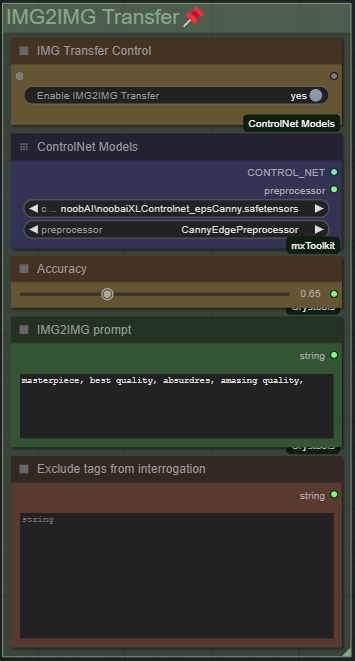
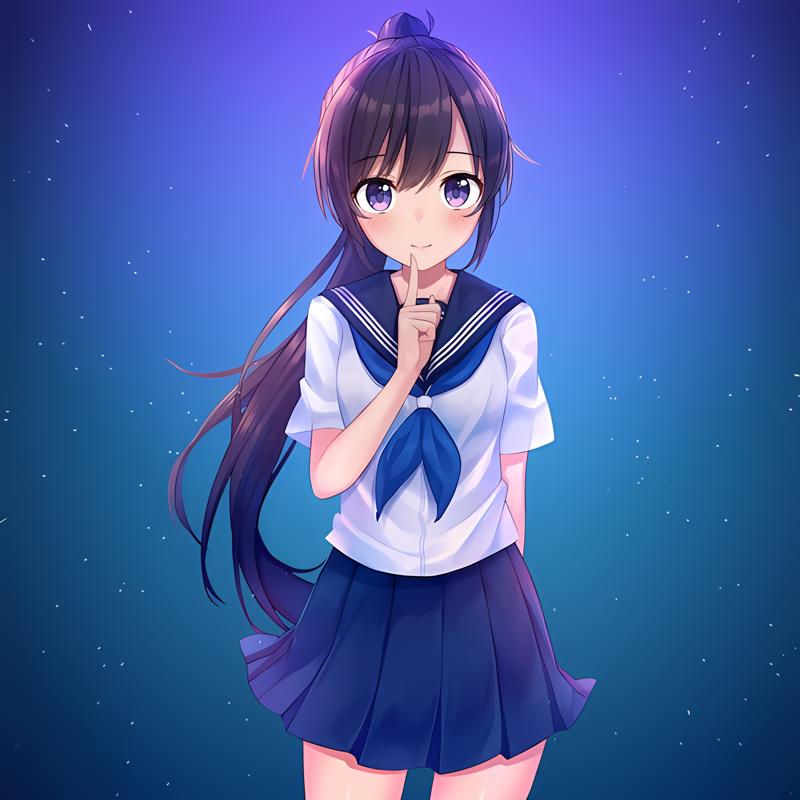
These settings result in this image together with an Anime styled LoRA that i'm using:
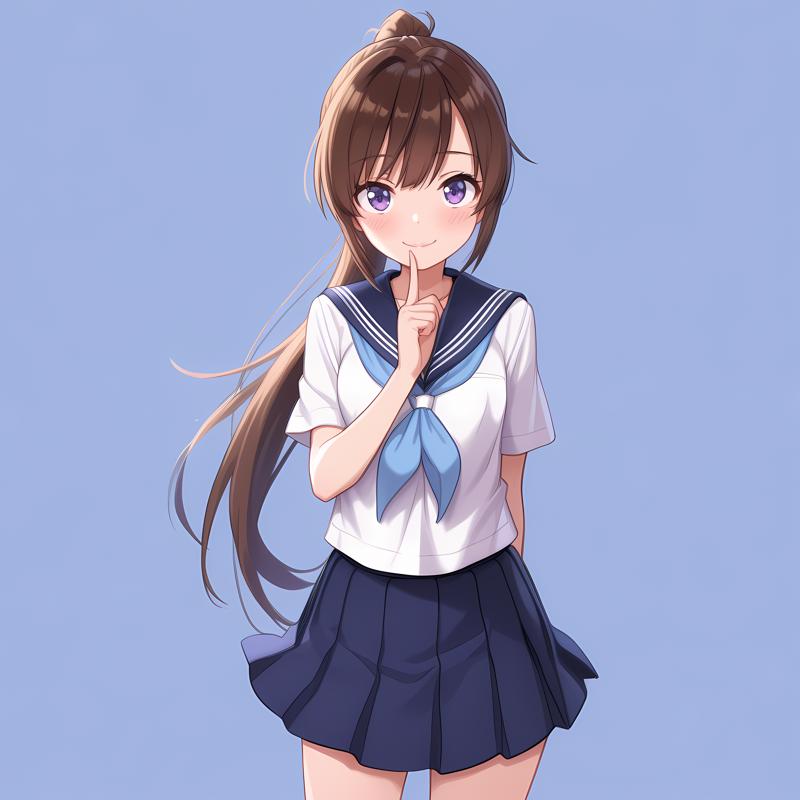
Next, I checked the "Show full IMG2IMG Transfer Prompt" node in the "Debug"-Group and saw the following output:
masterpiece, best quality, absurdres, amazing quality, 1girl, solo, long hair, looking at viewer, blush, brown hair, smile, bangs, skirt, school uniform, standing, purple eyes, ponytail, short sleeves, cowboy shot, pleated skirt, serafuku, sailor collar, blue skirt, neckerchief, blue background, index finger raised, finger to mouth
To finalize the result, I added a couple of elements the interrogation either missed or misidentified. In this case, I added "stars, vignetting, black hair" to the IMG2IMG prompt and added "brown hair" to the "Exclude Tags from Interrogation" node—since I wanted to adjust the hair color slightly.
I ran it again, and here’s the final result:
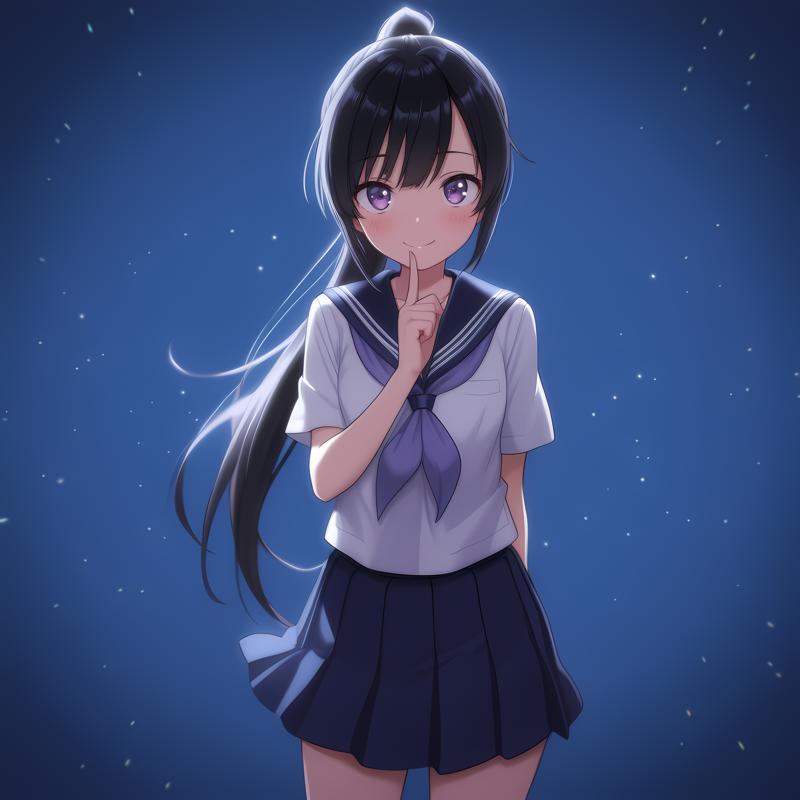
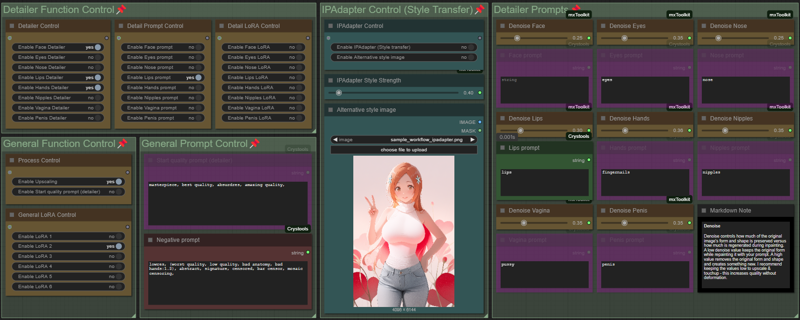
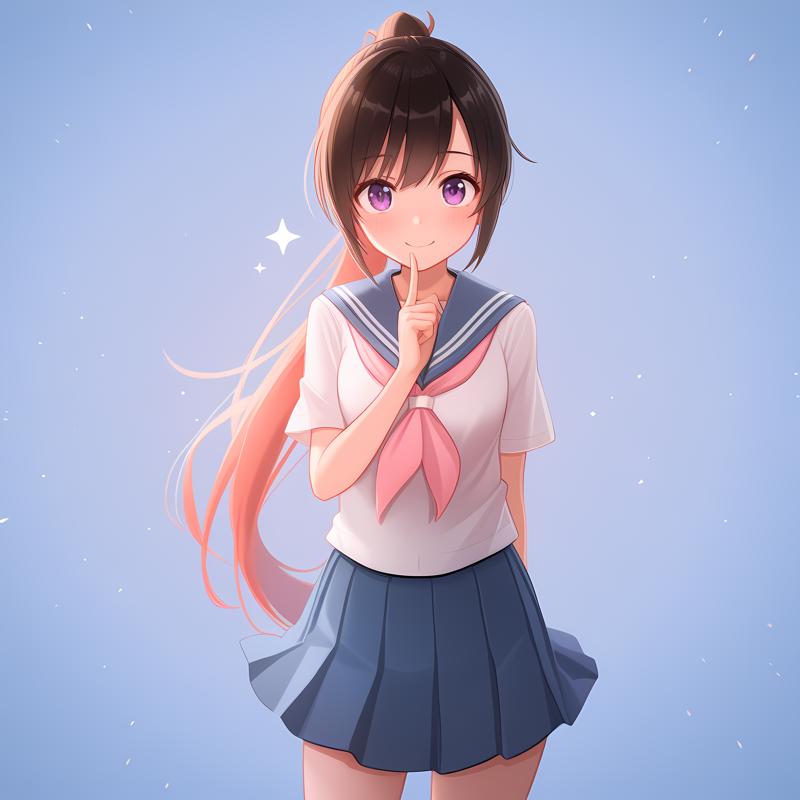
If you want to change the style of an image without using a LoRA, you can use the IPAdapter instead. By enabling "Alternative Style Image" in the "IPAdapter Control" node, you can copy the style from a completely different reference image.
In this example, I used the alternative image shown in my settings above. I simply activated both "IPAdapter" and "Alternative Style Image", and ended up with this result:
FAQ:
SAMLoader 21: Value not in list: model_name: 'sam_vit_b_01ec64.pth' not in []
If you get this error it's because your ComfyUI Installation is missing the SAM ViT-B Model.
This is usually included in the standard ComfyUI installation but can be left out if you download specific versions like the portable comfy version. You can fix this issue by doing either of these:
Go into your ComfyUI Manager, then click on Model Manager(should be somewhere in the middle) and then search for the "ViT-B Sam"-Model and install it.
Download the model here for example.
And move it into your models/sams folder
Return type mismatch between linked nodes [...]
If you're getting this error:
Return type mismatch between linked nodes: scheduler, received_type(['simple', 'sgm_uniform', 'karras', 'exponential', 'ddim_uniform', 'beta', 'normal', 'linear_quadratic', 'kl_optimal', 'AYS SDXL', 'AYS SD1', 'AYS SVD', 'GITS[coeff=1.2]']) mismatch input_type(['simple', 'sgm_uniform', 'karras', 'exponential', 'ddim_uniform', 'beta', 'normal', 'linear_quadratic', 'kl_optimal', 'bong_tangent', 'beta57'])Or this:
Return type mismatch between linked nodes: scheduler, received_type(['simple', 'sgm_uniform', 'karras', 'exponential', 'ddim_uniform', 'beta', 'normal', 'linear_quadratic', 'kl_optimal', 'AYS SDXL', 'AYS SD1', 'AYS SVD', 'GITS[coeff=1.2]', 'LTXV[default]', 'OSS FLUX', 'OSS Wan', 'OSS Chroma']) mismatch input_type(['simple', 'sgm_uniform', 'karras', 'exponential', 'ddim_uniform', 'beta', 'normal', 'linear_quadratic', 'kl_optimal', 'ays', 'ays+', 'ays_30', 'ays_30+', 'gits', 'beta_1_1', 'AYS SDXL', 'AYS SD1', 'AYS SVD', 'GITS[coeff=1.2]', 'LTXV[default]', 'OSS FLUX', 'OSS Wan', 'OSS Chroma'])If you get the first error, it's because you have a node, called RES4LYF, installed. If you get the second error you most likely have ComfyUI-ppm installed.
These node causes a mismatch between the expected schedulers and the delivered schedulers. In the past we were able to bridge this problem by parsing the scheduler in-between with another node. Since the update that introduced subgraphs, this is sadly not possible anymore.
My recommendation is to:
Deactivate the "RES4LYF" and/or "ComfyUI-ppm" Custom Node in your Node Manager
Restart ComfyUI
Refresh your Browser once
If you're using a Workflow that requires the RES4LYF or ComfyUI-ppm custom-node, you'll have to activate it again.
This is a problem created with overwriting the default list of schedulers and would have to be resolved by the custom-node developer.
[Should not happen anymore] I'm missing one of these nodes "workflowStart quality prompt", "workflowEnd quality prompt" or "workflowControlNet Models"
This error appears when you either haven't installed all the necessary comfyui custom nodes or your comfyui has not cleared it's cache. If you have this issue do the following:
Make sure you have all the custom nodes installed as listed in the workflow, the model page (check for your specific version in the description) or at the top of this guide
Check your ComfyUI Console where you've started comfyui and make sure none of the nodes say (IMPORT FAILED) when loading them, if one of them do - do the following:
Inside ComfyUI open your ComfyUI-Manager (install it if you haven't yet)
Click on Custom Nodes Manager
In the top left corner change the filter to "Import failed"
Wait till it loads and on the node/s where it failed click on "Try fix"
After it's done loading close down your comfyui (including the console where u started it)
Start ComfyUI again, once it's started you can open it in the browser again, make sure to click "refresh" in your browser once.
If you have all custom nodes installed and none of them fail, you can open your ComfyUI-Manager (install it if you haven't yet) and click on "Custom Nodes Manager", here click on "Filter" in the top left corner and change it to "Update". ComfyUI is now going to check if any of your nodes can be updated, if there's an update available make sure to update every node.
Close ComfyUI completely, including your console where you started ComfyUI.
Start ComfyUI again and once it's done loading go into your browser and enter the comfyui address. Once comfyui is loaded you close all open workflows, click the "refresh" button (Default is F5-Button) and then open the workflow again.ComfyUI should now have cleared the cache and when you open/drag the workflow in comfyui again it should work without problems.
[Should not happen anymore] Loop Detected TypeError: Cannot read properties of undefined (reading '0') at...
If you're getting this error it's most likely because of the recent huge changes to Comfy which are going to replace Node-Groups with Subgraphs. This Workflow still uses Node-Groups as of now since it's the simpler solution but will be upgraded soon when node-groups are being deprecated.
The issue is caused by the cg-use-everywhere custom-node. So if you're getting this error message, make sure you do the following:
Update comfy to the newest Version
Update the comfy-frontend of your comfy instance
You can do this by adding "--front-end-version Comfy-Org/ComfyUI_frontend@latest" as a start parameter of your main.py - check how to here.
Open your Comfy-Manager and make sure all custom nodes are up-to-date by going into your "Custom Nodes Manager" and then click on "Filter" in the top left corner and change it to "Update". ComfyUI is now going to check if any of your nodes can be updated, if there's an update available make sure to update every node (especially cg-use-everywhere).
Close ComfyUI completely, including your console where you started ComfyUI.
Start ComfyUI again and once it's done loading go into your browser and enter the comfyui address. Once comfyui is loaded you close all open workflows, click the "refresh" button (Default is F5-Button) and then open the workflow again.ComfyUI should now have cleared the cache and when you open/drag the workflow in comfyui again it should work without problems.
Thank you for reading the guide or at least the parts that help you, if you have any more questions feel free to leave them as a comment in either the model or here in the guide.
As more questions will come my way i'll make sure to add answers to the FAQ.
So if you have an issue that is not listed in the FAQ right now, just ask away and i'll help to the best of my abilities!
Enjoy generating ♥️

![[IMG2IMG] ComfyUI All-in-One Workflow Guide](https://image.civitai.com/xG1nkqKTMzGDvpLrqFT7WA/9a346ba3-8068-4fd5-8633-a17e67881388/width=1320/guide4(1).jpeg)