简介 (Introduction)
本文主要介绍一下用Lokr训练画风的基本思路或者框架。
推荐完整阅读本文章,以避免遇到了一些后续才会提到讲解的问题。
当然本文需要读者至少知道Stable Diffusion生图是怎么一回事或者说如何使用的,如果是完全零基础小白可能看不懂一些接下来说的东西。例如进行模型训练需要训练器这种最基本的信息还是要知道的。
This article provides an overview of the basic concepts and process for training an art style using Lokr.
It is recommended that you read the entire article to avoid running into questions that are only addressed later on.
Please note that this article assumes you already have at least a basic understanding of how to generate images with Stable Diffusion and how to use it; complete beginners may find some of the following content hard to follow. For example, you should know you need a trainer like Kohya ss.
训练集图片 (Training set images)
训练集图片选择 (Training set images selection)
严格来说选择方面没有特别多的讲究,就是尽可能地收集想要的画风的图片就可以。但是要注意,同画师不同时间段的作画可能是稍微变化的,这些变化也很容易被AI捕捉到,导致最终结果和训练的目标有所偏差,如下例子:
Strictly speaking, there isn’t much to consider when selecting images—just gather as many examples of the desired art style as you can. However, be aware that an artist’s work can vary slightly over different periods, and these subtle changes can be easily picked up by the AI, causing the final result to deviate from your training objective. For example:
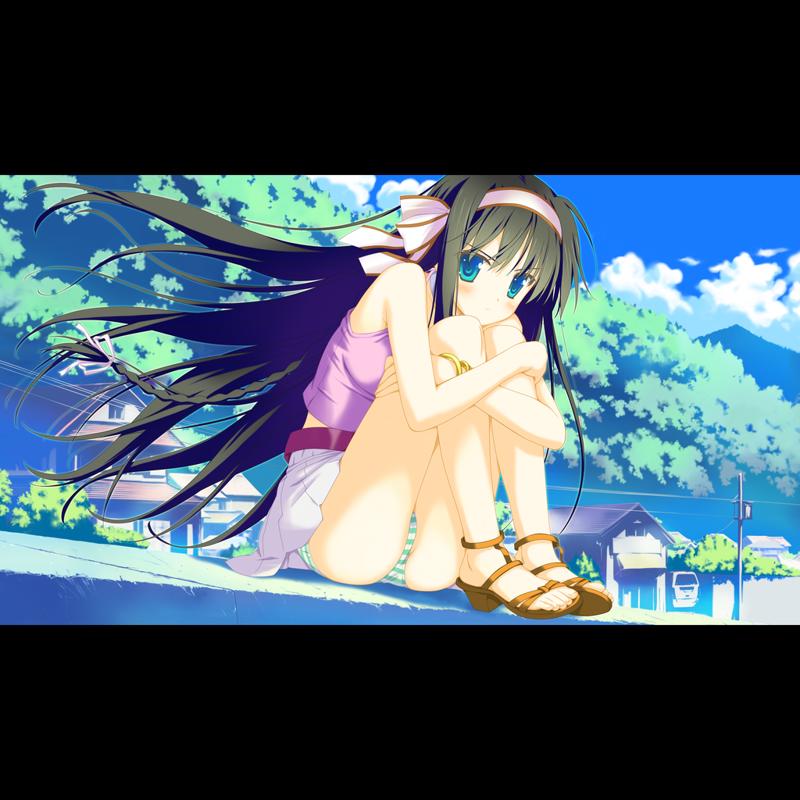
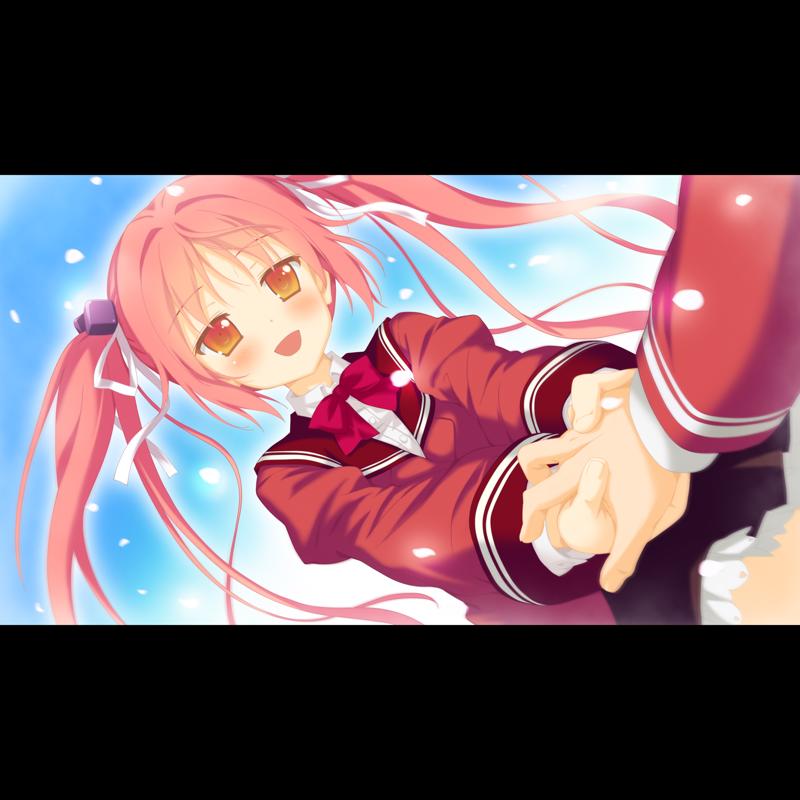
是可以明显看出前一张图片的人物上色更加朴素,而后一张图片更加鲜艳的。
这两者在AI眼中是不同的,如果想要后者的鲜艳效果,前者就可能对画风进行污染,这时就要去掉前者一类的图片。
一般个人会准备40张以上的图片。
You can clearly see that the character coloring in the first image is more monotonous, while in the second it’s more vivid.
These two styles look different to the AI; if you want the vibrant effect of the latter, the former could “pollute” the style, so you should remove images like the first.
Typically, you’d prepare more than 40 images.
正则图片 (Regularization images)
尽量准备和目标画风训练集相同数量的不同画风的图片。
正则训练集的文件夹中不应该包括目标画风的训练集图片。
如果你希望有更好的泛化效果,尽可能让正则训练集中的图片的特征涵盖到目标画风的训练集中的图片的所有特征。(例如目标画风中有白色裙子,黑色裙子,校服……那么正则训练集图片中也应该有白色裙子,黑色裙子,校服……)
同样,正则训练集中的画风和特征越多样越好,比如有不同样式的校服、白色裙子……
当然,这一步很繁琐,也可以不专门做,仍然可以有不错的效果。
(发现本人常用的正则训练集都是涩图,就不放例图了……
Try to prepare the same number of images of other art styles as in your target-style training set.
The regularization dataset folder should not include any images from the target-style training set.
If you want better generalization, aim for the features in your regularization set to cover all those in your target-style set. (For example, if your target set includes white dresses, black dresses, and school uniforms, then your regularization set should also include white dresses, black dresses, and school uniforms.)
Likewise, the more varied the styles and features in your regularization set—different school-uniform designs, white dresses, etc.—the better.
Of course, this step can be tedious and is optional; you can still achieve good results without it.
(I’ve found that the regularization sets I commonly use are all porn, so I won’t include example pictures…
图片处理 (Image processing)
图片只需要处理分辨率,如果图省事可以像上面的例图一样通过添加方形黑色或白色背景+居中+缩放的方式将分辨率统一。一般使用的分辨率在1024P以上,但不要超过1536P。前者是SDXL的训练分辨率,后者是光辉illu的训练分辨率。Noob的训练分辨率个人没有查询到确切数值,但根据推荐的生图分辨率,应该在两者之间。
如果使用bucket在不同分辨率进行训练,要注意图片的最长边长在1536以内,且最好保证图片的边长都是64的倍数。
对于边长不是64的倍数的图片,bucket在训练时可能对其进行裁剪,进一步导致结果不可控,虽然实际测试后发现影响并不大。
Images only need to have their resolution standardized. To simplify this, you can unify them by adding a square black or white background, centering the original image, and then scaling—just like in the example above. Generally, use resolutions above 1024 px but no higher than 1536 px. The lower bound (1024 px) is SDXL’s training resolution, and the upper bound (1536 px) is Illu’s training resolution. I haven’t been able to find the exact training resolution for Noob, but based on recommended generating resolutions, it’s likely somewhere in between.
If you’re using bucket training at multiple resolutions, make sure each image’s longest side stays at or below 1536 px, and ideally both width and height are multiples of 64.
When an image’s dimensions aren’t multiples of 64, bucket may crop it during training, which can introduce some unpredictability—though in practice we’ve found the effect to be minor.
训练集打标 (Training set tagging)
本人使用的是b站up主秋葉aaaki的整合包,图片来源其UI界面,训练器整合包的下载不在本文范畴内。
我们的目标是用1个触发词tag尽可能吸收所有画风,而其它tag不吸收画风。
因此在打标时,目标画风的训练集应该使用更高(如0.5)的阈值,打出更少的标;正则训练集应该使用更低的阈值(如0.35),打出更多的标。
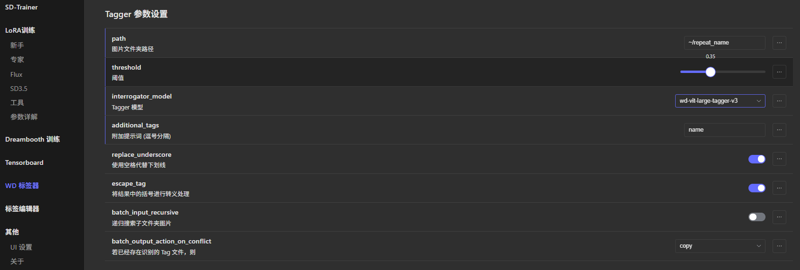
使用训练器中的WD标签器进行打标,模型个人常用wd-vit-large-tagger-v3,记得用附加提示词为目标画风的训练集把触发词打上去,正则训练集则不要打触发词,如图。
I’m using the integrated package by Bilibili user “秋葉aaaki,” and the images come from its UI. Downloading the trainer bundle itself is beyond the scope of this article. I haven’t used Kohya SS myself, but since the following UI images include English, you should be able to map them accordingly.
Our goal is to use a single trigger-word tag to absorb as much of the target art style as possible, while preventing other tags from absorbing that style.
Therefore, when tagging, use a higher threshold for the target-style training set (e.g., 0.5) to produce fewer tags, and a lower threshold for the regularization set (e.g., 0.35) to produce more tags.
Use the WD tagger built into the trainer—personally, I often use wd-vit-large-tagger-v3. Remember to include the trigger word (as an extra prompt tag) on images in the target-style set, and do not tag the regularization set with the trigger word, as shown in the figure.
之后使用标签编辑器进行如下流程:
对于两个训练集:
为你不想要的特征打上标签,例如我猜你的训练集中大概率有马赛克,显然要为马赛克打上对应标签(censored, mosaic censoring)。
同样,如果你像我刚刚的例图那样添加了上下或左右黑边,要打上对应的标签(letterboxed或者pillarboxed)。
如果你非常有耐心,可以把所有图片的人物动作,尤其是手,都打上对应的tag,可以有效解决糊手的问题……
对于目标画风的训练集:
删掉你想要的特征。比如在训练Q版小人画风时,往往会自动打上"chibi"一词,那么该词就应该删掉,保证chibi这个特征被吸收进你的触发词tag中。但大部分情况下其实不需要进行这一步。
Then use the tag editor to carry out the following process:
For both training sets:
tag any unwanted features. For example, if your dataset likely contains mosaics, tag them as censored or mosaic censoring. Similarly, if you added black bars at the top and bottom or on the sides as in my examples above, tag those images as letterboxed or pillarboxed.
If you’re very patient, you can tag every character pose—especially hands—to help eliminate bad-hand problem.
For the target-style training set:
remove tags for features you do want. For instance, when training a chibi style, “chibi” is often auto-tagged, so delete that tag to ensure the chibi feature is learned via your trigger-word tag instead. In most cases, however, this step isn’t strictly necessary.
参数相关 (Parameter setting related)
接下来讲的内容中也有很大一部分来源于我的个人习惯,不同的教程可能讲解完全不同的习惯和策略,但大同小异,只要能出好结果就是好策略。
省略掉一些和训练角色一样的部分或默认不变的部分,具体参考其它常见的教程或我的上一篇基本的角色训练文章。
Much of what follows is based on my personal habits. Different tutorials may explain completely different practices and strategies, but they’re largely similar—any approach that delivers good results is a good approach.
I’ll omit sections that are identical to general character LoRA training or default settings.
训练集目录结构和路径 (Training set directory structure and paths)
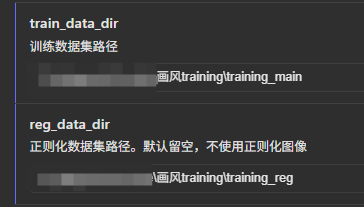
训练数据集路径照常填目标画风的训练集路径。
正则化数据集路径填你的正则训练集路径。
两者的文件夹目录结构是相同的。记得路径填的是外层文件夹,而不是直接装有图片的内存文件夹。
This part may be different on other trainers like kohya ss.
Training dataset path: fill in the path to your target-style training dataset as usual.
Regularization dataset path: fill in the path to your regularization training dataset.
Both folders should share the same directory structure. Remember to specify the outer folder, not the inner folder that directly contains the images.
目录结构例子如下 (directory structure example)(~/main/2_Sakuragi_Mizuha):
--main
----2_Sakuragi_Mizuha
------Miz_1.png
------Miz_1.txt
------Miz_2.png
------Miz_2.txt
------……
轮数和批量大小相关 (Epoch and batch size related)

训练200个epoch。使用我接下来的参数一般在100轮左右就可以在权重为1的设置下有很好的效果,往后稍微多几轮就会开始过拟合,但为了以防万一还是尽可能多训练几轮。而且画风Lokr的使用本来就要求使用者调整不同的权重,所以并不担心略微过拟合,而更要担心的是即使拉大权重也无法出目标效果的欠拟合。
批量大小(batch size)×梯度累加步数(gradient accumulation steps)=重复次数(repeat)×目标画风训练集图片总数(number)。比如你的目标画风训练集有100张图片,训练集设定为每张图重复2次,那么你的批量大小×梯度累加步数就等于200。调整梯度累加步数几乎不消耗显存,可以认为是一种低显存下模拟大batch size的情况。
这里的批量大小(batch size)×梯度累加步数(gradient accumulation steps)可以称之为总batch size或者等效batch size。
正则训练集的存在会自动让你的训练总图片数变为重复次数(repeat)×目标画风训练集图片总数(number)×2。
这样,你的一步就会走完总图片训练数的一半。
经过这些设置,在你的训练集分辨率bucket安排合理的情况下,在200轮时,你应该总共训练400步,也就是2步1轮(2 steps, 1 epoch)。
多提一嘴,个人常用的repeat数是2。
Train for 200 epochs. With the settings I’ll provide next, you can generally achieve very good results at around 100 epochs when the weight is set to 1; training a few more epochs beyond that will begin to overfit, but to be safe you should train as many epochs as possible. And since using Lokr for style inherently requires adjusting different weights, slight overfitting isn’t a concern—instead, you should worry about underfitting, where even increasing the weight can’t produce the target performance.
batch size × gradient accumulation steps = repeat × total number of target-style training images. For example, if your target-style dataset has 100 images and you set each image to repeat twice, then your batch size × gradient accumulation steps should equal 200. Adjusting gradient accumulation steps consumes almost no VRAM, so you can think of it as simulating a large batch size under low-memory conditions.
Here, batch size × gradient accumulation steps can be referred to as the total batch size or the effective batch size.
The presence of the regularization dataset will automatically make your total training image count equal repeat × total number of target-style training images × 2.
This way, one step will process half of the total training images.
With these settings, and assuming a reasonable bucket arrangement for your training resolution, by 200 epochs you should have trained 400 steps in total, which is 2 steps per epoch (2 steps, 1 epoch).
As a side note, I personally commonly use a repeat value of 2.
学习率相关 (Learning rate related)
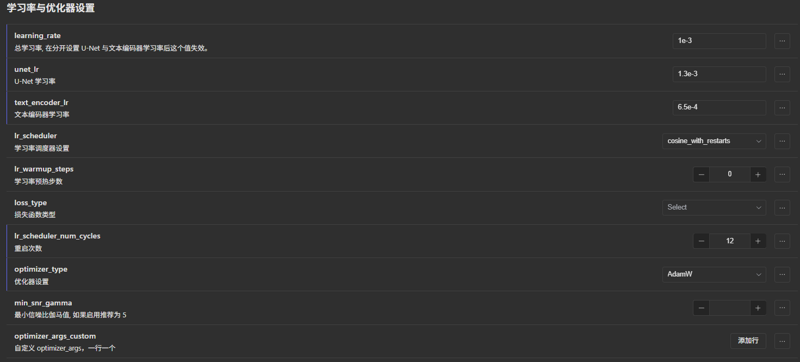
因为Lokr比LoRA更难拟合,加上我们使用了非常大的总batch size,学习率比前文中我推荐的2~4 e-4要高的多。我常用的值为1~1.5 e-3,个人推荐从1.3e-3开始尝试。文本编码器的学习率我没有从图表中观察到,很可能没有学习,但仍然照常填了U-net学习率的一半或十分之一。这个学习率对应的是AdamW优化器。
调度器、优化器等设置根据你的个人习惯设置即可,个人习惯使用余弦重启,每50epoch重启3次,优化器选择AdamW(或8bit)。
网上流传比较广泛的B站UP主今宵的教程推荐使用神童优化器,但个人因为50系环境不稳定的原因一直无法使用,而且该优化器需要单独填写的学习率和dim,因此这里不做过多相关的解释。
Because Lokr is harder to fit than LoRA, and we’re using a very large effective batch size, the learning rate is much higher than the 2 × 10⁻⁴ to 4 × 10⁻⁴ I recommended earlier. I typically use values between 1 × 10⁻³ and 1.5 × 10⁻³, and personally suggest starting at 1.3 × 10⁻³. I didn’t observe any learning for the text encoder in the charts—it likely isn’t updating—but I still set it to half or one-tenth of the U-net learning rate. This learning rate is for AdamW optimizer.
Scheduler, optimizer, and other settings can be adjusted to your own preference. I personally use cosine restarts with three restarts every 50 epochs and choose the AdamW optimizer (or 8-bit).
A widely circulated tutorial by the Bilibili user “今宵” recommends using the Prodigy optimizer, but I’ve never been able to get it working due to instability on 50-series GPU environments, and because that optimizer requires specifying its own learning rate and dim, I won’t cover it here.
训练网络相关 (Training network related)
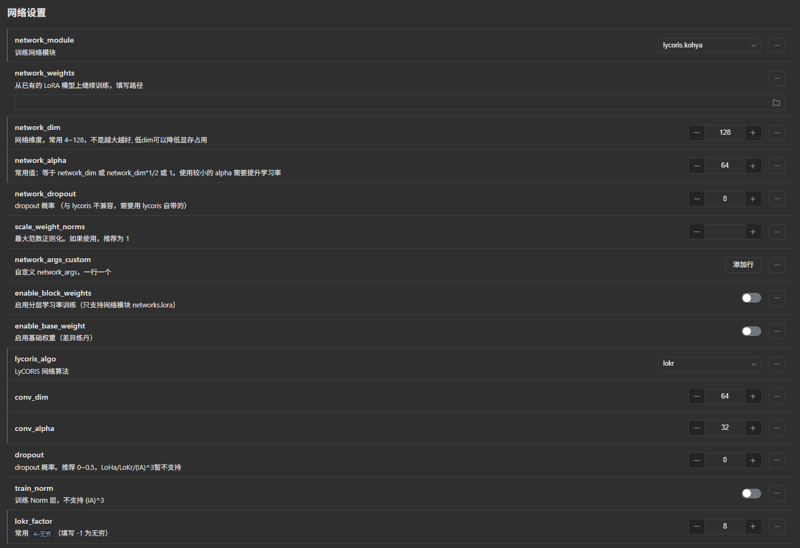
网络设置可以无脑按照图片中填写。
dim和conv dim越大,拟合到的细节就越多,因此直接128拉到顶直接填10000000。
其中lokr的作者建议conv dim不要大于64,因此拉到64。
如果你可以接受一个Lokr的文件大小接近200m,lokr factor可以填写4。这个数值越小,训练出来的文件也就越大,参数也就越多,细节也越多。但填写8已经可以有很好的效果。
Network settings can be filled in blindly according to the image.
The larger the dim and conv dim, the more details are fitted, so max them out at 12810000000.
The Lokr author recommends that conv dim not exceed 64, so set it to 64.
If you can accept a Lokr file size close to 200 MB, you can set lokr factor to 4. The smaller this value, the larger the resulting file, the more parameters, and the more details—but setting it to 8 already delivers excellent results.
标签相关 (Caption or tag related)
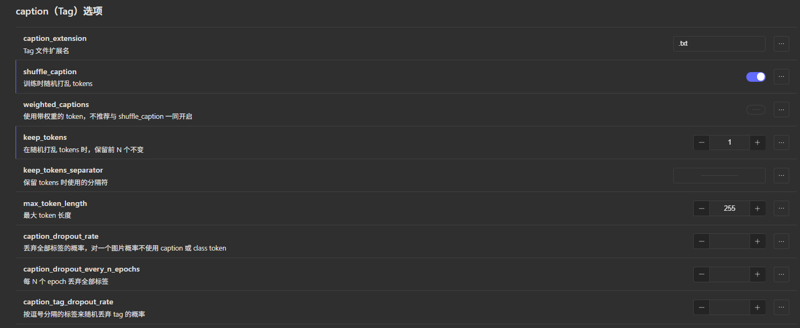
开启随机打乱tokens并保留第一个不变。这一步保证的是触发词tag永远在第一位并从图片中吸收最多的权重,而其它tag则尽可能均匀吸收。在训练中,越靠前的tag从图片中吸收的权重越多。
不要开启任何丢弃标签相关的选项,因为我猜你的训练集中大概率有马赛克等不想要的特征,这些特征可能会因为丢弃标签而被Lokr吸收。
Enable random shuffling of tokens while keeping the first one fixed. This ensures that your trigger-word tag always stays in the first position and absorbs the most weight from the images, while the other tags absorb weight as evenly as possible. During training, the earlier a tag appears, the more weight it absorbs from the images.
Do not enable any tag-dropping options, because your dataset very likely contains unwanted features such as mosaics, which could otherwise be absorbed by Lokr when tags are dropped.
噪声相关 (Noise related)

噪声设置如图照常填写多分辨率金字塔的两项参数。
For the noise settings, fill in the two multi-resolution pyramid parameters as shown in the figure.
关于V预测训练 (About V-pred training)
以Noob XL进行V预测训练时,需要替换训练器中的脚本包,并在自定义参数 ui custom params中添加以下参数(该部分参数不会随着下载配置文件而保存,每次导入先前的配置文件需要再次输入,需注意):
When performing V-prediction training with Noob XL, you need to replace the script package in the trainer and add the following parameters under Custom Parameters (UI Custom Params). These parameters won’t be saved with the downloaded config file, so you’ll need to re-enter them each time you import a previous configuration. (This part may be different on other trainers like kohya ss)
v_parameterization = true
zero_terminal_snr = true
v2 = false
scale_v_pred_loss_like_noise_pred = true关于训练器的脚本包,来源为站内文章如何在v预测模型上训练LoRA | How to train a LoRA on v-pred SDXL model。对于秋叶训练器,将根目录下scripts文件夹中的stable文件夹替换为新脚本包即可,名称当然需要保留stable,注意文件目录结构,不要发生多套了一层文件夹的情况。
Regarding the trainer’s script package: it comes from the on-site article 如何在v预测模型上训练LoRA | How to train a LoRA on v-pred SDXL model.
我的策略的原因和结果 (Reasons and outcomes of my strategy)
你可以在网络上看到一些诸如不打标训练画风,或不使用正则训练集的策略。
如果不进行打标,像图片中不想要的诸如马赛克这样的特征就会被吸收进Lokr。但如果你保证训练集图片中的所有特征都是你想要的,这样做可以让这个Lokr不需要触发词。
如果不使用正则训练集,也可以起到类似于不使用触发词就能触发画风的效果,但是这里的原理是画风被训练集中出现的每个tag都吸收了。这对于最终结果来说是更加不可控和不稳定的。也许这一次生图时使用了更多在训练集中出现过的tag,画风就更强烈;下一次使用了更少在训练集中出现过的tag,画风就更弱。
而正则训练集的作用就是,使用同tag吸收其它各种各样的画风,将原本的画风从这个tag中“挤”出去,且画风之间也会互相挤兑,最终在非触发词中将几乎不存在画风。
而所有从目标训练集中其它tag被挤出来的目标画风,都会被吸收到你的触发词上,因为正则训练集中没有你的触发词,就不会通过其它画风的图片来将画风从这个触发词中挤出去。
这也是为什么我上面有提到正则训练集的tag要尽可能涵盖目标训练集的所有tag。每个涵盖到的tag的画风,最终都会被挤到触发词中去,保证了最终结果的效果。
打个比方,你可以将每个tag理解成一个水桶,桶的盛水上限就是你设置的dim,其它的特征都是水,而画风可以理解成油。本来每个水桶会几乎均匀地接油和水(实际上越靠前接的越多),但除了你的触发词水桶之外,其它的水桶都被你的正则训练集灌入了更多的水,这些桶中的油就因为超过了上限而溢了出来,而你的触发词水桶被灌入的水少的多得多,最终油被大量收集到你的触发词水桶之中。
You can find strategies online such as training a style without tagging, or without using a regularization dataset.
If you skip tagging, unwanted features—like mosaics—will be absorbed into Lokr. But if you guarantee that every feature in your training images is desirable, this lets you train a Lokr without a trigger word.
If you don’t use a regularization dataset, you can similarly trigger the style without a trigger word, but the mechanism there is that every tag appearing in the training set absorbs the style. This makes the final result less controllable and more unstable. Maybe this time your generation uses more tags that appeared during training and the style is strong; next time it uses fewer of those tags and the style is weak.
The regularization dataset’s role is to use the same tags to absorb all sorts of other styles, “pushing out” the desired style from those tags, and having the styles compete with each other so that in the non–trigger-word tags the style is nearly absent.
All of the target style that gets pushed out of other tags in the target training set will be absorbed by your trigger-word tag—since your trigger-word tag never appears in the regularization set, no other style images can push it out of the trigger-word tag.
That’s why I mentioned above that the tags in the regularization set should cover as many tags from the target set as possible. Every style covered by a tag will ultimately be squeezed into the trigger-word tag, ensuring the final effect.
As a metaphor, you can think of each tag as a bucket (not that bucket for training at different resolution) whose maximum water capacity is the dim you’ve set, with other features as water and the target-style as oil. Normally each bucket would collect oil and water almost evenly (in practice, those earlier in order collect more), but except for your trigger-word bucket, all the others are filled with extra water from your regularization set, causing their oil to overflow. Your trigger-word bucket, having much less water added, ends up collecting most of the oil.
本文就到这里,应该已经把我目前所知道的东西讲解得比较全面了,如果有问题也可以评论提问,希望大伙都能炼出自己满意的画风。
This article ends here. I hope I’ve thoroughly explained everything I currently know. If you have any questions, feel free to leave a comment or ask. Here’s hoping everyone can train an art style they’re happy with.

