Introduction
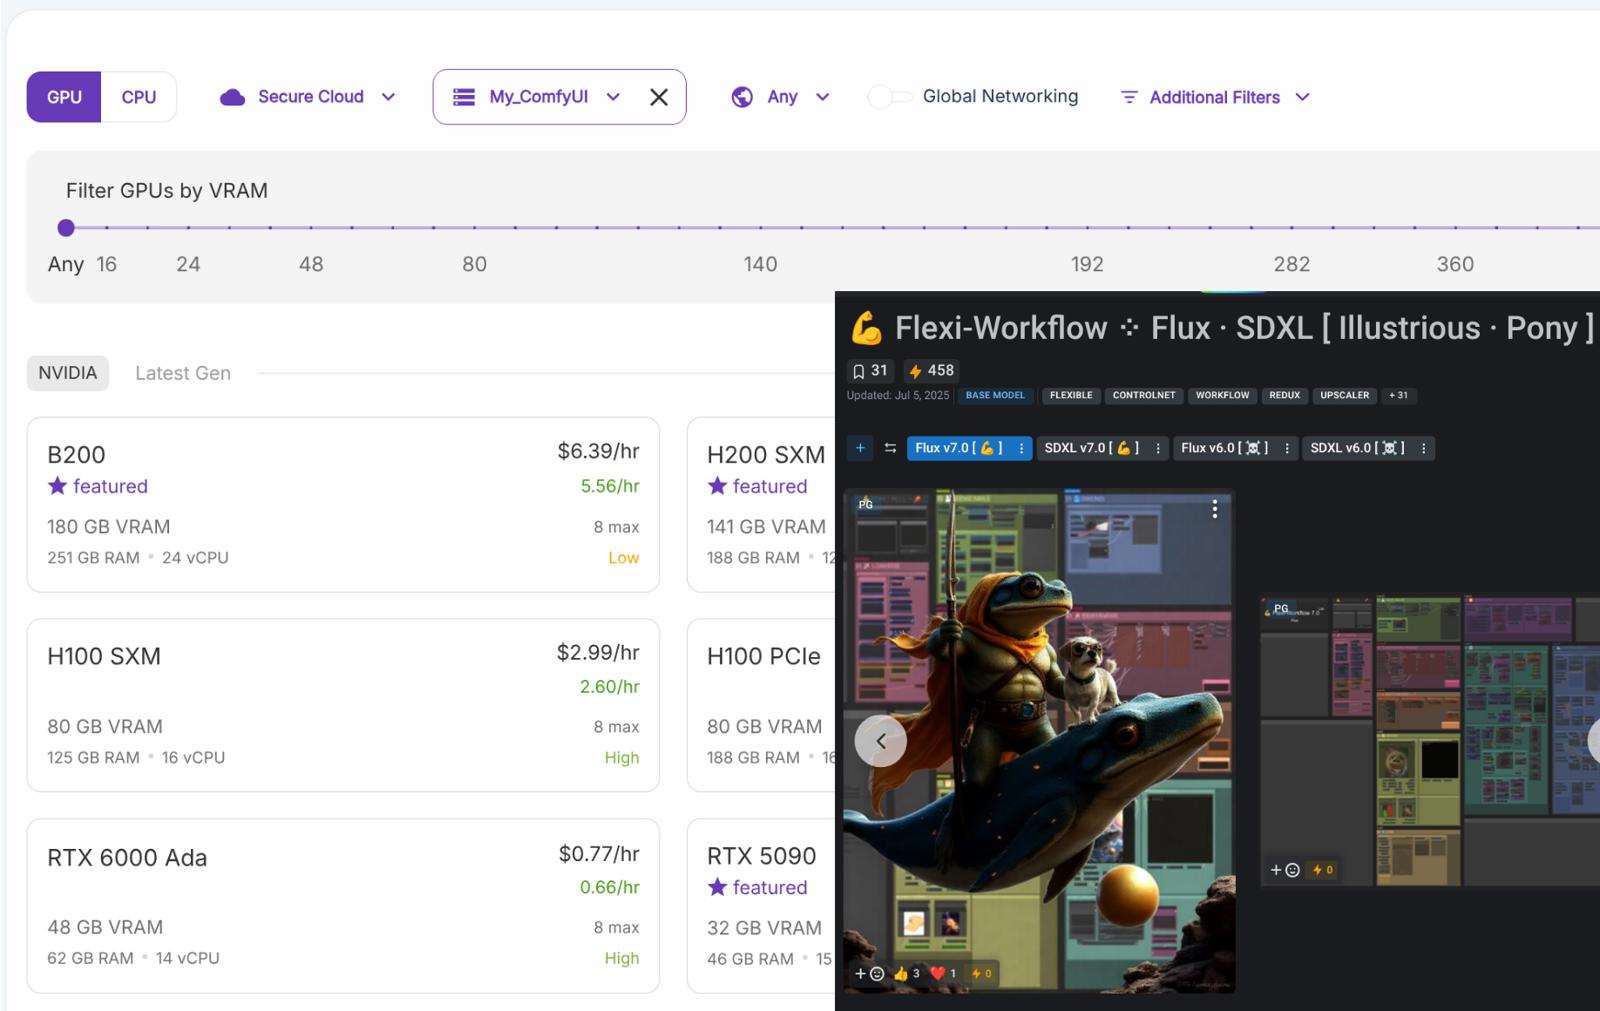
This is a companion article to the 💪 Flexi-Workflow, a flexible and extensible workflow framework in variants of Flux and SDXL.
While this suite of workflows was built and configured to run locally with moderate hardware requirements (e.g., NVIDIA GeForce RTX 3060 with 12 GB VRAM, as on my machine), sometimes you might just need a little more oomph!!! Herein, I provide a guided tutorial toward running the Flexi-Workflows on Runpod, a pay-as-you-go service providing on-demand cloud GPU rental. Many of the principles and provided lines of code, however, should be transferable to other similar services and/or for running other workflows of your choice.
Deployment of Flexi-Workflows on Runpod
Getting started with Runpod
Set up a Runpod account; I like just linking it to my Google account. Then, you'll have to add money to your account (e.g., $100) and all that jazz. Refer to the Runpod help system, if needed.
Preparing to deploy a "Pod"
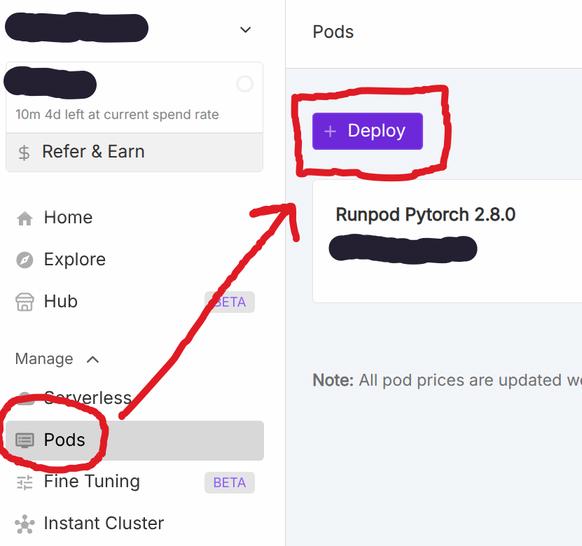
From the menu, select Pods, then + Deploy:
Now, given that pods are ephemeral, you'll need to decide which of the following choices works best for you:
Deploy and configure a Pod completely from scratch each and every time you need one, including reinstalling ComfyUI and custom nodes, downloading models, et al.
PROS: No extra storage costs
CONS: Extra deployment time; remembering or repeating setup steps; rendered images will be lost forever when the Pod terminates, unless saved otherwise
Create a network volume on Runpod.
PROS: All of your personal and important stuff (e.g., ComfyUI installation, models, and images) gets saved; easy integration with Pods, since they are on the same platform
CONS: Modest storage costs
Manually sync—upload and download—with an additional cloud storage service, such as BackBlaze.
PROS: May be cheaper; may be a service you already have
CONS: Syncing is not automatic, so if you don't remember to do it manually important recent stuff will be lost forever; connecting services doesn't even work much of the time (at least with BackBlaze); requires setting up application key on the storage service; syncing large amounts of data (e.g., AI checkpoint models) can be somewhat slow
Presuming choice 2, which is recommended to get started...
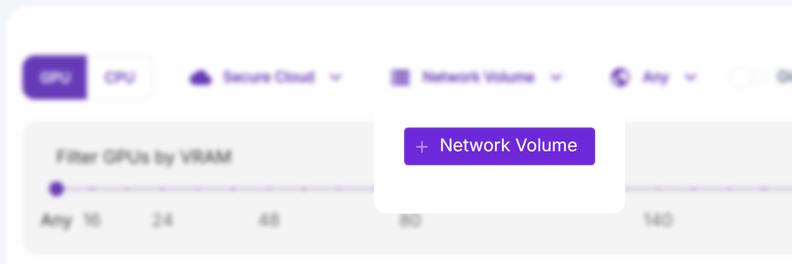
From the top menu, select Network Volume and then + Network Volume.
Your Network Volume setup might look something like this:
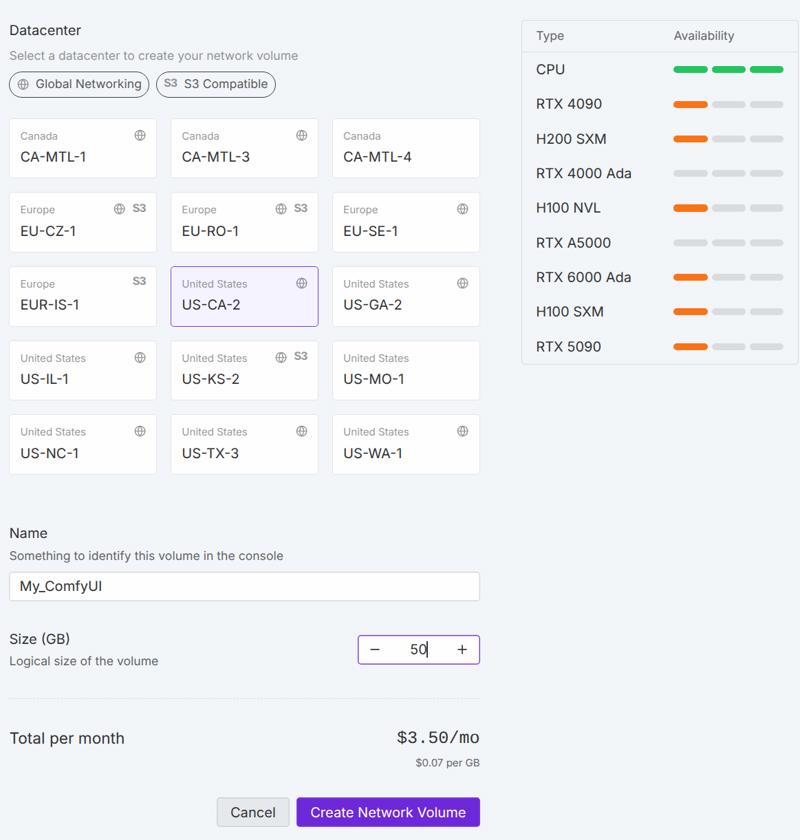
For setting up and running ComfyUI, 50GB is probably on the small side of what you'll want to start with. At any time, network volumes can be manually increased in size, but not decreased.
Deploying a Pod
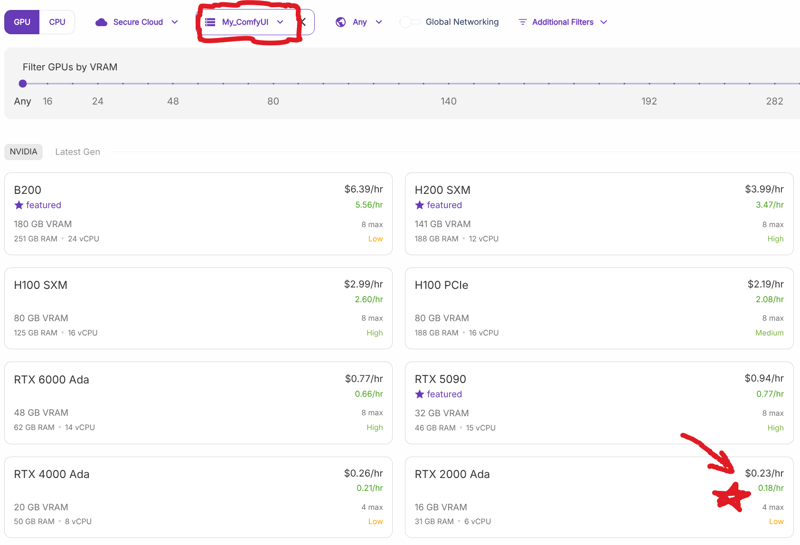
From the Pod deployment screen, make sure your network volume is selected in the top menu. Then, browse for the CHEAPEST available Pod. —You can deploy a faster Pod at a later time once you have everything set up and running...
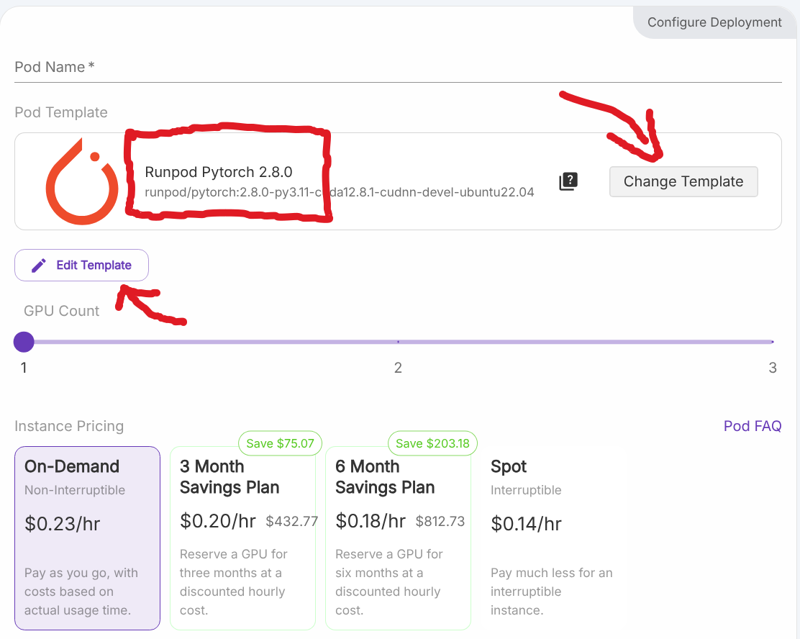
After selecting your Pod, change the template to Runpod Pytorch 2.8.0 (or the latest official Pytorch version available, but NOT the Runpod ComfyUI one). —While you are welcome to try the ComfyUI template, it won't be as up-to-date nor as customizable, and won't save any core updates.
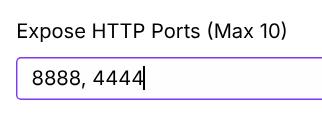
Then, select to Edit Template and add an additional HTTP port, such as "4444".
Review other choices, then Deploy On-Demand and wait for it to run through its start up procedures. —While it might be tempting to stop and restart the Pod with 0 GPUs attached—thinking you can save even a few more pennies during the installation process—this will default the storage container space down to 5GB and you will run into difficulties getting everything installed.
Navigating and configuring a Pod
Open the Jupyter Lab Notebook, if one does not start automatically. —Alternatively, you can use the web terminal option.
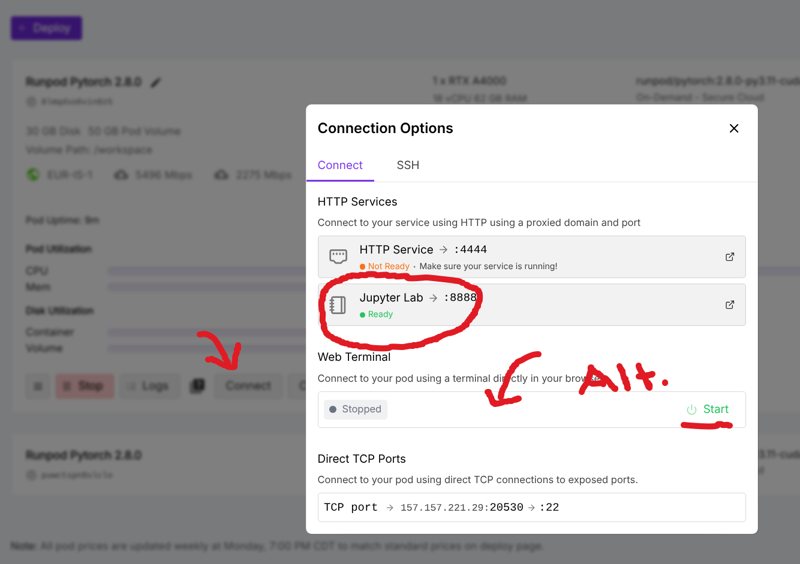
Launch a terminal session.
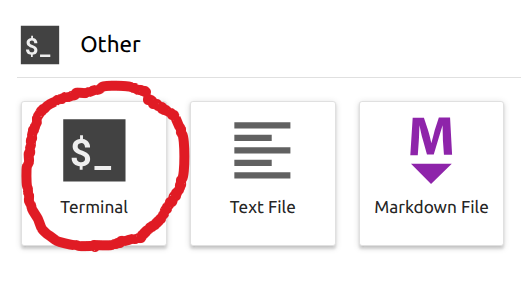
Installing ComfyUI
As you work through this section, make sure your CUDA version (e.g., 12.8) stays consistent between your Pod and installed Python libraries. You can check this on your Pod deployment:

Alternatively (and definitively), run the following command to check the active CUDA version:
# check nvidia GPU specs
nvcc --version
Starting a fresh installation of ComfyUI
Run the following commands to start a fresh installation of ComfyUI (use ctrl-c, then ctrl-alt-p to copy and paste):
# download fresh installation of comfyui
cd /workspace
git clone https://github.com/comfyanonymous/ComfyUI.git

# create a python virtual environment inside the comfyui folder and activate it
cd /workspace/ComfyUI
python -m venv venv
source venv/bin/activate
Installing required and/or useful libraries
Run the following commands to install key Python libraries:
# make sure the CUDA version matches your Pod
CUDA_HOME=/usr/local/cuda-12.8/ pip install --upgrade chardet cmake compiler comfy-cli deepdiff diffusers flatbuffers gitpython imageio-ffmpeg msgpack ninja numpy nvidia-pyindex nvidia-smi nvitop packaging pep517 pip protobuf psutil scikit-image setuptools sympy toml transformers triton typer unzip uv wheel --resume-retries 15 --timeout 20
Run the following commands to build and install the latest nightly version of PyTorch:
# make sure the CUDA version matches your Pod
# these are large files, so check that they completely download and install correctly...rerun if needed
CUDA_HOME=/usr/local/cuda-12.8/ MAX_JOBS=2 pip install --upgrade --pre torch torchvision torchaudio torchao --index-url https://download.pytorch.org/whl/nightly/cu128 --resume-retries 15 --timeout 20

# alternatively, uncomment and try this more conservative approach
# CUDA_HOME=/usr/local/cuda-12.8/ MAX_JOBS=2 pip install --upgrade torch torchvision torchaudio torchao --extra-index-url https://download.pytorch.org/whl/cu128 --resume-retries 15 --timeout 20
Run the following commands to build and install the latest version of Sage Attention 2, which takes several minutes to complete and may even look frozen at times (but periodically check the Pod status, such as in the system logs showing any OOM errors):
# make sure the CUDA version matches your Pod
# may take several minutes to complete
mkdir -p /workspace/ComfyUI-build-libraries
cd /workspace/ComfyUI-build-libraries
git clone https://github.com/thu-ml/SageAttention.git
cd SageAttention
git pull
CUDA_HOME=/usr/local/cuda-12.8/ EXT_PARALLEL=4 NVCC_APPEND_FLAGS="--threads 8" MAX_JOBS=32 pip install . --no-build-isolation
cd /workspace/ComfyUI

# alternatively, uncomment and try this more conservative approach, which will install faster but likely won't run faster
# CUDA_HOME=/usr/local/cuda-12.8/ MAX_JOBS=2 pip install --upgrade sageattention

# alternatively, uncomment and try this for the latest cutting-edge Sage Attention 3, but check the source github page for any updates to these commands
# mkdir -p /workspace/ComfyUI-build-libraries
# cd /workspace/ComfyUI-build-libraries
# git clone https://github.com/Dao-AILab/flash-attention.git --recursive
# git checkout b7d29fb3b79f0b78b1c369a52aaa6628dabfb0d7 # 2.7.2 release
# cd hopper
# git pull
# CUDA_HOME=/usr/local/cuda-12.8/ MAX_JOBS=2 pip install . --no-build-isolation
# cd /workspace/ComfyUI
Run the following commands to build and install the latest nightly version of Xformers, which may take a few minutes to complete:
# make sure the CUDA version matches your Pod
# may take a few minutes to complete
CUDA_HOME=/usr/local/cuda-12.8/ MAX_JOBS=2 pip install --upgrade -v --no-build-isolation -U git+https://github.com/facebookresearch/xformers.git@main#egg=xformers

# alternatively, uncomment and try this more conservative approach, which still installs a nightly version, but doesn't build it
# CUDA_HOME=/usr/local/cuda-12.8/ MAX_JOBS=2 pip install --upgrade --pre -U xformers --resume-retries 15 --timeout 20
Optionally, run the following commands to build and install the latest version of Apex, which may take a few minutes to complete:
# make sure the CUDA version matches your Pod
# may take several minutes to complete
mkdir -p /workspace/ComfyUI-build-libraries
cd /workspace/ComfyUI-build-libraries
git clone https://github.com/NVIDIA/apex
cd apex
git pull
CUDA_HOME=/usr/local/cuda-12.8/ pip install -v --disable-pip-version-check --no-cache-dir --no-build-isolation --config-settings "--build-option=--cpp_ext" --config-settings "--build-option=--cuda_ext" ./
cd /workspace/ComfyUI
Optionally, run the following commands to build and install the latest version of Bitsandbytes, which may take a few minutes to complete:
# make sure the CUDA version matches your Pod
# may take several minutes to complete
mkdir -p /workspace/ComfyUI-build-libraries
cd /workspace/ComfyUI-build-libraries
git clone https://github.com/bitsandbytes-foundation/bitsandbytes.git
cd bitsandbytes
git pull
CUDA_HOME=/usr/local/cuda-12.8/ pip install --upgrade cmake
CUDA_HOME=/usr/local/cuda-12.8/ cmake -DCOMPUTE_BACKEND=cuda -S .
CUDA_HOME=/usr/local/cuda-12.8/ make
CUDA_HOME=/usr/local/cuda-12.8/ pip install .
Optionally, run the following commands to build and install the latest version of CublasOps, which may take a few minutes to complete:
# make sure the CUDA version matches your Pod
# may take several minutes to complete
mkdir -p /workspace/ComfyUI-build-libraries
cd /workspace/ComfyUI-build-libraries
git clone https://github.com/aredden/torch-cublas-hgemm.git
cd torch-cublas-hgemm
git pull
CUDA_HOME=/usr/local/cuda-12.8/ python -m pip install -U -v .
Optionally, run the following commands to build and install the latest nightly version of Flash Attention, which takes several minutes to complete and may even look frozen at times (but periodically check the Pod status, such as in the system logs showing any OOM errors...or install later on a Pod with more RAM):
# make sure the CUDA version matches your Pod
# may take several minutes to complete
mkdir -p /workspace/ComfyUI-build-libraries
cd /workspace/ComfyUI-build-libraries
git clone https://github.com/Dao-AILab/flash-attention
cd flash-attention
git pull
CUDA_HOME=/usr/local/cuda-12.8/ pip install --upgrade ninja
CUDA_HOME=/usr/local/cuda-12.8/ MAX_JOBS=2 pip install . --no-build-isolation
cd /workspace/ComfyUI

# alternatively, uncomment and try this more conservative approach
# CUDA_HOME=/usr/local/cuda-12.8/ MAX_JOBS=1 pip install --upgrade flash_attn --no-build-isolation
Optionally, run the following command to install the latest version of Onnxruntime:
# make sure the CUDA version matches your Pod
CUDA_HOME=/usr/local/cuda-12.8/ pip install --upgrade flatbuffers numpy packaging protobuf sympy
CUDA_HOME=/usr/local/cuda-12.8/ pip install --upgrade --pre --index-url https://aiinfra.pkgs.visualstudio.com/PublicPackages/_packaging/ORT-Nightly/pypi/simple/ onnxruntime-gpu

# alternatively, uncomment and try this more conservative approach
# CUDA_HOME=/usr/local/cuda-12.8/ pip install --upgrade onnxruntime onnxruntime-gpu
Optionally, run the following command to install the latest version of PyOpenGL and PyOpenGL_Accelerate:
# make sure the CUDA version matches your Pod
CUDA_HOME=/usr/local/cuda-12.8/ pip install --upgrade PyOpenGL PyOpenGL_accelerate
Optionally, run the following command to install the latest version of Radial Attention (w/ Sage Attention 2 support):
# make sure the CUDA version matches your Pod
# these install instructions may not be working right now...
mkdir -p /workspace/ComfyUI-build-libraries
cd /workspace/ComfyUI-build-libraries
git clone https://github.com/mit-han-lab/radial-attention.git --recursive
cd radial-attention
git pull
cd third_party/SageAttention
CUDA_HOME=/usr/local/cuda-12.8/ EXT_PARALLEL=4 NVCC_APPEND_FLAGS="--threads 8" MAX_JOBS=32 pip install . --no-build-isolation
cd ../..
cd third_party/sparse_sageattn_2
CUDA_HOME=/usr/local/cuda-12.8/ pip install --upgrade ninja
CUDA_HOME=/usr/local/cuda-12.8/ pip install . --no-build-isolation
cd /workspace/ComfyUI
Optionally, run the following command to install the latest version of SpargeAttention:
# make sure the CUDA version matches your Pod
# may take several minutes to complete
mkdir -p /workspace/ComfyUI-build-libraries
cd /workspace/ComfyUI-build-libraries
git clone https://github.com/thu-ml/SpargeAttn.git
cd SpargeAttn
git pull
CUDA_HOME=/usr/local/cuda-12.8/ pip install --upgrade ninja
CUDA_HOME=/usr/local/cuda-12.8/ pip install . --no-build-isolation
cd /workspace/ComfyUI
Optionally, run the following commands to build and install the latest version of Sam 2, which may take a few minutes to complete:
# make sure the CUDA version matches your Pod
# may take several minutes to complete
mkdir -p /workspace/ComfyUI-build-libraries
cd /workspace/ComfyUI-build-libraries
git clone https://github.com/facebookresearch/sam2.git
cd sam2
git pull
CUDA_HOME=/usr/local/cuda-12.8/ pip install . --no-build-isolation
cd /workspace/ComfyUI
Finishing a fresh installation of ComfyUI
Run the following commands to finish a fresh installation of ComfyUI, including installation of Manager:
# pull the latest comfyui updates and install requirements
cd /workspace/ComfyUI
git pull
CUDA_HOME=/usr/local/cuda-12.8/ pip install -r requirements.txt --resume-retries 15 --timeout 20

# download comfyui manager package and install requirements
cd /workspace/ComfyUI/custom_nodes
git clone https://github.com/ltdrdata/ComfyUI-Manager comfyui-manager
cd  /workspace/ComfyUI/custom_nodes/comfyui-manager
CUDA_HOME=/usr/local/cuda-12.8/ pip install -r requirements.txt --resume-retries 15 --timeout 20

# configure comfy command line client to offer auto-completion hints
cd /workspace/ComfyUI/
comfy --here --install-completion
Pre-installing ComfyUI custom node packages
Optionally, run the following command to get a head start on installing some popular custom node packages, which are used in the 💪 Flexi-Workflows and likely others:
# install popular custom node packages
# if any fail, try installing through the ComfyUI GUI
CUDA_HOME=/usr/local/cuda-12.8/ python /workspace/ComfyUI/custom_nodes/comfyui-manager/cm-cli.py install --channel dev ComfyMath ComfyUI_Comfyroll_CustomNodes comfyui-easy-use comfyui-impact-pack comfyui-kjnodes comfyui_controlnet_aux controlaltai-nodes rgthree-comfy
Optionally, run the following command to install many of the node packages used in the 💪 Flexi-Workflow v7 FULL edition; you will not need all of these for running the scaled-down editions:
# install flexi-workflow v7 FULL edition custom node packages
# if any fail, try installing through the comfyui GUI
CUDA_HOME=/usr/local/cuda-12.8/ python /workspace/ComfyUI/custom_nodes/comfyui-manager/cm-cli.py install --channel dev A8R8_ComfyUI_nodes ComfyUI-GIMM-VFI ComfyUI-Image-Filters ComfyUI-NAG ComfyUI-ReduxFineTune ComfyUI-TaylorSeer ComfyUI-Thera ComfyUI-TiledDiffusion ComfyUI-VideoHelperSuite ComfyUI-VideoUpscale_WithModel ComfyUI-nunchaku ComfyUI_ExtraModels ComfyUI_InvSR ComfyUI_LayerStyle_Advance ComfyUI_Sonic Comfyui-LG_Relight Float_Animator LanPaint Ttl_ComfyUi_NNLatentUpscale anaglyphtool-comfyui comfy-plasma comfyui-advancedliveportrait comfyui-detail-daemon comfyui-fluxsettingsnode comfyui-if_gemini comfyui-inpaint-cropandstitch comfyui-itools comfyui-openai-fm comfyui-pc-ding-dong comfyui-rmbg comfyui-supir comfyui-wd14-tagger comfyui_image_metadata_extension comfyui_ipadapter_plus comfyui_layerstyle comfyui_pulid_flux_ll comfyui_ultimatesdupscale comfyui_zenid gguf sd-perturbed-attention wanblockswap
Optionally, run the following command to install some additional quality of life packages:
# install quality of life packages
# if any fail, try installing through the comfyui GUI
CUDA_HOME=/usr/local/cuda-12.8/ python /workspace/ComfyUI/custom_nodes/comfyui-manager/cm-cli.py install --channel dev ComfyUI-Crystools ComfyUI-KikoStats comfyui-custom-scripts comfyui-lora-manager comfyui-n-sidebar pnginfo_sidebar scheduledtask
Launching ComfyUI
Run the following commands to launch ComfyUI:
# launch comfyui
cd /workspace/ComfyUI
source venv/bin/activate
comfy --here --skip-prompt launch -- --disable-api-nodes --preview-size 256 --fast --use-sage-attention --auto-launch --listen --port 4444
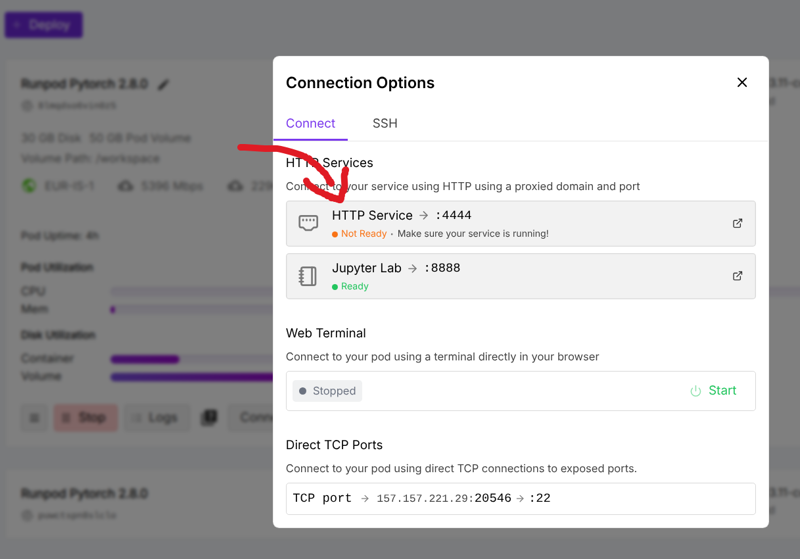
If you did not install Sage Attention, remove the "--use-sage-attention" argument. Change the port, if needed, to match your Pod setup. If ComfyUI does not automatically launch in a separate browser window, go back to your Pod deployment and connect to the HTTP service.
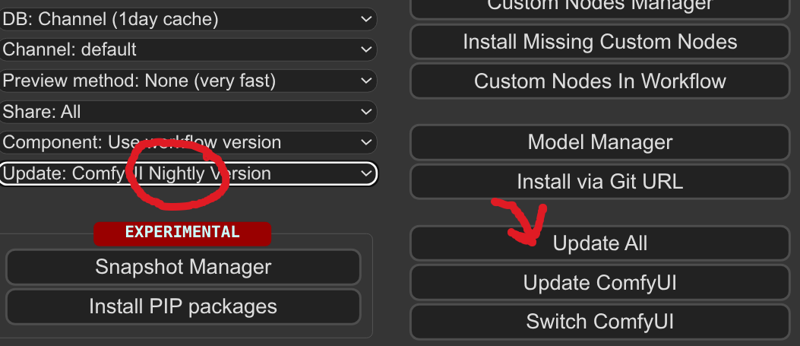
Updating and configuring ComfyUI
After successfully launching ComfyUI, open Manager and switch to the Nightly version. Then, update all.
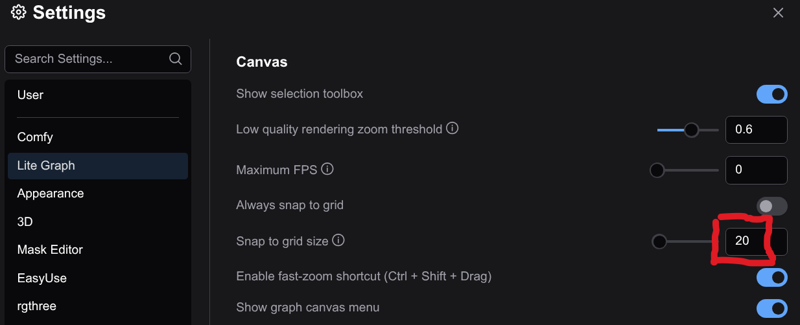
Optionally, open ComfyUI settings and change the Snap to grid size to 20, which is the spacing used in the 💪 Flexi-Workflows:
Installing additional custom node packages
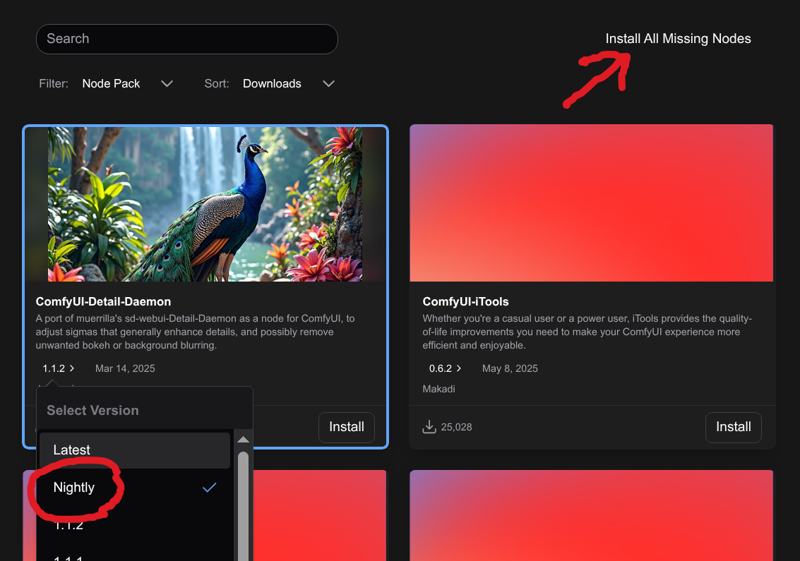
Open Manager and start installing node packages and/or drop a workflow—such as the 💪 Flexi-Workflow v7 light 🪶 edition—onto the canvas and go through the Install Missing Nodes process. It is recommended to select Nightly versions, prior to installation.
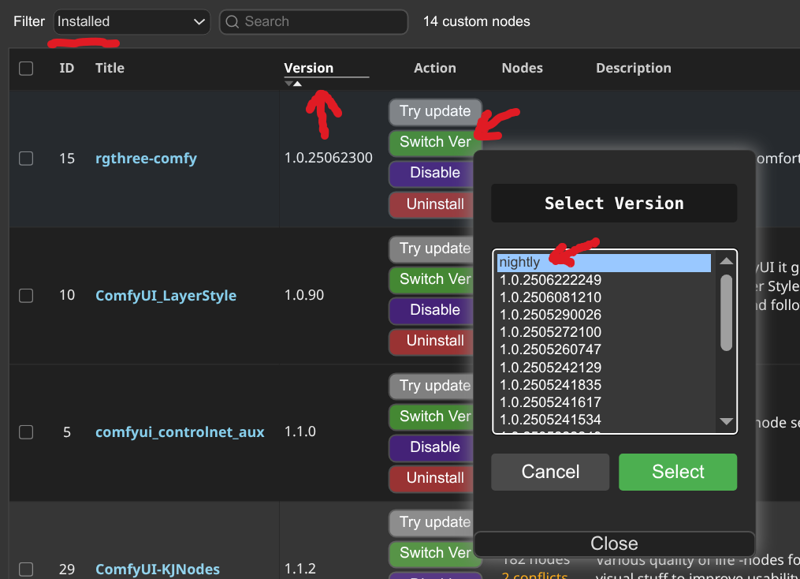
Optionally but recommended, open Manager, filter by Installed, sort by Version, then switch to nightly versions for all custom node packages. —There is a potential masking bug when using the 💪 Flexi-Workflows that comes from the KJNodes package, if it is not updated to nightly.
Restarting ComfyUI
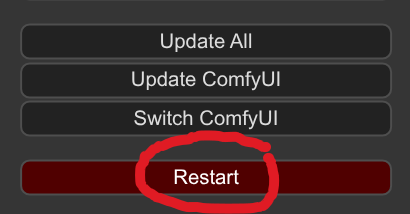
After all of these various updates, you will definitely want to restart ComfyUI by opening Manager and clicking Restart.
Optionally, from the command line stop ComfyUI with ctrl-c (which is the same as the copy shortcut...and can result in unexpected stoppage if not careful!). Then, update and restart ComfyUI with the following commands:
# AIO update and launch comfyui
cd /workspace/ComfyUI
source venv/bin/activate
CUDA_HOME=/usr/local/cuda-12.8/ python /workspace/ComfyUI/custom_nodes/comfyui-manager/cm-cli.py update all
comfy --here --skip-prompt launch -- --disable-api-nodes --preview-size 256 --fast --use-sage-attention --auto-launch --listen --port 4444
Downloading models
Downloading from ComfyUI Manager
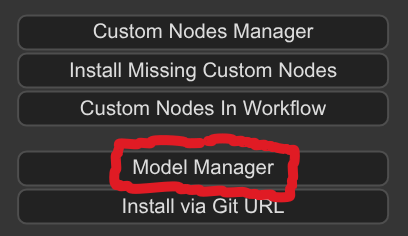
Open Manager, then Model Manager. Install any models you want, but the selection is very limited.
Downloading from Hugging Face
You may need to be signed in to Hugging Face for this to work. Locate any models you want, then right-click and Copy link address.
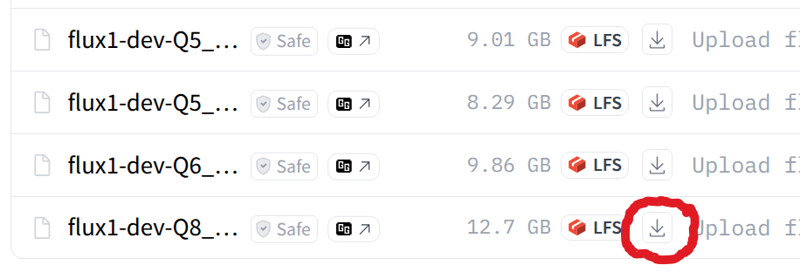
Edit the following command line template and run it from your Pod's Jupyter command line:
# hugging face download template
wget -N -P "/workspace/ComfyUI/models/<<remaining_folder_destination>>" "https://huggingface.co/<<remaining_url_to_model>>"

# hugging face download template, alternative...if you get destination name is too long error or want to save with a different filename
mkdir -p "/workspace/ComfyUI/models/<<remaining_folder_destination>>"
wget -N -O "/workspace/ComfyUI/models/<<output_file_destination>>"" "https://huggingface.co/<<remaining_url_to_model>>"
Downloading from Civitai
You will need to be signed in to Civitai and then create an API key for this to work. Navigate toward the bottom of your user settings:
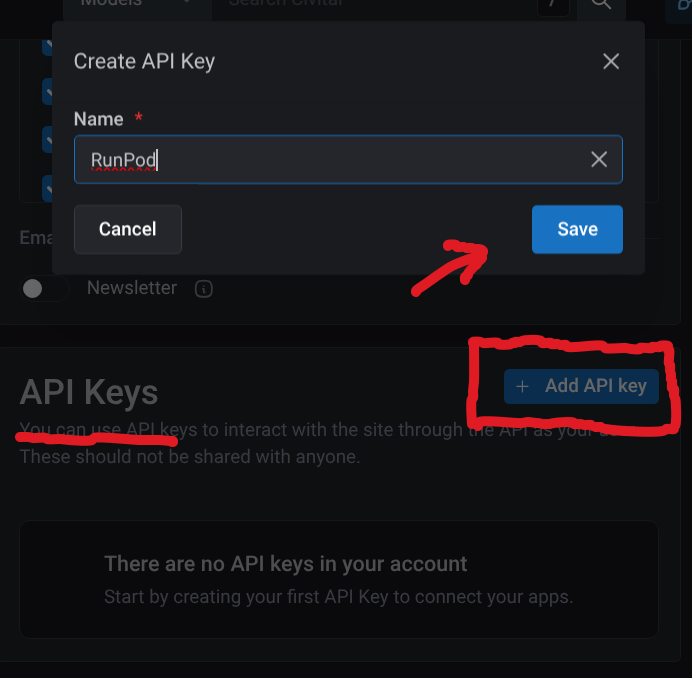
You will be asked to copy the API key; save it locally in a secure place for later reference. Locate any models you want, then right-click and Copy link address.
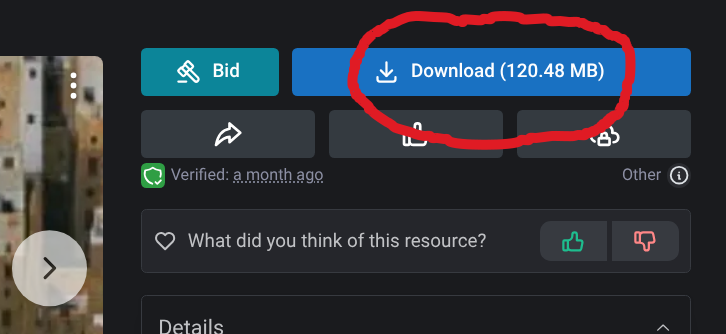
Edit the following command line template and run it from Pod's Jupyter command line:
# civitai download template
wget -N -P "/workspace/ComfyUI/models/<<remaining_folder_destination>>" "https://civitai.com/<<remaining_url_to_model>>&token=<<api_key>>" --content-disposition

# civitai download template, alternative...if you get destination name is too long error or want to save with a different filename
mkdir -p "/workspace/ComfyUI/models/<<remaining_folder_destination>>"
wget -N -O "/workspace/ComfyUI/models/<<output_file_destination>>"" "https://civitai.com/<<remaining_url_to_model>>&token=<<api_key>>"
Other remote download helpers
Downloads from other online repositories are possible; check the help documentation and follow the general process as for Hugging Face and Civitai.
If downloaded files are zipped, edit the following command line template:
# unzip file template
cd <<location_of_zip_file>>
unzip <<zipped_file_name>>

# unzip file template, alternative
cd <<location_of_zip_file>>
unzip <<zipped_file_name>> -d <<download_folder_destination>>
Uploading from your local computer
Uploading large model files from your own local computer is likely to be excruciatingly slow, but may be necessary when you can't find an online source repository or alternative. Files can simply be dragged and dropped in the Jupyter interface.
Semi-automated downloading of models used in Flexi-Workflows
You may need to manually agree to some model licenses (e.g., Flux.1 dev) on Hugging Face for some of these to work.
Given that the 💪 Flexi-Workflows were built and configured to run locally with moderate hardware requirements, you may want to upgrade some of the models to beefier versions (e.g., fp8 → fp16) for running on Runpod.
Edit (as needed) and run the following commands to download the active models used by default in the 💪 Flexi-Workflow v7.1 Flux editions:
# download checkpoint model
# edit to use your own API key
mkdir -p "/workspace/ComfyUI/models/diffusion_models/flux"
wget -N -O "/workspace/ComfyUI/models/diffusion_models/flux/flux1DevScaledFp8_v2.safetensors" "https://civitai.com/api/download/models/1158144?type=Model&format=SafeTensor&size=full&fp=fp8&token=YOURAPIKEY"

# download ViT-L text encoder
wget -N -P "/workspace/ComfyUI/models/text_encoders/flux" "https://huggingface.co/Aitrepreneur/FLX/resolve/2b03fd4a8280bda491f5e54e96ad38fd8ab7336b/ViT-L-14-TEXT-detail-improved-hiT-GmP-TE-only-HF.safetensors"

# download t5xxl text encoder
wget -N -P "/workspace/ComfyUI/models/text_encoders/flux" "https://huggingface.co/camenduru/FLUX.1-dev/resolve/fc63f3204a12362f98c04bc4c981a06eb9123eee/t5xxl_fp16.safetensors"

# download VAE
wget -N -P "/workspace/ComfyUI/models/vae/flux" "https://huggingface.co/receptektas/black-forest-labs-ae_safetensors/resolve/main/ae.safetensors"

# download Redux style model
wget -N -P "/workspace/ComfyUI/models/style_models/flux" "https://huggingface.co/ostris/Flex.1-alpha-Redux/resolve/main/flex1_redux_siglip2_512.safetensors"

# download Redux clip vision
wget -N -P "/workspace/ComfyUI/models/clip_vision/flux" "https://huggingface.co/ostris/ComfyUI-Advanced-Vision/resolve/main/clip_vision/siglip2_so400m_patch16_512.safetensors"

# download turbo lora
mkdir -p "/workspace/ComfyUI/models/loras/flux/acceleration"
wget -N -r -O "/workspace/ComfyUI/models/loras/flux/acceleration/FLUX.1-Turbo-Alpha.safetensors" "https://huggingface.co/alimama-creative/FLUX.1-Turbo-Alpha/resolve/main/diffusion_pytorch_model.safetensors"

# download details lora
wget -N -P "/workspace/ComfyUI/models/loras/flux/detail" "https://huggingface.co/tungmtp/flux_skin_lora/resolve/main/aidmaImageUprader-FLUX-v0.3.safetensors"

# download treefrog character lora
# edit to use your own API key
mkdir -p "/workspace/ComfyUI/models/loras/flux/animal"
wget -N -O "/workspace/ComfyUI/models/loras/flux/animal/kgr-hyla-cinerea-flux-v01.safetensors" "https://civitai.com/api/download/models/1225614?type=Model&format=SafeTensor&token=YOURAPIKEY"

# download lucky dog character lora
# edit to use your own API key
mkdir -p "/workspace/ComfyUI/models/loras/flux/animal"
wget -N -O "/workspace/ComfyUI/models/loras/flux/animal/kgr-lucky-the-little-doggy-flux-v01.safetensors" "https://civitai.com/api/download/models/1225609?type=Model&format=SafeTensor&token=YOURAPIKEY"

# uncomment to download kontext checkpoint model
# wget -N -P "/workspace/ComfyUI/models/diffusion_models/flux/tools" "https://huggingface.co/6chan/flux1-kontext-dev-fp8/resolve/main/flux1-kontext-dev-fp8-e4m3fn.safetensors"
Edit (as needed) and run the following commands to download the active models used by default in the 💪 Flexi-Workflow v7.1 SDXL editions:
# download checkpoint model
# edit to use your own API key
mkdir -p "/workspace/ComfyUI/models/checkpoints/sdxl"
wget -N -O "/workspace/ComfyUI/models/checkpoints/sdxl/albedobaseXL_v31Large.safetensors" "https://civitai.com/api/download/models/1041855?type=Model&format=SafeTensor&size=pruned&fp=fp16&token=YOURAPIKEY"

# download VAE
wget -N -P "/workspace/ComfyUI/models/vae/sdxl" "https://huggingface.co/stabilityai/sdxl-vae/resolve/main/sdxl_vae.safetensors"

# download turbo lora
# edit to use your own API key
mkdir -p "/workspace/ComfyUI/models/loras/sdxl/acceleration"
wget -N -O "/workspace/ComfyUI/models/loras/sdxl/acceleration/sdxl_turbo_weghts_beta_v0_1_0.safetensors" "https://civitai.com/api/download/models/1330130?type=Model&format=SafeTensor&token=YOURAPIKEY"

# download details lora
# edit to use your own API key
mkdir -p "/workspace/ComfyUI/models/loras/sdxl/details"
wget -N -O "/workspace/ComfyUI/models/loras/sdxl/details/aidmaImageUpgraderSDXL-v0.3.safetensors" "https://civitai.com/api/download/models/1269325?type=Model&format=SafeTensor&token=YOURAPIKEY"

# download rain frog lora
# edit to use your own API key
mkdir -p "/workspace/ComfyUI/models/loras/sdxl/animal"
wget -N -O "/workspace/ComfyUI/models/loras/sdxl/animal/Rain Frog SDXL 2.safetensors" "https://civitai.com/api/download/models/1330130?type=Model&format=SafeTensor&token=YOURAPIKEY"

# download DOG lora
# edit to use your own API key
mkdir -p "/workspace/ComfyUI/models/loras/sdxl/animal"
wget -N -O "/workspace/ComfyUI/models/loras/sdxl/animal/DOG.safetensors" "https://civitai.com/api/download/models/708827?type=Model&format=SafeTensor&token=YOURAPIKEY"

# uncomment to download omnigen2 checkpoint model
# wget -N -P "/workspace/ComfyUI/models/diffusion_models/omnigen2" "https://huggingface.co/Comfy-Org/Omnigen2_ComfyUI_repackaged/resolve/main/split_files/diffusion_models/omnigen2_fp16.safetensors"

# uncomment to download qwen text encoder, used by omnigen2
# wget -N -P "/workspace/ComfyUI/models/text_encoders/omnigen2" "hhttps://huggingface.co/Comfy-Org/Omnigen2_ComfyUI_repackaged/resolve/main/split_files/text_encoders/qwen_2.5_vl_fp16.safetensors"
Edit (as needed) and run the following commands to download the active models used for Wan video generation by default in the 💪 Flexi-Workflow v7.1 Flux, Flux —core+wan, and SDXL editions:
# download checkpoint model
wget -N -P "/workspace/ComfyUI/models/diffusion_models/wan" "https://huggingface.co/city96/Wan2.1-I2V-14B-480P-gguf/resolve/main/wan2.1-i2v-14b-480p-Q8_0.gguf"

# download umt5xxl text encoder
wget -N -P "/workspace/ComfyUI/models/text_encoders/wan" "https://huggingface.co/Kijai/WanVideo_comfy/resolve/main/umt5-xxl-enc-bf16.safetensors"

# download clip vision
wget -N -P "/workspace/ComfyUI/models/clip_vision/wan" "https://huggingface.co/Comfy-Org/Wan_2.1_ComfyUI_repackaged/resolve/main/split_files/clip_vision/clip_vision_h.safetensors"

# download VAE
wget -N -P "/workspace/ComfyUI/models/vae/wan" "https://huggingface.co/calcuis/wan-gguf/resolve/ff59c62b6a008bc99677228596e096130066b234/wan_2.1_vae_fp32.safetensors"

# download fusionX turbo lora
wget -N -P "/workspace/ComfyUI/models/loras/wan/acceleration" "https://huggingface.co/Serenak/chilloutmix/resolve/main/Wan2.1_I2V_14B_FusionX_LoRA.safetensors"

# download self-forcing turbo lora
wget -N -P "/workspace/ComfyUI/models/loras/wan/acceleration" "https://huggingface.co/Kijai/WanVideo_comfy/resolve/main/Wan21_T2V_14B_lightx2v_cfg_step_distill_lora_rank32.safetensors"

# download upscaling model
wget -N -P "/workspace/ComfyUI/models/upscale_models" "https://huggingface.co/Kim2091/UltraSharpV2/resolve/main/4x-UltraSharpV2.safetensors"
Running ComfyUI and next steps
After completing all installation steps and restarting ComfyUI, hopefully you are able to render images successfully!
You may want to tweak your 💪 Flexi-Workflows—or other workflows—to take fuller advantage of the additional hardware resources:
Upload and switch to full model weights, such as from fp8 to fp16 or even fp32 equivalents. In most cases, you will probably want to use original released, non-GGUF models.
Switch any device processing from CPU to GPU (i.e., Cuda:0 or defaul).
You can try replacing any load model nodes with their MultiGPU equivalents.
For Wan video generation, bypass the Tea Cache and Block Swap nodes.
Recall that the CHEAPEST available Pod was recommended for the initial setup, but now you will probably want to consider redeployment to something beefier for faster render times (albeit at a cost). However, make sure you have a plan for saving your current setup before terminating your Pod.
Saving your ComfyUI setup and terminating a Pod
There are three basic scenarios here:
If you installed ComfyUI on a Pod's temporary container volume, it will be completely destroyed and lost upon terminating the Pod. If you now decide you want to save anything, some options are to download selected files to your own local computer using the Jupyter interface (which will be very slow!), setup and transfer data to a Runpod network volume (though not as easy as it sounds, this article may help), or setup and sync to a supported cloud service (see #3)
If you set up a network volume on Runpod to begin with AND attached it to your deployed Pod, you're golden! Everything important—your /workspace/, including ComfyUI installation*—will be saved automatically and show up again when redeployed.
If you set up a supported cloud service, such as BackBlaze, be sure to manually upload your data before terminating a Pod. You will have to reverse the process by downloading your data upon redeployment.
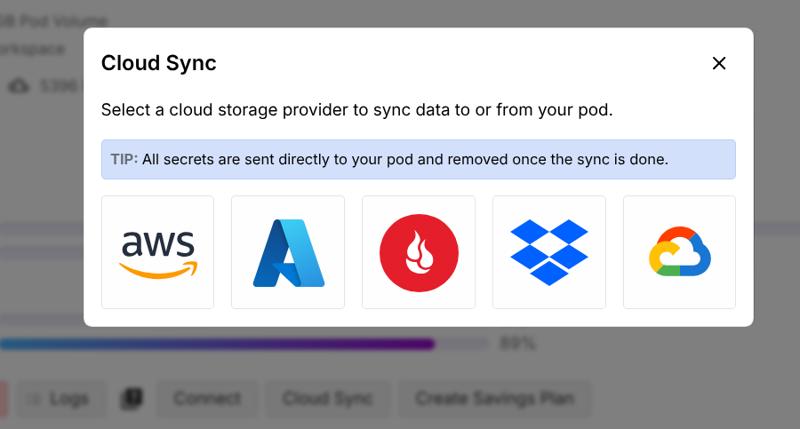
While stopping a Pod only puts it into a hibernation-like state, with a reduced rental rate, terminating a Pod completely destroys it forever!
[* = Some of the important Python libraries, such as Sage Attention, may require reinstallation.]
Redeploying your ComfyUI on a new Pod
As an addendum to the previous instructions, mouse over the available Pod options until you've found one that suits your needs and budget:
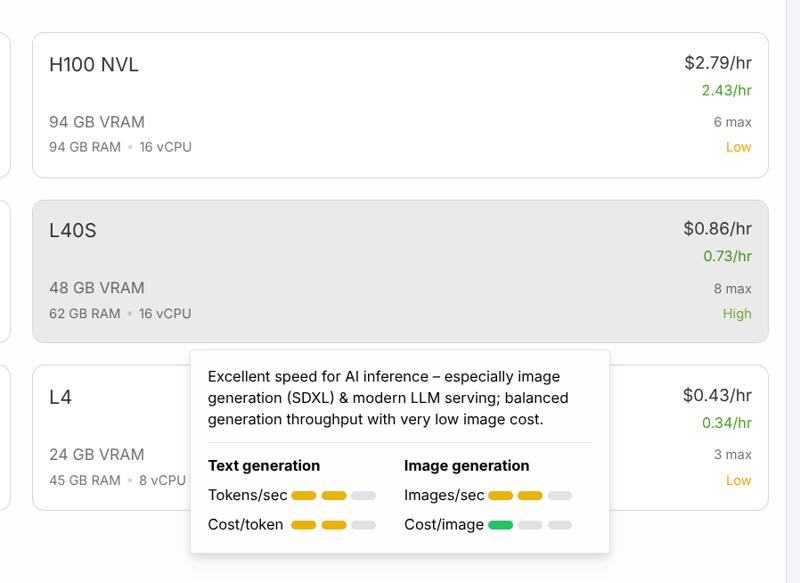
If you are using a network volume on Runpod, double-check it is attached to your Pod upon deployment and everything should show back up in your /workspace/.

If you are using a supported cloud service, such as BackBlaze, manually download your data after deployment.

Helpful reference
Some of these are repeated from the previous instructions, but can be helpful reference without having to hunt through all of the installation process again.
AIO update all and launch ComfyUI one-liner
# AIO update all and launch comfyui one-liner
cd /workspace/ComfyUI && . venv/bin/activate && CUDA_HOME=/usr/local/cuda-12.8/ pip install --upgrade pip && pip install --force-reinstall comfy-cli click==8.1.8 && git -C /workspace/ComfyUI pull && git -C /workspace/ComfyUI/custom_nodes/comfyui-manager pull && CUDA_HOME=/usr/local/cuda-12.8/ pip install -r /workspace/ComfyUI/requirements.txt -r /workspace/ComfyUI/custom_nodes/comfyui-manager/requirements.txt --resume-retries 15 --timeout 20 && CUDA_HOME=/usr/local/cuda-12.8/ python /workspace/ComfyUI/custom_nodes/comfyui-manager/cm-cli.py update all && comfy --here --skip-prompt launch -- --disable-api-nodes --preview-size 256 --fast --use-sage-attention --auto-launch --listen --port 4444
List ComfyUI command line arguments
# list comfyui command line arguments
cd /workspace/ComfyUI && python main.py --help
Download model templates
# hugging face download template
wget -N -P "/workspace/ComfyUI/models/<<remaining_folder_destination>>" "https://huggingface.co/<<remaining_url_to_model>>"

# hugging face download template, alternative...if you get destination name is too long error or want to save with a different filename
mkdir -p "/workspace/ComfyUI/models/<<remaining_folder_destination>>"
wget -N -O "/workspace/ComfyUI/models/<<output_file_destination>>"" "https://huggingface.co/<<remaining_url_to_model>>"

# civitai download template
wget -N -P "/workspace/ComfyUI/models/<<remaining_folder_destination>>" "https://civitai.com/<<remaining_url_to_model>>&token=<<api_key>>" --content-disposition

# civitai download template, alternative...if you get destination name is too long error or want to save with a different filename
mkdir -p "/workspace/ComfyUI/models/<<remaining_folder_destination>>"
wget -N -O "/workspace/ComfyUI/models/<<output_file_destination>>"" "https://civitai.com/<<remaining_url_to_model>>&token=<<api_key>>"
Pip commands
# list installed packages
pip list

# check for dependency conflicts
pip check

# install or upgrade package
# recommended to prepend with CUDA_HOME=/usr/local/cuda-12.8/
pip install --upgrade <<package>> --resume-retries 15 --timeout 20

# save pip state (into current folder)
pip freeze > date-pip-freeze.txt

# restore pip state (from current folder)
# recommended to prepend with CUDA_HOME=/usr/local/cuda-12.8/
pip install -r date-pip-freeze.txt --no-deps
Jupyter terminal commands
# recursively delete directories, which Jupyter does not allow by default in the GUI
rm -r <<file_or_directory>>
Unzip files
# unzip file template
cd <<location_of_zip_file>>
unzip <<zipped_file_name>>

# unzip file template, alternative
cd <<location_of_zip_file>>
unzip <<zipped_file_name>> -d <<download_folder_destination>>