
Foreword
This guide was developed with the generous support and expertise of SubtleShader and Huslyo123. SubtleShader’s contributions were foundational, particularly in the areas of photography, merging, fine-tuning, and precision. His input helped shape the structure, clarity, and quality standards throughout the guide. Huslyo123 provided valuable feedback and review, helping refine key aspects of the workflow and presentation.
Chapter 1: Introduction
Creating a highly realistic, high-fidelity, character LoRA (Low-Rank Adaptation) is a precise and professional undertaking. It requires a deliberate design methodology, technical discipline, and a comprehensive understanding of how visual data translates into semantic features within an AI model. This process can be compared to architectural design: the more intentional and refined your approach, the more stable and adaptable your final model will be.
This guide is intended for creators who require their model to perform consistently across a wide range of prompts, lighting conditions, facial expressions, and camera angles. Whether the objective is branding, marketing, storytelling, or personal use, the goal remains the same: to produce a character AI model that is photorealistic, promptable, and robust.
This guide is not designed to be:
A one-click training shortcut that eliminates the need for thoughtful input
A low-cost outsourcing solution that compromises quality for convenience
A photography tutorial, although a solid understanding of photography will significantly improve results
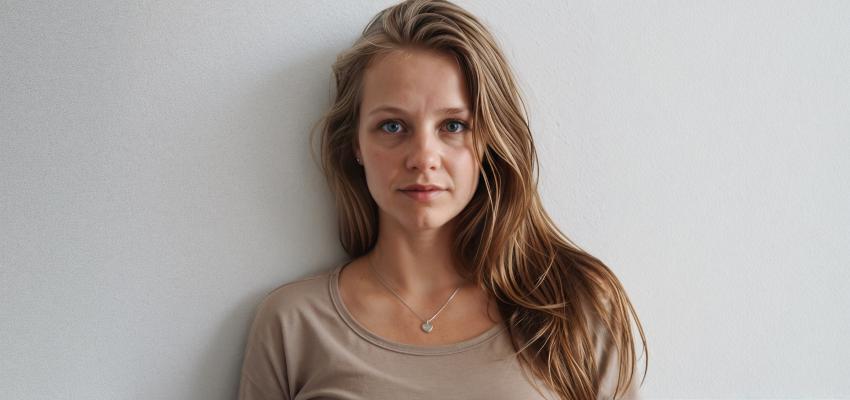
Below is an example of a ComfyUI generated image using the method described in this guide.
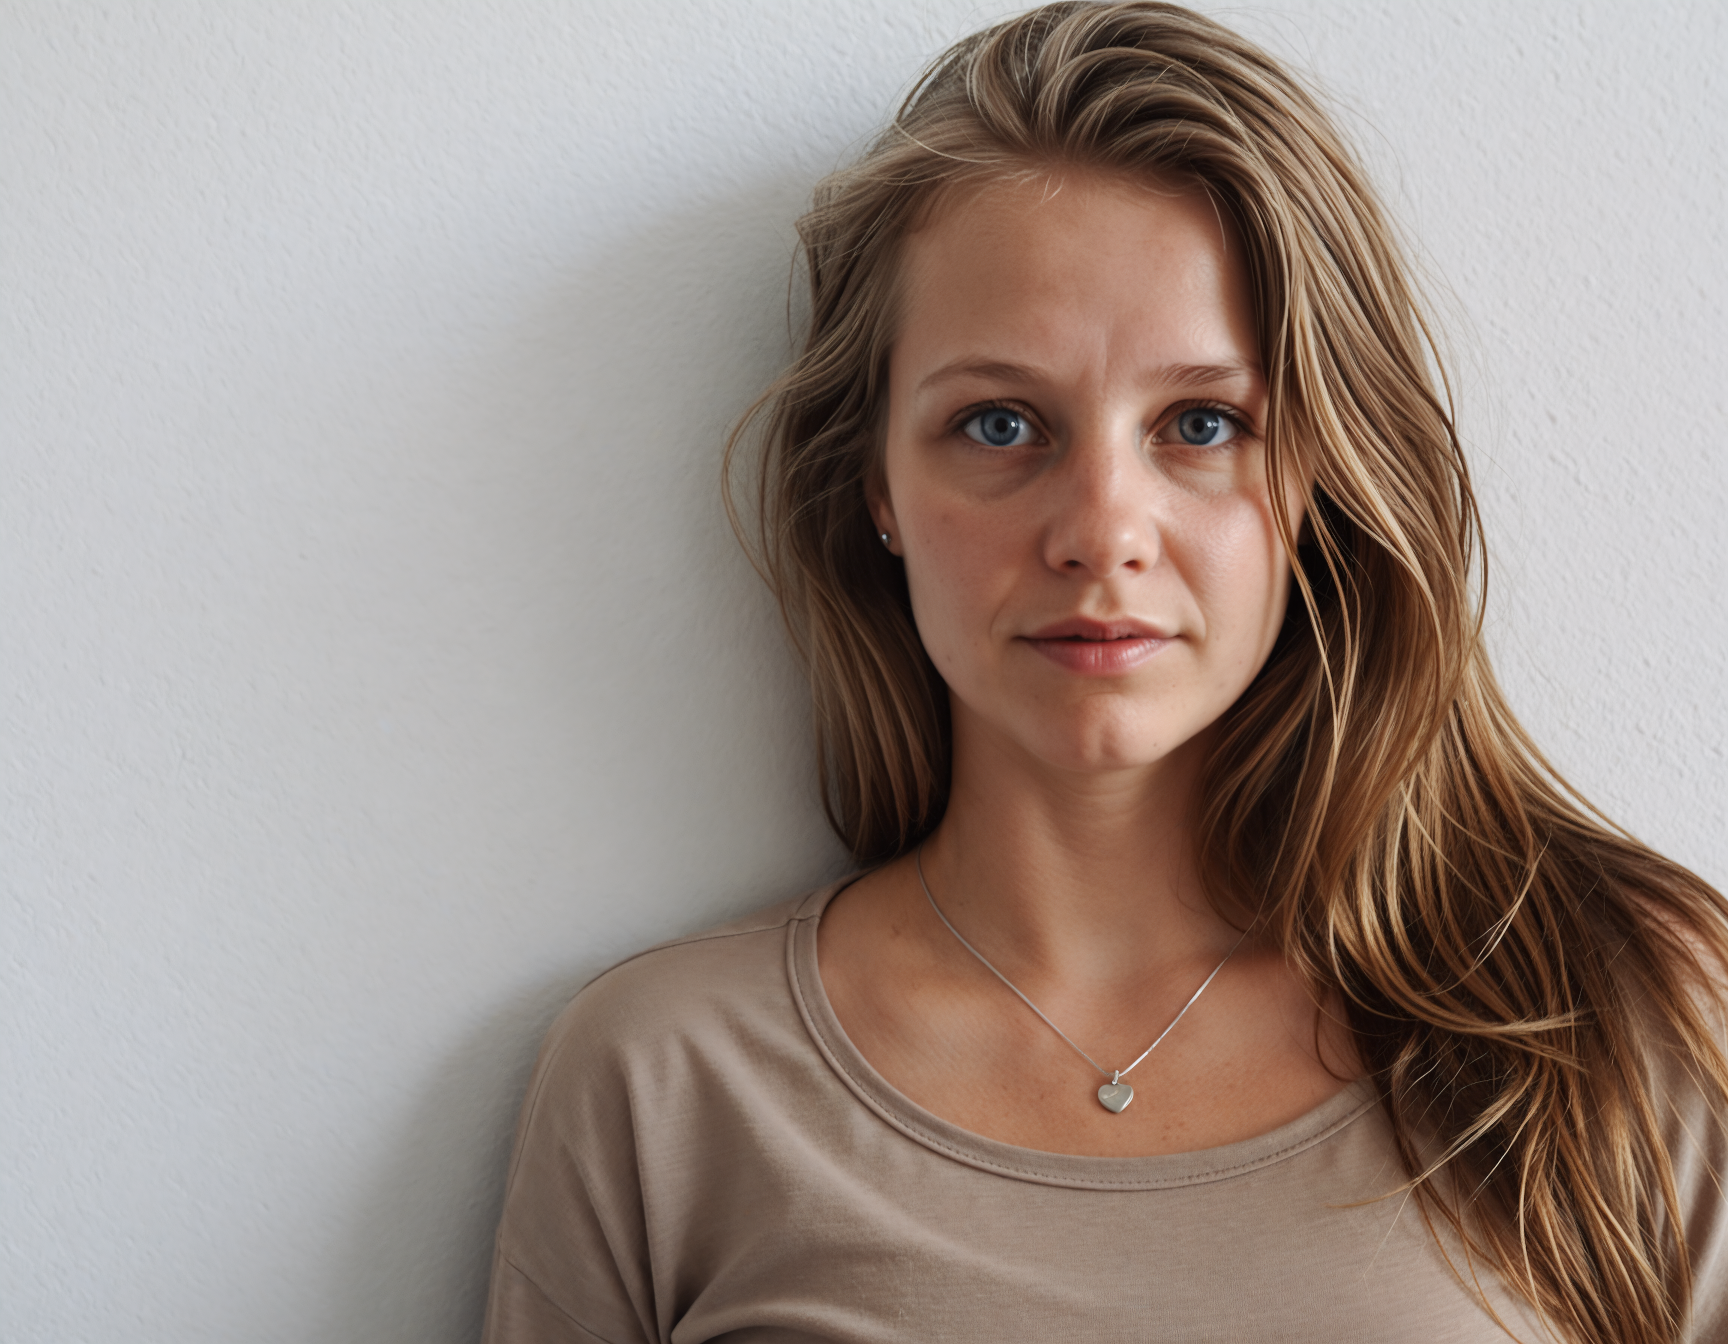
The freely available model Aetherous (https://civitai.com/models/1699760/aetherous) was trained using the principles outlined in this guide.
Note: This article focuses on fine-tuning a full checkpoint but uses the commonly used term training as well. Tools like OneTrainer use training as a catch-all term that may refer to training from scratch, fine-tuning an existing model, or creating a LoRA.
Vision Before Execution
Before collecting data or launching a training tool, define your intent clearly and in writing. Consider the types of scenes your character should inhabit, the emotions it should express, and the relevant camera angles, lenses, and moods. Determine how lighting and background elements will be handled. These design decisions will guide both the data collection and the training and validation processes.
The recommended base model for developing a high-quality and realistic character LoRA is Big Love XL by SubtleShader. It is recognised for its strong anatomical accuracy and photorealistic texture handling. The author has invested significant time in crafting a flexible and high-performing model. However, no base model is without limitations (even Big Love XL). Study the model's strengths and weaknesses carefully. Your LoRA must extend and refine what the base model does not already understand.
Ethical Foundation
If the model is based on a real individual, written consent is mandatory. This consent must include permission to use their images, to train the model, and to generate content using their likeness.
Legal compliance is essential. Be aware of applicable privacy laws, copyright regulations, and personality rights. Ethical responsibility goes beyond legal requirements. Realistic AI-generated content can be misused, and creators must act with care, particularly when working with identifiable individuals.
Also clarify who holds the rights to the trained model and its outputs. Define whether the creator, the subject, or both retain usage rights. This helps avoid confusion, especially in commercial or collaborative contexts.
Always consider the intent and potential impact of your model. If there is any uncertainty regarding the appropriateness of its use, seek professional advice.
Prerequisites
To follow this guide effectively, you should possess a strong visual and analytical sensibility. A background in photography is beneficial, as is working knowledge of tools such as OneTrainer, Kohya's GUI, ComfyUI, GIMP, and Photoshop. A modern Nvidia GPU with at least 12 GB of VRAM is recommended to ensure smooth training performance.
Note: If local hardware is unavailable, cloud services such as RunPod or Google Colab can be used. These offer access to high-performance GPUs but may introduce limitations in session duration, storage, and reproducibility. Use with care and ensure compatibility with your process.
This guide is not simply about executing a training script. It is about constructing a system that can visually and semantically interpret your character. This includes designing a dataset that communicates identity clearly, tagging with semantic precision, training with control rather than automation, and validating results through visual inspection rather than relying solely on metrics. Prompt structure must also be considered during extraction and deployment to ensure consistent output.
Each chapter in this guide represents a step in this process. Expect to revise, refine, and iterate. The workflow is intentionally slow to maximise quality, fidelity, and control.
Chapter 2: Dataset Construction
The dataset is the most critical component of the model training pipeline. It is not merely a collection of images and tags. It defines the visual identity, semantic boundaries, and behavioural patterns that the model will learn to replicate. An example of a dataset is given below.
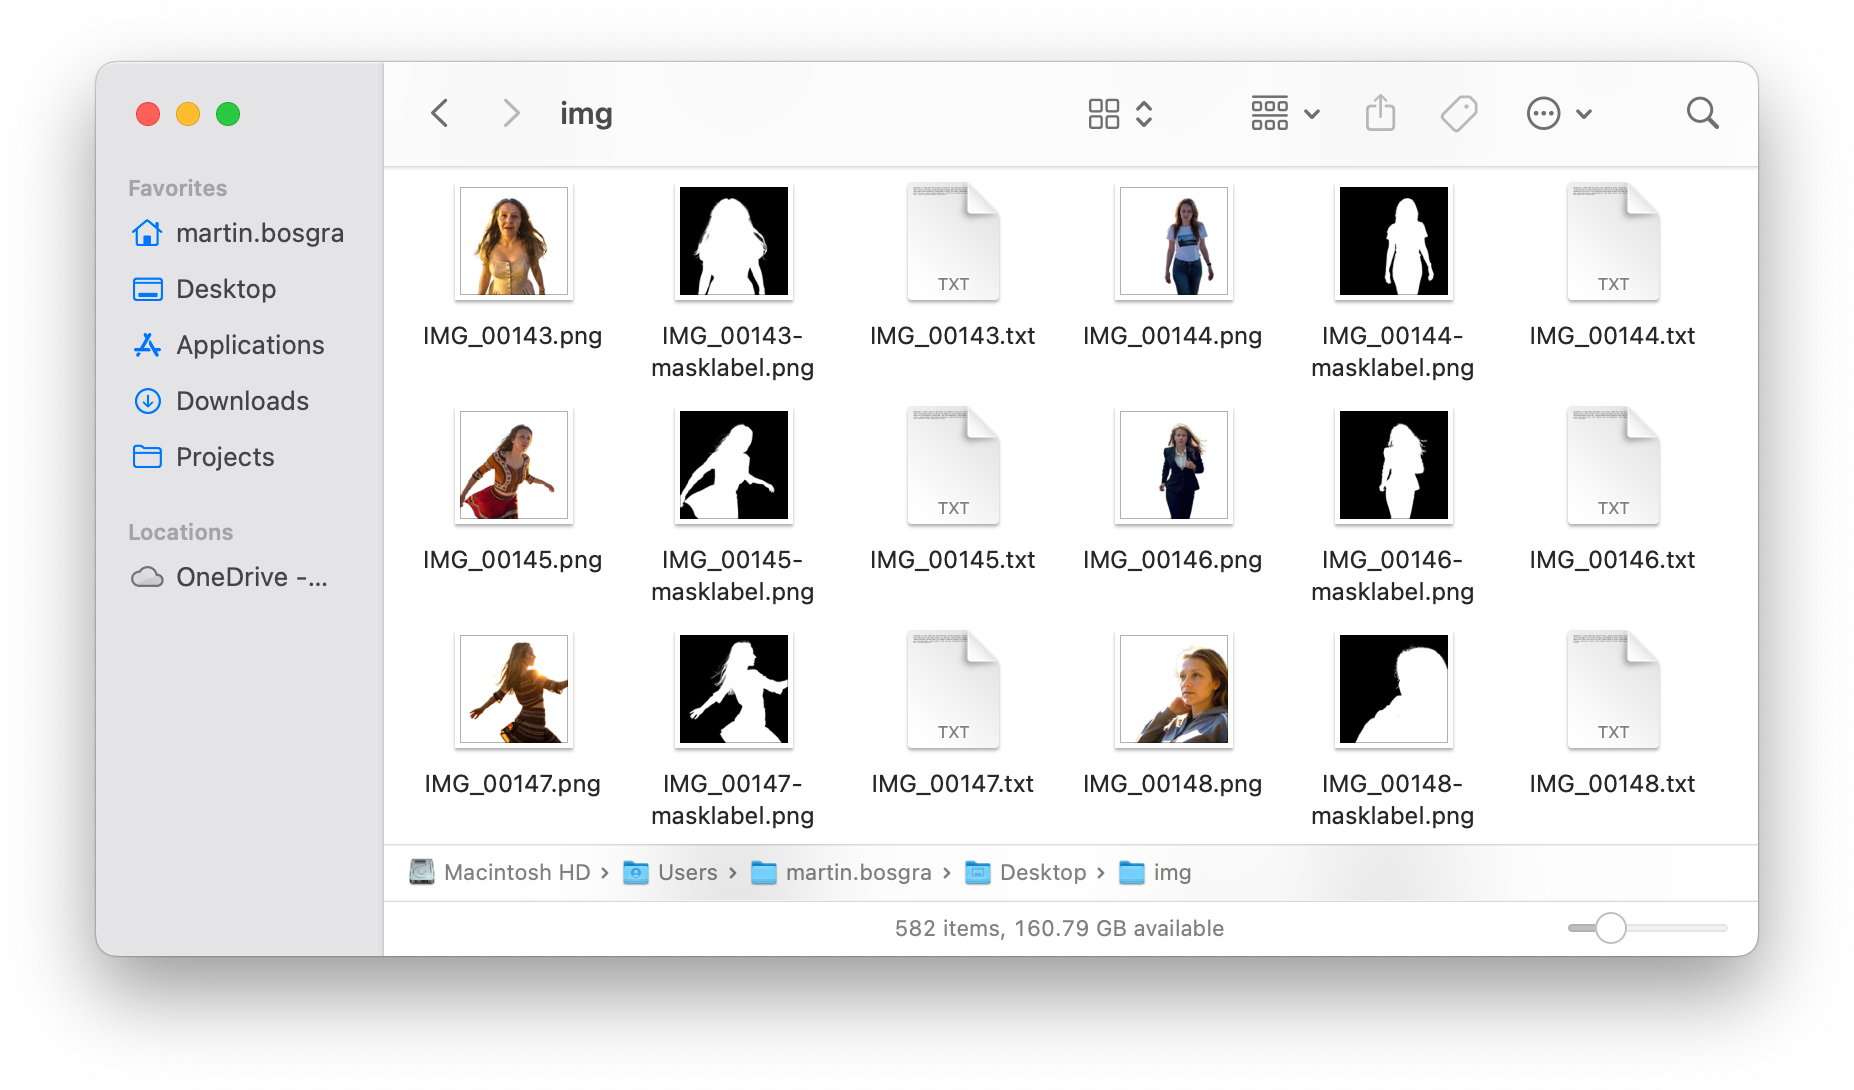
The example dataset above contains 194 triplets, each consisting of an image, a corresponding segmentation mask, and a descriptive caption.
Image Selection
Images must be selected with care, based on clarity, diversity, and relevance. Each image should contribute a distinct element to the dataset, such as a specific pose, facial expression, lighting condition, or composition. Redundancy should be avoided, as repeated visuals introduce bias and reduce the model’s ability to generalise. If the dataset is large, tools such as FastDup can assist in identifying and thus removing duplicates or near-duplicates.
Variation is essential. A curated dataset of 150 to 200 images is typically sufficient to produce a high-quality model, provided that each image is purposeful and distinct. This target is achievable through careful selection and editing, and it should reflect the intended capabilities of the model. But remember: quality over quantity works best in image selection.
Note: Images of the same person taken too far apart in time can introduce inconsistencies, as changes in age, style, or appearance may affect how features are interpreted and tagged.
A recommended distribution of image types, based on camera framing, is as follows:
Close-ups: 20–30%
Mid shots: 40–50%
Full body: 20–30%
This balance enables the model to learn facial detail, body geometry, and spatial context. Any deviation from this structure should be intentional and aligned with the specific objectives of the character model.
Image Quality and Composition
Use high-resolution images in PNG format whenever possible. If JPEGs are used, they must be saved at maximum quality to avoid compression artefacts, colour shifts, and banding. Lighting should be soft and directional. Avoid harsh shadows, blown highlights, and inconsistent exposure, as these degrade training quality.
Backgrounds should either vary, be neutral, or be removed entirely. Distracting elements introduce noise, reduce model focus, and can accelerate overtraining. Use background removal tools such as BRIA RMBG-2.0 or Photoroom and apply manual corrections where necessary. Skin tone must be consistent across the dataset. Correct blemishes, uneven lighting, and colour imbalance. Retouching should aim for clarity and uniformity, not stylisation.
Pose, Expression, and Body Geometry
Every decision in dataset construction should reflect the intended use of the model. Before selecting images, ask: What should this character be able to do? The answer will guide the selection of poses, expressions, and visual contexts.
Use natural, anatomically accurate poses such as standing, sitting, leaning, or walking. Avoid ambiguous limb placement or cropped body parts, as these can confuse the model and reduce promptability.
Include a range of facial expressions, such as neutral, smiling, serious, and playful. This supports semantic variation and enables the model to respond accurately to prompt-based emotional cues.
The objective is to build a model that understands the character both visually and semantically. Every image should contribute meaningfully to that understanding.
If object use is part of the character’s intended behavior, include a few clear examples, such as holding a cup or using a phone. These should be natural, well-composed, and relevant to the model’s purpose.
About Phone Cameras
Images from phone cameras should only be used when no better source is available, and only after thorough post-processing. These images often suffer from perspective distortion, compression artefacts, colour imbalance, low dynamic range, and inconsistent exposure. The skill of the photographer also affects the final quality.
If phone images are included, they must be edited to meet the visual standards expected by the base model. This includes correcting technical flaws and unifying the overall look and feel of the dataset. Experience in post-processing is essential. While tagging poor-quality images may offer limited mitigation, it is not a reliable solution and should be avoided, as it can introduce artefacts into the generated outputs.
In summary, unless you are confident in your ability to correct and standardise phone images, it is best not to use them. If phone images must be used, tools like the Enhanced Image Colour Transfer node from ImageBag (https://github.com/NHLStenden/ComfyUI-ImageBag) can help align colours with higher-quality sources, assuming careful pre-processing.
Chapter 3: Tagging Strategy
Tagging is a foundational step in the training pipeline. It is not optional, nor is it cosmetic. Tags form the semantic structure of your dataset. They determine how the model interprets visual features and how those features can be prompted during generation. Even with high-quality images, poor or inconsistent tagging introduces noise and significantly reduces control.
Structured tagging enables precision. It allows the model to associate specific visual traits, such as clothing, expressions, or environments, with promptable concepts. This is essential for building a model that responds reliably to descriptive input.
Always tag with intent. Each tag should reflect what you want the model to understand and reproduce.
Purpose of Tagging
Tags serve two essential functions:
Descriptive: Accurately reflect the visual content of the image.
Functional: Enable promptability during generation (pose, lighting, emotion, etc.).
Each tag is a signal. If your dataset lacks precision, the model will learn ambiguity. If your tags are rich, consistent, and relevant, the model will learn structure.
What to Tag and Why
Tag only what is meaningful. Avoid generic or redundant tags such as “nose” or “solo”. Focus on features that define the character and influence generation. To help guide consistent and effective tagging, here is a breakdown of meaningful categories and examples:
Pose: standing, sitting, reclining, leaning
Expression: smiling, serious, surprised, angry
Lighting: soft light, backlight, highkey, lowkey
Background: studio, outdoor, gradient, textured wall
Clothing/Accessories: dress, scarf, hat, high heels, glasses
Hair/Makeup: long hair, updo, natural makeup, bold lips
Composition: centered, rule of thirds, diagonal, close-up
Facial Features: freckles, strong jawline, high cheekbones, asymmetrical eyes
Object interaction: holding cup, using phone, carrying bag
Caption Format
Use a structured format for each image caption. This improves consistency and ensures alignment with prompt structure.
Recommended format:
subject_token (optional), pose, expression, lighting, clothing, background, compositionExample:
myLORA, standing, smiling, soft frontal light, red dress, studio background, centeredThis format promotes semantic clarity and prompt compatibility.
Note: Most base models have a token limit for text input. For SDXL, the limit is 77 tokens, which typically corresponds to 50 to 60 words. Captions or prompts that exceed this limit will be truncated, potentially omitting important information.
Tools and Workflow
Auto-tagging tools such as WD14 or multimodal language models (Gemma 3) can provide a baseline, but manual correction is essential. Automated tools often produce vague, subjective, or redundant tags that do not contribute meaningfully to model finetuning. You are responsible for the quality of the model, and that responsibility includes the tagging process.
Recommended workflow:
Use auto-taggers to generate initial captions
Review and correct each tag manually
Remove irrelevant or duplicate tags
Prioritise tags that influence generation
Maintain consistency across similar images
Chapter 4: Training
Training a realistic character model is a non-linear process. It requires iterative refinement, controlled overfitting, and continuous validation. The objective is not to reach convergence, but to achieve an optimal balance between specificity and generalisation. The model must learn to represent the character with high fidelity while remaining promptable across varied contexts.
Training Configuration
To maintain full control over the model’s behaviour and output quality, complete UNet fine-tuning is required. The text encoder components should and will remain frozen to preserve prompt interpretation and not let it influence the finetuning negatively. Fine-tuning is performed using low learning rates and extended epochs to allow the model to learn detailed visual features without destabilising.
Begin by launching OneTrainer. Below is an example of the user interface.
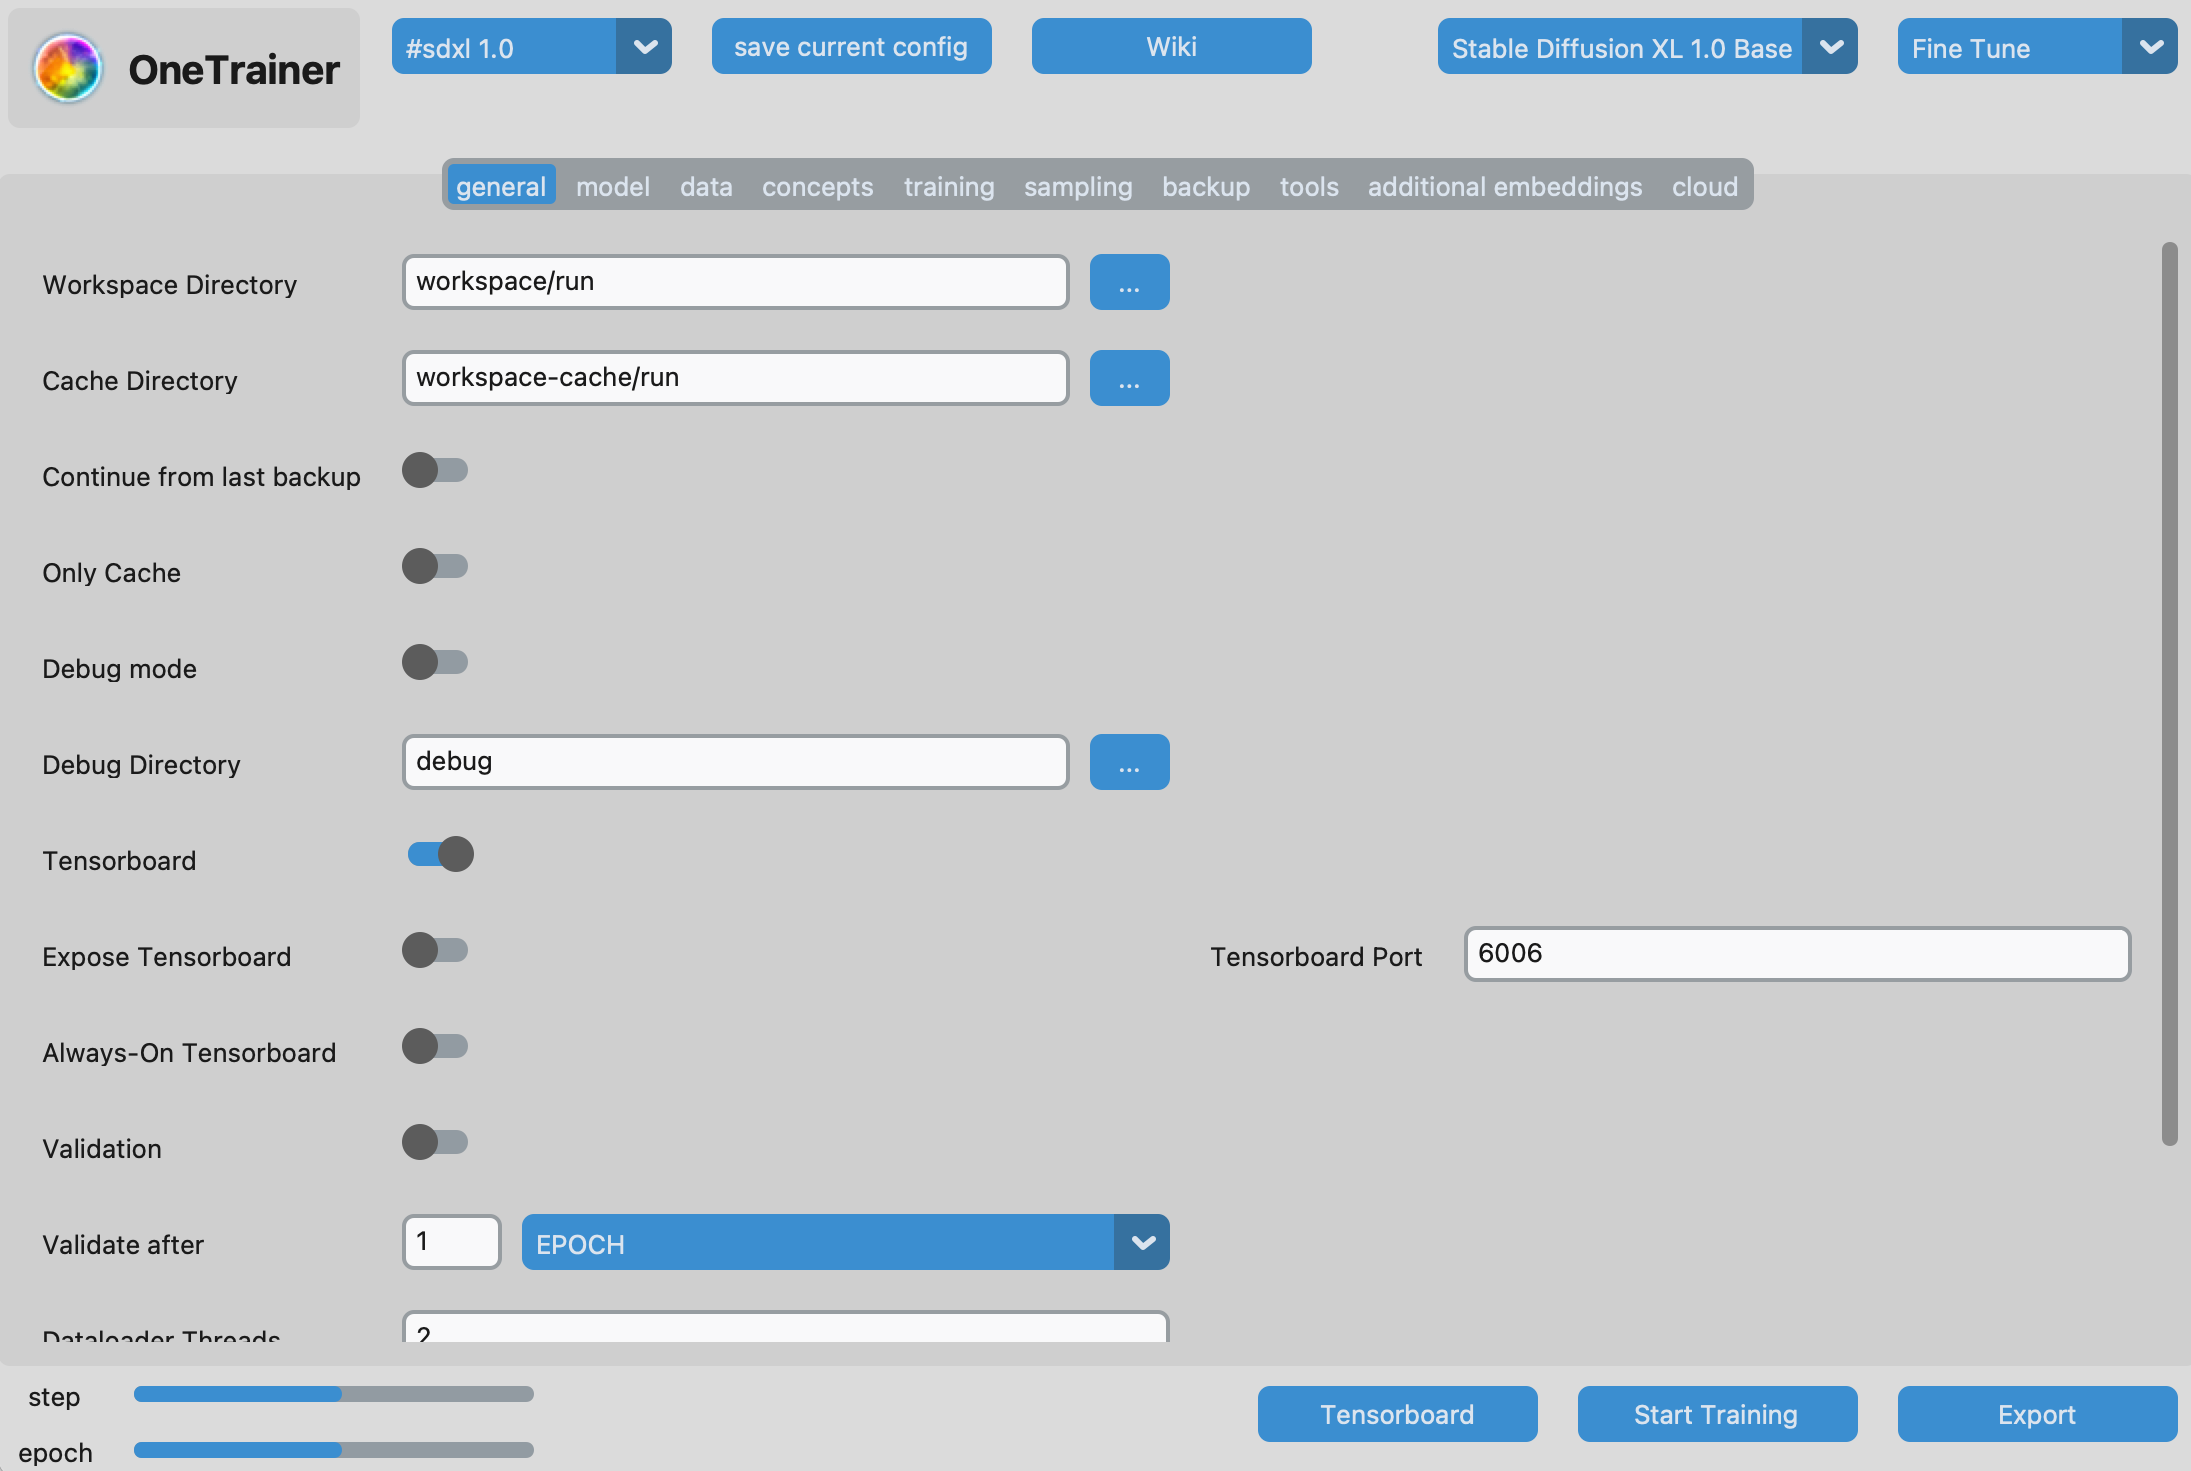
Select the appropriate architecture for the base model and choose the Finetune option located in the top-right corner of the interface. The following settings are recommended:
Learning Rate: 4e-6
Epochs: 100
Batch Size: 2
Optimizer: Adafactor or AdamW8bit
Precision: fp16
Gradient Checkpointing: Enabled
Memory-Efficient Attention: Enabled
Save Frequency: Every 1 or 2 epochs
If the background has been removed from the images, masked training should be enabled. Details are provided in the next section.
Enable TensorBoard at the start of training to monitor progress across epochs. With extended training durations, overfitting is likely to occur. However, overfitting is not the objective. It can reduce generalisation and promptability, particularly in high-quality character model development. Observing its onset is part of understanding model behaviour. TensorBoard provides visibility into loss curves, training stability, and early signs of overfitting.
Knowing when to stop training and selecting the optimal checkpoint is critical. The next section outlines how to identify overfitting and validate model performance.
Note: A default config for Nvidia GPUs is included in the attachments of this guide and can be used as a starting point.
Masked Training
Masked training directs the model to learn from specific regions of an image while reducing attention elsewhere. It is most useful when the subject is the focus and backgrounds are repetitive or distracting. By limiting background influence, the model can train longer before overfitting. In testing within this workflow, masked training has not been observed to worsen perspective or pose.
To use masked training, create a black-and-white PNG mask for any image where it is needed. The file must share the same name as the original image with -masklabel.png appended. White regions define what should be included, black regions reduce or exclude attention.
Masks can be created from background removal outputs generated with tools such as BRIA RMBG-2.0 or Photoroom. The alpha channel must then be separated from the RGB channels (for example, with ImageMagick) to produce a proper mask. When using external masks, set Unmasked Probability and Unmasked Weight to 0.
Validation Strategy
Validation is essential for understanding model behaviour. It provides insight into undertraining, overtraining, and semantic drift. Validation helps determine whether the model is learning the intended features or deviating from them.
Reserve approximately 10 to 15 percent of the dataset for validation. This ratio offers a practical balance between meaningful evaluation and manageable processing time. Validation images may be cropped or reframed versions of training images to preserve semantic content while avoiding direct duplication. This approach allows reuse of the same tags, ensuring consistency in prompt structure during testing.
If the image sources are extensive, consider selecting a completely separate set for validation. This can improve generalisation and reduce the risk of overfitting to the training data.
Ensure that the validation switch is enabled and that validation concepts are defined within OneTrainer.
Starting the Training Process
Once the dataset is prepared, the configuration is set, and validation is enabled, the final step is to begin training. In OneTrainer, click Start Training to launch the process. From this point forward, the model will begin learning the visual and semantic patterns defined in the dataset.
This phase requires patience and observation. Training may take several hours or longer depending on hardware and configuration. It is a passive step, during which your role shifts to monitoring and validating.
Chapter 5: Validation and Checkpoint Selection
After training, validation follows as a critical phase in developing a high-quality character model. It ensures that the model has learned the intended features without drifting, undertraining, or overtraining. This step is essential and not optional as it directly impacts model fidelity. Validation is key to selecting the optimal checkpoint and confirming that the model performs reliably under prompt conditions.
Monitoring with TensorBoard
After training is complete, launch TensorBoard by navigating to localhost:6006. This interface provides access to several training metrics, including the validation loss curve, which indicates how well the model generalises to unseen data. Identify the lowest point on the validation loss graph. This typically corresponds to the most promising checkpoint for initial testing. In the example below, the epoch around step 10k was used as a starting point.
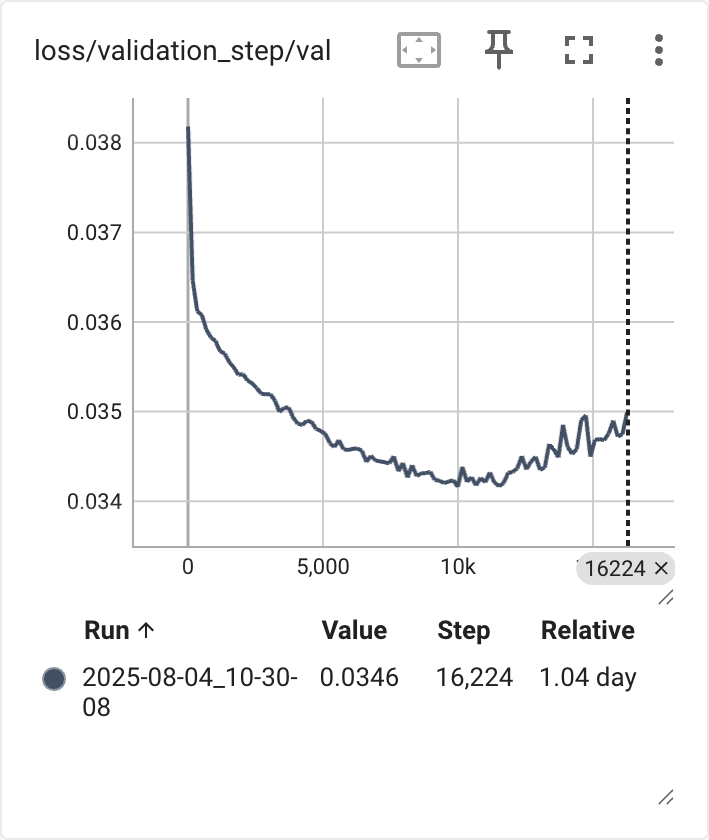
Tip: When selecting the optimal checkpoint, also pay close attention to the smoothed training loss curve. Apply a high smoothing factor, such as 0.999, using the slider on the right side of the interface. This helps reveal the overall trend more clearly. Look for the point where the loss consistently declines and then begins to flatten, jitter, or show artefacts. This often indicates diminishing returns or the onset of overfitting. The corresponding epoch is typically a strong candidate for checkpoint selection.
Initial Testing with ComfyUI
Use ComfyUI to test the selected checkpoints. Load the model and generate images using the same prompts that were used during training. This ensures semantic consistency and allows you to evaluate how well the model responds to known inputs.
Refer to the base model’s documentation for recommended generation settings, including CFG scale, sampler type, and resolution. These settings should match the conditions under which the model was originally used to generate images.
Visual Evaluation Criteria
Validation in ComfyUI should include a structured and methodical visual inspection process. Generate test images using fixed prompts and seeds to ensure consistency across epochs. Then, compare outputs using the following criteria:
Anatomical fidelity: Are limbs correctly placed and proportioned?
Skin texture: Is the skin smooth, detailed, and consistent?
Lighting consistency: Are shadows and highlights natural and balanced?
Prompt responsiveness: Does the model respond accurately to descriptive input?
Use the following table (in bullet style) to guide your evaluation:
Undertraining:
Indicators: Blurred skin, generic features, poor resemblance, low prompt responsiveness
Action: Advance 2–4 epochs
Overtraining:
Indicators: Burned highlights, exaggerated textures, anatomical deformations, prompt insensitivity
Action: Roll back 2–4 epochs
Repeat this process until the optimal checkpoint is identified. The selected version should balance detail retention with prompt flexibility and semantic accuracy.
Chapter 6: Iterative Refinement
Training a character model is not a one-pass process. It requires repeated evaluation and adjustment. As the model evolves, the dataset composition, tagging accuracy, and training parameters must be revisited. Backups and version control are essential. Every change should be documented with its rationale and observed impact to support reproducibility and long-term development.
To strengthen this phase, monitor semantic drift by comparing generated outputs against reference prompts and images. If the model begins to deviate from its intended identity, retraining with clarified semantic anchors may be necessary. Use structured evaluation prompts to test emotional range, pose diversity, and lighting consistency. These prompts should remain fixed across iterations to ensure comparability.
Prompt variation is another effective method. Slight changes in phrasing can reveal whether the model understands concepts flexibly or rigidly. A robust model should respond accurately to both direct and nuanced descriptions.
Visual regression logging is recommended. Maintain a chronological archive of generated outputs for each checkpoint. This allows for side-by-side comparisons to identify improvements or regressions in anatomical fidelity, texture realism, and prompt alignment.
Checkpoint evaluation should be systematic. Create a scoring matrix to assess each saved version across multiple dimensions. Below is an example:
Epoch 18:
Prompt Accuracy: High
Visual Fidelity: Excellent
Generalisation: Moderate
Overfit Signs: None
Epoch 22:
Prompt Accuracy: Moderate
Visual Fidelity: Good
Generalisation: High
Overfit Signs: Slight
Epoch 26:
Prompt Accuracy: Low
Visual Fidelity: Over-sharpened
Generalisation: Poor
Overfit Signs: Present
If the model is used by others, structured feedback should be collected. Prompt behaviour, realism, and usability are key indicators. Feedback can guide adjustments to the dataset or inform retraining decisions.
Each refinement cycle should have a clearly defined objective, such as improving emotional expressiveness, reducing lighting artefacts, or enhancing pose diversity. The process is not only technical but strategic. It ensures that the model remains aligned with its intended identity and performs reliably under varied conditions.
Chapter 7: Extraction and Deployment
Once the optimal checkpoint has been identified, the final step is to extract the LoRA adapter (commonly referred to as LoRA) from the fine-tuned model. This process isolates the learned differences between the base model and the trained version, resulting in a compact and reusable LoRA file suitable for deployment.
Extraction Interface
In Kohya's GUI, navigate to the Utilities tab and select Extract LoRA. Below is an example of this tab sheet.
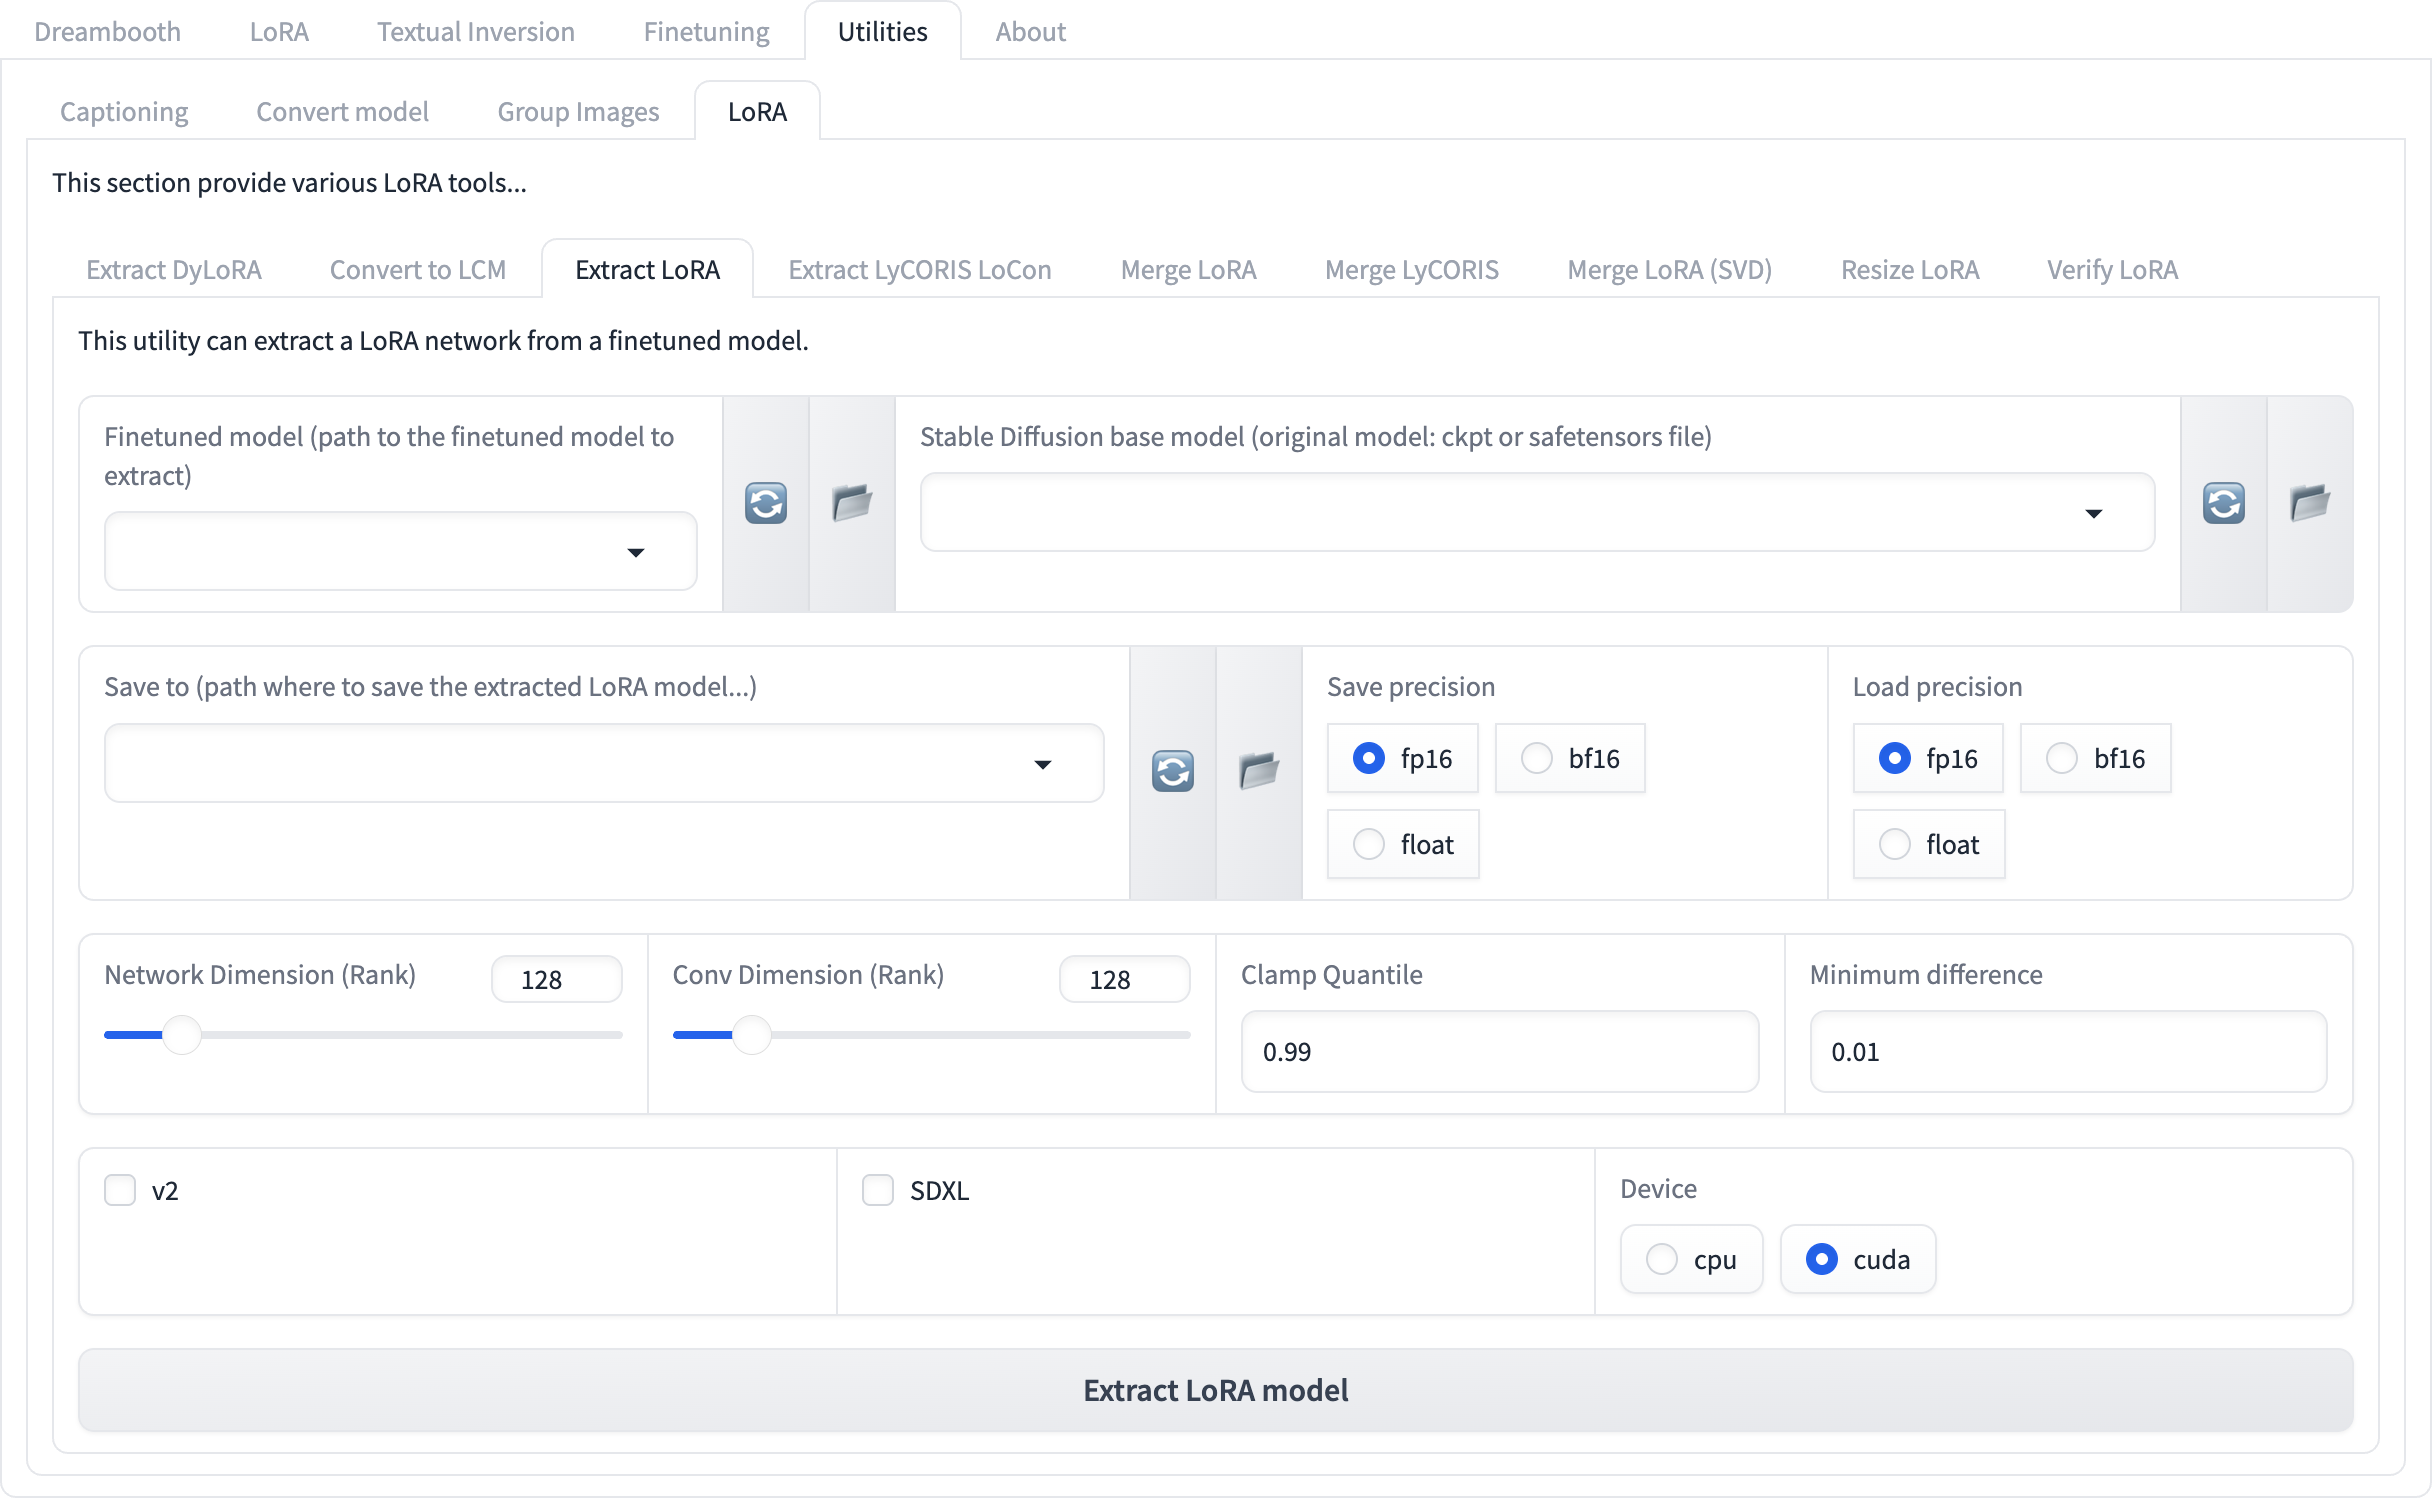
The interface presents several fields and options. Each parameter influences the structure and quality of the extracted LoRA. The following table (in bullet style) outlines the key parameters and their recommended values for realistic character LoRA extraction:
Finetuned Model: Path to trained
.safetensorsfileBase Model: Path to original model used during training
Save To: Destination path for LoRA file
Save Precision: fp16
Load Precision: float
Network Dimension (Rank): 64
Conv Dimension (Rank): 64
Clamp Quantile: 0.99
Minimum Difference: 0.0001
SDXL: Enabled
Device: cuda or cpu (based on system)
Notes on Clamp Quantile and Minimum Difference
Clamp Quantile determines the threshold for filtering extreme weight values. A value of 1.0 disables clamping entirely, preserving all weight differences. While this may retain maximum fidelity, it can also preserve noise or overfitted weights. A value of 0.99 is recommended to suppress outliers while maintaining semantic precision.
Minimum Difference sets the threshold for including weight changes in the LoRA. A very low value, such as 0.000001, includes nearly all changes. This may increase file size and introduce noise. A value of 0.0001 is recommended to retain meaningful changes while filtering out negligible differences.