Changelog
2023-09-08
Added kohya config for 24 dim locon
Updated wd14 undesired tags
Updated showcase prompt examples
Updated showcase style
Preface
This document contains guidance on how to create a Stable Diffusion ancillary model called a lora. You can use a lora to add ideas to any Stable Diffusion checkpoint at runtime.
The context of this document is creating a lora based on images of a person. The methodology expressed here should hold true for anything you'd like to train, however.
The tool we will be using to configure our lora is called Kohya's GUI, which we will simply refer to as Kohya. This browser-based user interface is installed and run locally, and allows you to specify certain configuration options for training, which it will store in a json file at runtime.
When run, Kohya will pass these configuration options as parameters to a python script, which will then begin creating your new lora.
Kohya also facilitates the creation of other types of ancillary models, as well as the ability to interrogate images to create captions for them, which will be used in the course of training to allow you to better express the idea you wish to with the lora.
Download some images
I've seen all kinds of pretty girls pass by my feed on Reddit over the years. When I see one I like, I search for them on Instagram. If I like their feed there, I follow them.
So when I wanted to start making loras, this was the pool I drew from. I wanted to find pretty girls that didn't have loras (or only had bad loras). I pick girls for loras that I think have beautiful, distinctive faces.
I use a chrome extension to download all of their images in an incremental batch.
Image theory
Some people will tell you that you should do everything you can to clean up your source images, and to prefer fewer high-quality images and cull until only the cream of the crop remains.
I think that given a certain quality floor, the more images the better, within reason. I imagine the images like a pencil drawing on the canvas of the base model. The more repeats you give the image, the thicker the pencil is. It's like a carving gouge cutting into wood. It's like water gradually wearing away at stone.
Most of my loras have over 100 training images, though some have under 40.
Primary and supporting images
Now I want to review the images for the girl I've selected for the lora. I'll put them into 2 categories: primary images and supporting images.
I've used both Adobe Bridge and FastStone Image Viewer for this. Today, I prefer FastStone.
I'll rate the primary images a 1 and the supporting images a 2.
Primary images can be your clear, high-resolution pictures. They can be the ones with a rare smile. They are the special ones you want to help get trained in.
I like to get different angles on the face. Get them smiling. Get the side angle that gives a good view of her jawline and nose. Get her with her mouth open. Get her showing her teeth in an authentic smile. Funny faces are ok, too. You want to capture what's unique and distinctive about her face.
You want some full-body pictures to go along with the pretty faces. Don't be afraid to put some pictures in that don't feature her face if she's showing off the rest of her figure. Your objective isn't just to train the face, but the whole body.
Variety helps here.
If you have a lot of images, don't feel like you need to put them all in there. There's a balancing act between your supporting images (the ones with a lower number of repeats) and the stars of the show. If you feel like it's just more samey stuff, feel free to skip over that picture; you've already got it covered. The good ones will still make you want to include them, even if it's just another supporting image.
Put them into folders
Kohya will ask you where your images are. There are some conventions you need to follow.
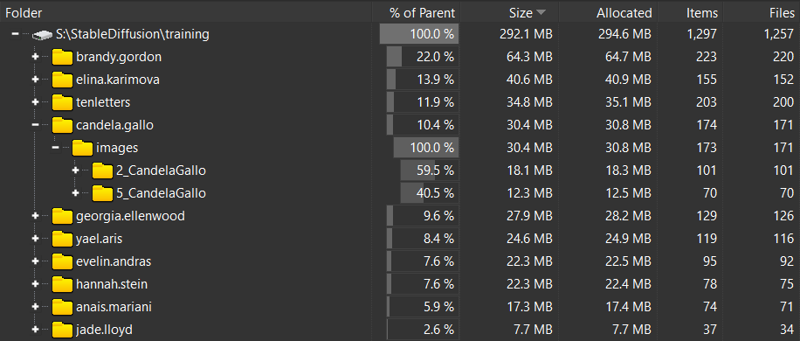
I create an images subfolder, and inside of that, I create two folders:
5_TriggerWord
2_TriggerWord
The 5 and 2 determine how often the image is repeated for each epoch. The TriggerWord is the trigger word for your lora: the girl's name (eg HaileyGrice).
But how many repeats should I use?
The objective here is to have your primary images have more influence over the end product than the supporting images. This means that the total number of steps they contribute to training should be higher than the supporting images.
The supporting images will refine what the primary images carve out.
For example, when I revisited my Brandy Gordon lora, I saw that she had 164 supporting images and only 58 primaries. I gave the supporting images no repeats (1x) for the primaries I did them 5 times.
This means that the primaries contributed 58x5 (about 300) steps per epoch, and the supporting images contributed 164 steps per epoch. This gives the primary images about double the influence of the supporting images.
Selecting a trigger word
You want to make sure that this trigger word is unique. There are some people out there who are creating loras that all share the same trigger word. This is the "MyClass" of lora making. Your trigger word should have some semantic value, and it shouldn't clash with your other loras.
The trigger word in the folder name is only used if you aren't captioning, so at the end of the day the only really important part is the number before the underscore.
Caption them
I'll admit it. I'm a lazy bastard. I don't lovingly craft my captions for each of the 100+ images for each lora. I use wd14 captioning, which presents a bunch phrases separated by commas.
It's my understanding that the meaning of each of those phrases will be sucked out of the image, and what is left is stuffed into your trigger word.
For my Hannah Stein lora, I wanted her to retain her signature freckles, so I removed "freckles" from the captioning with the intent that they would be included by default when the trigger is used.
wd14 captioning is not without its drawbacks. It is easy to make, and allows the lora to be flexible, but it will lose some "defaults" you might expect it to have. For example, my Jade Lloyd lora often presents Jade without her signature platinum blonde hair. This is because wd14 tagged it, removing that aspect of her from the trigger. If I didn't do that, her hair would probably default to platinum blonde, but would be harder to change with a prompt. The less you extract, the more inflexible the lora will be.
When you caption, you should prefix the captions with your trigger word (eg HannahStein). I typically use "photo of HannahStein,".
My captioning guidance
I think it's a good practice to imbue everything about the girl but the hair into the trigger word. You want to capture her figure, you want to capture her eyes. You want these without having to prompt for them.
I started doing this with my Adriana Callori model, because I wanted to keep her small breasts (ok, ok, it's my preference).
Anyway, I did the same thing with Alexandra Lenarchyk, and her eyes came out making me feel like I'd struck gold.
Here are the "Undesired tags" I put into Kohya WD14's captioning tool:
1girl,solo,breasts,small breasts,lips,brown eyes,dark skin,dark-skinned female,flat chest,blue eyes,green eyes,nose,medium breasts,mole on breast,mole,birthmark,scar,cleavage,ass,large breasts,freckles,grey eyes,mole on body,mole under mouth,teeth,black eyes,thick eyebrows,very dark skin,mole on cheek,mole under eye,mole on neck,collarbone,armpits,navel,foreheadFor undesired tags to take, they must be a comma-separated list of values, with no spaces between the phrases. If you have , blue eyes, it won't work. And while she is not a "dark-skinned female", Adriana was, and keeping that tag there isn't going to hurt. My plan is to establish a list of imbuable feature tags to exclude. Depending on the results I have as I continue with this strategy, I may have to revisit some of my favorites.
Setup Kohya
I've included an example json with the settings I typically use as an attachment to this article.
Just load it in the Kohya ui:

You can connect up to wandb with an api key, but honestly creating samples using the base sd1.5 checkpoint is kind of pointless. SDXL would probably do a better job of it. I actually only started making SD15 loras because I wasted so much collab time failing to create a decent SDXL lora.
At the end of the day, you want to gradually train your lora over a number of epochs, saving the lora along the way every couple of epochs so that if you do overshoot the mark with your final epoch, you can use a previous epoch. When in doubt, do more than you think you'll need to.
Shoot for at least 1500 total steps, but take this with a hefty grain of salt. The number of steps is decreased when you increase either the batch size or gradient accumulation and is doubled when using things like flip augmentation.
You can either overshoot by putting in more epochs than you think you'll need, and simply reviewing them and choosing the one you like, or you can undershoot and then start from there if you feel like it's undercooked by putting your starting point in at LoRA > Training > Parameters > Basic ... LoRA network weights.
Train
It takes a while to create your lora. Make sure that you don't have your Stable Diffusion client open, since it's sucking up some vram just sitting around and will probably slow the process down. At least it does with my 8G card.
Test the final lora
Run a few batches of your showcase for the lora to see how it goes. 20 images should give you a good idea if it's overtrained.
Oh crap, I overtrained my lora
Your girl is looking kind of fried, eh? Worry not, kind traveler. You did remember to save your lora every couple of epochs, right? You can use the A1111 script "X/Y/Z grid" to compare the different versions of your lora against each other.
One of the options in the script is "Prompt S/R", which will take a part of your prompt and replace it with something else. Since we specify the lora by filename in the prompt, we can replace the specified version with different versions, and we'll get a grid.
If you're using Dynamic Prompts for your showcase images (and you definitely should), make sure that "Unlink seed from prompt" is unchecked, because we want to compare apples to apples against the different lora versions.

The other axis of your grid should be "Seed". Fill this in with some -1s. This will generate a seed for that column/row to work with.
After you've inspected the grid and selected an epoch, simplify the name of the file and use that as your lora. You should do it now, because you're going to be creating showcase images next, and you want your prompts to make sense.
Create some showcase images
For this, you want to use both XYZ grid and dynamic prompts. I've used two strategies for this. One is more hands on, and the other more hands off.
How many images?
Well, I think you should try to fill your showcase post, which allows for 20 images. You're going to get some loss with bad gens, and you want to exercise your new lora in your favorite checkpoints.
I usually do 10-20 gens per checkpoint. I might end up with 100 images, and during review I'll often far exceed the mere 20 that can fit into the showcase.
In such an eventuality, I still give these images their time in the sun by creating a new post to put them in. They'll show up on your lora page, too.
When I see loras with like 4 showcase images, it's a red flag. If your lora is unable to consistently create usable images, it shouldn't be published anyway. You should shoot for like an 80%+ hit rate. And some checkpoints just won't play well with some loras, so if you think yours is trash, check a couple of other checkpoints before scrapping it.
The hands off way
Run a batch with a batch count of 20 and a batch size of 1. Upscale your image by 1.5 to 2.5 with a .2 to .35 denoising.
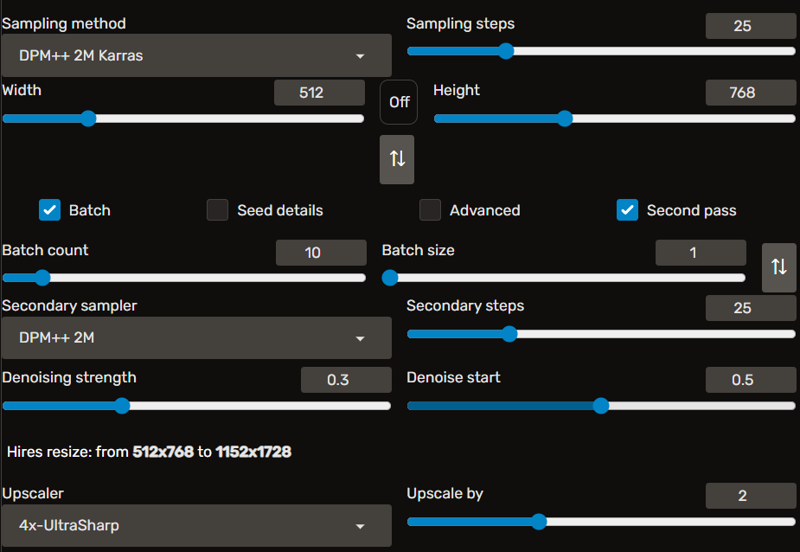
In conjunction with this, you're going to want to use XYZ grid to pass it through a number of different checkpoints.
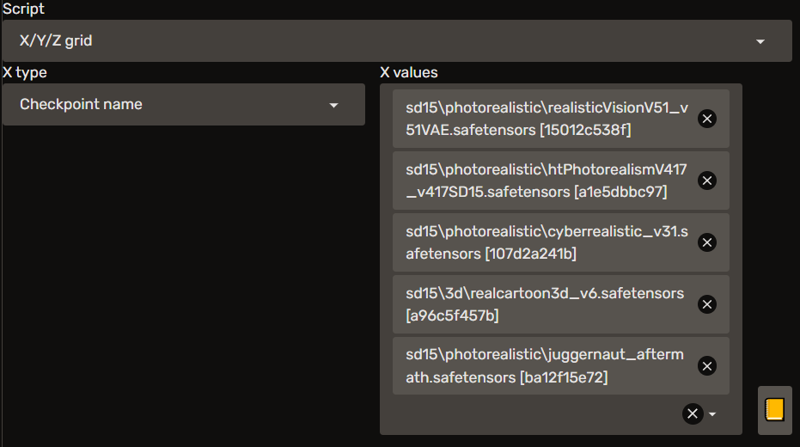
You don't need to create an actual grid for this, so you can turn that off if you want.
If you're using Dynamic Prompts, be sure to check "Unlink seed from prompt".

This will ensure that each checkpoint gets a different dynamic prompt for the same seed (which will be incremented by the batch). If you don't unlink the seed from the prompt, the same prompt will be used against all of your specified checkpoints, reducing the diversity of your images.
The hands-on way
This is my preferred method.
The objective here is the same as the hands-off way. But instead of wasting your time upscaling a bunch of generations that you don't want to use anyway, you're carefully vetting the initial images and sending them to img2img for upscaling. This strategy allows you to review the generated images while your batch is still processing so that when it's done, it will start upscaling what you want in your showcase.
Rather than using an XYZ grid, I queue a batch with Agent Scheduler for the checkpoint I want to run. In the settings for the Agent Scheduler, uncheck "Hide the checkpoint dropdown". This will allow you to pass along the proper checkpoint for the batch to the scheduler.
You'll want to review the images with Infinite Image Browser, send them to img2img, and queue them for processing with Agent Scheduler.
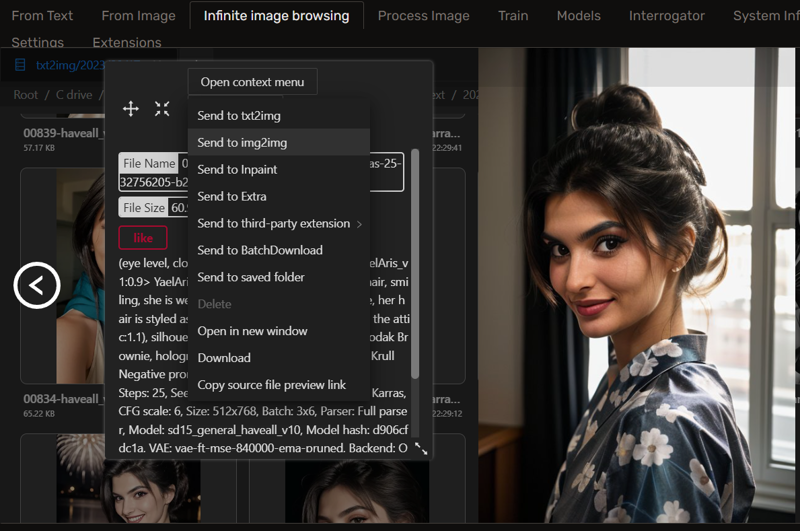
Just queue and continue to review. They'll pop out in your output folder when they're done.
If you forget to specify the checkpoint for the image, you might generate an image in RealCartoon3d, and then upscale it using HT Photorealism. And your generation info will say it was done in HT, but of course, nobody can replicate that.
I actually made that mistake with my Yael Aris showcase and just sucked it up.
Dude, you keep on mentioning a showcase prompt using dynamic prompts, what is that?
You might not get hit by this; I definitely have. The Civitai content rules for real people specify that:

The AI will be like "I think I see some cleavage here, mods check it out" and the mods will either let it pass or remove the image from the site and notify you. I will usually have a few images in each lora showcase that don't pass mod approval. Their decisions are both capricious and final.
But I'm trying! And I use a special dynamic prompt for it, to try to remove any offending clothing.
The dynamic prompt
You won't have everything I do, because I made some of this stuff myself, but here's the prompt I use today:
    showcase:
      - |
        {headshot|{upper|half}-body|close range} of ${girl},
        focus on {smiling|} face,
        {from behind|side view|2::}
        wearing {
          {conservative|victorian|cosplay} clothing
          | a {halter|maxi|sheath|peplum|pencil|t-shirt|Qipao|bell sleeve|long sleeve|empire waist|Handkerchief Hem|pouf|tulle|sweater|silk} dress
          | a <lora:edgPencilDress_MINI:0.8> {pencil_dress|edgpdress}
          | a tennis dress <lora:tennis_dress-1.0:0.8>
          | a maid dress <lora:victorian_maid-1.0:0.8>
          | a {jean|leather|feather|fur-lined} jacket
          | a tshirt and jeans
          | a {star trek|military} uniform
          | a turtleneck
          | leather armor
          | a mage robe
          | camo
          | a pantsuit
          | a thin sweater
          | an elegant evening gown
          | a {__devilkkw/attire/attire_styles*__} kimono
        },
        her {__colors/*__|} hair is styled as __hairstyles/female/*__,
      - |
        ${girl},
        focus on eyes,
        close up on face,
        {smile,|smiling,|huge smile,|grinning,|laughing,|pouting,|3::}
        {wearing jewelry,|}
        {__colors/*__|} hair styled as __hairstyles/female/*__,
        {vignette|ND filter|soft focus|lens flare|desaturated grunge filter|black and white|__promptgeek/lighting__|6::}
The basic idea here is to get a varied image using the lora. Maybe she's smiling, maybe she isn't. She's wearing some kind of shirt, uniform, or a dress. Her hair is styled in a specific way.
As you can imagine, this creates enough variation that each of your images will be visually distinct. Take this as a starting point to make your own dynamic showcase prompts.
The style
To make this easy, I've saved the prompt above in a dynamic prompt file, and use it in a style.
showcase,"{3::|__demoran/styles/realistic__,} __demoran/composite/showcase(girl=photo of {prompt})__",FastNegativeV2 (camera:1.3) (cleavage:1.4) (nsfw nude naked:1.4) signature text watermarkThe takeaway
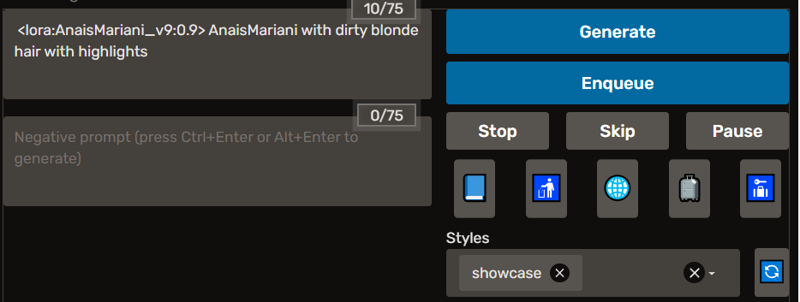
So how do I actually use that stuff? I just put the lora in the prompt along with the trigger word and select the "showcase" style. Then I run it. The prompt gets inlined as the girl, and we're off to the races.
Select your images
Now review your images in FastStone or Bridge.
If you have more than 20 images, you're going to need to be selective. I review the ones I've upscaled. Sometimes I take a gamble with ADetailer fixing the face of a full body shot and it doesn't work out; I simply delete those. I rate the items I want in the showcase as a 1, and the others I want in follow up posts as a 2. The unrated ones I don't upload.
I rate the image as a "5" when I pull them in, so that I know which ones I've already put in there in case I get distracted or confused. Your showcase can only have 20 images in it.
Build your showcase
When putting images in your showcase, take care to not repeat similar framing. You don't want one close-in portrait right next to another one; you want to juxtapose it with an upper-body shot or a styled rendition. This is more pleasing to the senses when viewing them side by side.
While your showcase can have 20 images in it, I think it's a good practice to not fill it to the brim right away. In the future, you may generate an awesome shot that you want in there, but you don't want to have to delete one of the already great shots you've put in a place of prominence already.
Publish
Now you just publish the lora. You'll want to know how many steps and epochs it uses. To find this, just look in the Kohya console.

If you selected a prior epoch, you can find that epoch's data higher up in the console buffer.
You'll need to provide some description for the lora. I usually provide a link to the girl (since most of mine are relative unknowns) and the weight at which I generated the showcase images.
You upload the lora, provide the metadata, set the description, and upload the showcase images. Then you publish. And you're all set!
Bonus round: How do loras work, anyway?
Example Kohya training configurations
Here are some examples of the training data and configuration I've used to create some of my loras. You'll find the full image set, captions, and Kohya configuration for each.
You can also find some sample Kohya configurations attached to this article.
Failures
I hope you don't take my words for gospel. They're a good starting point, but you can explore from there. Here are some of my failed expeditions. You can view them as a path not to tread, or try to snatch success from the jaws of my failure.
8 dim locon
Too small. I tried this in a couple of configurations for different girls, and it didn't end up working out. I consider this a "nano lora"; it ends up yielding results better than an embedding, but not as good as a normal lora.
Q & A
What do you gain from "primary" and "supporting" images in your training data? Would you expect similar results if you had all primary images with an equivalent overall number of repeats and otherwise identical parameters?
It's a qualitative thing. I want the best pictures to influence the training the most, so I give them more steps in each epoch than the supporting pictures.
Also, if the girl almost never smiles, I put her smiling pictures as a primary. If she never shows off her body (as with Anastasia Cebulska, the girl I'm about to work with), I put the ones in where she's got the most revealing clothing. There was one picture of her where she was wearing leggings in some yoga pose; great shot of her ass and back, no face to be seen. That went in as a primary, because I want to train not just the face, but the body as well, and I can't very well do that if she's always dressed like a nun.
Generally speaking, if the picture is clear and presents a good view of her face, it's a candidate for a primary picture. I want her jawline, I want her nose, I want her dimples when she smiles.
These pictures provide the core. They are the saw that cuts the wood. The supporting images are the sandpaper that smooths out the rough edges left behind, providing more context for what we have emphasized.

