1) Start a training
Civitai → Train a LoRA → choose Character / Style / Concept.

2) Build your dataset
Use clean, sharp images (no text/watermarks), good lighting, varied angles.
Suggested counts:
Character: ~30–100 (~50 good sets)
Style: ~80–400
Concept: ~40–80 for same poses
A file Word that need to know what images need to collect:
Guide to Submitting Images for LoRA Creation
3) Auto-tag & Manual-tag
Trigger Word:
Word that you want to enable LoRA when prompting
Auto-label (Tag mode):
Max Tags: 30 • Min Threshold: 0.3
Blacklist obvious junk (unrelated styles, “text/watermark/logo”, wrong gender, parody/meme, etc.).
Example: steampunk style,cybernetic enhancements,parody,meme,subtitled,english text,elf,bara,watermark,web address,profile,twitter username,artist name,virtual youtuber,character name,copyright name
Prepend Tags: add a (character name).

You can use danbooru tag to find name of your character
Manual tags (important):
Prefer specific tags:
Character: appearance (black hair, aqua eyes, earrings) + specific clothing (white shirt, grey jacket) instead of generic words (shirt, jacket, pants,... except that character has too many clothes).
Style: put any tags that visible on every image that you see.
Concept: tag the object/theme/poses as Trigger Word and its key attributes.
Remove tags that aren’t visible or not right on images.
Note: tagging vs. not tagging (hair-color example)
If you tag the dataset with “black hair”, but the character’s real hair is black-brown, the LoRA will learn that mixed shade. Later, when you prompt black hair, it will often output black-brown (because that’s what it learned from your images).
If you don’t tag hair color in the dataset:
If your prompt does include black hair, the output may be pure black (not black-brown), because the prompt forces it.
If your prompt doesn’t mention hair color, the output may show the original look from the dataset—or vary randomly—depending on the base model and checkpoint.
Bottom line: Tagging what you actually see makes results more predictable. It’s best to tag every visible detail. For consistency, you can reference Danbooru tags.
Other Tags: Background, Poses, Expression,... are keeping it
Rights & acknowledgment → tick the boxes → Next.

4) Base model & sample prompts
Base model: SDXL → Illustrious

Sample Media Prompts (example for character per-epoch previews):
masterpiece, best quality, ultra detailed, 1boy/1girl, solo,
"TRIGGER_WORD", "full name/label", "appearance details", "clothes", other tags
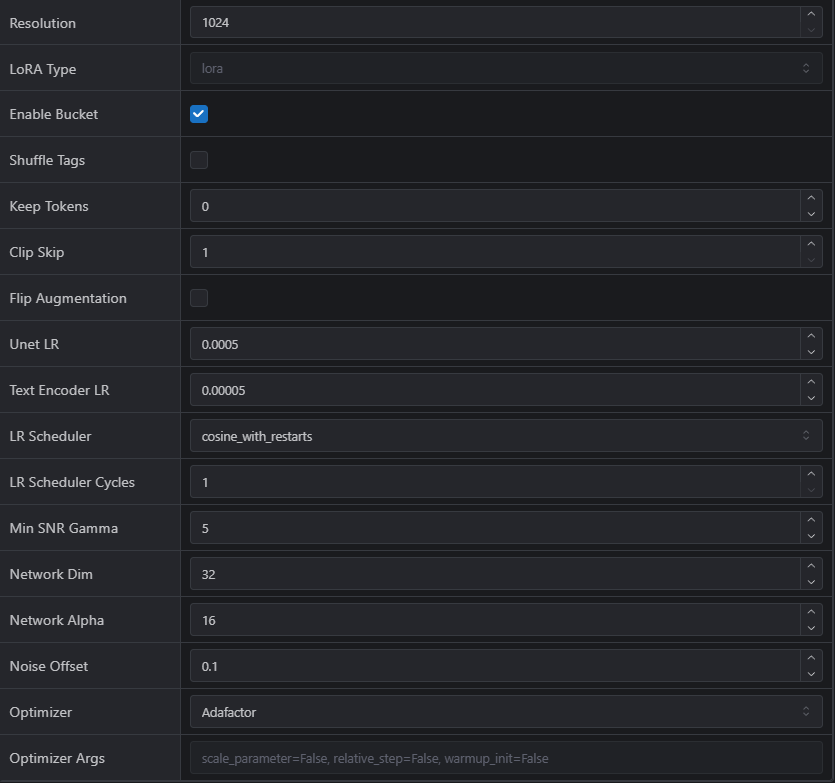
5) Targets by LoRA type for Training Parameter
A) Character LoRA
Epochs: 10 ~ 15
Total steps: ~1,100–1,400 (sweet spot ≈ 1,200).
Clip Skip: 2
UNet LR / Text LR: 0.0005 / 0.00005
Scheduler: cosine_with_restarts • LR Scheduler Cycles: 1.
Optimizer: Adafactor
If the outfit/features are very complex → consider Dim/Alpha 64/32.

B) Style LoRA
Total steps: ~1,600–2,000 (small set: 50 - 100 imgs) or ~2,000–3,000 (larger set: 200 - 300~ imgs).
Clip Skip: 1
UNet LR / Text LR: 1 / 1
Scheduler: cosine
Optimizer: Prodigy

C) Concept LoRA
Total steps: ~1,500 - 1,600
Clip Skip: 1
UNet LR / Text LR: 0.0005 / 0.00005
Scheduler: cosine_with_restarts • LR Scheduler Cycles: 1.
Optimizer: Adafactor

Confirm above then go below to Submit.

Thanks for checking out this quick LoRA training guide. If it helped, feel free to leave feedback or share your results—good luck and have fun!

