Estimated reading time: 15 - 20 minutes.
Since quite a few people have been asking me for a guide, I figured it’s finally time to put one together!
❗️Before we dive in, a few things you should know
If any of these apply to you, this guide isn’t for you:
You don’t have the patience to stick with the process.
You’re fine with a quick, low-quality LoRA like 99% of what’s on CivitAI.
You want instant results without investing extra time for stability.
You only train on hosted sites, not locally.
You’re expecting deep technical explanations (this is about process, not theory).
You don’t have an NVIDIA GPU with at least 8GB VRAM. (I haven’t tested with less VRAM, AMD, or Mac, so I can’t help there.)
If you’re still with me, good—because the payoff is worth it. Follow this process and you’ll end up with more stable LoRAs.
Got it? Let's begin...
Tip: read the whole guide first before diving in. I sometimes jump around between steps, and it’ll make a lot more sense if you’ve seen the big picture first.
⚒ Here're all the tools you'll need:
Git
If you don't know git, uncle google is your friend, I'm not going to explain how to work with it.
(Recommended to me by ethensia) Image Composite Editor from Microsoft: https://download.cnet.com/image-composite-editor-64-bit/3000-2192_4-75207152.html
You can find you own link if you don't like cnet.
Dataset Editor: https://github.com/Jelosus2/DatasetEditor
You can download it from the release page.
Chainner (Img upscaler): https://github.com/chaiNNer-org/chaiNNer-nightly
You can download it from the release page.
Why nightly? -> It supports nVidia 50xx series GPUs.
Derrians LoRa Trainer: https://github.com/derrian-distro/LoRA_Easy_Training_Scripts
Clone the main repository to your PC, don't use the one from the release page.
I'm not going to explain how to install those, you'll have to figure it out yourself from README of each application. Otherwise this would be too long guide.
📡 Step #1: Gathering Images for a dataset
Let's start with how many images you need for a good LoRA...
This is one of the most debated questions—and the truth is, quality matters far more than quantity. A LoRA trained on fewer, high-quality images will almost always outperform one built on a huge dataset of low-quality material.
As the saying goes: your generations are only as good as the dataset you train on.
That said, my approach is to collect as many images as possible first, regardless of quality. Both good and slightly bad will end up in the pool—because later, during the sorting step, we’ll filter out what’s actually useful.
Low-quality images include things like:
Blurry or out-of-focus shots
Flat or washed-out colors
Images that are too dark
Very low resolution
Let's get to image gathering. You have a few options:
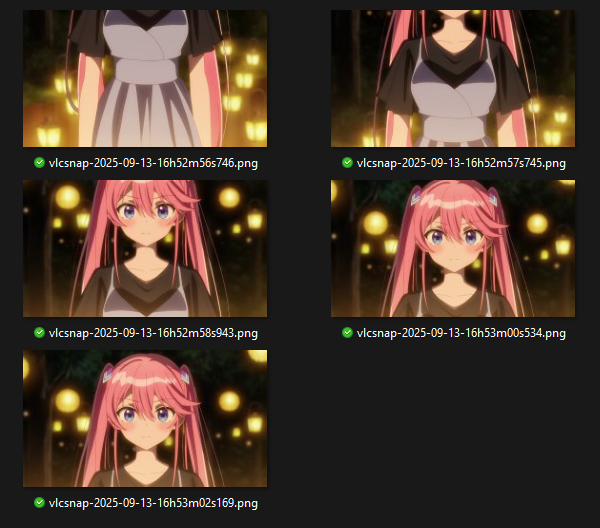
a) 🎞 Manual Snipping (while watching anime) <--- This is the way.
Since I can’t show you examples directly (DMCA reasons), here’s the workflow:
Open your anime in VLC, Netflix, or whatever player you like.
Use the Snipping Tool (or any screenshot tool).
Watch the anime, pause when your character appears, and snip.
Learn the shortcuts—it makes things much faster.
For reference, snipping a full 12-episode season usually takes me about 1–2 hours. I skip a lot because I only snip from shows I’ve already watched—so I know exactly which parts to ignore when the character doesn’t appear.
👉 And no, please don’t think I rewatch the same episode over and over just to snip a single character 😅. You can grab all characters in one pass, then filter later during the cleanup step.
Why this method is great:
You get to rewatch the anime 😄
You skip very bad images right away, so Step #2 (sorting) is easier
You capture characters from multiple angles: back, side, and especially those camera pan shots (camera slowly moving up from characters feet all the way to her head). These are gold—they’re usually the highest quality frames you’ll find. More about this in #Merging Images
b) 📹 Auto-Screencap with a Program
Another option is to use a program that automatically takes screenshots while the video plays.
Advantages:
Super hands-off: just run it, wait, and you’ll get a folder full of frames.
No need to rewatch the anime if you don’t want to.
Disadvantages:
It often misses the best frames—especially those key angles and smooth pan shots I mentioned in Option A.
You’ll usually need to crop the images afterward, which adds an extra step.
c) 📦 Using BangumiBase Repository
I won’t say “don’t use it,” but I highly recommend against this option.
It works pretty much like Option B (auto-screencap), but with even more drawbacks:
The image quality and consistency aren’t reliable.
You’ll end up with tons of duplicate images, meaning extra cleanup work.
d) 🌐 Pulling Images from Official Sources
For extra high-quality, full-body shots, you can also grab images from official anime websites or wikis. Good places to check include Zerochan or various booru sites.
What to look for:
Images with the “official style” tag → usually clean art with a white or transparent background.
Images with the “megami magazine” tag → often group shots, but sometimes you’ll find exactly the single character you need.
Important note:
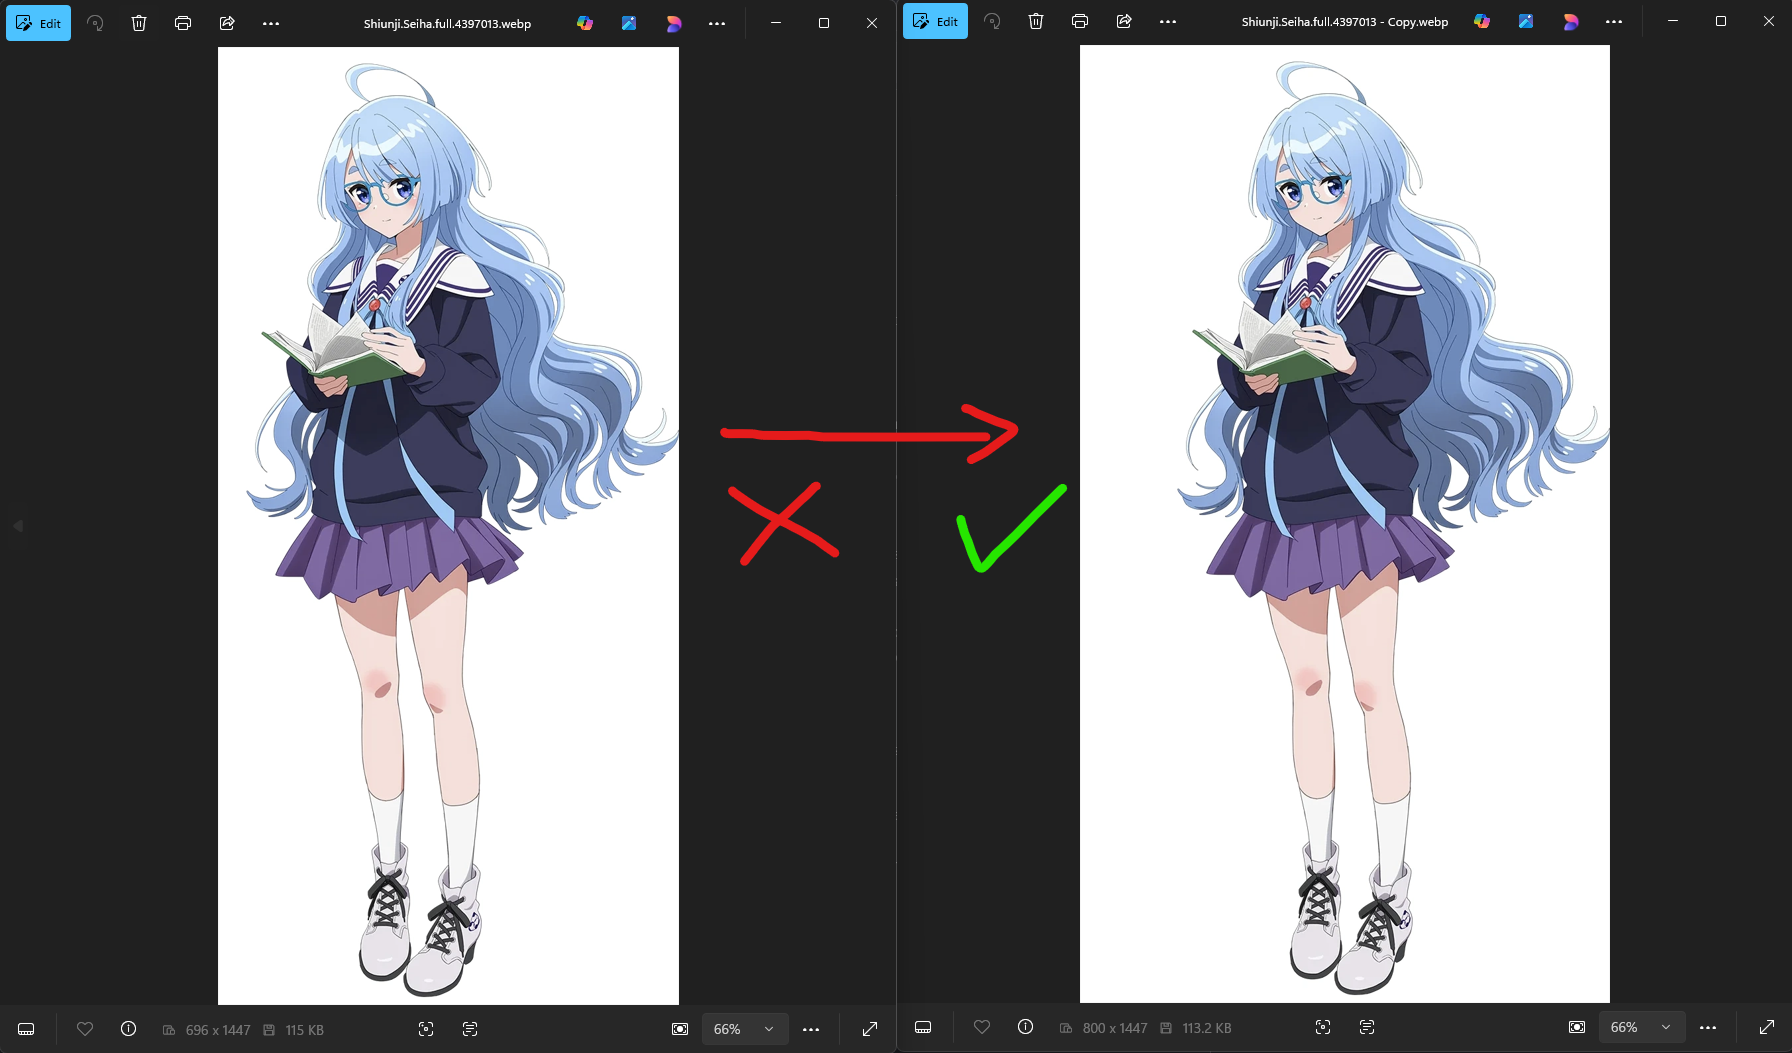
Official character visuals often come with transparent backgrounds. For training, you’ll want to add a solid background (ideally white), since transparent backgrounds don’t work well.
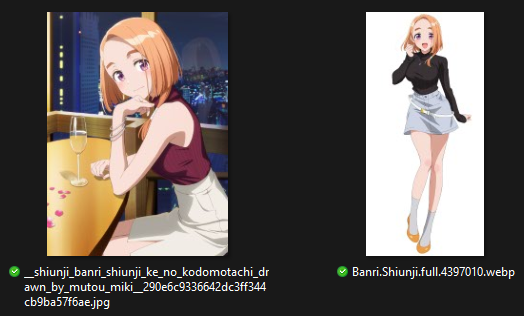
(Example: Left = Megami Magazine illustration, Right = official character visual. The original had a transparent background and no cropping; this version is already cleaned up.)
⚠️ Note on Older Anime
Keep in mind that older shows usually won’t have official visuals in high enough quality. This method is best suited for newer series where official art is more readily available.
Example:
Here’s a dataset I built from anime screencaps, plus a handful of extra images pulled from websites.
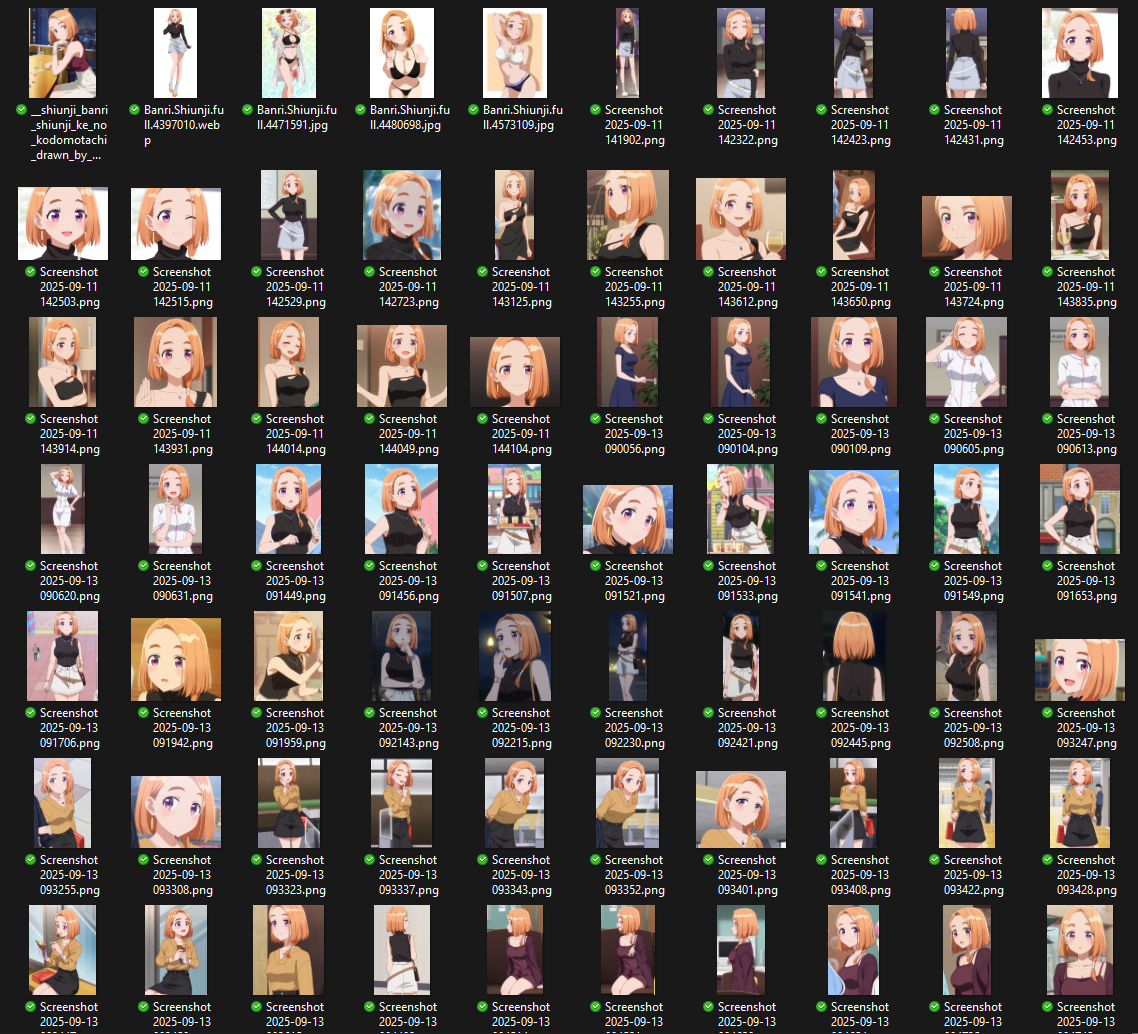
(Not all images are shown here—the full set would be too large. In total, there are about ~125 images.)
🪄 Step #2: Processing Images
Before you start training, you’ll need to filter your images.
Whether you upscale first or sort first doesn’t really matter—I switch it up depending on the situation. Sometimes I sort the images before upscaling, sometimes I do it the other way around. The key is to make sure only high-quality, usable images make it into the final dataset.
♻️ Filtering / Editing
Do an extra cropping of badly cropped images in case you accidently made some in Step #1.
What to look for:
Center the character in the frame—avoid having them on the edges.
Crop solid borders around the image to remove unnecessary space.
Fix partial outfit cuts:
If a belt is only partially visible, crop a bit above so it’s completely out of frame.
If part of a skirt is barely visible, crop it out entirely.
Yellow arrow — tag this later as 1other
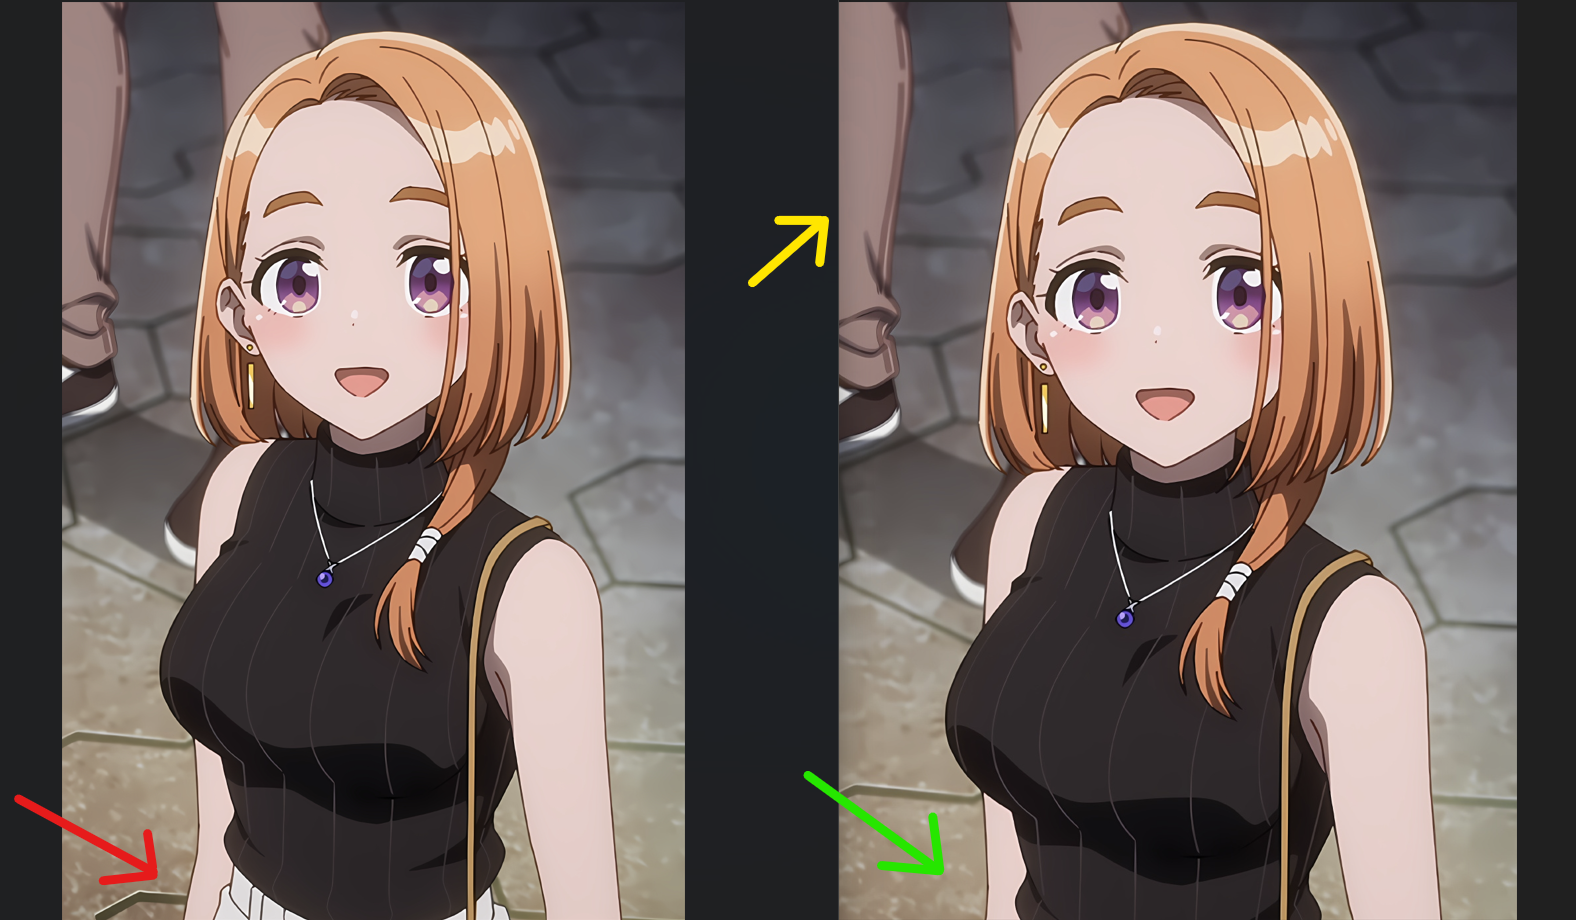
Crop the head if needed:
For full-body images where the head quality is poor (blurry, eyes just dots), remove it from the frame.
Later, make sure to tag the image as “head out of frame” to avoid confusing the model.
Ideally to get the best quality, sometimes I like to remove artifacts or other people from images too. Here's an example:
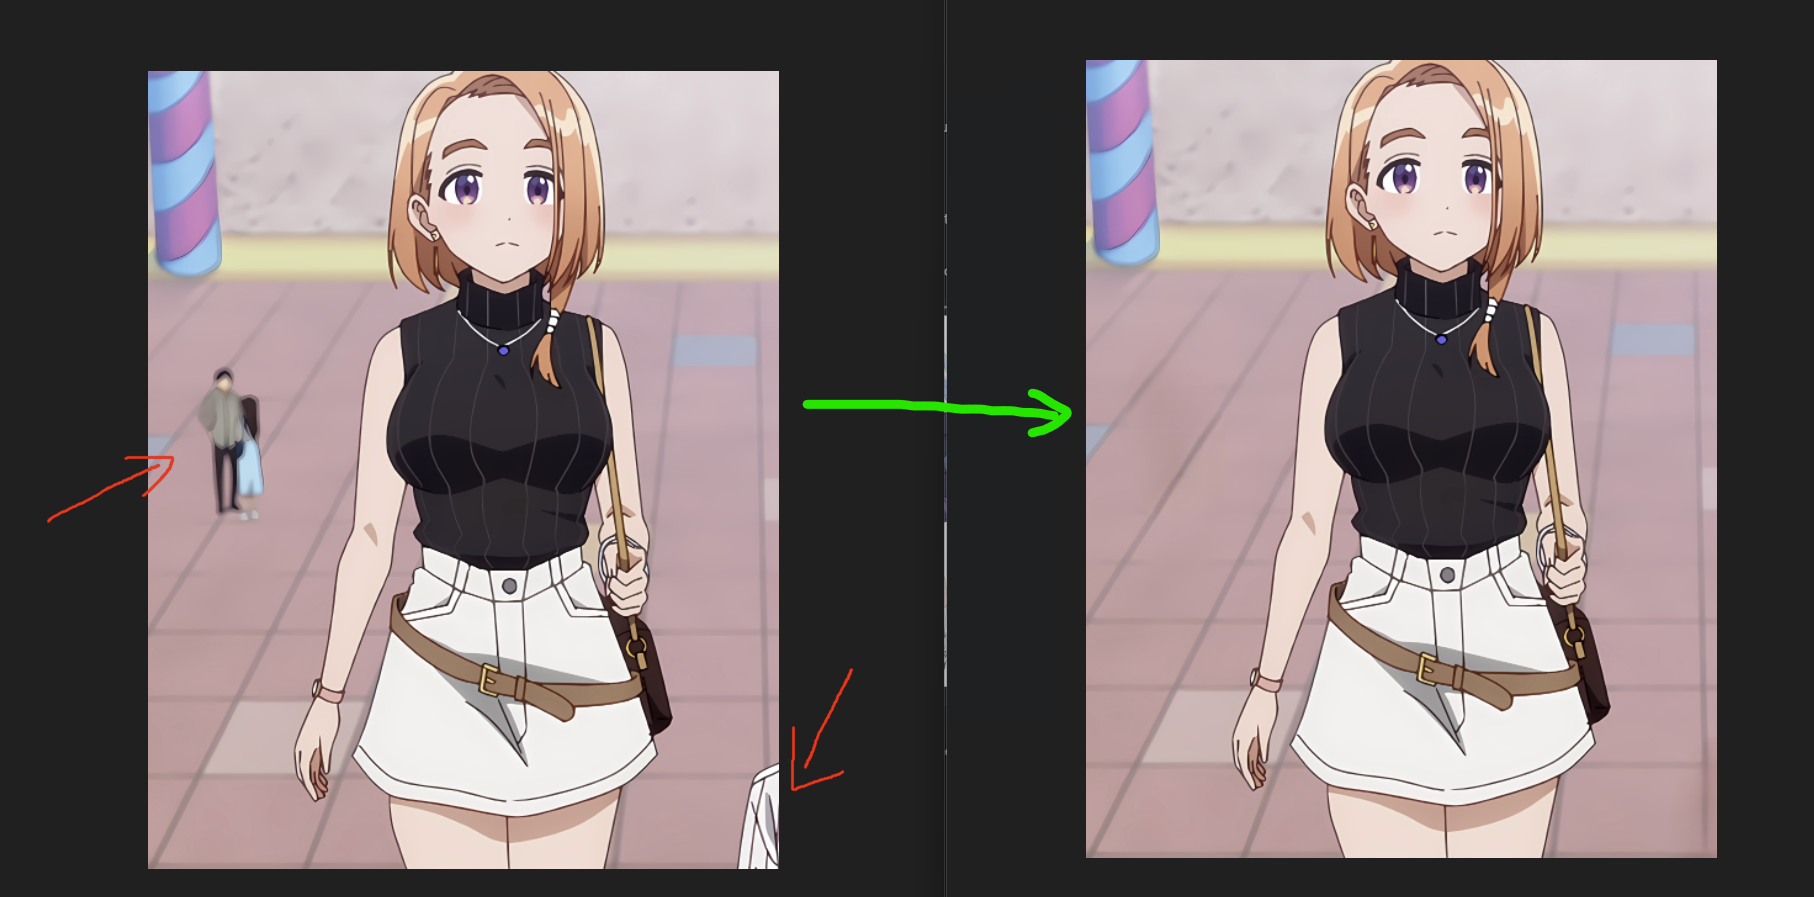
This later helps reduce any artifacts during image generation.
⚠️ Working with Sparse Datasets
Sometimes, if your dataset is very limited, you might have to use images that aren’t perfectly centered.
The character may not be exactly in the middle, but you work with what you have.
Ideally, try to center them as much as possible—otherwise, your generated images could end up with characters off to the side.
Personally, I prefer my characters centered, so I aim for that whenever I can. 🙂
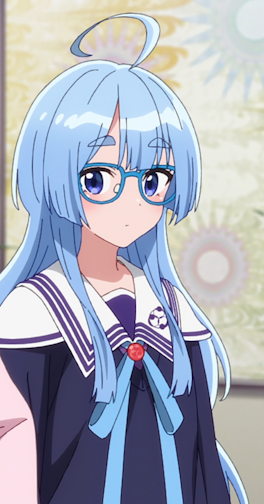
Make sure to filter out overly dark images from your dataset.
Key points:
Don’t confuse dark scenes with night-time shots.
Too-dark images are those where shadows are completely black or important details on the character are barely visible.
(Optional) You can also remove “evening” or “sunset” images with an orange tint if you already have plenty of daytime images.
Tip: Only do this if your LoRA, after training, produces a weird color tint in normal daytime generations.
If you keep these images, tag them properly with labels like
evening,sunset, ororange themeso the model knows how to handle them.Additionally, you can try color correcting those in Photoshop too.
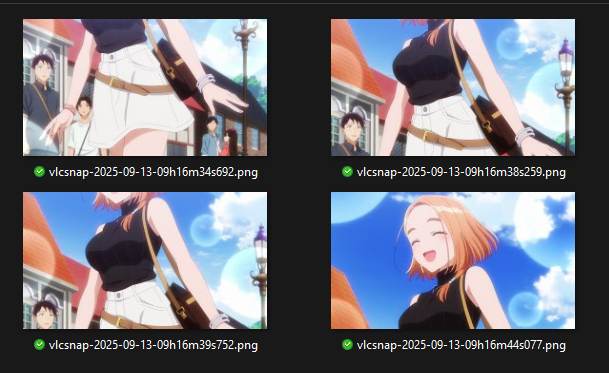
✂️ Merging Images
If you’ve downloaded Image Composite Editor (ICE), go ahead and start it up.
Load your images into the program as shown below:

You can skip the stitching step and go straight to cropping.
⚠️ Important: Not all images will merge correctly.
Here’s an example of a successful merge:
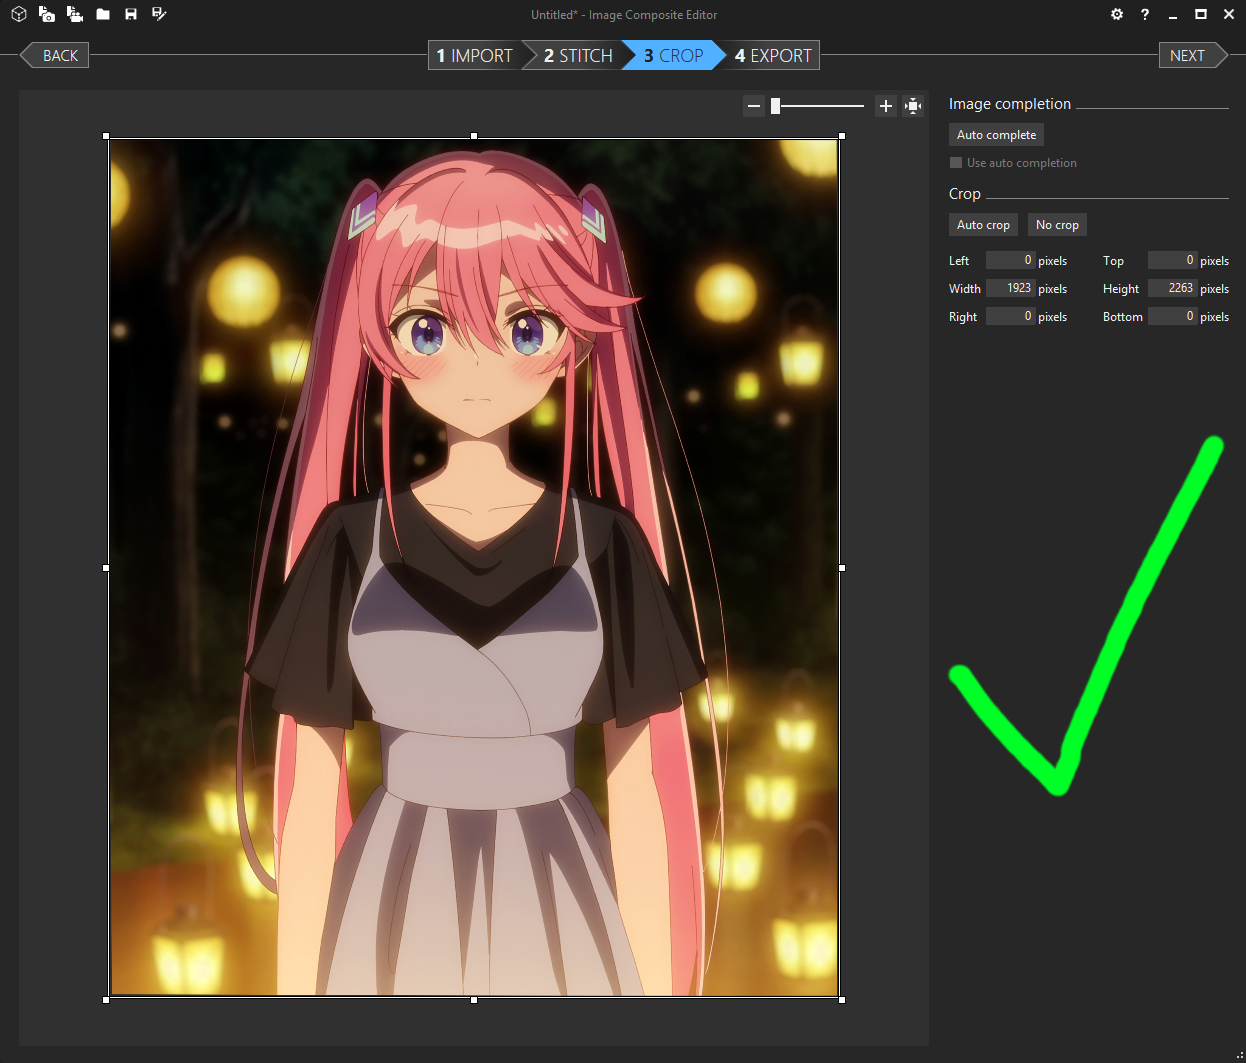
Here’s an example of a bad merge:
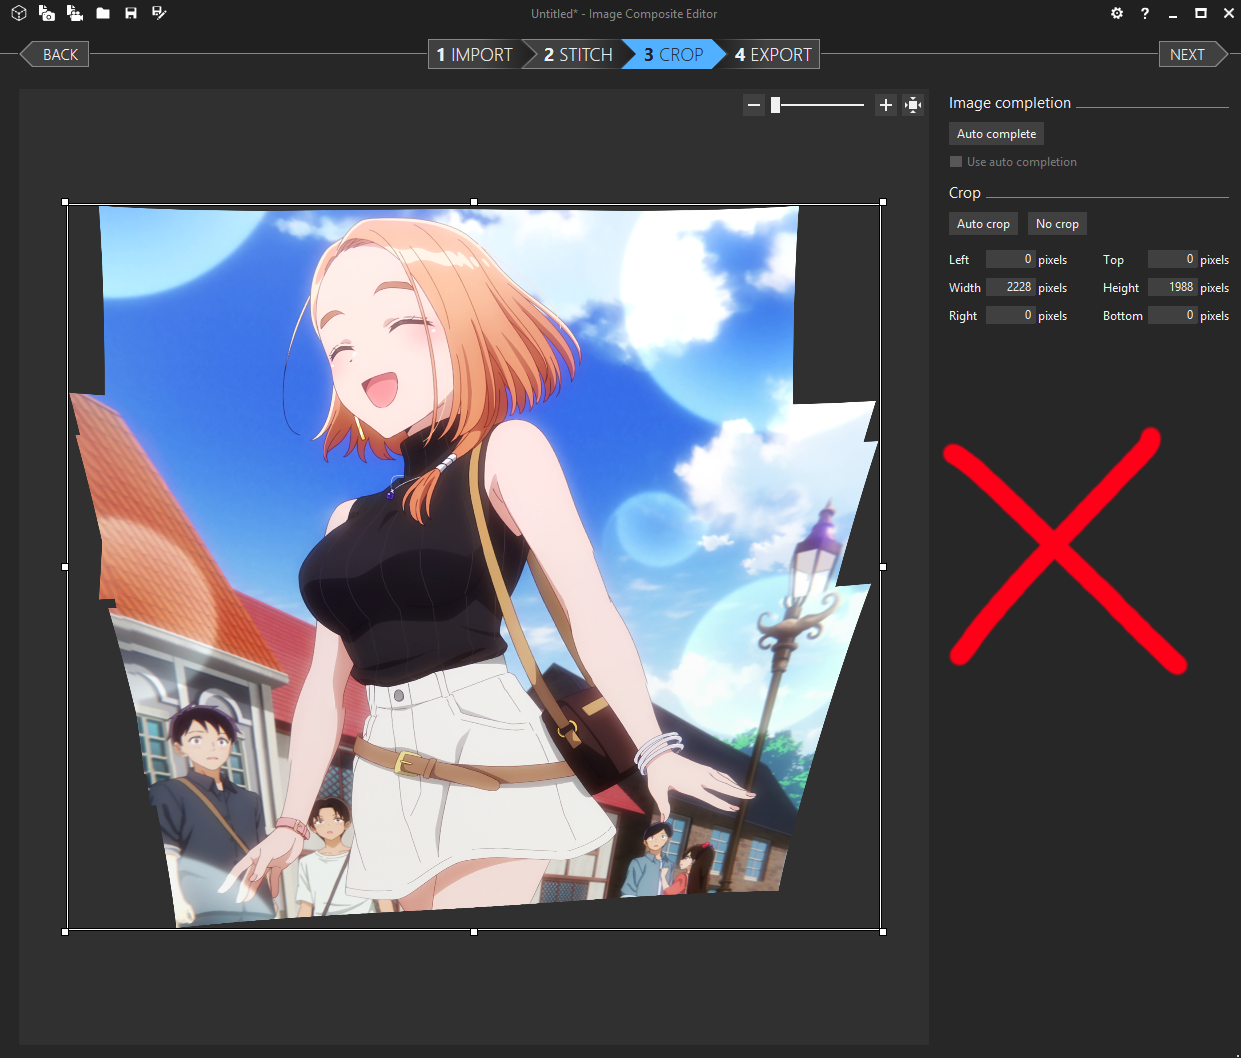
Hopefully, it’s obvious why this is a bad merge. But just in case—it’s stretched very unnaturally, which would ruin the training.
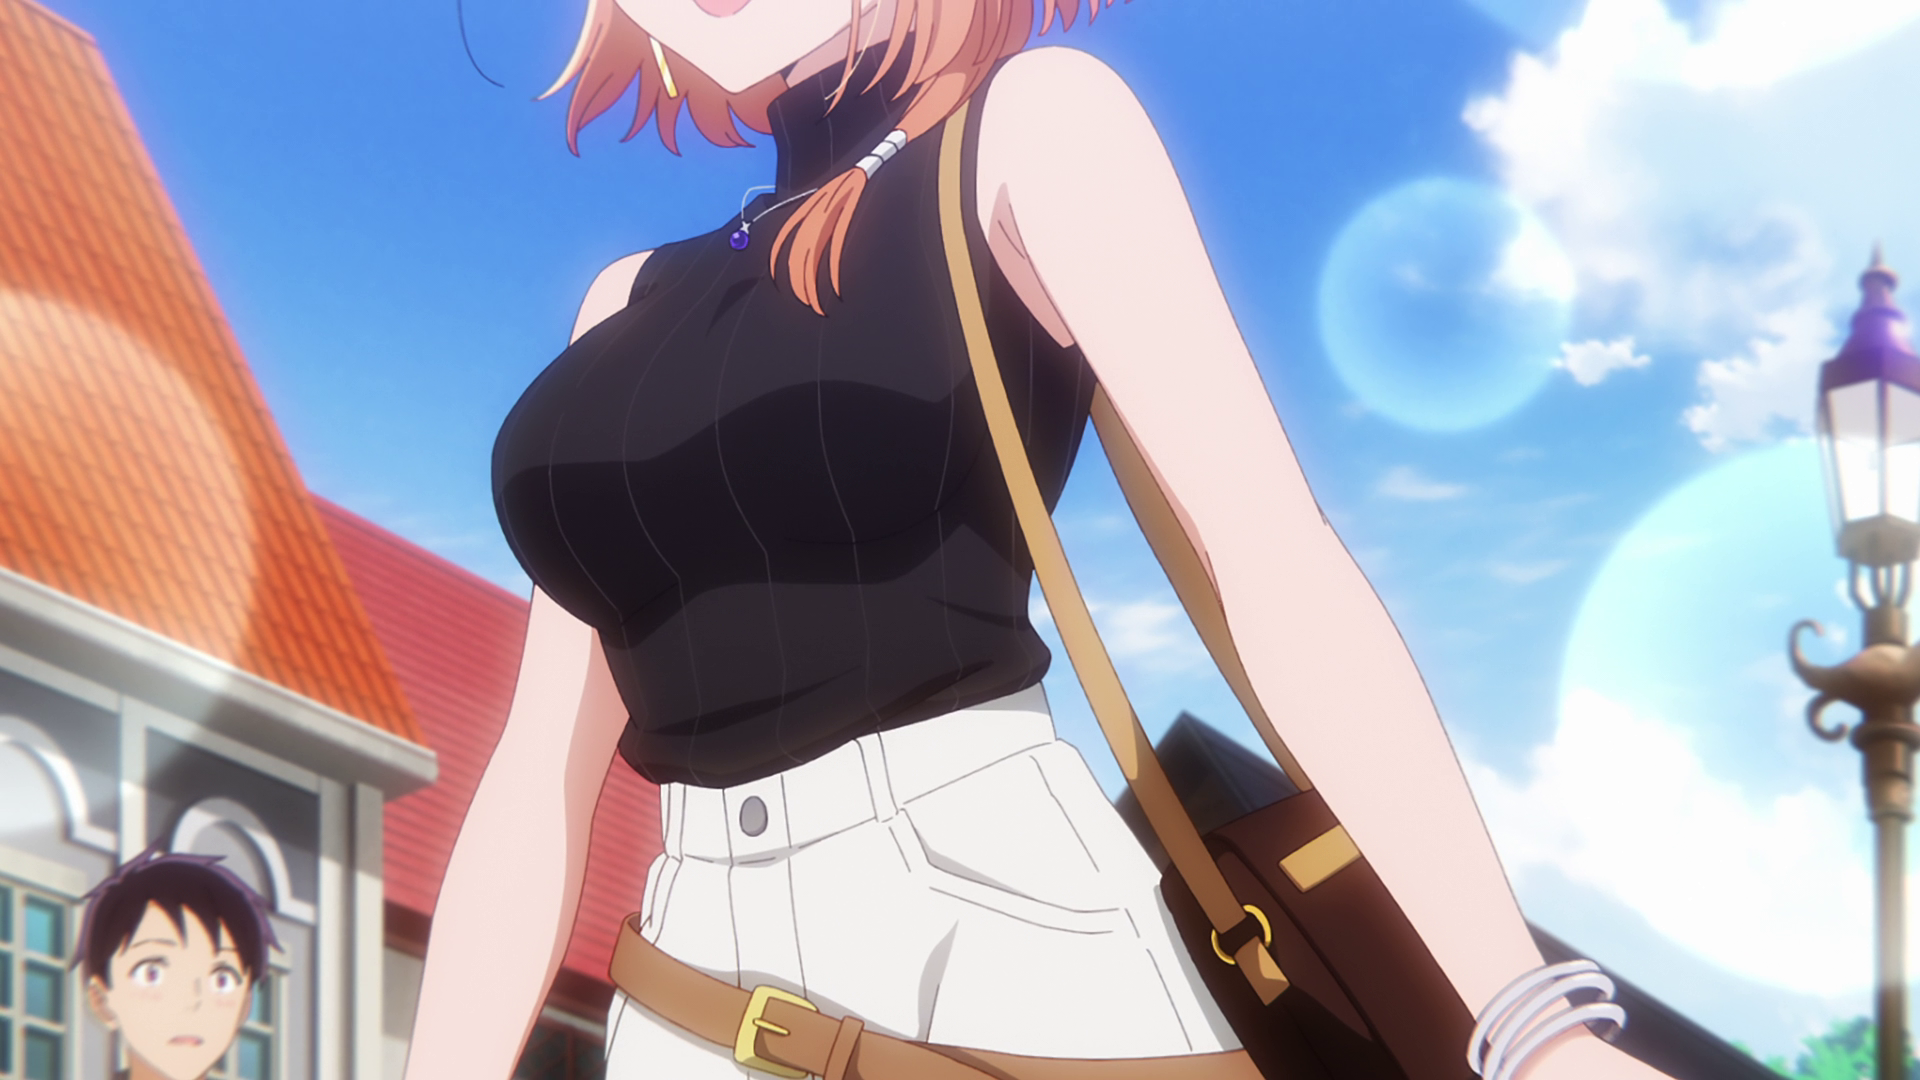
⚠️ Good news: If your dataset is small, not all is lost. You can still use these images separately, without merging.
I recommend cropping the sides around the character, like this:
BEFORE:
AFTER:
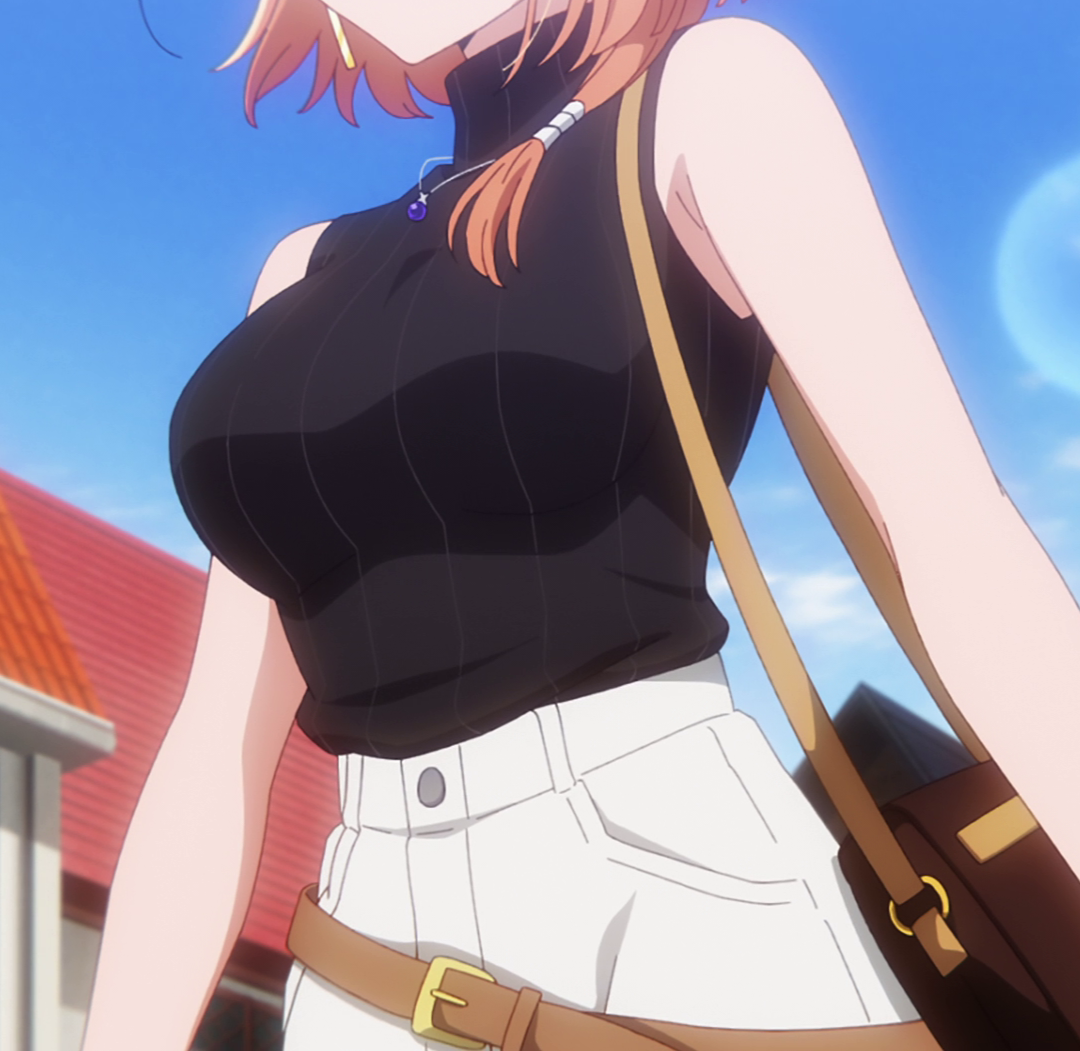
This way, the images remain usable and won’t negatively impact your LoRA.
Why Crop?
Less tagging later – the image focuses only on the relevant part.
Better focus on details – if something like the mouth isn’t fully visible, crop it out
⚠️ Reminder:
Full character perspective – it’s better to train on the entire character rather than just isolated pieces like lower body.
If the head is cropped out, tag the image as
head out of frameduring the tagging step.
🔼 Upscaling / Color Correction (optional)
⚠️ This step is optional, as it can sometimes introduce issues. I’ll cover potential problems shortly.
Open the chaiNNer program.

Load the file I shared in the attachments:
It’s inside the zip called
Necessary_files_for_training.Navigate to File → Open… and select
Upscaling_Nodes.chn.
Once loaded, you should see this screen:
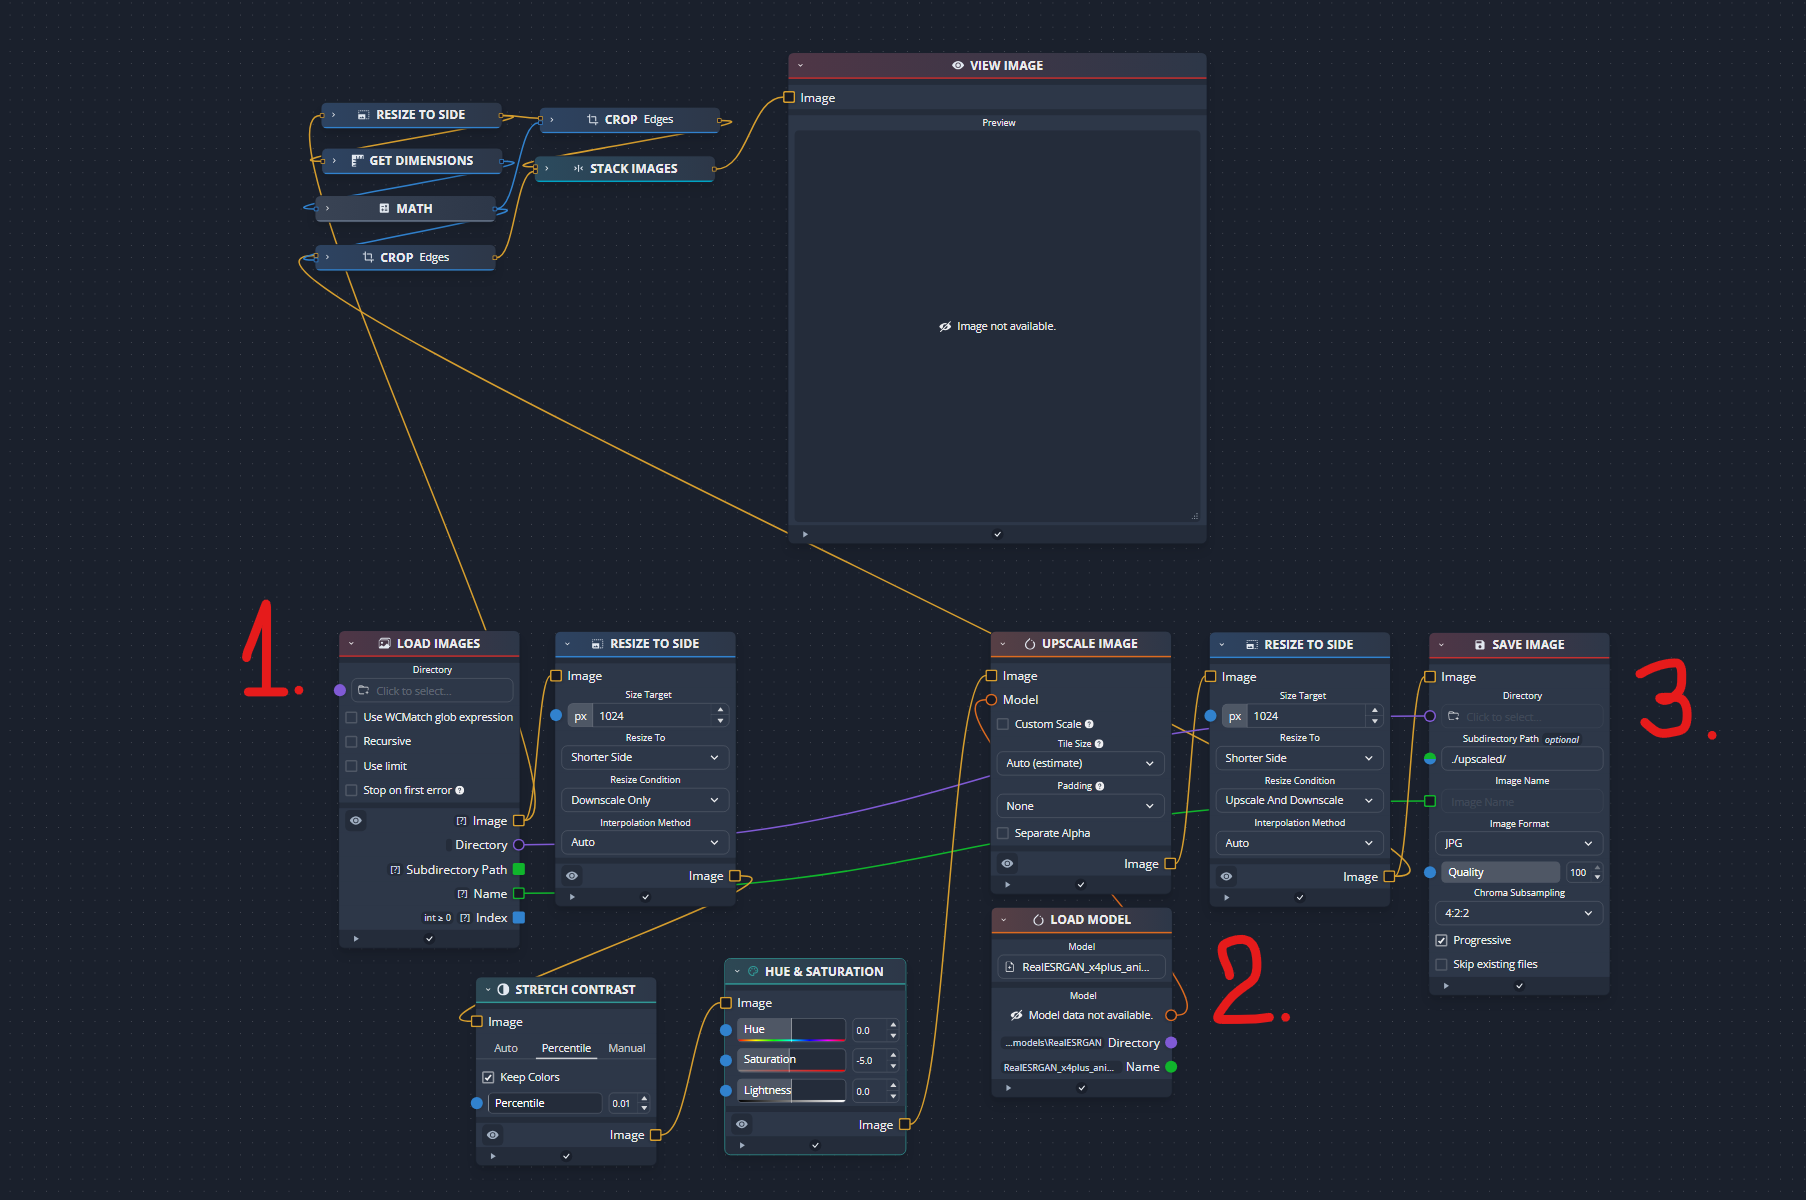
Load your folder of images into chaiNNer.
Load the upscaler model (
.pthor.safetensorsfile). Examples:RealESRGAN_x4plus_anime_6B.pth2x-AnimeSharpV4_RCAN.safetensorsSpecial note for AnimeSharp users:
Set Saturation to -5 in Hue and Saturation node.
Connect Stretch Contrast directly to Upscale Image.
(Reason: Anime 6B modifies image saturation, but AnimeSharp does not.)
Pick your save directory.
I usually save in the same folder as the source images—no reason to use a separate location.
Check VRAM usage.
Make sure no other programs are consuming GPU memory.
Recommended: at least 8GB VRAM for Anime 6B. AnimeSharp may work with slightly less.
Run the upscaler
Click the green play button at the top and wait for it to finish.
⚠️ Warning: Some images may become overly saturated when using Anime 6B.
I’m not exactly sure why this happens.
Options for dealing with these images:
Skip them entirely.
Don’t include them in the training dataset.
Or manually fix them in Photoshop (or another image editor) before using them.
📂 Sorting & Setting Repeats
After filtering and upscaling, sort your images into separate folders based on type or focus. Then, set the correct repeats for each folder.
Recommended Repeats:
1 repeat: ~23–30 images
2 repeats: ~16–22 images
3 repeats: ~4–15 images
4 repeats: Only if necessary—this can burn or bleed in the final LoRA. Use 4 repeats only if an outfit refuses to train properly with 3 repeats.
📝 Note: You generally don’t need more than 30 images per folder—quality > quantity.
SD1.5 days are long gone; you want your generations to look good and consistent.
Example: Single-Outfit Dataset
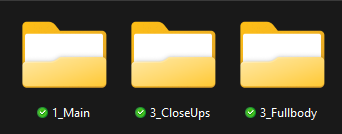
CloseUps – Focused on face or head
Main – Upper body shots, ideally from the belt up
Fullbody – Entire body shots (feet may be out of frame), including dynamic “cowboy shots” or images that show most of the character
Example: Single-Outfit Dataset & Outfit-Based Sorting
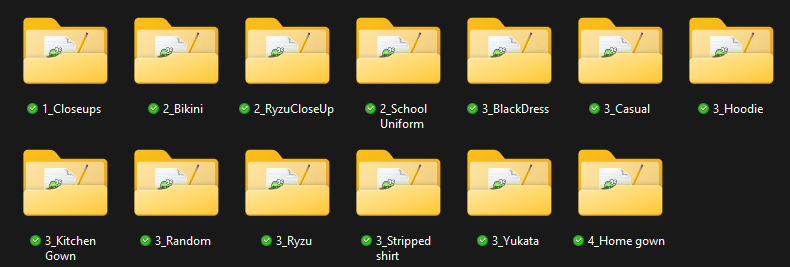
CloseUps can include images from all outfits.
Why this works:
Gives you more control over what gets trained and how much influence each set of images has on the LoRA.
Optional: You can further separate by single outfit, similar to the method above.
Example: For a school uniform:
1_MainSchool→ Upper body shots (repeats set according to previous guidelines)3_FullbodySchool→ Fullbody shots (repeats set accordingly)
This approach helps you balance training across different poses and outfits without letting any one type dominate.
Example: Limited/Small Dataset (~10–15 Images)
Place all images into a single folder.
Set it to 3 repeats.
Maintain some balance in composition:
At least 3 fullbody images
Around 5 upper body images
Around 5 close-ups
Ideally, include some from-behind shots (upper body or “cowboy” shots).
Portraits and close-ups from behind aren’t as useful, so focus on shots that show more of the character.
This ensures even a small dataset captures enough variety to train effectively.
🔬 Step #3: Tagging Images
🪠 Auto-tagging
Open Jello’s Dataset Editor.

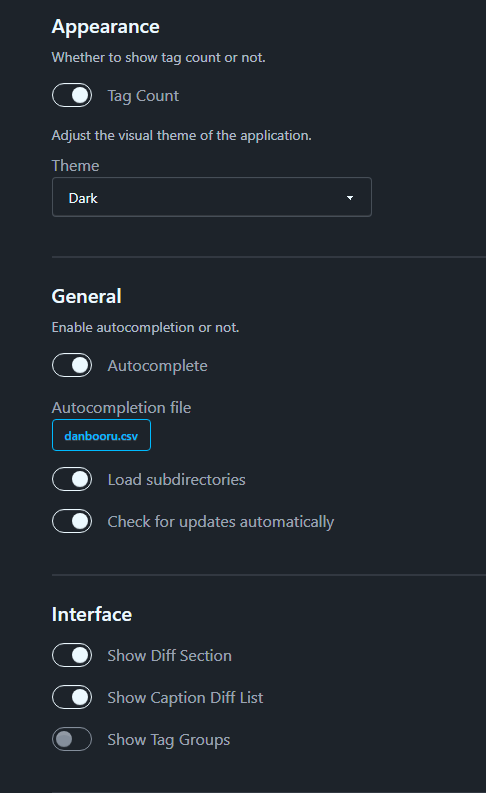
Before loading any dataset, go to the Settings tab and adjust the following:
Toggle on:
Tag countToggle on:
Load subdirectoriesUn-toggle:
Tag groups(personal preference—you can leave it on if you like)
These settings will make it easier to manage and review your dataset efficiently.
Go to the top-left corner, click File → Load Dataset, and select the root folder of your character.
Once the dataset is loaded, go to Tools → Autotag Images and press Start.
This will only run the autotagger service, it won’t tag the images yet.
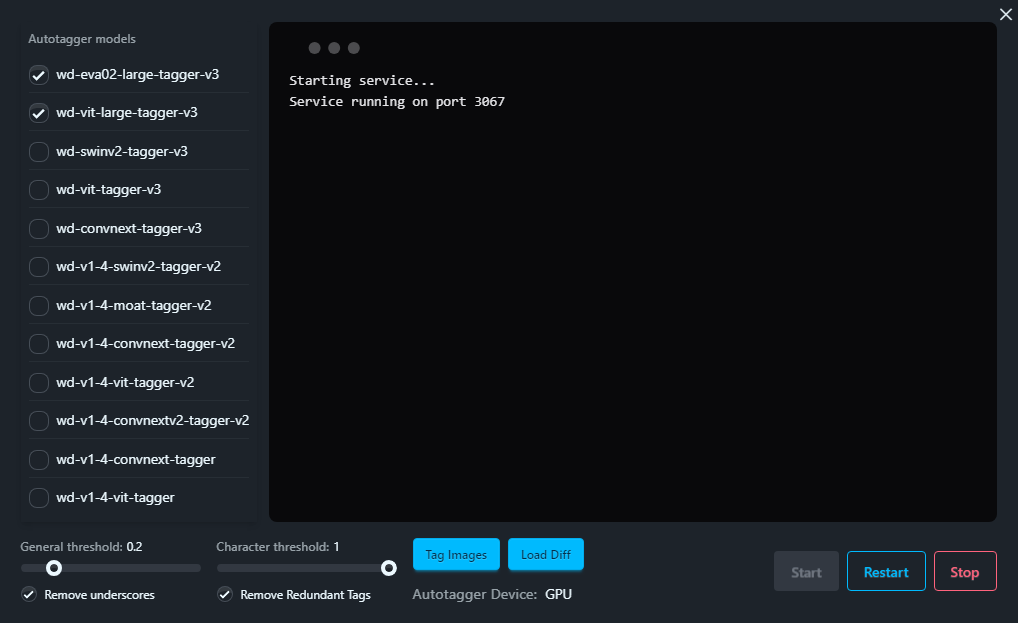
Autotagger Settings:
I recommend using a combination of:
eva02large-v3vit-large-v3
General threshold:
0.2Adjust later if it tags too many or too few images.
Character threshold:
1Prevents automatic character tags we don’t want.
1means a 100% match, which rarely happens, so no unwanted character tags will be applied.More on this in the next step.
Running Autotagging
Click Tag Images to start the autotagging process.
If this is your first time, the program will download the required tagging models—this may take a while.
Once tagging is complete, you can close the dialog window.
🪚 Fixing Tags — The Most Important Step!
You might ask, why is this step so crucial?
The fewer bad tags your dataset has, the more stable your generations will be.
This step takes time and patience, but it pays off in the final LoRA quality.
Trigger / Activation Tags
Only create these if your character has multiple outfits that share a common feature.
Otherwise, avoid it—training a new concept with a trigger tag can introduce unpredictable results.
Everyone has their own approach (100 people = 100 opinions). Use it if you think it helps; I generally skip it, as my tests show it’s not necessary.
⚠️ Activation tag has to be something unique. It can not match anything from booru tags! The reason is explained right below.
❌ Avoid booru Character Tags in Your Dataset! ❌
Including them can cause serious problems:
You don’t know what data the checkpoint was trained on, so it could introduce random or low-quality content.
Your LoRA will mix in unwanted data instead of focusing on your dataset.
This does not improve consistency—it usually just creates artifacts or bleeding.
For best results, you want your LoRA to learn only from your curated dataset, not inherited tags from external sources.
Keep your dataset clean and only tag images with what’s actually present.
Fixing Tags: Common Practices
I’m not going to dive into how to use Jello’s Editor—there’s a README for that, and it’s pretty straightforward once you look at it.
Danbooru is your best friend here—the most commonly used tags usually have a wiki entry that explains exactly when and how to use them.
Here are issues I encounter frequently and how to address them:
General tags:
Delete redundant ones. Example:
jewelry→ keep only specific items likenecklaceorearrings. If there isn’t a more specific descriptive tag available, you can just stick withjewelry.Delete tags like:
virtual youtuber, official alternate costume,
Clothing details:
Example: change
jacket→red jacket, and only keep the specific tag in the dataset.swimsuit→ keep onlyaqua bikini, frilled bikiniand such.same goes for
underwearas forswimsuitfrills→frilled shirtorfrilled *piece of clothing*(if a tag for that piece of clothing doesn't exists, you can keep the general tag)off shoulder→off-shoulder shirtoroff-shoulder *piece of clothing*(if a tag for that piece of clothing doesn't exists, you can keep the general tag)school uniform&serafuku→ these are a little bit tricky, you can keep them or remove them (I personally don't use them if the dataset is simple.)pantsorshorts→ even if it's not visible properly stick to one which is correct (note: don't forget to add color)
Pose / gaze corrections:
Remove
looking at viewerif the character isn’t actually looking that way.Ideally find a tag that describes gaze the best.
Don't mix up
looking to the sideandfacing to the side, that are 2 different things.
Expression / Head / Body tags
To get better control over face expressions I recommend you to add any missing tags like
expressionless,shy,happyetc.Add
closed mouthoropen mouthin case it is missingFix
smile,frown,light smileAdd
colored eyelashes, only where it's visibleDifferentiate properly
fang,fangs,fang outStick to one eye color, eg.
aqua eyesorblue eyes, keep just one which is correctSame goes for hair color
Fix
short hair,medium hair,long hair,very long hairetc... - ⚠️ Careful close-up / portrait image can not be combine withvery long hair- danbooru wiki will tell you moreUnify breast size, get rid generic of
breaststagAnd yet another tricky part is when it comes to breasts tags
98% of the time, I remove any breast tags where they are not visible
So basically if there's no visible cleavage or sideboob and such, I remove any breasts tag
Some people do keep it and tag it everywhere, so this is up to you
Missed tags: Autotaggers often skip:
from side,from behind,from above,from below→ tag these manually.Change
upper body→close-uporportraitas appropriate.
Lighting / scene:
If you kept
eveningorsunsetimages, make sure they’re tagged, as autotaggers often miss them.Add
nightto night shots
Accessories consistency:
Neck ribbon, bow, or bowtie? Pick one tag per outfit and stick with it.
Is it
hair ribbon, hair bow, hairclip? Prune generic tags likehair ornamentif it’s already specific. You can keep it if there's no specific tag for it.
Style tags (for screenshots):
Remove any style specific tags such as
official styleoranime coloringon screencap imagesTag each image with
anime screencap.Yes, I know the tag on booru is
anime screenshot. However, this tag was changed in 2025 fromanime screencapafter illustrious was trained.
This should help make the LoRA more flexible with styles.
Background tags
Add
blurry backgroundnot justblurry- auto taggers miss these quite oftenRemove mistagged
transparent background- white backgrounds usually get mistagged as suchFix
sky→blue skyetc.
Multiple characters on an image
You have two options for this one:
1. Tag everything of both characters
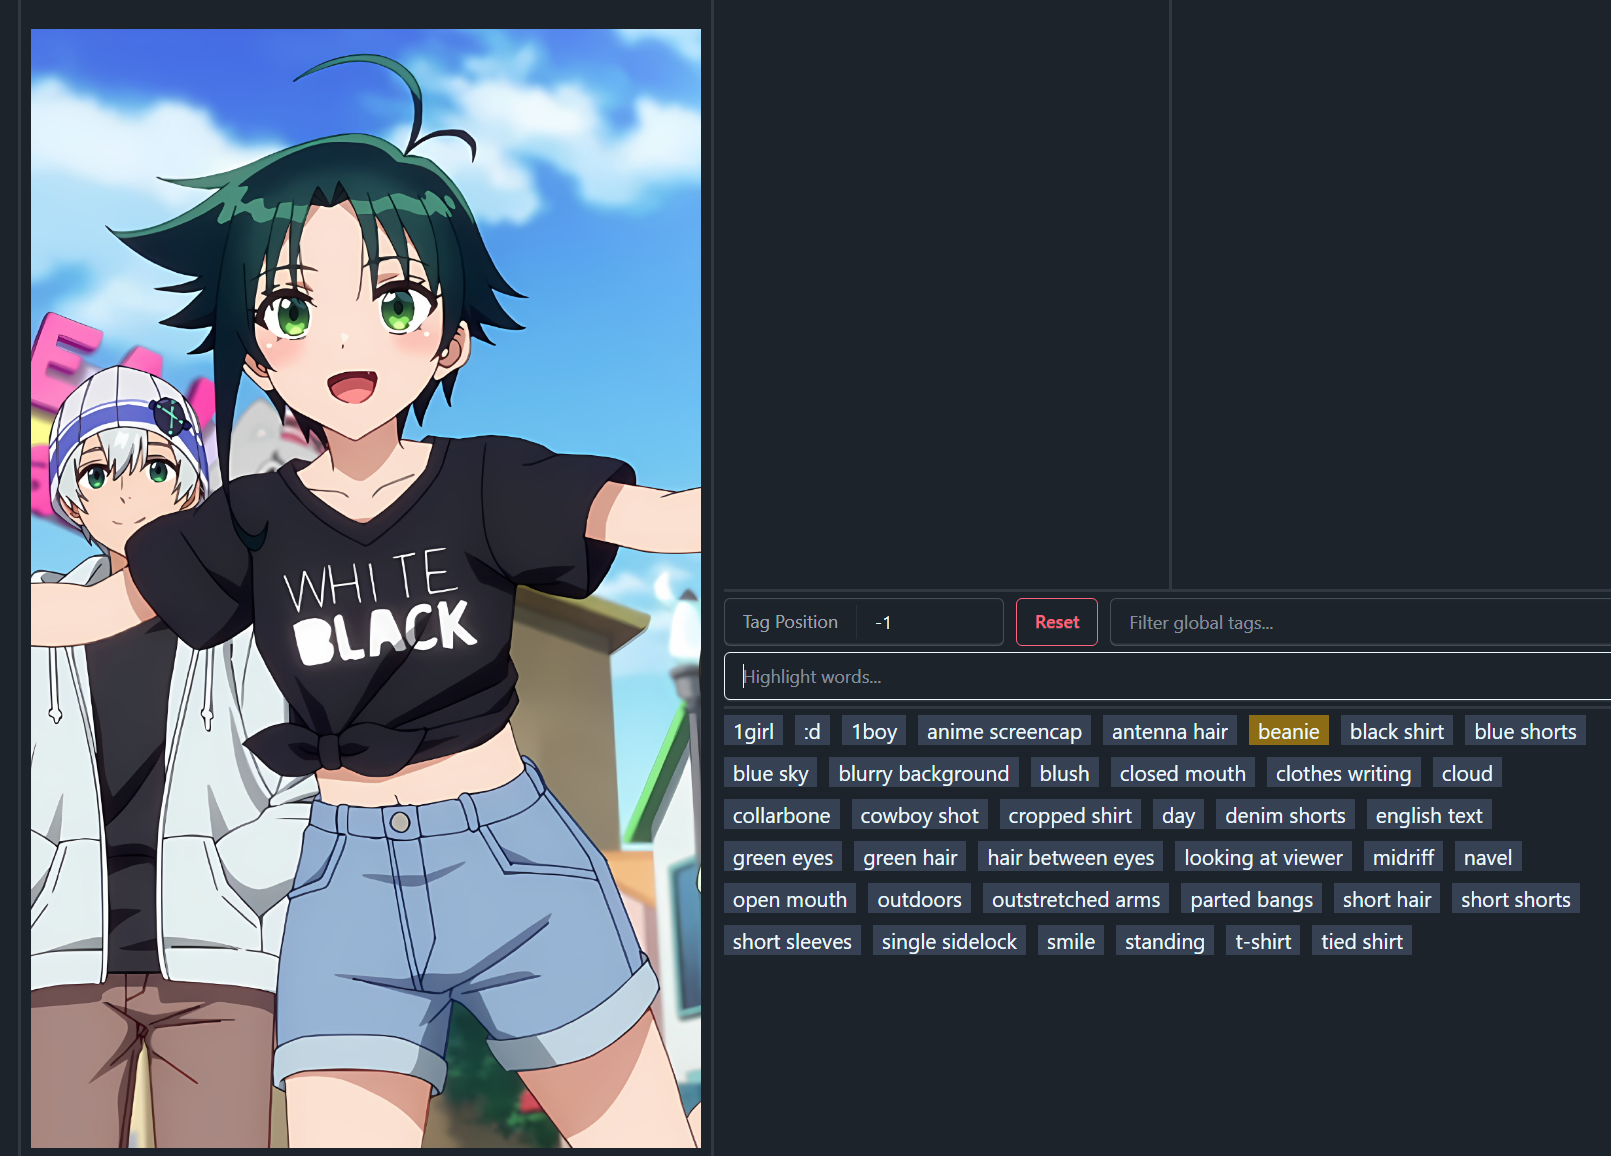
2. Remove any tags related to non-focused character and let 1boy/1other absorb it.
This is the option I use almost all the time, as I do not care about other characters on an image.
Here on this example image I've already removed tags related to the boy: grey hoodie, open clothes, all that's remaining is beanie. So let's remove that too.
FAQ: How do you know which tag to use?
I usually look up a similar image on a booru site and compare the tags. Even after 2 years of making LoRAs, I still double-check boorus to make sure I’m tagging consistently. (Not for every image obviously)
"The more you tag, the better you become at recognizing which tags are accurate, and over time the process gets faster—especially when you take advantage of Group Edits."
⌛️ Step #4: Training LoRA
⚠️ Note: These settings are designed for PCs with at least 12GB VRAM.
If you have less, check the Arc En Ciel Discord for guidance.
I’m training on an NVIDIA 4070 Ti (12GB VRAM).
Open Derrain’s LoRA Training App.
Load the
.tomlfile I shared in the attachments.Once loaded, you should see a screen like this:
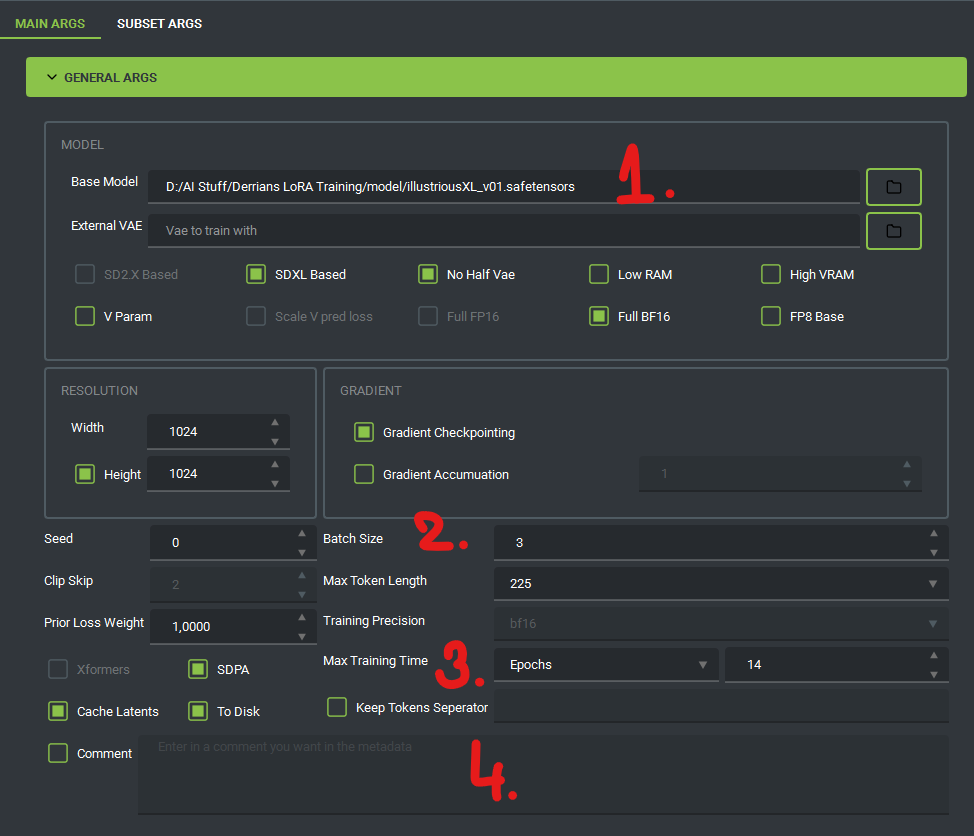
Base Model:
Load illuXL 0.1. (Change to noobai model if you want to train noobai)
Models trained on illuXL 0.1 are compatible with illuXL 0.1 and newer.
They should also work with NoobAI models, but some artifacts or minor incompatibilities may appear.
External VAE:
Can be left empty, as illuXL 0.1 already includes a VAE.
Additional Notes:
You can also train using illuXL 1.0 or NoobAI models (check compatibility).
Avoid illuXL 1.1, 2.0, or higher—these models generally perform poorly.
⚠️ Don't train on anything other except for base checkpoints. You would lose compatibility with other checkpoints.
Batch Size:
If you have 8GB VRAM, set it to 2.
Max Training Time:
This value will be adjusted occasionally; I’ll explain how later.
Comment:
You can tick this and write something like:
"Made by XYZ"for reference.
Network arguments:
⚠️ Don’t touch this unless you know what you’re doing!
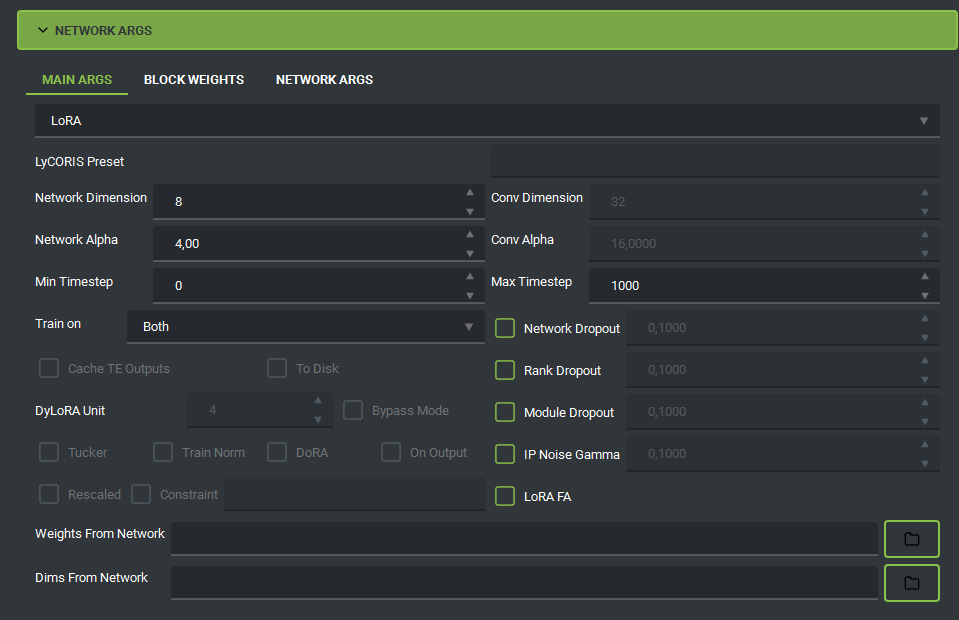
Network Dimension: 8
Network Alpha: 4
Why 8 and 4?
You don’t need higher values for a single character. This setting provides plenty of capacity without losing details.
With these settings, your LoRA will end up around ~50MB in size.
Optional adjustment:
For characters with 8+ outfits, you can increase to 16 / 8, also doubling the size to ~100MB.
I always test with 8 / 4 first before increasing dimensions, no need to bloat the size if it's not used anyways.
Many website trainers set these values to 32 / 32 by default, which produces a 200MB LoRA.
Some people will argue: “Higher is better—it saves more details.” Sure, but for a character with only a few outfits, you don’t need your LoRA taking up that much space and your details will still be the same. Remember: checkpoints already contain hundreds of characters and still sit around ~6GB in size.
Saving arguments:
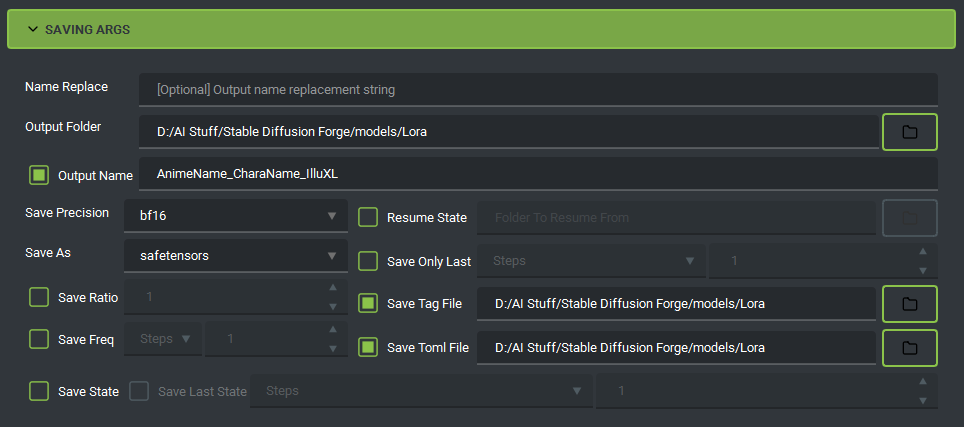
Output Folder:
Set this to any location you prefer.
Output Name:
Name your resulting LoRA file however you like.
Save Tag File:
Creates a
.txtfile with all tags in your LoRA.Useful for later reference in WebUI.
Save TOML File:
Creates a configuration file for Derrian’s trainer.
If training fails, you can reload this file and continue without re-entering all settings.
Save Frequency:
Set
Save Freqto every 2 epochs andSave Only Lastto 3 epochs.Example: If
General Args.Max Trainingis 14 epochs, this will save epochs 10, 12, and 14.
Formula:

This value will appear once training starts.
For a single-outfit character, aim for approximately 200-300 real steps.
For a multi-outfit character stick with
General Args.Max Training = 10-14 epochs.
Example: Small Dataset
15 images × 3 repeats × 10 epochs ÷ 3 batch size = 150 real stepsThis is a bit too low, so increase epochs to around 16–20.
Tip: Some characters train faster, while others need more time. I can't really give you a straight answer on this one. Every dataset, every character is different. You'll have to find the balance yourself.
Subset arguments:
Click to switch to the next tab.
This is where you will load your dataset / images for training.
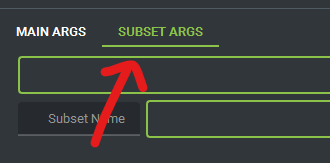
Click Add all subfolders from folder.
Select your root folder containing the images.
The program will load all subfolders automatically (e.g.,
1_CloseUp,3_Fullbody, etc.).
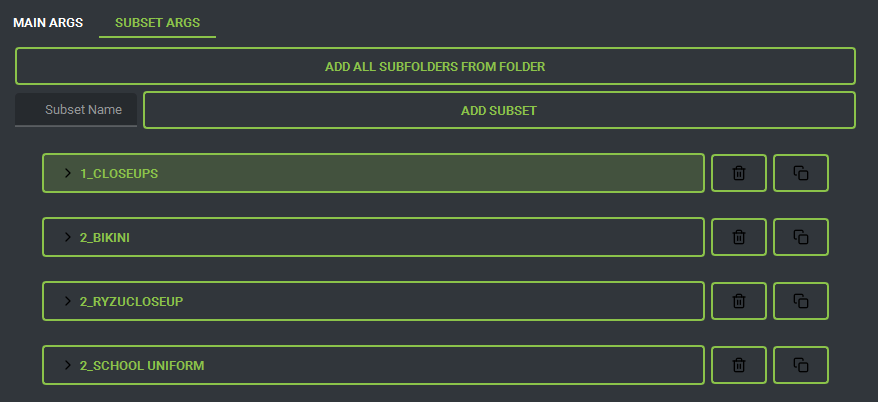
The repeats you set on folders are loaded automatically—no need to adjust them again.
You must tick
Shuffle Captionsunder each folder manually.(Optional) If you have an activation / trigger tag, set Keep Tokens to
1.
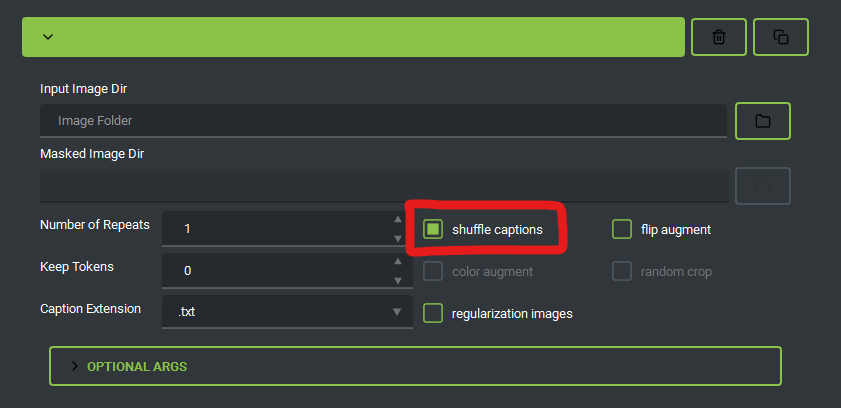
All that’s left now is to hit Add to Queue or Start Training—and you’re on your way.
"I know not everyone will agree with these settings—but hey, if it works, it works!"
Tip for Beginners
Start small: Don’t begin with multi-outfit characters. Try training a single-outfit LoRA with 10–15 images first.
Trial & error: LoRA creation is an iterative process.
If it doesn’t work the first time, don’t panic.
Repeat your steps carefully, and you’ll gradually get it right.
🩺 Step #5: Testing LoRA (Is it stable?)
Once your LoRA is trained, it’s time to test whether it’s:
Undertrained
Overcooked / burnt to a crisp
Just right
Everyone has slightly different parameters for what they call “stable,” but personally I aim for about 5 out of 6 generations looking good.
🔎 How do you know if a LoRA is undertrained?
The character looks generic or not recognizable.
Outfits or hairstyles are inconsistent across generations.
Key features (like accessories, ribbons, or colors) are often missing or wrong.
Feels like the LoRA didn’t “lock in” the character yet.
🔥 How do you know if a LoRA is overcooked / burnt?
The model forces details everywhere (extra accessories, weird shading).
You start seeing artifacts or distortions (e.g., eyes melt, clothes blur, odd textures).
Weird hands appear more often than usual.
It loses flexibility—no matter what prompt you use, it spits out the same rigid pose/outfit/style.
Colors may look oversaturated or unnatural.
✅ How do you know if a LoRA is just right?
The character is consistently recognizable across multiple generations.
Outfits and hairstyles show up reliably but with some natural variation.
No weird artifacts, distortions, or “burnt” textures.
It plays nicely with prompts—you can still guide style, lighting, or composition without the LoRA overriding everything.
Bonus check: When you remove anime screencap from the prompt, the character should still be somewhat flexible with different styles—whether from the checkpoint or an additional style LoRA.

![[Guide][Local training] Creating anime character LoRA (Illu or NoobAI)](https://image.civitai.com/xG1nkqKTMzGDvpLrqFT7WA/f353fe96-387f-46ed-8d61-b2b7a641e5c4/width=1320/QAN6DZ6E8Z0PF73CYA7A8QAA50.jpeg)