Welcome to the English Guide.
中文版的攻略,可以看这里:如何只用一张图片,且不用电脑来炼丹(训练LoRA)? | Civitai
🏯 Introduction
Think LoRA training is too hard and too complex?
Think without tons of high-quality images it’s impossible to make a good LoRA?
Think you need a high-end computer to even try?
Yes and no.
I can tell you: with the proper setup, it’s actually possible to train a high-quality LoRA with just 1 or 2 high-quality images!
Hoho, you lazy cat! But I do prepared a shortcut for you.
Here’s the TL;DR steps for a single anime character lora if you don’t want to read the full scroll of wisdom:
😏TL;DR
Prepare at least 15 non-identical images from different angles/poses.
(But Sensei, you said only 1 or 2…?
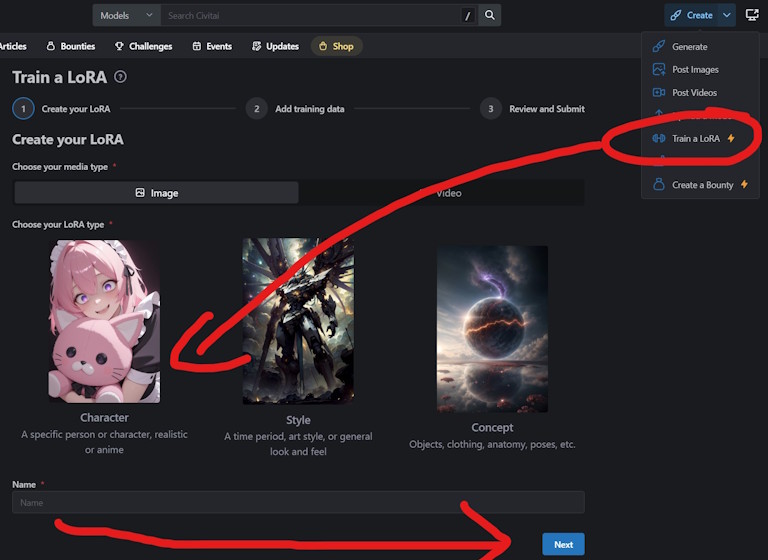
(This is the TL;DR trade-off! If you try only 1 or 2 here, the trainer will booooom, your LoRA will look like trash, and you’ll come crying “Sensei you liar!” If you really want to do 1 or 2 images, scroll down for the real guide.)Throw them into CivChan’s online LoRA trainer!
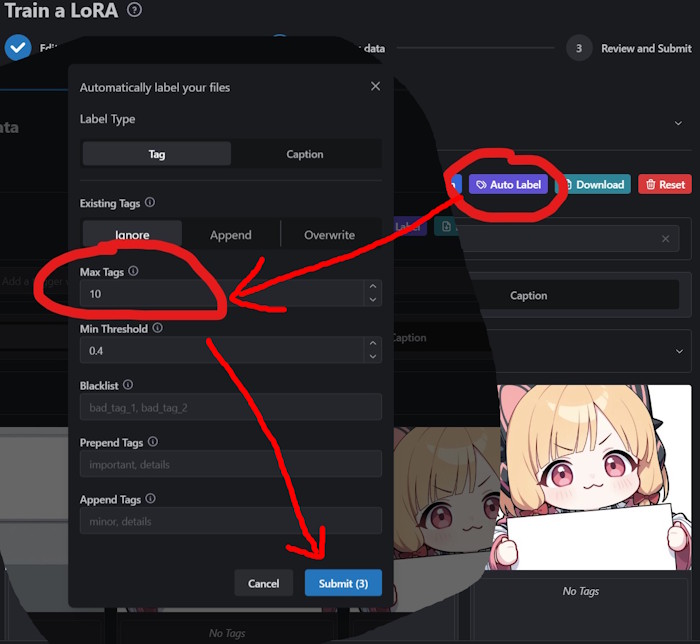
Hit the "Auto Label" button. Change max tags to 20. Hit "submit"
If it is a Character LoRA: Filter tags: type in “hair” → delete all Character features-related tags like blonde hair/long hair. Same with eye color like blue eyes.
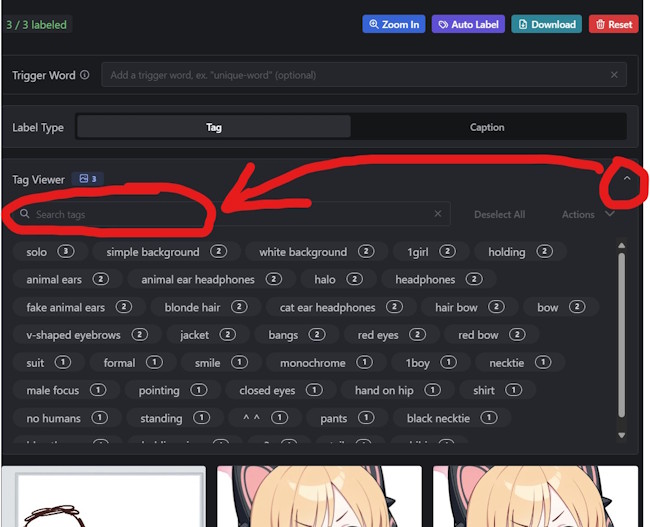
But if it is style LoRA or Concept LoRA, nothing usually needs to be deleted if WD1.4 tag everything correctly.
Add a unique trigger word (e.g.
mikuBA / CaptainCiv / unique-word) in the "Trigger Word" section above. Hit "Next".Next: select the Illustrious for the go-to anime style models today.
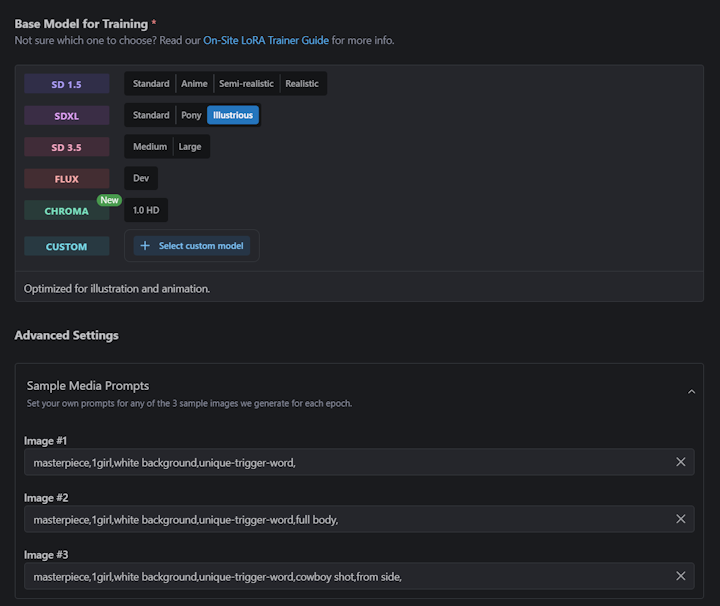
Add Sample Media Prompts for preview images.
Example:masterpiece,1girl,white background,[your trigger word]
(If you skip this, previews will look like hot garbage.)Open Advanced Parameters → tweak "Epoch", "Num Repeats". Adjust both so total training steps are close to 1000. You will need to adjust both "epochs" & "Num repeats", and epoch = 15~20 is a good start, for "Num repeats", my example below don't have reference value, as only 3 images is in the dataset, so don't simply copy that "67", Num repeats is generally lower than my example.
Adjust "Clip Skip" to 2. Enable "Shuffle tags" and set "keep tokens" to 2.
Adjust "Network Dim/Alpha" to 8 for smaller file size.
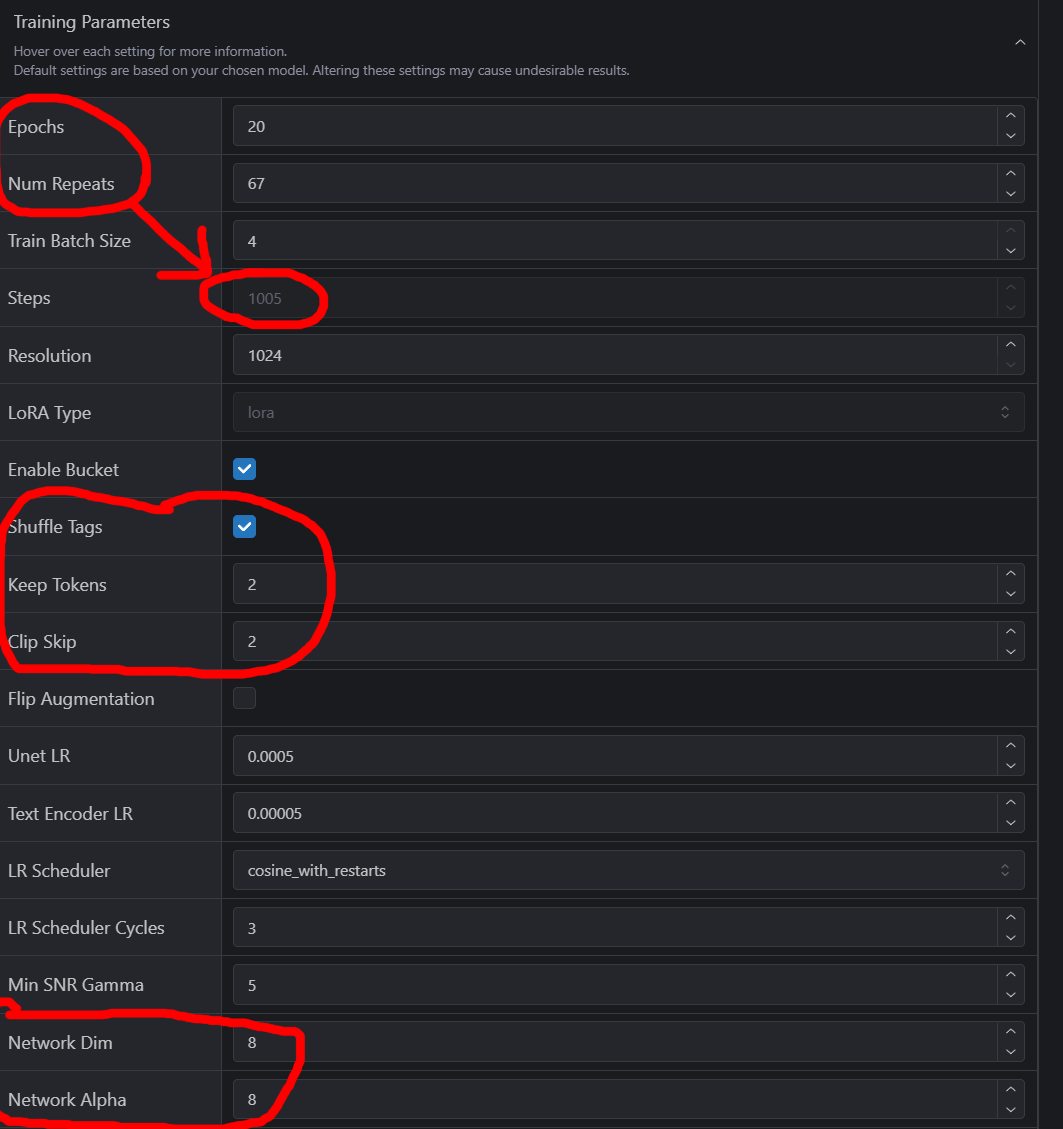
Hit Submit. Goodbye, 500 buzz!
Wait 40-70 minutes for the training to be completed.
Test your LoRA Epochs, start from 50% (like 10/20 or 8/16). (you can use either your own rig or CivitAI to test it if you have membership subscribed. but if neither conditions are meet, you can only rely on the preview images and luck. I recommend only epoch after 75%, like 12/16 or 15/20) with the preview you think is the best.):
If it looks underfitted (missing character traits) → go 3 epochs later (10 -> 13 -> 16)
If it looks overfitted (repeating poses, weird textures) → go to earlier epoch.
Once you find the sweet spot → 🎉 Hooray, publish it!
(Q: But CivChan just said “zaku zaku you are so weak!” and threw me garbage LoRA that is either underfitting or overfitting, never balanced…

(A: Then enrich your dataset! Pick the best images from your failed LoRA, add them in, and train again with this enlarged dataset. But beware—goodbye another 500 buzz! Can your buzz wallet survive?)
1. Why Civitai’s Online LoRA Trainer?
Because it’s actually the perfect shortcut for beginners and lazy cats alike.
It’s built on kohya-ss under the hood, so you’re not losing quality or compatibility compared to training locally.
It’s fast, reliable, and has fewer parameters to fuss over than local kohya. No need to drown in command lines or dozens of settings.
For comparison:
Local training (my rig: 4060 Ti 16GB) → takes at least 1.5 hours to train one LoRA.
During that time, no GPU-related works like gaming or generating waifus—only browser or CPU tasks are usable.
Plus, you suffer from the GPU fan roaring like a jet engine, making it… not very relaxing.
Civitai Online Training → usually 40–60 minutes for the same job. While it runs, you can do whatever you want on your PC.
Drawback:
Civitai's online trainer can't use regularization!!!
This means if your dataset images are mostly monochrome (like blue and white), or if you're training characters from black-and-white doujinshi, there's a super high chance things will go off the rails. Regularization is the best fix for these issues.
Civitai’s LoRA trainer lacks a loss/average chart showing loss rate of each epoch. Experts (not me 😅) can use that info to detect the best epoch effectively, but online trainer users can’t.
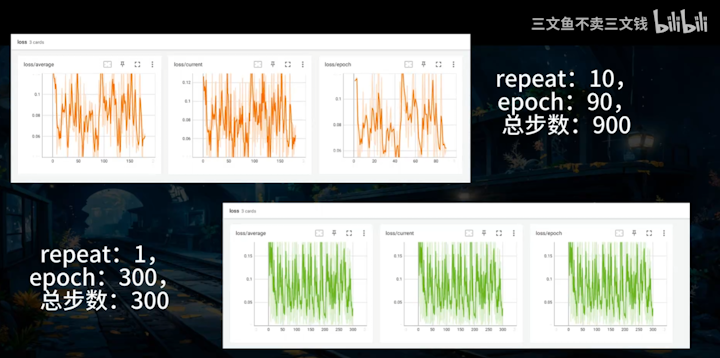
You cannot train LyCORIS type models using the online trainer.
But hey—what if you’ve got a RTX 5090 GPU and don’t mind running locally? No problem! The parameters are pretty similar - just find the same parameter and change these numbers, and magic will happened!
2. How to Train a LoRA with Just 1 Image
Let’s be real—this happens a lot, especially with unpopular 2D game characters where barely any fanart exists.
Also, there are many case that girls are too revealing that Google Nano Banana simply refuse your reference sheet request (like my Minase example below).
But what if I told you…
1 image can actually equal 4–10 unique training images?

The secret arts: crop and flip!
(If their outfit are not that revealing, though, you can use Google Nano Banana (https://aistudio.google.com/) to generate all sorts of poses/angles for them—we'll cover that in the next section.)
Example: My Minase LoRA
Minase | Illustrious LoRA | Civitai

It was trained on 2 images initially. (1 image also works the same way). Here’s the trick:
Take 1 original image.
Crop it into multiple sub-images:
Full body
Cowboy shot
Upper body
Portrait
Avatar
Lower body only
Boom—1 image just became 6 useful training samples.
Important: Cropped image, especially the lower body only, must be tagged correctly, so that the LoRA learns features properly. Normally WD1.4 can automatically handle it well, but you better still keep an eye on it.
I did this manually for maximum control (cropping by hand in Paint.NET).
Downside: Can be tedious, and no batch processing support.
There used to be a hugging face project provide online character splitter but it's discontinued :(.
For batch cropping → you’ll need scripting with Ultralytics + Face/body YOLOv8 pre-trained model + Pillow (not beginner friendly, but very powerful).
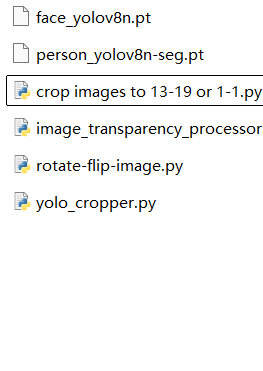
Upscaling Warnings
If your source image is small (like 300x300):
Kohya-ss will auto-upscale to 1024 using Pillow → results in ugly artifacts that your LoRA will learn and repeat.
Solution: upscale to 1024on the long side properly before training. Mobile user can also do it using online tools.
Recommended: Remacri or RealESRGAN 4x Anime 6B.
Personally, I like Remacri → it preserves more original details.
Downside: more artifacts are also preserved.

To fix that, I run the upscaled image through Stable Diffusion i2i or inpaint at low noise → removes artifacts while keeping it almost identical to the original.

I've heard CivitAI's standard Hi-res Fix in the generator is Remacri, but not sure about it.
If your source image is large (>1024px on the long side):
Even a cropped avatar will still close, equal or even exceed 1024px.
Great! You can skip upscaling.
Flipping
Flip each cropped image horizontally.
This step can be done by Civitai's generator itself (it's called 'Flip augmentation,' and if you click it, your pic will randomly flip horizontally).
But the problem is, you can't control it. So, personally, when I'm down to just one image, I'd choose one where any asymmetry isn't too noticeable to flip, and just keep the other images as they are.
Works well for symmetrical characters (like Minase).
Doesn’t work well for asymmetrical characters (e.g., unique accessories on one side).
Example: my Hakuhou LoRA
Character has a one-sided hair ornament.
Flipping makes AI think the hair ornament can appear on both side of hair.
I had to manually edit with Paint.NET + SD Inpaint to fix it. (which is painful)
And even then… sometimes the ornament still appeared on the wrong side… orz.
Rotate 90° left/right
Usable in some cases, but apply with caution.
If the rotated image still looks natural and consistent, it’s fine.
If the orientation feels odd or unnatural, it can confuse the AI and actually hurt your results.
For my Z35 lora, I rotated only these pictures that still looks somewhat normal even after the rotate:
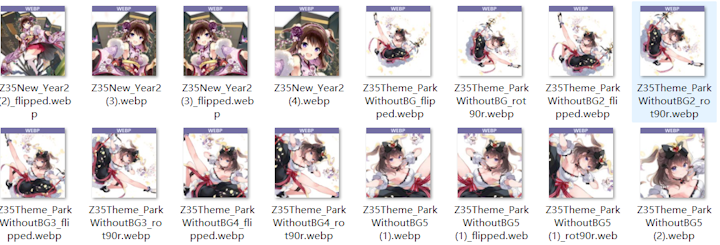
Why Crop & Flip Helps
Forces the AI to see different body parts separately instead of only one full image.
Each crop changes the pixel-level data, so training is less repetitive.
Reduces the risk of overfitting.
(Q: Ehh, Sensei! But my generated characters always stuck in the same pose! Isn’t that useless?)
(A: Hmph. Crop & flip is survival training, not luxury. If you want pose variety—go hunt for more images!)
⚠️ Keep expectations realistic:
It only reduces overfitting—it doesn’t eliminate it.
Since all images are derived from the same pose, your LoRA will still default to that pose more often.
It’s not as good as having a truly varied dataset with new poses.
But even if your initial LoRA is overfitting and stuck in the exact same pose, there’s still hope! You can brute-force variety by generating tons of poses and angles from that character—even if they still stubbornly default back to the original stance. Then, carefully pick the best-quality generations that differ enough from the base pose and add them into your dataset.
Boom! From 1 image → infinite possibilities.
The catch? It eats more time, more effort, and yes… way more buzz. ⚡
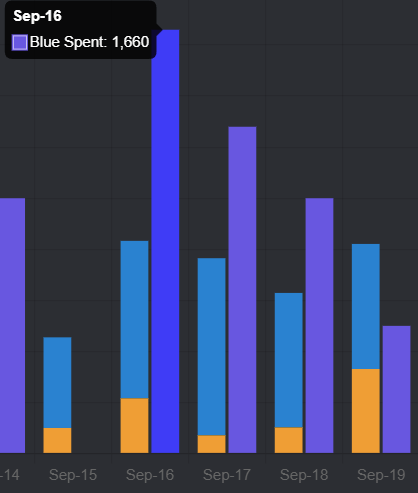
Buzz farming tip: You can earn at least 400 blue buzz per day in under 10 minutes, if you do all the daily activities and attend the daily challenge.
3. Normally, You Have More Options
Most of the time, you’ll have way more than 2 images. That’s great, because more options generally mean better LoRA quality and an easier workflow.
But remember, quality > quantity.
👉 20 carefully chosen, high-quality images will always beat 100 blurry screenshots or compressed trash.
Think of difficulty levels like this (tier list 😏):
Easy: Standard characters in anime episodes (all those isekai bangumi you saw every season).
Medium: Anime game characters with standard 3D models (Hoyoverse games, Wuwa, etc.).
Medium: Popular 2D mobile game characters that comes with lots of fanarts (like FGO).
Hard: Obscure unpopular 2D game characters—hardly any good refs, good luck soldier.
Main Sources for Images
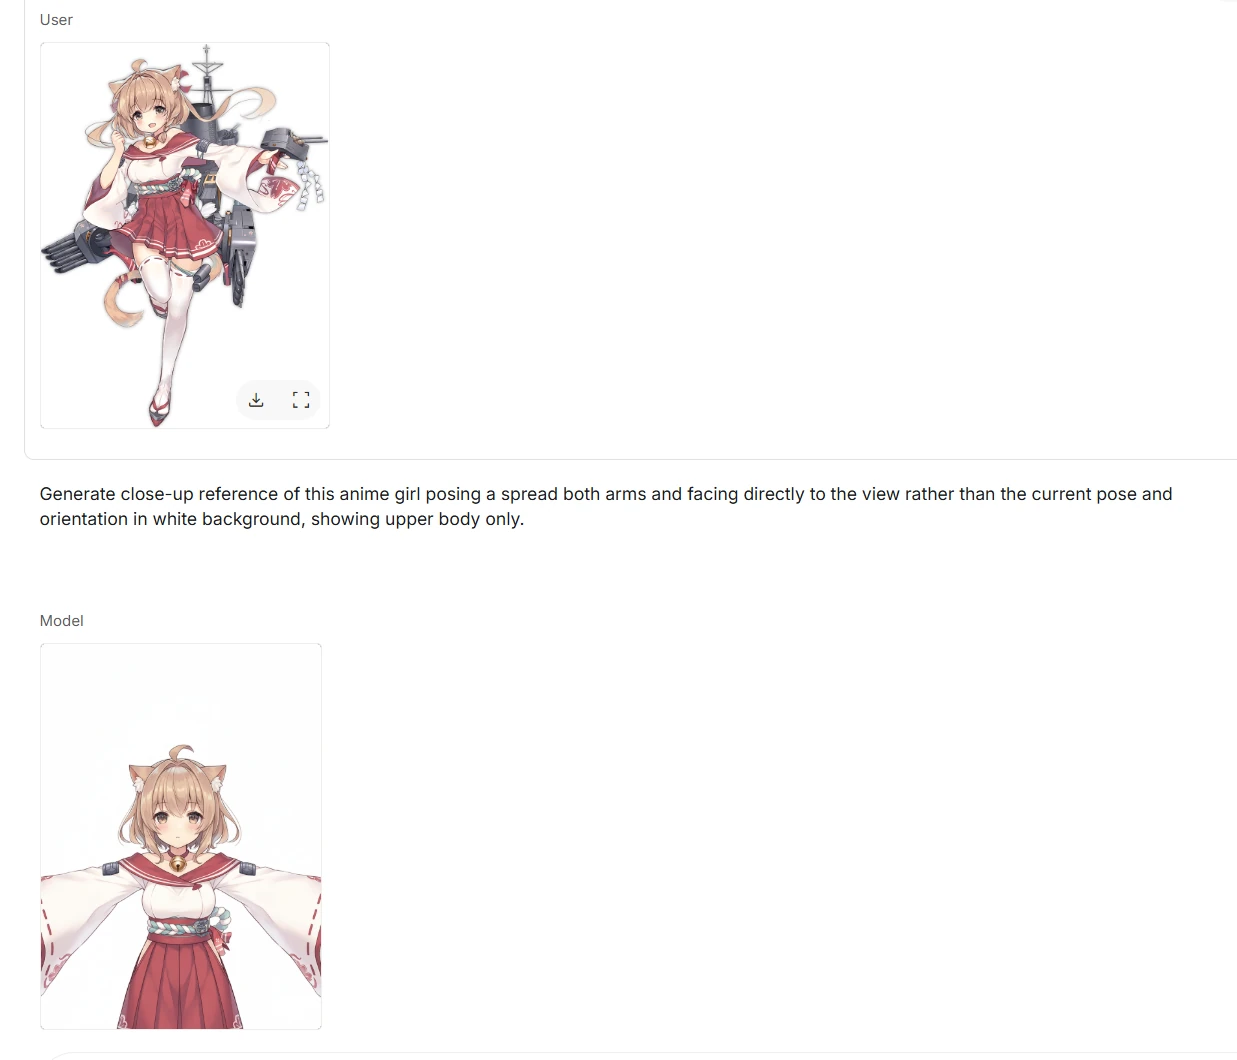
1. Google Nano Banana (Reference Sheet Cheat)
Google Nano Banana can generate a full reference sheet of your waifu from different viewing angles—front, side, back, even those cool anime ¾ shots. You can just copy my prompts.
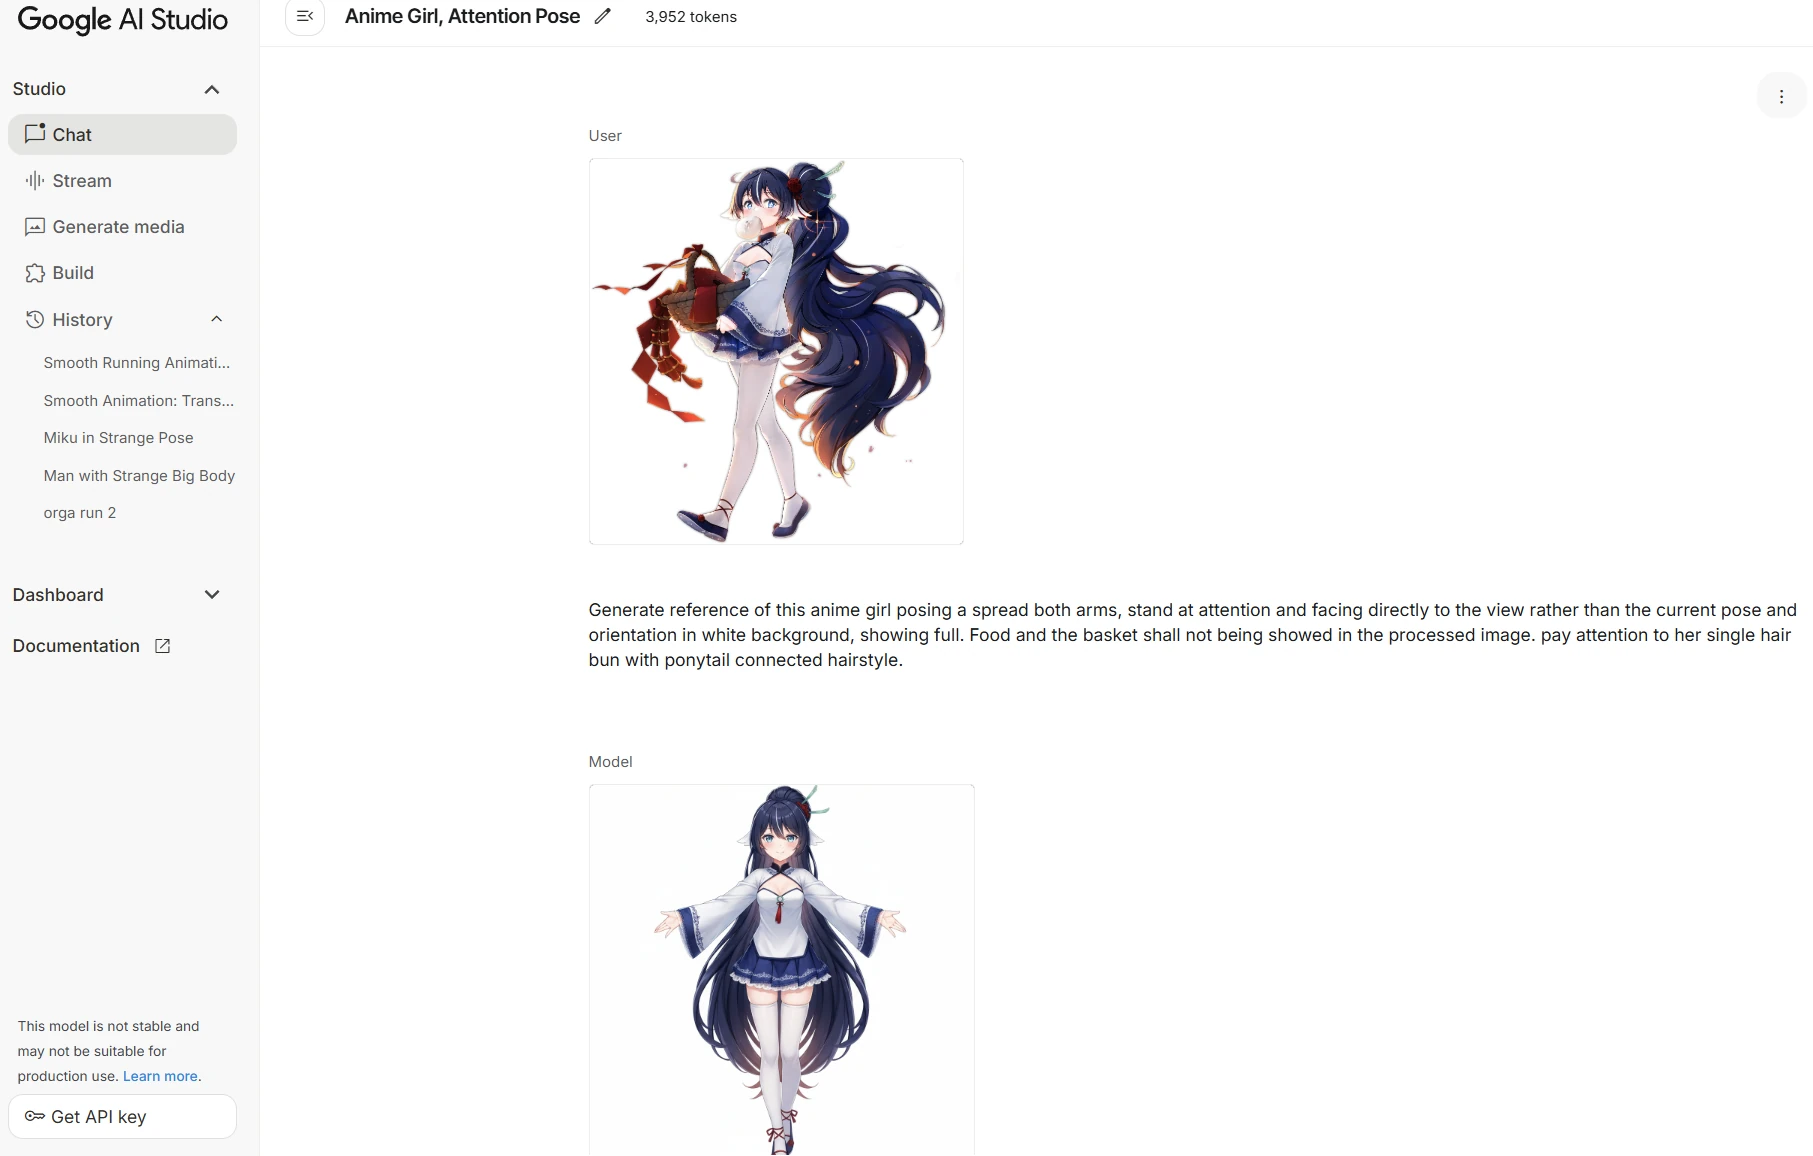
But beware, young padawan, there are several drawbacks:
Censorship: Anything too revealing, Nano Banana will auto-censor with added clothes. Large cleavage? Covered. Underboob? Covered. Bikini girl? ❌ “Request denied.” Sadge.
Detail loss: Unless you are super lucky, you’ll lose a lot of fine details like tiny hair ornaments, jewelry, or body accessories—unless you emphasize them a lot. And sometimes, even with emphasis, Nano Banana just shrugs and doesn’t get it.
Resolution woes: The outputs often come with lots of artifacts. I strongly recommend upscaling or cleaning them with the same tools from 3.1 to polish them.
👉 Overall, Nano Banana is a solid sidekick to bulk up your dataset variety if your image pool is small (and your character isn’t too revealing xD).
2. Anime Screenshots
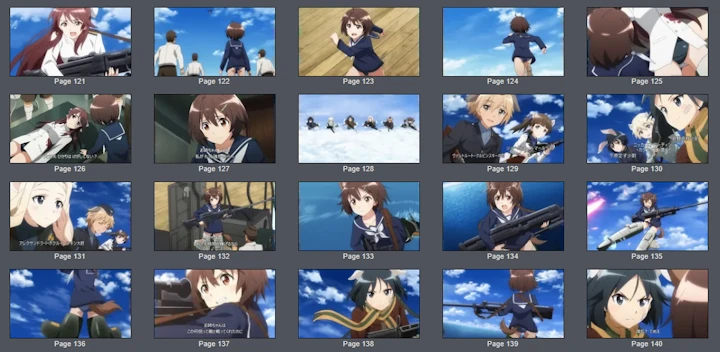
Select only high-quality frames (clean, sharp, no motion blur).
Yes, manual screenshotting is tedious.
If you’re lazy or ambitious, you can use YOLO models for auto-detection, but this needs some coding/scripting skills.
3. In-Game Screenshots
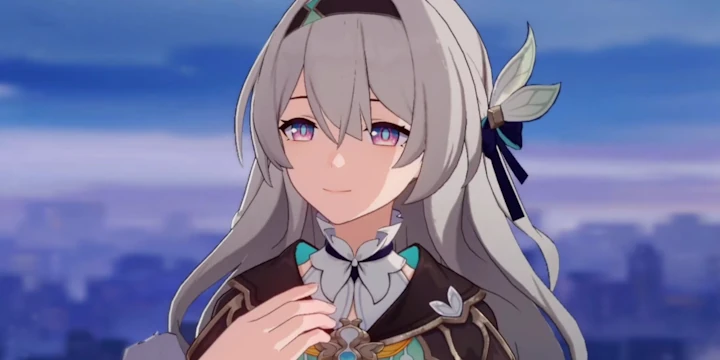
Take multiple shots of your character:
Front × 3
Each Side × 3
Back × 1
Various angles (cowboy shot, portrait, full body).
Warning: even if the art is anime-style, it’s still 3D. That affects training.
If you want a purer 2D style, preprocess these screenshots in Stable Diffusion img2img with ~0.3–0.4 noise. This converts semi-3D renders into more 2D illustrations.
4. Danbooru
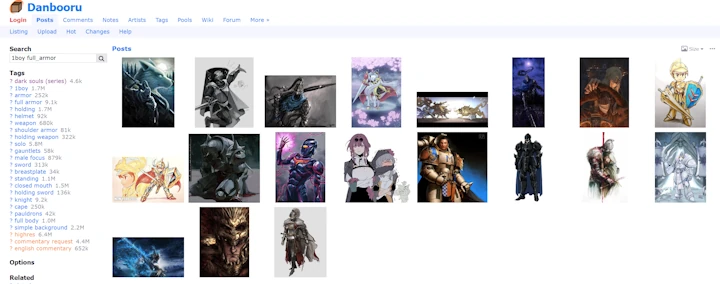
Very solid choice. Already comes with tags & filters, so it’s easier to pick high-quality fanart.
Way less spammy than Pixiv.
Banned any AI generated content.
5. Pixiv

Great source, tons of art.
But beware: today it’s full of AI-generated art.
AI art are generally fine but usually ignores details—clothing patterns, accessories, unique features may be missing or wrong. If you feed too much of these images, your LoRA will also “forget” critical details (unless you don't care about these details that much).
6. Crop & Flip (link back to 3.1)

Cropping + flipping still helps keep consistency with the original artist’s style.
Especially important if your dataset is small.
4. Tagging
After the image prep marathon, you’ve cleared the hardest stage! Tagging is the cooldown lap of this shounen training arc—it’s still important, but compared to dataset hunting it feels like farming slimes after fighting the Elder Dragon.
Tagging is critical, but thanks to wd1.4 auto-tagger it’s actually beginner-friendly.
You’ve got two ways: run it locally on your machine, or use civchan’s built-in auto tagger (also powered by wd1.4).
For this guide, I will use Civchan since it’s easier to grasp (though personally, I tag locally and then clean with BooruDatasetTagManager).
Upload your images.

Hit the Auto-Label button. Change that "Max Tags" to 20 instead of the default 10!!!

Hit the Submit button.
Wait a short while—boom, tags appear!
Now comes the tricky part:
First situation, you are training Character LoRA

You better Delete all hair-color and hair-length tags (e.g., blue hair, long hair, short hair).
Type “hair” in the filter bar, search for these tags, and delete them all.
⚠️ Don’t delete tags like hair ornament or hair flower unless they’re one of the most important features to the character, like the hair ribbon to Arona from Blue Archieve shall also be deleted.
Switch filter to “eye”.
Do the same—delete color tags like yellow eyes, green eyes.
Regarding clothing: if a character only has one outfit and one hairstyle, then you can also consider removing the clothing and hairstyle tags.
However, if there are two or more outfits, since WD1.4 is not as accurate at labeling clothing compared to hair color and eye color, deleting the clothing tags may actually make it harder for you to restore those alternate outfits using trigger words. In this case, I personally do not recommend removing those tags!
Then, scan through the whole tag list.
Delete other unique character traits like ahoge, cat ears, anime ears, tails.
Delete incorrect tags such as:
Random or unrelated tags like
"virtual YouTubers"when you are not training VtubersClothing color tags that are wrong (e.g.,
"pink kimono"when the character wears purpleThis ensures the LoRA learns accurate features and avoids baking errors into the model.
Second situation, you are training Style LoRA or Concept LoRA
Usually nothing need to be deleted if WD1.4 tagged everything correctly.
Now, you add a unique trigger word in the trigger word section above.
(e.g.
mikuBA / CaptainCiv / unique-word)
This trigger word works like the summoning circle that binds all those deleted traits into one chant. Instead of being scattered across tags, they’re compressed into a single magical word that forces the model to recall your character’s essence.
5. Training Setup
Now that you’ve finished tagging, smash that Next button—welcome to the exciting second-to-last step before your LoRA is born!
🏯 Model choice
For Illustrious LoRA, I recommend sticking with the default IllustriousXL v0.1 option that Civchan provides.
It’s the foundation stone of all Illustrious models.
It’s relatively undertrained, which actually gives you maximum flexibility and versatility.
NoobAI models (including V-Pred) can still use these Illustrious models.
And best of all—it’s cheaper than custom bases like WAI-ILL (IllustriousXL v0.1 costs only a base value of 500 buzz, while select custom models will eat at least 1000 buzz 💸).
If you prefer Pony or even SDXL, you can choose them too—but results may not be as strong for anime characters, since Illustrious is built specifically for anime (at the cost of being weaker for realism).

🖼️ Preview images (Sample Media Prompts)
Next is the preview prompt setup.
⚠️ Civchan’s previews are generated at only 10 steps… which means quality is yikes-tier.
What is worse is that if you don't have:
A local machine that can run Stable Diffusion, or
Have CivitAI membership subscribed
...Then these preview images will be the only way you can use to estimate the quailty for each epoch.
Recommanded prompts:
Image 1:
masterpiece,1girl,solo,white background,[your trigger word],Image 2:
masterpiece,1girl,solo,white background,[your trigger word],full body,Image 3:
masterpiece,1girl,solo,white background,[your trigger word],from side, cowboy shot,👉 Right-click > open in new tab to enlarge them, so you can compare images a bit better.
👉 If you leave the preview blank, civchan will generate ultra-mega-chaotic garbage that tells you nothing.
🔧 Training parameters
Civchan actually simplifies things a lot. Only a handful of settings really matter:
Must change:
Num repeats & epochs (Both affect Steps)
Clip skip
Network DIM
Network Alpha
Shuffle prompts

1. Clip Skip
Set clip skip = 2 for anime.
Quick explaination: CLIP has 12 layers of transformer magic. Normally it uses the last one, but anime art tends to benefit from stopping one step earlier (the 2nd from last layer). That’s why “clip skip = 2” works best.
2. Network Dim & Alpha
Recommended: DIM = 8 → file size ≈ 54 MB (safe & balanced for anime LoRA).
Or go smaller: DIM = 4 → file size ≈ 27 MB (more aggressive, still works, I personally like this).
Alpha = either equal to DIM, or half of it (I prefer equal).
Why not leave DIM at default (32)?
👉 Because that creates bloated files with little gain for anime datasets. Think of it as putting a handful of books into a container meant for shipping cars. Most storage space are empty and wasted, like the image below.

For realism LoRA, though, generally larger DIM will be required to capture fine details and subtle textures.
3. Shuffle tags & Keep tokens
Enable Shuffle tags and set Keep tokens to 2. This keeps your trigger word locked while mixing up the rest of the tags to encourage variety.
4. Training Repeats & Epochs
These determine the total training steps, which is the real boss fight parameter:
Formula:
Steps = (dataset counts x epochs x repeats ) ÷ batch size = steps
Keep batch size = 4 (default, fastest, best balance).
Aim for ~1000 steps total.
Even 750 steps already gives decent results.
Some guides say 2000–3000 steps, but in my experience that almost always leads to overfitting unless your dataset is huge (200+ images).
💰 Important: If steps > 1050, civchan charges more buzz. The higher the steps, the more expensive.
As for repeats vs epochs:
Technically, higher repeats × lower epochs work better for small training sets in character training, because you can set the weight for repeats.
However, since CivitAI's online LoRA trainer doesn’t support setting weights for individual images, it’s better to keep the epochs slightly higher.
👉 My go-to setup:
Epochs = 16–20
Adjust repeats so that steps land near 1000.
This way, you’ll see improvement around 50-70% of training (e.g., epoch 11/16 or 12/18). From there, test and pick the best epoch result—not too early, not too late. Personally, I like to check every 3 or 4 epochs (for example: 10 → 13 → 16 → 19) so the overfitting signals become more noticeable.
Testing different epochs normally need to be done on your local PC, or in case you have CivitAI's membership subscribed, you can use their private mode for testing.
🌀 LyCORIS (advanced, local only)
If you’re training on your own machine, you’re not limited to LoRA. You can also select LyCORIS in the Network Module option.
LyCORIS uses the LoKR algorithm (choose it in the “LyCORIS algo” option).
It’s MUCH better than standard LoRA for:
Capturing style
Handling multiple characters in one model
But beware—the parameter scaling is wildly different from LoRA:
You’ll need stupidly large DIM values (like 100,000 😱).
Keep alpha very small (even as low as 1).
LoKR factor: I recommend 8. The smaller this number, the more VRAM it eats, and the larger the output file becomes.
My experience: with LoKR factor = 4 and batch size = 2, training already ate up 13 GB VRAM.
Other parameters (epochs, repeats, shuffle prompts, etc.) are about the same as LoRA.
Since the focus of this guide is LoRA, I’ll keep this section short. But if you’re aiming for serious style training, LyCORIS is worth exploring.
🎉 Wrap-Up
Before closing, let’s be honest about one unavoidable problem:
If you train with a very small dataset (like only 1 image), you will run into “Style Bake-In.”
This means your LoRA doesn’t just learn the character, it also heavily absorbs the artist’s style.
Personally, I don’t mind—I actually love the style of the artists I use, so I’m happy to keep it baked in.
But if you prefer something more universal (usable across many styles), the only real fix is to build a larger dataset.
That said, this guide shows you it’s absolutely possible to train with even just 1 images. It’s harder, yes—but still doable with patience.
Here’s a quick summary of what we covered:
High quality beats quantity → better 20 great images than 100 blurry screenshots.
Cropping & flipping can turn 1–2 images into many training samples.
Upscaling before training avoids artifact-baked results.
Tagging smartly (delete constant hair/eye color, bake them into trigger word).
Use IllustriousXL v0.1 → best balance of flexibility, anime focus, and cost.
Tweak parameters: DIM 4–8, clip skip = 2, ~1000 steps total.
Pick your epoch wisely → too early = underfit, too late = overfit.
👉 The result: With the right prep and settings, even a tiny dataset can give you a solid LoRA.
,1girl,chibi,portrait,;p,ahoge,cat ears,white hair,simple background,v,.jpeg)

