Part One: Before Training Starts
Why make a lora? What’s this article for?
When the base model can’t properly do something you need a lora to consistently give you the output. That means training the model on the missing data.
Wan 2.2 doesn’t know 2d anime style so well. It can do it, but the output definitely looks more 3D CG than 2d traditional style. This logic can apply to any style lora in my opinion.
I made this article so I can explain my thought process when training anime style loras. The information here is not factually true or backed by any data, it’s all my opinion or the result of reading other’s advice. I owe the bulk of my knowledge to Seruva19’s great lora write ups. He knows a lot more than me, so you can read those for more info. Also the nice people in the Banodoco wan training discord chatroom answer all my questions.
I don’t understand the technical aspects of most of this. I just read what others have done and then try it. Then I experiment and make assumptions. So it’s possible what I teach here may be wrong or outdated. But I think it may help, I trained a few loras now so I think there is some method to my madness here. Overall I owe a lot to those before me and their kind open nature in sharing their knowledge with me. I hope I can do the same for you. I also don’t go into some aspects of how to do certain things, but just my logic behind why you should do them. This article will be in 3 parts, and I’ll release each part as I make them.
Here is some loras I’ve done for Wan 2.2:
High versus Low Model in Wan 2.2
Understand that the High model is mostly what’s new compared to 2.1. It is supposed to handle both motion and the general shape of things. The low is mostly just 2.1 but trained more. It’s there to fill in the details on top of the high model. This makes the high model super important for an anime style lora. If the high model doesn’t start laying the ground-work for anime, you will not trigger the anime style in the low model and no level of training in the low model will matter if the high doesn’t give you the anime shape. Furthermore if the high is not trained enough you can get anime but not in the style of the show you’re training it on. In my experience, you will need to train the high model until you can clearly see the style from the anime in the high model by viewing the preview when it's in the middle of generating. For character loras for IRL people, for example, the high model is not important because the base model knows what a human looks like already. I’ll explain more in the second section of this article about how to review the training.
Time Step
This is not a technical paper, so I’ll explain how I “feel” things work. Understand that when you train the model you need to set the boundaries where the high model needs to “switch” to the low model. For the T2V model, the configured inference boundary timestep is 0.875. For I2V, it is 0.9. When you use speed-up loras like lightning you will have less steps, and it will be harder to accurately switch from high to low. For example like 4 a step generation will have less wiggle room versus 20 steps. In that case, I recommend you just train the low model on the full time step range, so when the high switches to the low, it will be trained on that timestep (ie 0.890 or 0.90). The training time difference is minimal.
Usually in the comfyui console when you queue a generation you can see for each sampler type the “sigmas” which is where each step is for the time step. For example below DPM++_SDE 6 steps:
Total timesteps: tensor([999, 961, 909, 833, 714, 499], device='cuda:0')
6 time steps, and it switches past the 0.875 barrier after the 4th number/step, that's when you need to switch from high to low, so 4 steps high and 2 on the low. There is around 0.052 gap though which the low isn’t trained on, so if you trained low on full timestep it would cover these small gaps. With 20 steps you can get much much closer to where the gap in training wouldn’t matter.
Training Settings
For your configuration file, I won't tell you the best settings. I use diffusion pipe, which seems to have similar settings to ai toolkit. Musubi tuner has the best customization but the highest learning curve. Especially for style loras it has the best functionality. I have not yet tried it though. I use diffusion pipe because it's simple, so the advice here is in the context of diffusion pipe only. The only settings I would recommend tweaking from the start would be:
Gradient_accumulation_steps if you have plenty of vram, increase this instead of the number of batches. I train locally and my vram gets quite full so I tend to not change this. This just makes your training runs more efficient in general. The trainer does more efficient training in each step.
Blocks_to_swap Ideally you want to train without block swapping, even if that means trimming down your frames in your video sets, or decreasing your image resolutions. But if you must, then the best way I like to do it is to bring the blocks swapped as low as possible without an OOM in the first 30 or so steps. So start at like 30…if no OOM then adjust down to 20…if it goes OOM at say 15, then I bring it back up to 18 or something and keep it there. I watch the vram usage and ideally keep around 23GB vram being used since my 3090 has 24GB of vram. if the vram is only like 10GB out of 24GB then I increase GAS or image resolution if I have the wiggle room.
[model]
type = 'wan'
ckpt_path = '/data/trainingstuff/wan2.2-I2V-A14B'
transformer_path = '/data/trainingstuff/wan2.2-I2V-A14B/high_noise_model'
dtype = 'bfloat16'
transformer_dtype = 'float8'
timestep_sample_method = 'logit_normal'
min_t = 0.9
max_t = 1
#min_t = 0
#max_t = 1
#goldenboyHIGHi2v_v2
Point to the high model using transformer_path, and use ckpt_path for root of the models folder.
I like to use dtype bfloat16 and transformer_dtype flot8 to train it in fp8. Minimal quality loss for a lot less resources. I like to add a comment of what model I am working on since it saves it in the folder, I can reference it later to know what that training data was if I forget. Also I comment out the low timesteps, but when I switch to the low model, I change my path from “high” to “low” and comment out the top two timesteps and comment in the bottom two time steps. So I can use the same file easily each time I switch training runs from high to low.
[adapter]
type = 'lora'
rank = 32
dtype = 'bfloat16'
I just keep rank 32 almost always. No real reason, 16 I hear is good enough too. You should research on your own.
[optimizer]
type = 'adamw_optimi'
lr = 2e-5
betas = [0.9, 0.99]
weight_decay = 0.01
eps = 1e-8
I prefer the default adamw_optimi optimizer on default learning rate.
There is automagic which adjusts the learning rate on the fly. I had ok results, but I never saw problems using this, so I think you should research on your own and decide your favorite. And then experiment with new settings and see how they change things. I like to stick to defaults because there is less chance for something to go wrong.
Dataset Settings
Resolutions:
This is a tricky subject. I tend to keep my images at 512 resolution, but I may bump them up towards the end of a training run for a few thousand steps at 768 or 1024 resolution. Video resolution can be tiny. I tend to keep it at 256 if it doesn’t OOM. I also don’t like fixed resolutions so much anymore.
frame_buckets
I like keeping the frame buckets to less than 50 due to training locally with 24gb of vram only. And I make sure my videos don’t have more frames than 50 to prevent OOM. This is the biggest cause beyond resolution for OOM. If you have a long video better to split by the frame buckets or better yet split that video into 2 files. You can get the buckets quite low if you have short clips like 12-24 frames long for example. If you train on runpod and use something with tons of vram then you don’t need to worry as much, though faster training speeds is less money spent.
For videos, I set them on their own resolution separate from the global resolution. Keep repeats at one as well. You can do many different directories for different resolution videos. For example a few videos which you want to catch details from you can increase in resolution and keep them very few frames long to prevent OOM. I tend to just keep 1 set of videos the same though.
enable_ar_bucket = true I use this and allow DP to pick the optimal resolutions/aspect ratios based on the data itself.
num_repeats = 1 I tend to keep it at one and try to get a large enough dataset where repeats are not required. I prefer higher GAS over more repeats. For more info on epochs/repeats are, I recommend watching this old video at the 15 min timestamp, the concept is still the same
Collecting Datasets: Images
The most efficient way is to start from the images first. Use PySceneDetect to get screen captures. You will get thousands of files, just scroll through them using large thumbnail previews and drop the ones you like into a folder. Then do another pass once more until you slim your data selection down to something manageable. If you want you could just train on videos alone, but I recommend a mix of images and videos. For me the images are there to teach the details and the style. The videos are for teaching motion.
There is no magic number for dataset size, but in general for a style lora you want to depict as many unique things as you can to teach the model how to represent those things. I get screen captures of not just people, but images of things like: garbage, random trees, fish in water, cars in traffic, or city scapes. The more things the model is trained on the higher chance to trigger the lora and the more accurate your generations will be.
You also don’t want too much of the same things. If you get too many photos of the main characters, if you prompt someone with similar features then they will come out instead. Or like if the only red headed pony tail character in the data, will be that person if you mention red hair and pony tail in the prompt more often than not. Though for me this isn’t that big of a deal if a character is baked into the lora as long as they don’t appear in every generation.
Collecting Datasets: Videos
After you have your image data set, use PyScene to grab video clips. For me video teaches movement. The kind of movement that you want to teach the base model. If a video exists and is in your image dataset, you can remove the image from the dataset since it’ll be trained in with the video. I tend to have higher # of images in my dataset than videos (they’re easier to caption and less resources to train many of). No videos in a wan 2.2 dataset will result often in more stiff or reduced motion generations so I don’t recommend it while in 2.1 its fine just to have images only.
Videos don’t have to be long, 2-3 seconds (20-50 frames) is plenty. You want to teach the motion and move onto the next concept. I also convert all the files to 16fps as that is what wan is trained on. You can do so easily with ffmpeg, ask an LLM to make the code to do it for you. You can also use ffmpeg to list out the file names and frames for each file in a list. Then you can use that to figure out what your frame buckets should be.
You can also use a video editing program like handbrake to manually adjust the frames in each video. Such as reducing down 60+ frame videos to 50 frames if you don’t wanna go over 50. DP can also split videos based on the buckets, but then you risk having your captions not cover the missing bit that has been split out. You do not need to resize videos/images, just let DP do it for you when you set the resolutions and ar_bucket.
Also PyScene will sometimes fail and include a scene with one or multiple breaks. It’s tedious but make sure to watch every clip you’ve picked to make sure there is not a break in the scene. ie where the scene cuts to something different. Wan isn’t good at picking this up and captioning a scene break would be hard to do properly, you’re just going to result with worse loss in your training if you don’t. You also can pick long clips, then go into a program like handbrake or use ffmpeg to cut them down to the # of frames you need.
When you use Pyscene to spit out images/videos just use the thumbnails to gauge what visuals you want to pick up in the data. Drop them in a folder for review, review them by watching one by one and prune out the ones you don’t want.
I can think of a few things by just viewing this. Showing off how explosions are animated, comedic faces, extreme and dark lighting etc. a few clips here would be helpful for the high model to teach those things.

Captioning Methodology
You technically don’t have to put any captions beyond a trigger word to train a lora in wan. But is that best practice, I think not. I personally find that descriptive captions typed as if you are writing them as a prompt to generate that image/video you are captioning works best. But for style lora, I specifically do not caption anything related to style. That includes things like “anime” or “animation” as I think you will be fighting against those concepts which are already in the base model. You don’t want to bring out the 2d style animation that wan already knows when training. So for me, the best anime style lora is one that will make your generation anime without you having to prompt it in. At the same time, sometimes some prompts are cursed or using speed up loras makes it harder to trigger. In that time I put “anime” in the prompt and it will fix things, but that's a last resort for me. More on that in the second part of this article.
My approach is to caption EVERYTHING in the photo. That includes the detail of the character's clothing, hair style/color, what they’re doing, the camera movement, setting, etc. This allows you to teach the model how those objects / concepts are supposed to look. If I say, “a woman sits down” versus “a woman with shoulder length blue hair sits down in a lounge chair at a cafe while holding a steaming cup of coffee”. Now the lora understands what those look like in the style. I had once forgotten to caption a character’s studded belt. The character was in the data a lot. So all my characters started getting this studded belt. Or if I mentioned a belt it would be the studded style one. Going back into the data and captioning this “studed belt” removed this from happening, meanwhile if I prompted “studed belt” I got one that looked like that character’s one from the show. If you don’t caption it, it will be biased by the lora. Which is why I also don’t like to caption regarding style, I want that aspect baked into all my generations, but I don’t want all my characters to have studded belts so I make sure to caption that.
You can see an example with the baked in objects in a generated video here with the captions:
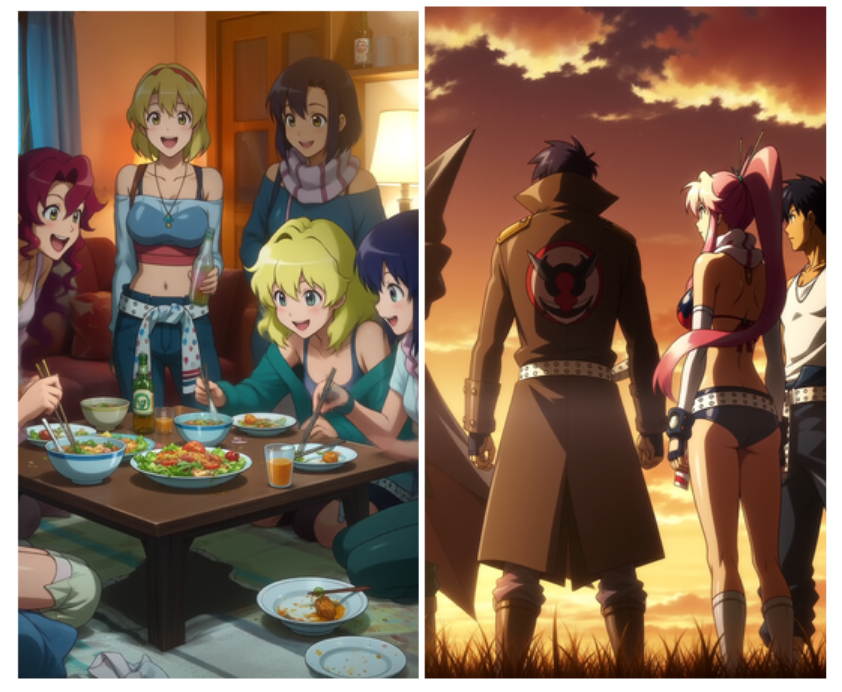
GurrenLagannStyle. a group of seven young adults, mostly women, gather around a low table in a cozy apartment for a late-night meal, their outfits casual but flirtatiously styled with tank tops, crop sweaters, and loose off-shoulder tops, one girl with long curly hair leans over the table laughing while another with a sleek bob sips from a bottle, a sleepy blonde with tousled hair slumps forward with her cheek on the table while a friend with straight bangs strokes her back, a sporty girl with a pixie cut reaches across for food with a grin, the others chat and eat with chopsticks and drinks scattered among half-finished plates, the camera holds a warm static frontal shot capturing the layered body language and expressive faces lit by soft orange indoor light,
You can see the blonde standing woman’s belt has the studs. And the other girl next to her and the other girl in the right of the frame clearly have Yoko’s scarf (shown in the other image properly) yet none of that was in the prompt. And that’s because it was not captioned properly. The other example, I wont need to show the prompt because you get the point but you can see everyone gets studded belts! If you see you’ve missed an object you can update your captions and resume training, the further training will fix it.
Another thing, if your dataset is letterboxed, has watermarks, subtitles, artist signatures etc. I recommend editing these out. You can caption them in but I think you will have a high chance of them being baked into the lora. It sucks when a lora consistently gives a watermark or letterbox unprompted. If you need to crop a large dataset I recommend https://www.birme.net/ (images only). Videos I use hand break one-by-one, but there is probably a better way to crop videos in bulk. For a non-anime style lora, I had a dataset full of people with tattoos and I don’t like tattoos so I just photoshopped them out rather than captioning them. Another thing you could do (I haven’t personally though) is to photoshop or use qwen to remove noise or clutter such as crowds in background of a large group shot, or like something poorly animated in the scene or maybe just something you plain don’t want in your lora.
Here is some examples and my logic behind choices for proper captioning:

GoldenBoyStyle. Outdoor urban scene under a bright blue sky, with a metallic pole faintly visible in the background. A young man wears a red baseball cap positioned backwards. His face is contorted in an extreme comedic expression of disgust or being overwhelmed, with wide, upturned eyes, a scrunched nose, an open mouth, and visible sweat beads on his forehead. He is surrounded by and appears to be struggling with a large, overflowing pile of miscellaneous garbage, including a prominently displayed white and red instant noodle cup with "CURRY" and Japanese text printed on it. Parts of a bicycle frame and wheel are visible amidst the trash. Close-up shot, focusing on his distressed face and the immediate heap of garbage.
It's long and detailed, I have everything I can captioned but I don’t mention that it's animated or about the coloring etc. I want that bit baked into every generation. At the same time, I don’t want every time I caption “garbage” to have banana peel or cup noodle in it. Also I caption as if I want to generate this image in wan. This caption would work really well as a prompt for a different lora even. A caption of “A man is covered in garbage and looks sad” would work but you miss out on a lot of context.
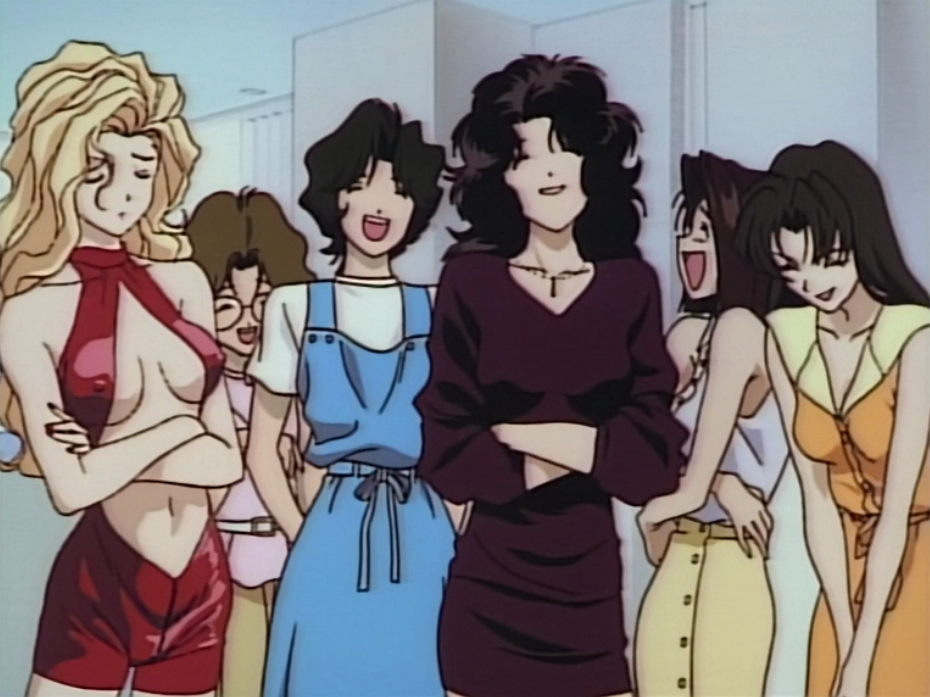
GoldenBoyStyle. Interior setting with a plain, light-colored wall in the background. A group of seven women is depicted. From left to right: a woman with voluminous blonde hair in a shiny red revealing outfit, arms crossed, looking down with a slightly troubled expression; a woman with short brown curly hair and glasses, a pink top, smiling; a woman with short dark curly hair, a white t-shirt and blue overalls, laughing with an open mouth; a woman with voluminous dark wavy hair, a dark maroon blouse, smiling with arms crossed; two women with shorter dark hair and light-colored tops, laughing; and a woman with long dark straight hair, a yellow-orange collared blouse, smiling. Medium shot, capturing the group of laughing and smiling females.
I try to get the details of every character including hair color and clothing, and the environment. With many characters it may be difficult, so at the minimum get the clothing and hair down for each. If you have a fat one, then describe that too, or an old one etc.
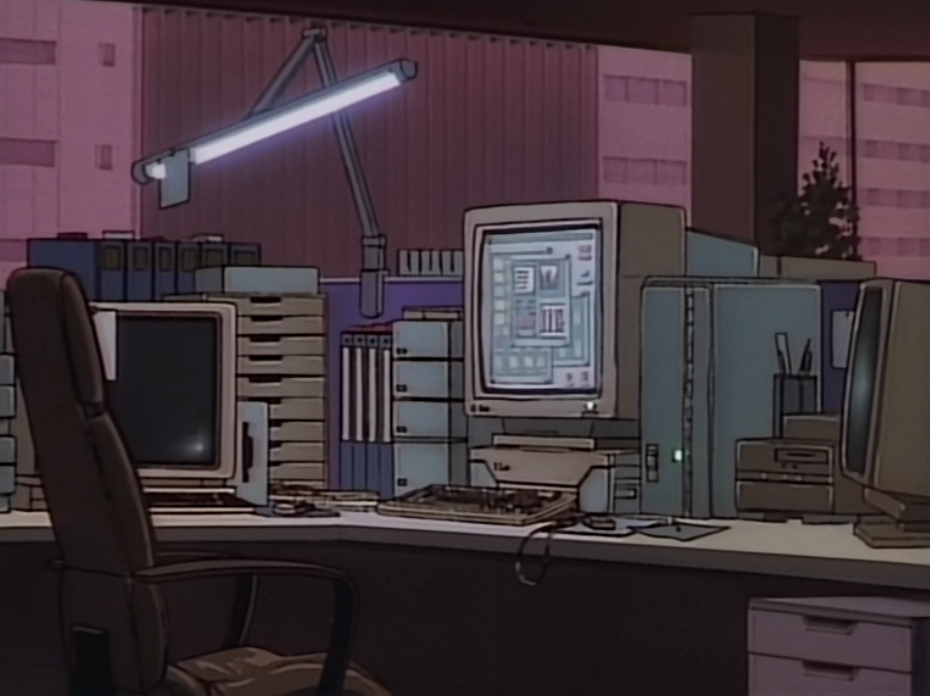
GoldenBoyStyle. Dimly lit office interior, after hours. Large windows in the background show the faint, dark silhouettes of city buildings. A cluttered office workstation features multiple vintage beige computer monitors and towers, stacks of paper in horizontal trays, a beige keyboard, a mouse, and a dark brown leather high-backed office chair. An articulated desk lamp with a long, glowing fluorescent bulb is positioned over the desk, casting a cool light on the immediate area. Medium shot of the unoccupied office workstation, conveying a quiet, after-hours atmosphere.
Here I have no characters, the scene is rather boring. But we want to teach as many concepts as we can. And also sometimes we wanna generate scenes where there are no people. So environmental shots also help with the style lora.
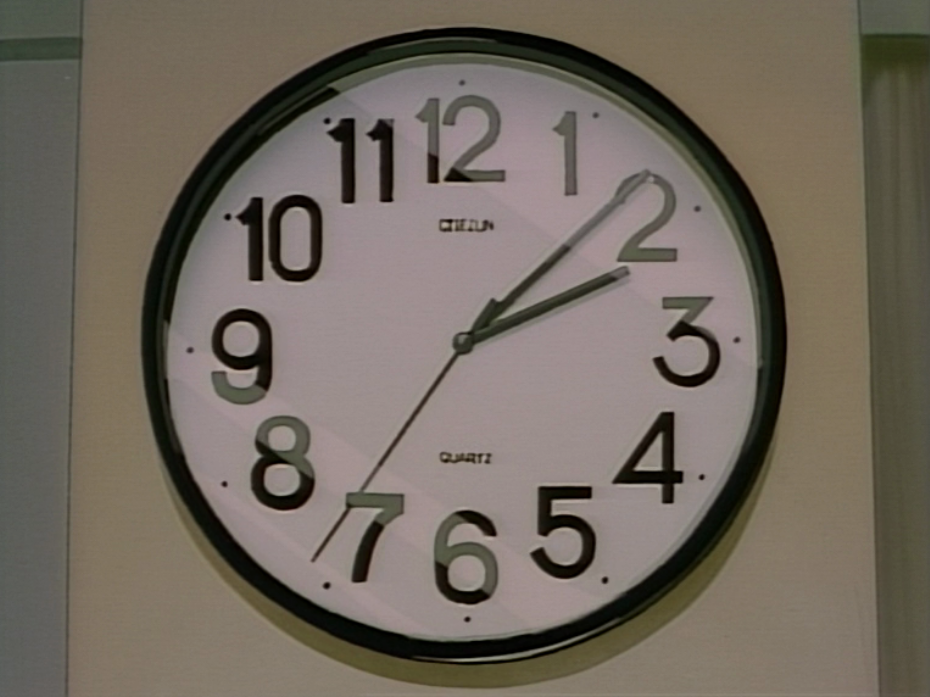
GoldenBoyStyle. Interior setting with a plain, light beige wall. A classic round wall clock with a black frame, white face, and large black Arabic numerals is depicted. The clock hands show the time as approximately 2:08. The brand name "CITIZUN" and "QUARTZ" are printed on the face. Close-up shot, centered on the clock face.
Another example of something mundane, but you’re reinforcing the style in the training. These simple images are also quite easy to caption since they’re not too complicated. Anime tends to waste time like this, showing establishing shots or mundane items with little animation. These are perfect for still images for the dataset.
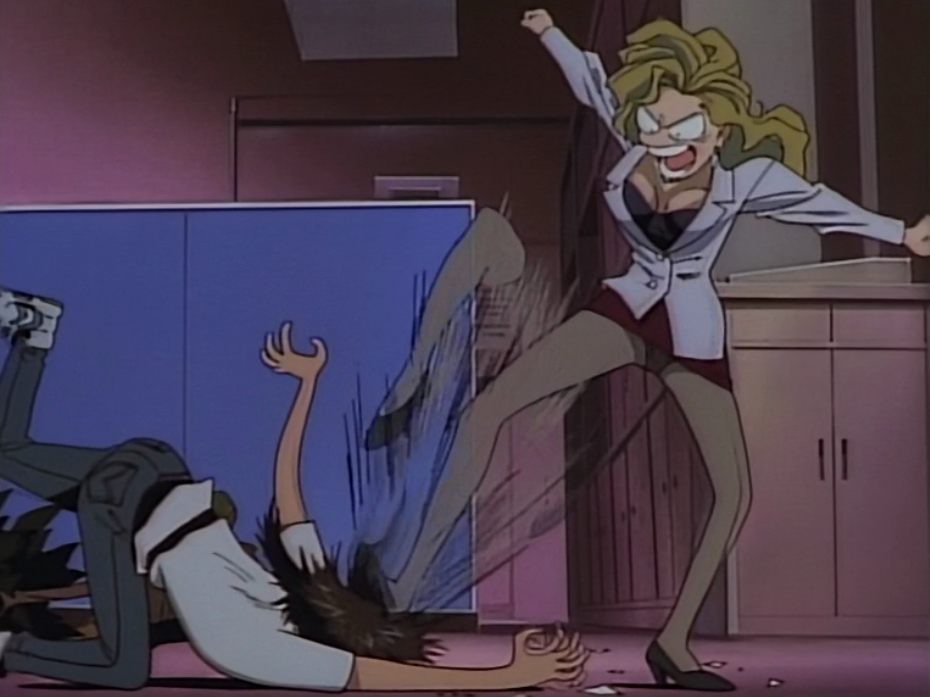
GoldenBoyStyle. Dimly lit interior office setting with blue filing cabinets and a closed door in the background. A woman with voluminous, wavy pale blonde hair, a light gray blazer, a black low-cut top, a dark maroon mini-skirt, beige stockings, and black heels, is in a dynamic action pose. She is delivering a high kick with her right leg towards a man who is falling backwards on the floor. Her face has an angry, open-mouthed shouting expression. The man on the floor has short dark hair and a light blue t-shirt. Motion blur lines indicate the speed of the kick. Medium shot, capturing the action sequence.
This is here to teach some comedic style from the show. The comical face, the way speed is conveyed with the multiple legs. Admittedly this would be a great video clip in the dataset for motion as well.
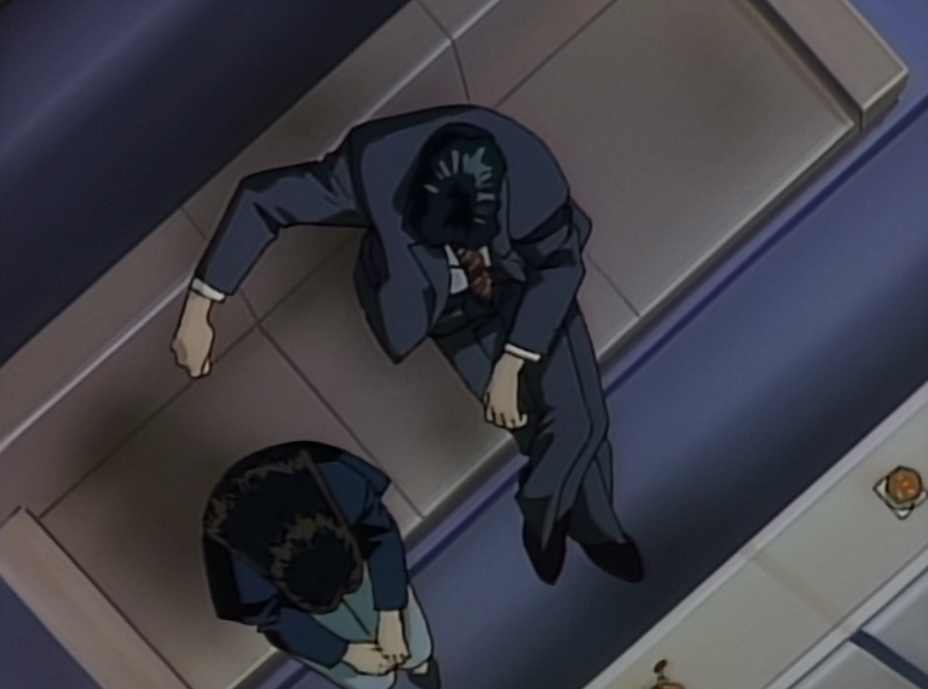
GoldenBoyStyle. Interior setting with light-colored tiled floor and plain walls. A man with short dark slicked-back hair, a dark blue suit, white shirt, and striped tie, is sitting, his right hand extended slightly. Below him, a young woman with long dark hair, a dark blue blazer, and a light-colored skirt, is also sitting on a couch. The scene is viewed from a high angle, looking down at the two sitting figures. Overhead, bird's-eye view.
I wanna show some different camera angles so I include an overhead shot. You wanna mix it up with different camera angles. Some shows tend to do extreme close up medium shots (because it's easier to animate). If you have too many of those your generations may be too close up often. Then again also be careful because sometimes wide shots are animated poorly (such as facial features).
Also sometimes studios cheap out and run out of budget and some parts or whole episodes are animated poorly. Here is a notorious example:
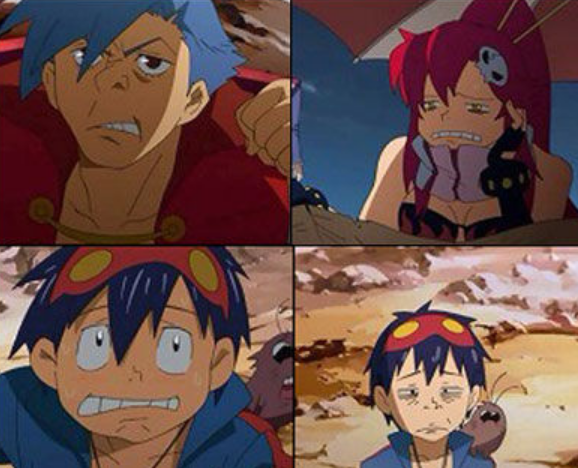
Yes, it's from the show. Does it look good? Is it on model? No. Same for videos, some episodes have reduced motion because of budget reasons. And you wouldn’t want those in your video dataset because you’re just polluting the model. Gurren Lagann had remastered the seasons into 2 movies with some better animation so I used video clips from that instead of the show because I liked that animation more. So the reverse can also be true.
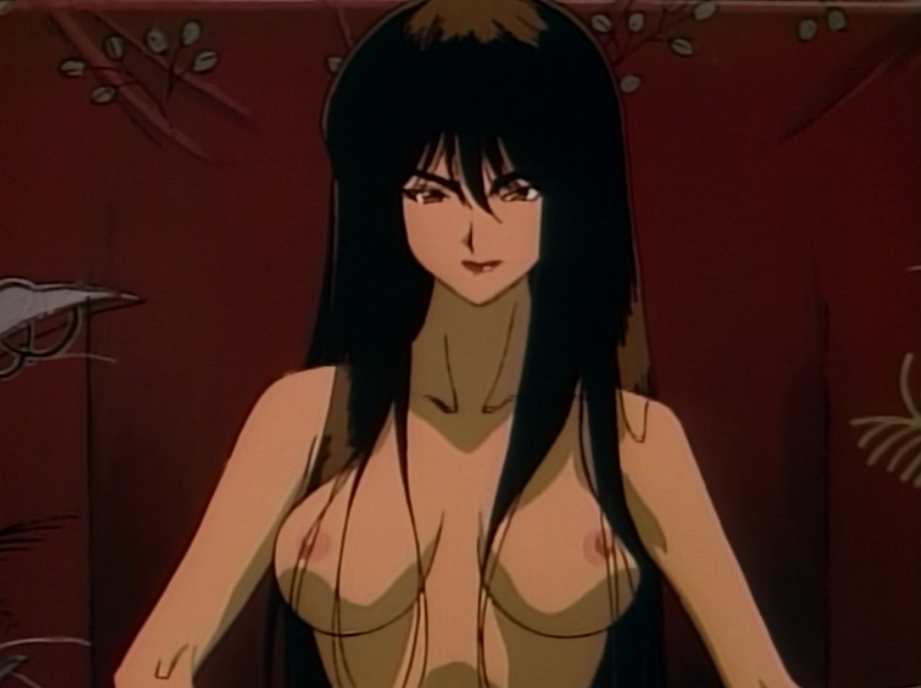
GoldenBoyStyle. Dimly lit interior setting with a dark red, patterned fabric background. A woman with long, straight black hair is depicted from the chest up. Her bare breasts are visible. She looks directly at the viewer with an intense, slightly challenging expression, her lips slightly parted. Close-up shot, focusing on her face and bare chest.
This show also has soft nudity, I include shots of nipples or naked characters so the model knows how to represent those too. I had a different lora which didn’t have any nipples in the training data so when I prompted it, it tended to not trigger the art style. I would have to insert some things I know are heavily trained into the lora to trigger (for example mechas which are in the show a lot).
You have to be careful though, you can see already in just a few examples the blonde woman is featured heavily. With characters with lots of screen time you may face them becoming the default when prompted. Consider trimming them out of the dataset a bit if you don’t want that happening. You could also crop them out or use something like qwen edit or nano banana to modify them to something else or remove them. Alternatively for example you can do the opposite, get qwen to nudify the characters so you can get nudity in your training data if its missing.
Another thing to consider is some shows use CGI in some scenes, or the OP/ED are animated much nicer. Those to me don’t match the style of the show. I exclude them in that case. In older shows they have mid-episode breaks where they show off some art, often it's not in the same style as the show, those I don’t include. I don’t want to train the wrong style in the lora.
Character tagging is another talking point. I personally don’t recommend trying to combine a character and style lora. You will get best results from just making a character lora using the same captioned training data and combining it with the style lora. Character loras don’t need a lot of data or training compared to style. I learned that from my raven teen titan’s lora. Then again, you can probably just chuck in the characters names as another trigger word, and it may help, but I haven’t tried that really. From looking at other lora creator’s advice was to only tag characters in scenes where they are the only character.
Let's talk trigger words real quick. You need the style to trigger in the high model, so I believe that trigger words do work. Because when it doesn’t trigger I can jam in a few other words I know are in many of the captions and it will trigger more often. So by that logic having the same single unique trigger word in every caption will help. And stringing in multiple trigger words which appear in the caption dataset will help increase chances of the style triggering in the high model. (and the opposite, prompting for something not trained in the lora will not trigger the style). This is just personal preference and it honestly isn’t any extra work putting the trigger word in. As for where the trigger goes in the caption / prompt, I don’t think it matters. I think in other models (like SD?) if you had a word at the front or end of a prompt it was given more weight. In wan I don’t think it matters, but I like to have it at the front. I don’t think its good to use a common word for trigger as you will be fighting with the weights of the base model. Like in my raven teen titan’s character “RAVEN” would likely put actual raven birds in the generation as well so I use RAVTT as the trigger for her.
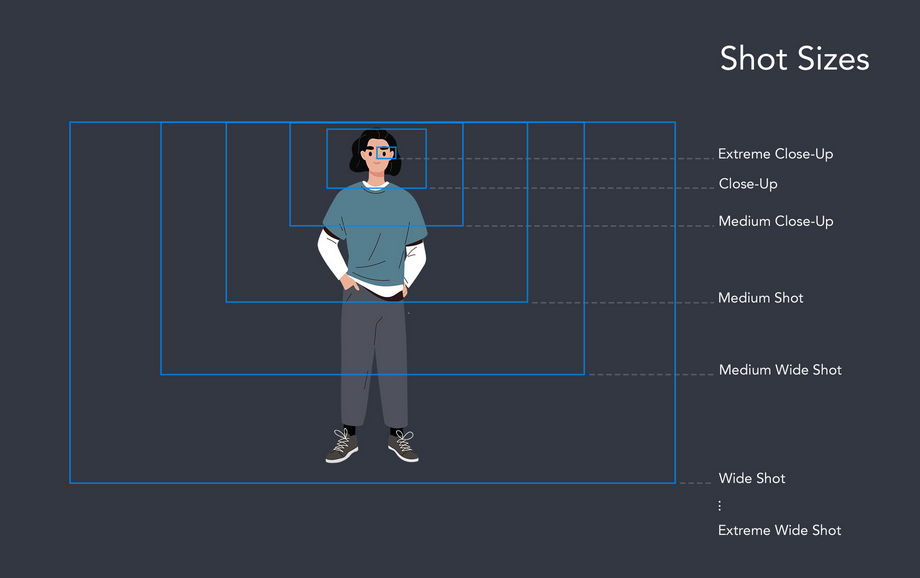
Let’s talk about camera shots. Captioning the type of camera shot will also help because you’ll be training the model on the style of the camera shots shown in the show. But be careful because sometimes LLMs will just caption all images as “static shot” or give it the same shot regardless of what it actually is. In that case you’re better off removing the camera angles or doing them manually, I tend to just stick something like “arc shot” or “medium shot” at the end of the caption/prompt for ease of readability.
This is not my image, but its good to know the below phrases when captioning. And also check this reference doc as it shows what shot and lightning that wan knows https://alidocs.dingtalk.com/i/nodes/EpGBa2Lm8aZxe5myC99MelA2WgN7R35y
I think for images its less important but for videos more important. This is not the most important thing to include in the captions but it will make things a lot better when you wanna use them in your generations and will trigger the style easier and if you wanna mimic the camera motion of the show.
How to create captions
This article isn’t really meant to show how to create them since there are many ways. I often see people mention joy caption. Qwen or other LLMs in comfyui are probably the best methods. Both of these are great since they’re open source. I heavily use Gemini 2.5 via Ai Studio. Check my previously released lora descriptions for how I do it. Basically you want to prompt the LLM to caption in the way I’ve described in the previous section of the article on caption methodology. Caption everything, don’t mention anything about the style. Insert your trigger words. The negative of using something like Gemini is that these closed source models will get worse over time for censorship or greed. (for example chatgpt is now not good but used to be great at NSFW prompting…)
After the LLM spits out your captions, I HIGHLY recommend you do 1-2 passes through them. Have the image/video up on one screen while reading the caption on another screen. Oftentimes it can make mistakes. Such as a wireless headset mic is seen as a cigarette. Or a sword is a staff. Etc. Sometimes it's comically wrong. I had some poorly captioned images and noticed some really high loss. Sometimes the LLM will use certain words like “male” instead of “man” or “either upset or sad” instead of just “sad”. You have to update your prompt for the LLM after noticing these to address those problems and recaption again.
After cleaning up the captions, the loss improved for me. I often do it while training and just resume from the checkpoint with the fixed captions. It’s probably the most laborious and most boring part, but it's probably one of the most important parts. Detailed and accurate captions will beat out the quantity of data every time. In short, it is better to have quality over quantity. When I have 400+ sets of data, I try to knock them out 100 or so at a time, on breaks during work. It’s worth the effort. Some people mention some method of using one LLM to check the results of another LLM’s captions. This article won't be able to help with teaching those techniques so do research on your own for that.
Verify dataset is clean
Go through and open a few random videos/images and their captions. Make sure they’re numbered correctly. If you have the wrong image/video matching the wrong caption then you will have poor training results.
Also when you start up the training run, read the logs at the beginning when the trainer is caching the dataset. It will read out the # of files, the resolutions, and if anything is missing. Once I found out I was training the videos twice instead of image and video because I copy pasted my videos into the images folder by accident. Or some frames were too low for the frame bucket so they were being dropped from the training run. Or that I had set the aspect ratio wrong for the images but correctly for the videos. Or the directory had a typo so it skipped images all together.
You also need to delete the image/video cache when making adjustments to the captions mid-training and resuming from checkpoint to reflect the changes. Also make sure the right file extensions are being used. Or the encoding on your videos isn’t bad (ie showing distortion or weird pixels etc).
With all this you’re ready to start training in part two of this article. Part two will go over starting the training process, how to check in the progress and run tests, and finally determine training is done.
Part two and three are in progress, so check back in when they’re ready and I’ll link them here.

