
Welcome back! There's been a lot of changes, so this article will function as a bit of a replacement to my previous "Generate video for free on Google Colab" article, as well as the updates walking through switching to and using my 2-phase video generation workflow, as well as a quick primer on using image-to-video, and finally an example of downloading a LoRA from civitai.com using civicomfy and applying it to a run.
If you have already set up colab using the notebook in the previous article, you should replace that notebook and workflows with the ones attached to this article - there have been substantial upgrades that add speed and functionality.
If you are starting from scratch, use the files attached here, and follow the instructions in the previous article to get set up - all the instructions in the previous article should still be valid.
So what's been updated?
Updates to notebook to support newer colab runtimes / newer PyTorch versions
This makes sure ComfyUI installs and updates will work properly.
Option to support Google's networking by default instead of cloudflared
This makes ComfyUI load more quickly and function more responsively, as well as allows the video preview functionality in the 'save video' window to work correctly
Using Google's networking does prevent the 'Save' functionality for workflows from working - you can 'Export' workflows instead if you make changes you'd like to save.
The option to 'USE_CLOUDFLARED' is available via a configuration checkbox if you want to enable the old functionality.
Enabled Negative Prompt using Negative Attention Guidance (NAG)
The negative prompt, even the defaults, can make a difference, and using the speed-up LoRAs effectively disables the negative prompt. NAG allows us to benefit from a negative prompt again!
Now let's get into some examples / walkthroughs! These will move a little bit faster as you should be getting a little bit more accustomed to navigating ComfyUI now that you've been through generating your first T2V video in the previous article.
Image-to-Video (I2V):
Load up the 'WAN5B.json' workflow (file is attached to this article), and let's take a look at how to start a video from an image (or how to 'animate' an image you have). I'll be using this image I generated with SDXL, feel free to download and use this one, or use something of your own:

Important - The image you use needs to have the same dimensions as the video you'll be creating. This workflow creates either 704x1280 or 1280x704 videos (so basically '720p'). The workflow will resize images you upload, and add some black bars where needed, but you'll get much better results if you start with that same size image, or one that can be scaled down to that size without changing the width-to-height ratio. Use the best quality image you can - scaling up a tiny, poor quality image will result in poor quality video - garbage in, garbage out, as they say...
Looking at the workflow in ComfyUI, you'll need to change it to use the 'Turbo' speed-up LoRA instead of the 'FastWAN' LoRA. There are toggle switches in the nice, new, 'Power Lora Loader', so make sure the 'Turbo' lora is enabled and 'FastWanFullAttn' is disabled when doing I2V:
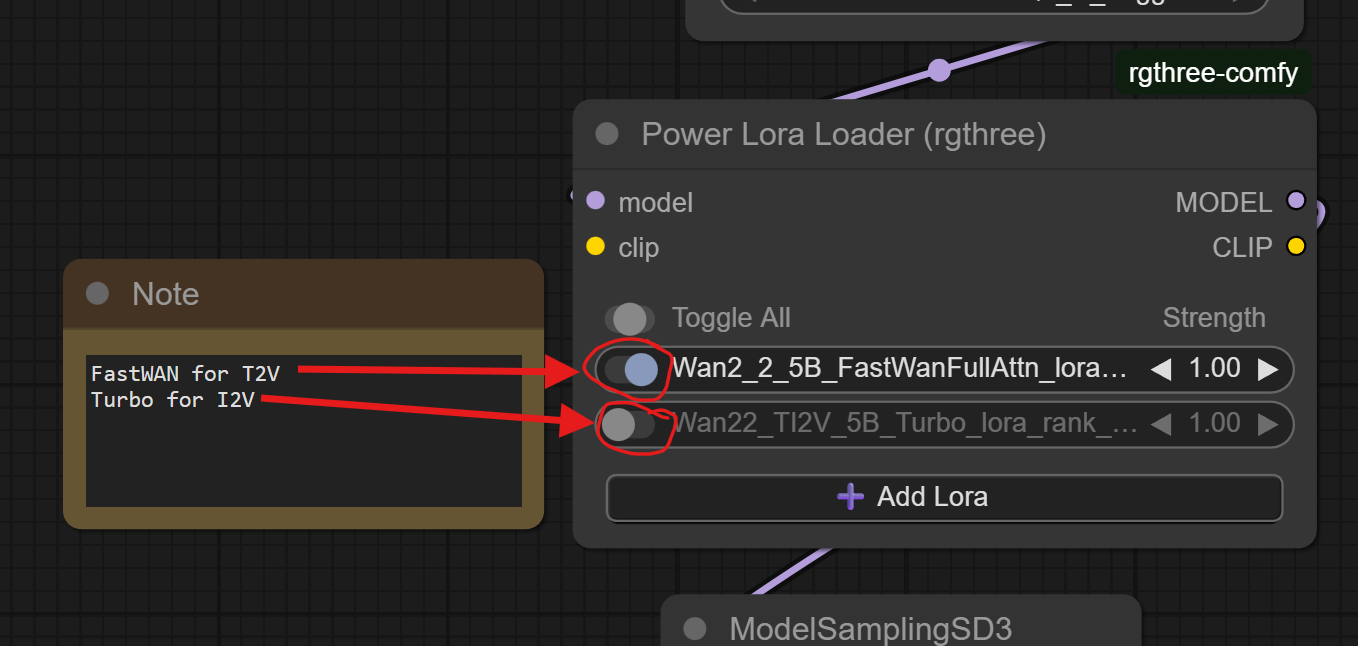
(This image shows the configuration for T2V. Click those toggles so the top one is disabled and the bottom one is enabled for I2V!)
Next, we upload our image. Find the "Start Frame" group, right-click on the banner that reads 'Start Frame' and 'Set Group Nodes to Always'. This will enable the image loader and the resizer nodes.

(You can choose 'Set Group Nodes to Never' to disable the 'Start Frame' nodes again and set it back to text-to-image mode again)
Then, upload your image into the Load Image box by clicking 'choose file to upload' and finding your image file.

The image upload node outputs the dimensions of the image (768x1344 is SDXL's preferred 720p size - this will resize to 704x1280 well).
What's that 'End Frame' group for? - The node I'm using to load the start image can also load an end image (have WAN make a video that ENDS with a certain image instead, or use a start and end image - using both a start and end frame is a technique known as first-last-frame-to-video, or FLF2V). I wouldn't use it, because, unfortunately, the WAN5B model just isn't trained well enough to get acceptable quality much of the time when using an end frame. It does technically work if you want to play around with it (and it's included in some of the ComfyUI demo workflows with a specialized build of WAN5B, so I guess it's sometimes good enough for them?), just expect weird artifacts and color matching issues. Maybe some LoRA creators will come along and improve/expand that functionality in the model, so I'm leaving the nodes in my workflows and holding out hope!
Next, visit the 'Width', 'Height', and 'Frames' nodes. Make sure width and height are what you expect. If you want a landscape-oriented video, you can flip-flop the width and height, just make sure you're using a landscape-oriented input image.

'Frames' is the number of frames we'll be generating in the video. You should leave this at '121' unless you know what you're doing.
Finally, we need to set our prompt:
I used this prompt (including the misspelling of the word 'red' - feel free to correct it in your run, I'm leaving it for posterity):
a 3d cartoon woman with blonde hair and robotic arms, wearing a read hooded sweatshirt and blue jeans is standing in a dark alley with a magical green glowing crystal hovering above her robotic hands. Keeping the stone hovering above her hands, she carefully turns toward the camera, and holds the stone out toward the camera. The stone emits more and more green light, suffusing the scene with a green glow. The camera pulls back, revealing more of the woman and the surrounding scene.

A couple notes, you'll notice I'm including a negative prompt here (it's the red prompt box below the green one). This gets applied to the model using negative attention guidance (NAG). Not to get too technical, but that 'Turbo' LoRA that we enabled earlier (as well as the FastWAN one) require setting CFG=1 in the sampler, and that disables the the negative prompt in the sampler using CFG, but we can use NAG with WAN to inject the negative prompt (so we 'zero out' the negative prompt conditioning for the sampler, and inject it into the model using 'WanVideoNAG'). I've set some good, sane defaults for 'scale', 'alpha', and 'tau'.

Second, we're also automatically saving the last frame of the video we're generating:

This will allow you to easily start another 5-second video generation from the point the video you just made stopped (download the image from this 'Save Image' node, upload it into the 'Load Image' node, create a prompt for the next 5 seconds of the video, and run). Finally after you've generated all your 5-second videos, you can stitch them together into a long video!
Here's the video I got from my prompt and image:
This is not cherry-picked, just the first gen that came out. WAN5B really didn't know what to do with the robotic hands - maybe my prompt could have described them better. I've also noticed WAN5B is better with realistic content than cartoon / animated stuff. It did OK with her face and the glowing gem, however.
Try some other prompts to see what else you can make her do, or try it on your own images!
Two-Phase Video Generation:
First, the 'why' - WAN5B is designed to be a small, fast model that can generate 720p video on 'consumer-grade' hardware. That's no small feat, and it works pretty well at that - the problem comes with the VAE that's used to decode the video once it's generated. For a 5-second, 24-fps video, the WAN2.2 VAE gobbles up 12+ GB of RAM. That makes it really hard to fit both the model AND the VAE onto so-called 'consumer-grade' hardware at the same time. We have 16GB of VRAM to work with, so we have to make compromises by using a lower 'quantization' of the WAN model (think like compression on a JPEG image - you can make the file size smaller, but eventually, image quality will suffer). The workflow I have that outputs the video all in one go uses the Q4 WAN quantization. We can, however, stop after generating the video and save the 'latent'. Then in another workflow, load that latent and just run it through the VAE, and we can use the Q8 quantization instead (I should try to make the full model fit instead of using the Q8, it's only 10GB, but then everything wouldn't fit on a free google drive account...). Higher number is better, and the quality drop between the Q8 and the full model is imperceptible (whereas you can see the quality drop between Q4 and Q8, although it's really very close).
Plus, running this way allows us to not have to run ComfyUI in 'lowvram' mode - meaning text encoding for your prompts gets offloaded to the GPU as well, significantly speeding up those steps.
Enabling 2-phase video generation:
Shut down ComfyUI if it's running, and go back to the colab notebook. in the 'Download Resources' section, check the 'TWO_PHASE_VIDEO_GEN' box and the 'DOWNLOAD_MODEL' box, then run it by clicking the circle-with-a-triangle-inside button.

This will delete the Q4 model and download the Q8 one. If you want to go back, run the 'Download Resources' step with just the 'DOWNLOAD_MODEL' box checked, and it will switch back to the Q4 for you, and you can run the 1-phase workflow again.
Next, start up ComfyUI with the 'TWO_PHASE_VIDEO_GEN box checked:

Once ComfyUI is running, open the 'WAN5B_ToLatent.json' workflow file (it's attached to this article). That workflow looks exactly the same as the one-phase workflow, but it uses the Q8 WAN quantization:

and instead of the video saving nodes, it just has this:

This saves that 'latent' - the file the model creates before feeding it into the VAE - into your 'output' directory in another folder named 'latents'. Once you've run this workflow (you can run it a few times and create a few latents before moving on - they're only about 20 MB in size), you'll need to locate it on your google drive and move it to the 'input' folder so the next workflow can load them.
Go back to the colab notebook, and click on the file folder icon to open your storage drive, then drill down to 'drive' -> 'MyDrive' -> 'ComfyUI' -> 'output' -> 'latents':

Drag-and-drop that '.latent' file up to the 'input' directory:

there it is.

Next, open 'WAN5B_LatentToVideo.json' in ComfyUI. Find the 'LoadLatent' node, and choose the file you just moved over into the 'input' folder.

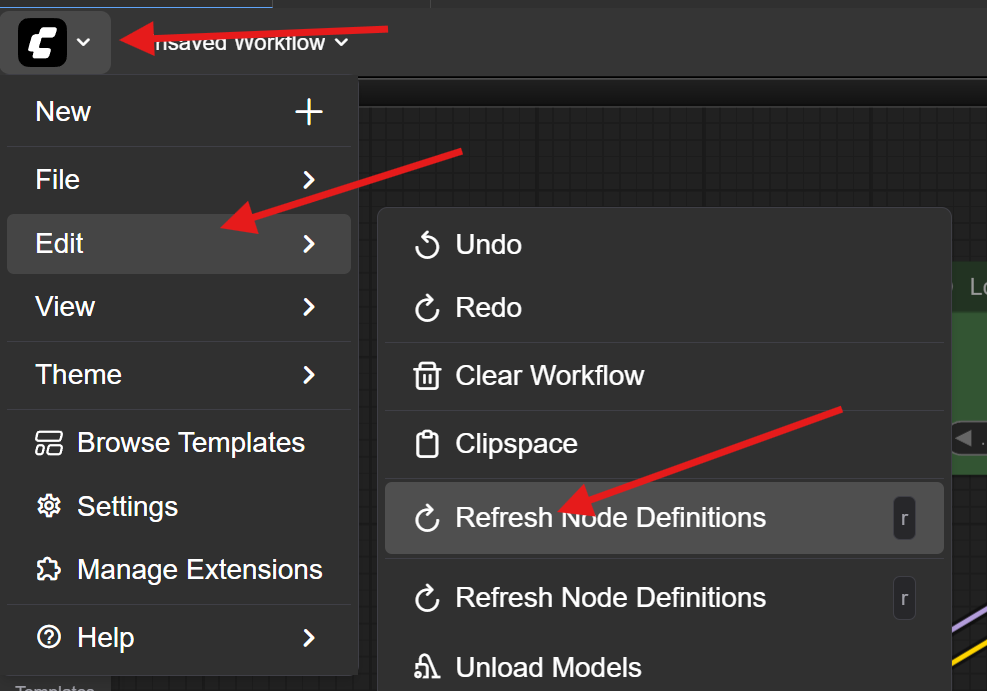
If you do not see the file in the list, you may need to refresh your node definitions. Click the 'C' icon in the corner, then choose 'Edit' -> 'Refresh Node Definitions':
This workflow saves the start frame of the video as well as the end frame, so you'll have them for extending the video later if you want:

Also, notice the setting on the 'LastFrame' - since this workflow is separate from the workflow that generated the video, it doesn't know how many frames total are in the video, so if, for some reason, you changed the number of frames in the first workflow, set it to the same thing here, or you may not get the actual last frame of your video.
And that's it, hit run, the VAE will load and chew up pretty much all of the VRAM on your instance, and spit your video out in a couple of minutes.
You may be asking yourself, "Why didn't he just force unload all the models between running the sampler and doing the VAE decode in the all-in-one workflow?" I tried. Something about the way ComfyUI loads GGUFs causes stuff to remain in VRAM, and it errors out unless you do it in two separate workflows like this. If anyone knows what's going on with that and has any ideas, I'd love to hear them in the comments!
Enjoy slightly faster video generation at slightly higher quality!
Use LoRAs for WAN Video Generation:
I've included 'civicomfy' in the install of ComfyUI to download LoRAs from civitai.com, and included a 'Power Lora Loader' node to assist you in using LoRAs for video generation. I'll walk you through an example.
Many, if not most, of the LoRAs available for WAN 5B are (very) NSFW, so my example will use the Live Wallpaper Style as a SFW example. In my experience, this LoRA adds some dynamic motion and attempts to create a video that ends where it starts so it looks good running on a loop. It is intended to be used with image-to-video (I2V), so we'll start with an image. I'll be using this one that I generated with SDXL. Feel free to use it also, or use one of your own, just remember that it will get resized to 720p (704x1280 or 1280x704) so make sure the dimensions are close to that:

Load up ComfyUI, and open the 'WAN5B.json' workflow (attached to the article). Since we will be downloading the LoRA using civicomfy, we need to set up an 'API key' on civitai.com. This is basically a password to your civitai.com account, so don't share it with anyone.
Go to your settings on civitai.com:
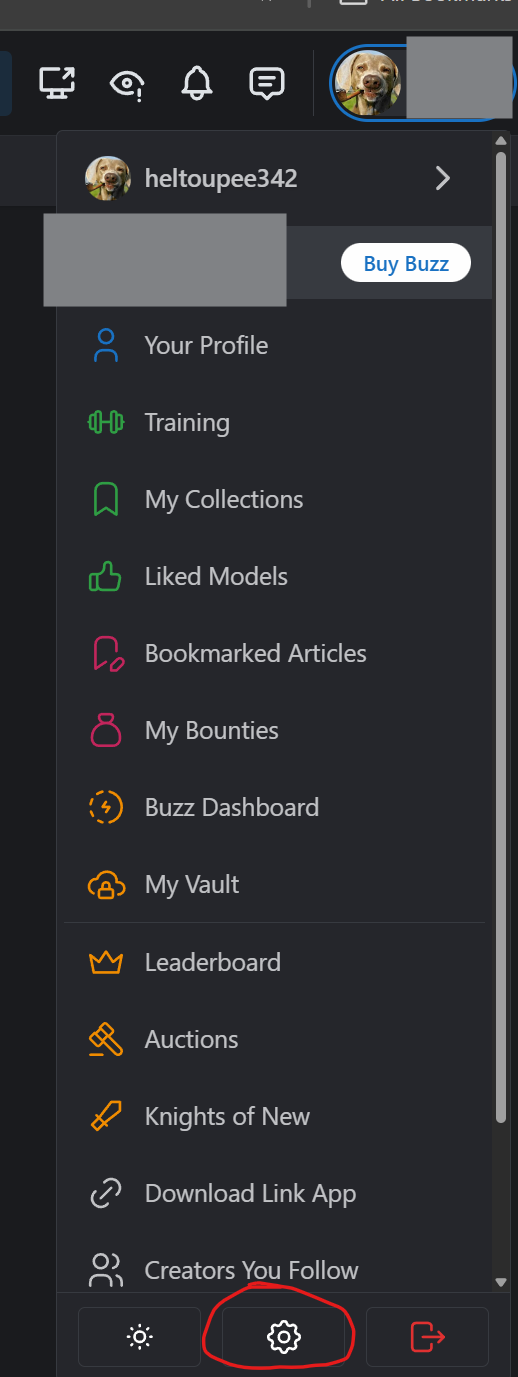
Almost all the way at the bottom is the 'API Keys' section. Click 'Add API Key':

Then name it and save:

Then click the clipboard icon to copy it to your clipboard. It won't ever be displayed again, so make sure you copy it, or you'll have to create a new one:

I save mine at the top of my colab notebook - you'll need it every time you come back to colab to start ComfyUI up again if you want to download things from civitai.com:

Back to the ComfyUI window, find the 'civicomfy' button and click it to load the interface:

Go to the 'Settings' tab, and paste the API key we generated in the 'Civitai API Key' box. You'll also need to set the 'Default Model Type' - choose 'loras'. Finally, there are some settings for blurring NSFW images that are attached to the models and displayed in searches (this extension searches civitai.com for things, and sometimes the examples of what the things can do are (very) NSFW, if that's what they're designed for). Leaving this alone is fine, or set it to taste:

Next, we'll search for the LoRA we're going to use. Click on the 'Search' tab and fill out the search:

Click on the blue button to download the LoRA. Make sure you get the TI2V-5B version, as LoRAs built for other WAN versions won't necessarily work.
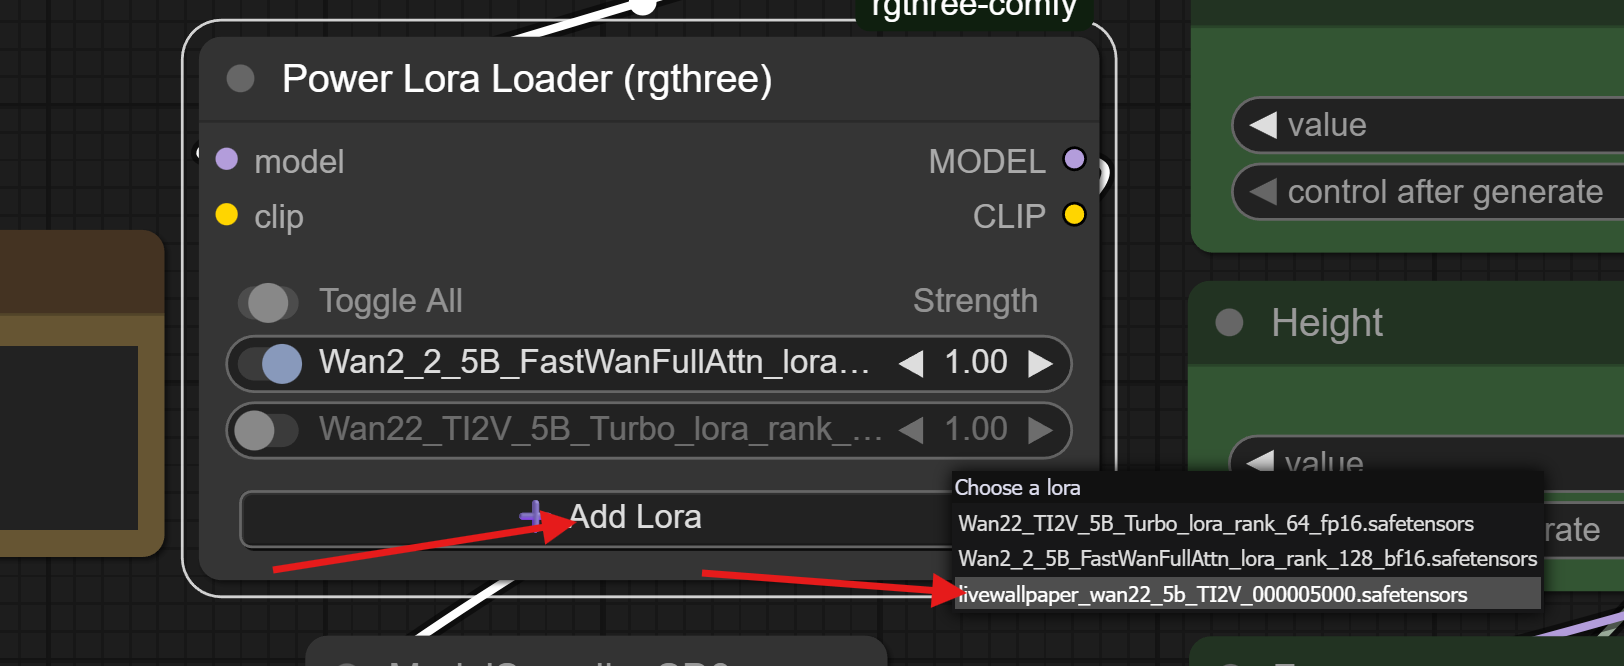
Once downloaded, go back to the 'Power Lora Loader' node in your ComfyUI workflow, click 'Add Lora', then choose the livewallpaper lora:
You can right-click on any LoRA listed in the Power Lora Loader for a menu of options. 'Show Info' contains a way to pull info directly from civitai.com, as well as a link to the LoRA page on civitai.com that you can reference for usage info.
I've used this to discover that there's an 'activation word' of 'l1v3w4llp4p3r' for this LoRA that I'll be sure to include in my prompt.
Since we'll be doing I2V, we want to disable the FastWan LoRA and enable the Turbo LoRA:

These LoRAs both make generation faster by making WAN generate a video in only 4 steps, but Turbo works better with I2V and FastWan works better with T2V, so I include both and you'll just have to switch between them.
Next, we upload our image. Find the "Start Frame" group, right-click on the banner that reads 'Start Frame' and 'Set Group Nodes to Always'. This will enable the image loader and the resizer nodes.
(You can choose 'Set Group Nodes to Never' to disable the 'Start Frame' nodes again and set it back to text-to-image mode again)
Then, upload your image into the Load Image box by clicking 'choose file to upload' and finding your image file.

Next, the prompt. I'll use this:
l1v3w4llp4p3r. A 3d cartoon woman with white hair and blue eyes stands in the gently falling snow. She wears a headband and earrings decorated with smooth blue gems. She also wears a white sleeveless dress, one black glove and one white glove, and she holds a bouquet of blue roses.
She lifts the bouquet up to her face, closes her eyes, and smells the roses.

Some LoRAs are clearly intended for T2V, while others (like this one) are intended for I2V. You'll have to experiment to find how to use them best.
Click run, and you should get a video out. Here's the video I got:
That worked pretty well. There's no artifacts or anything clearly amiss, although there's not all that much motion aside from the snowflakes. I'm thinking the image and prompt I chose didn't really show off the LoRA's functionality very well - I should have prompted her to do more, or maybe added her hair blowing in the wind or something...
Experiment, and see what else you can get her to do, or maybe disable the LoRA and see what effects that has.
Conclusion:
That's it. If you've read this far and tried out some of the examples for yourself, thank you! Please leave any comments, problems, or suggestions for improvements in the comments section.
Thanks again!