While there’s an explosion in txt2video after Aniamte-diff and we all love the stunning videos, we feel that there's a missing piece between generating img/vid in the community because
Most of your creation becomes one-off prop, as keeping the generation consistent across videos are nearly impossible (unless you went through lengths to train a Lora)
Apart from bundling them as TikTok video collage/put them on onlyFans, there are no good way to reuse a creation that you have made previously
Auto-Rig pipeline for the Generative era
Introducing a new approach to think about building character and story-telling. Instead of one-off video, replace it with a character base that can be further extend with your different tries of in-painting/Loras/animation.
This approach solves the previous problems because we design with these principles :
Controllable and extensible - Each character's features can be controlled and reedited in granular details, with sliding controls or programmatically.
Functional across the internet - The created character is beyond a single video, and you can embed it in the website, use it as VTuber-skin or as your app's AI concierge, or feed it into a video recorders for any lengths.
Github Link⭐️: https://github.com/avatechai/avatar-graph-comfyui (give us a star! 🌟)After Installing the nodes with ComfyUI as per the GitHub instruction (Comfy Manager WIP), and you can easily create your own responsive characters. Creating the first Character is rather time consuming and difficult, but adding future iterations gets easier over time.
Three Phases of Making Responsive Character
Segmenting -> Mesh building -> Running it w/ ShapeFlow
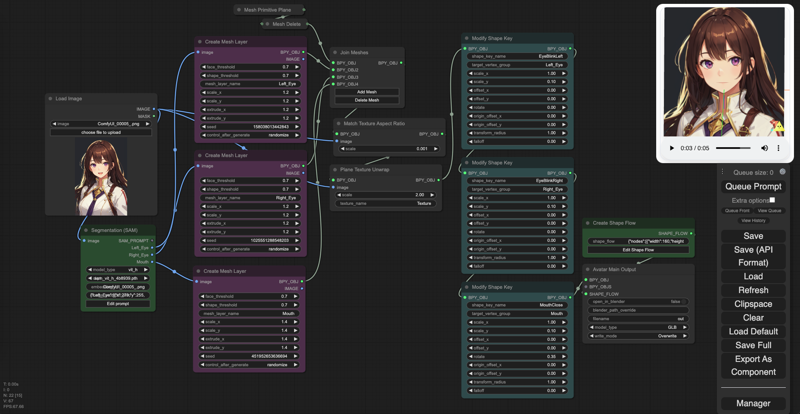
(comfyUI nodes for animating components)
1. Segmenting
Use the "Segment Anything Model" SAM in the package to create,
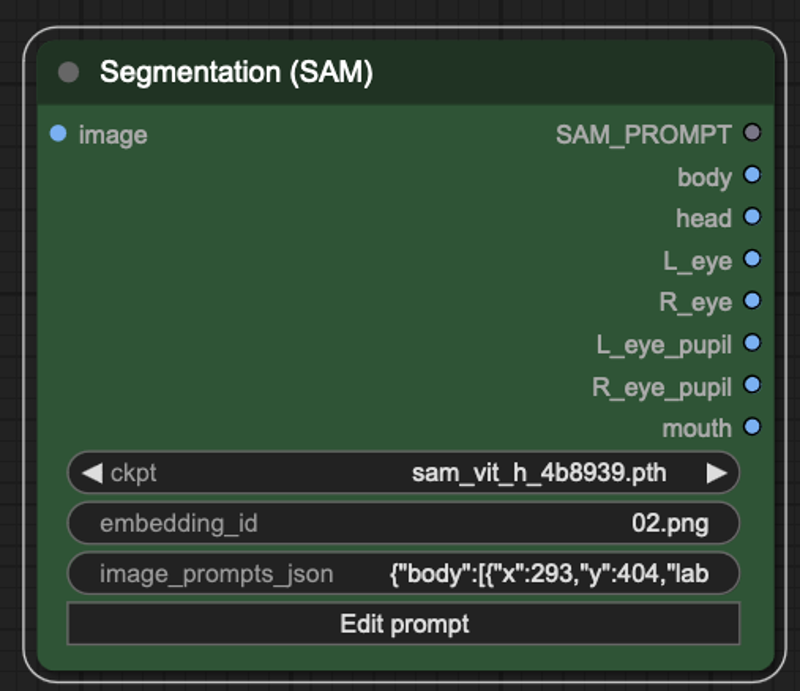
You can add any labels by Opening the "Edit Prompt" panel. Each layers corresponds to 1 output slots with the relevant image segment
the script installs the largest segment-anything model for parts. If there are resources constraints, you have three major models to choose from
sam_vit_lorsam_vit_b.
2. Mesh Building
Use the "Create Mesh Layer" node to create a mesh.
By using
extrude_x/yto create an outside anchor, you would get a more natural eye blink effect that doesn't deform outer area as muchSetting the size of the area is critical, as it affects the size of the area. Often time, segment output is not as perfect and might induce artefacts. eg. in the picture below the eye area (orange) didn't include all of the eyelash. The solution is to use
scale_x(width) andscale_y(height) to capture a wider area
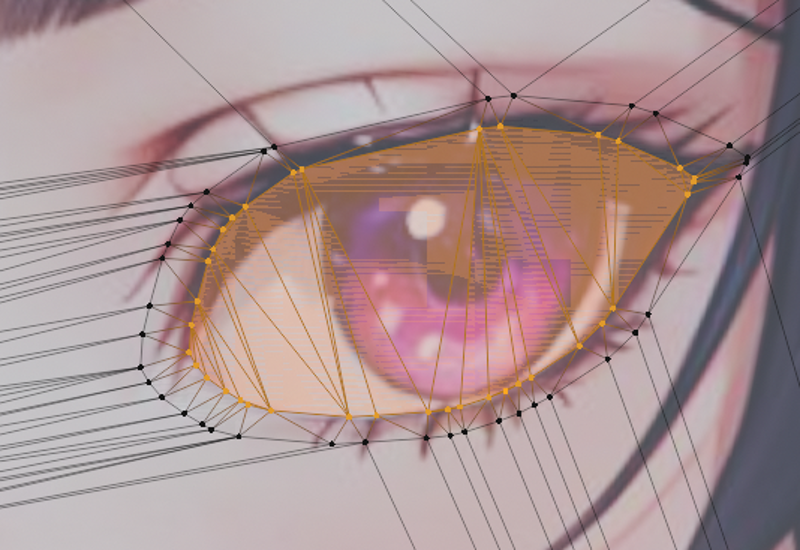
before: scale_x = 1.0 scale_y = 1.0
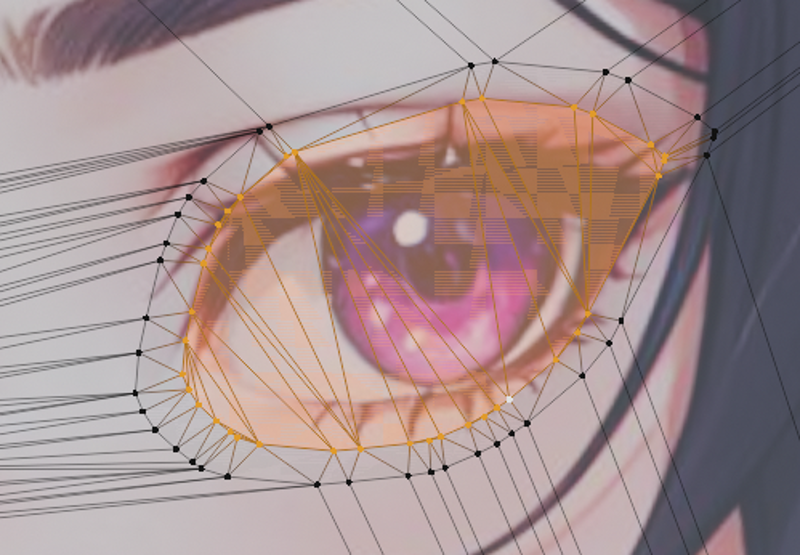
after: scale_x = 1.1 scale_y = 1.6
Use "Modify Shape Key" to set the Final form you want to have. For us, we want the eye to close by itself. So we would set scale_y = 0.1 (10% of its original height), and keep scale_x = 1.0
3. Running with ShapeFlow.
ShapeFlow is a concept that controls how real-time data affect the character mesh and states. In short, it makes your character "response" to external inputs and trigger the designed actions (open mouth when mouse click / eye scanning left/right when mouse hover)
First you can use the "Create Shape Flow" and click (Edit ShapeFlow). You will notice the nodes will be stored in a Json format.

It will open up a white editor on top of comfy with the most simple example included inside

Blendshape Output gives you direct control of the desired visual effects.
the Eye blinks combines multiple provides irregular
Some cool nodes to explore:
Mouse Down
eye tracking mouse pos
pos_x/y,scale_x/y,rot_x/y/zfor the image (demo: jumping cat)visibilein Blendshape Output x "Layer Value" for Multi-layer (demo in the making)
Other utilities nodes are:
Visualisation for seeing the results
Time (Current seconds /delta time (rendering) )
Operator for basic arithmetic
Math for value manipulation (Lerp demo wip)
You are all set ! You can preview it in the upper right window, or save it as an object in .ava .glb etc. via "Avatar Main Output" node
If you have more questions, please feel free to join our Discord or Star our Github for more details
