So I was recently asked to explain my method for making my inversions.
Firstly, I would like to say, check out the guide (LINK TO THE GUIDE) that started me off to understand this. The writer obviously knows more than me and this is probably a better starting point for anyone.
Secondly, I am ignorant. There is no better way to say it. Ignorance is bliss and I am quite happy, but at the same time I am probably destroying my hardware by not being more aware.
I have shambled this together from my latest (at the time of writing) inversion DEN_luasant_SG.
My spec.
Currently I am running an RTX3090 Ti, 64GB ram, and i9 processor. I have ram to spare and this will make a huge difference in your times and similar. I'm sorry I am not clued up enough to know what settings are best for what situation and so on. You have been warned. Following my guide may not be good for your hardware. My Machine cooling is probably not ideal and I have to open the case to improve the air flow just to keep my card from over heating. Keeps the room warm though.
What you will need.
So to make the inversions my way you will need Automatic1111 installed (this may seem obvious but I'm sure there are other, and better, ways to do this) and a dataset for the subject / art style. We will start with the data set as this should be the most time consuming element, IMO.
Getting the dataset.
How you do this is your own choosing. You can be very controlled in your collection of images, or you can "brute force" the dataset with excess. For ease and speed I tend to rely on brute force, basically just going excessive, and fine tuning later if I need.
The images should be large, high resolution, and clear where possible. Though these will be processed and shrunk later, they should be at least the size of the inversion you are making. I started with 1.5 (512x512) and I haven't migrated yet, so this is focussed on this. The bigger the images in the dataset, the better, as this makes for a clearer image and better detail.
Controlled Dataset
For a controlled dataset of a subject (person), you want to create the dataset to be reasonably balanced between headshots, bust, and full body. Because a lot of the models I am making are based on adult and glamour models, if you don't want a heavy nude element, you also need to ensure this is balanced against nude and clothed images.
I would aim for 20 of each as a minimum (20 head, 20 bust, 20 full) as this is an ideal balance and a good representation. The images should be varied but clearly show the subject and avoid images that show multiple subjects.
If you are not fussed about nude or clothed etc, then you do you. If you are, I would try to ensure that, for the bust and full body, there is a balance of 50/50 clothed to nude each, weighing in favour of clothed if you have to (so 10 clothed & 10 nude for both bust and full but favouring clothed if needed).
If you are wanting to do a style, or similar, then you want volume. You want lots of images, you want lots of high res images. There is nothing more I can say. You are going to do the same thing with these images, but the more you have the better it will learn.
Brute force
"brute force", as I call it, is collecting as much as possible and worrying about the consequences later. This has been the method for quite a few of my inversion (100 - 500+ images sometimes) to just get as much as I can and as much variation as possible. There is not a lot more to say than that. This method is slower in the long run, as you have to work through a lot more images, but can have the benefit of providing a lot more for fine tuning if you need, not to mention general learning material for the inversion.
Collecting and making the dataset
Regardless of whether you are "brute forcing" or controlling, more images is not a bad thing to my understanding. It simply gives the system more to learn from. Just remember to be balanced with it if you are doing a controlled dataset.
I tend to collect a lot of my datasets from forums and similar. If the subject has a lot of galleries you can collect a lot quickly. From here you can start picking the images you want to use for the purposes above (controlled). With the example inversion for this guide, the subject did not have a lot of galleries I could locate, so I went with the "brute force" method.
I located and collected all the galleries I could, and moved all the images into one folder.
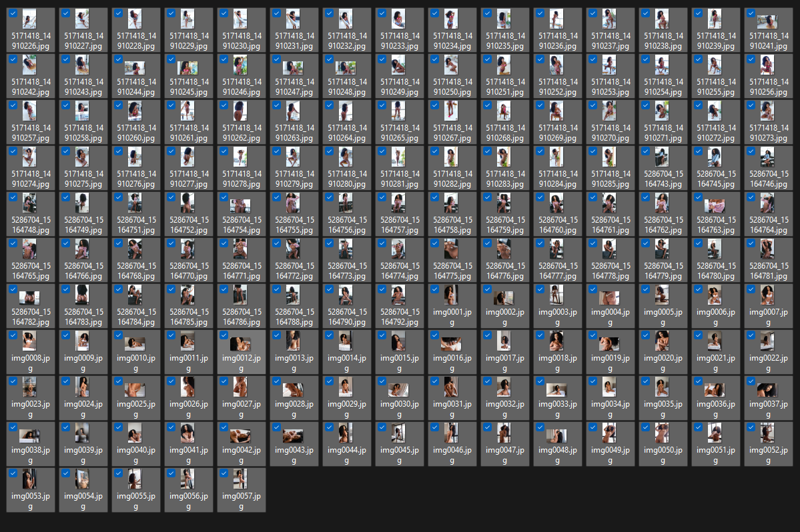
This gave me a starting number of 155 images. From here its a simple job of going through them and cropping to a 1:1 (square) ratio.
Now, before we continue, there is an option in Automatic1111 training that allows the system to auto focus, crop and everything, but this will not distinguish some elements (like logos). you will get a better result form doing this yourself, but if you want to skip this, go to the training section now.
Resuming. As we go through the dataset, we want to ensure that we are cutting from the images anything that may taint the inversion. Specifically, when working with adult models and the like, I'm referring to logos and watermarks. These will be detected in the training and you may find your inversions start applying logo like elements.
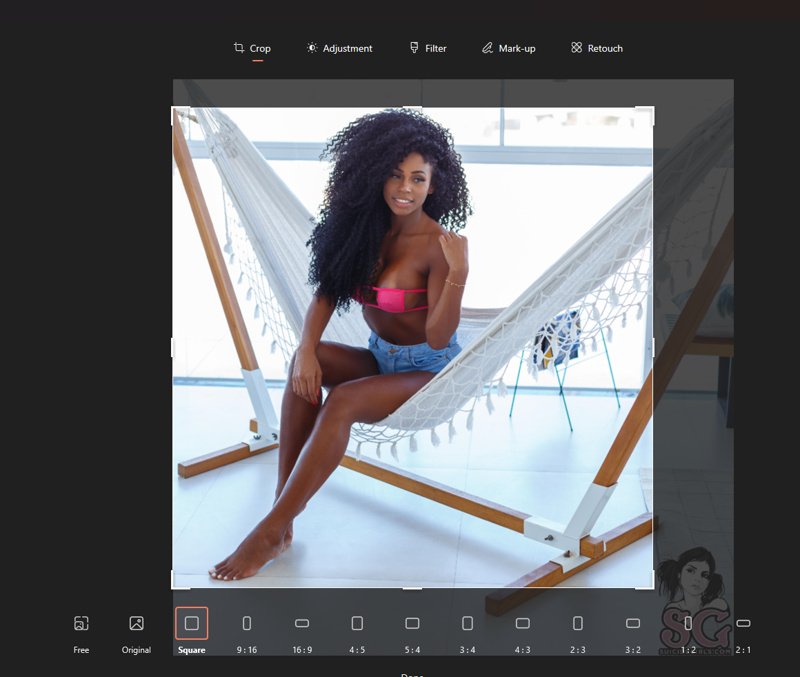
Easiest option is just to use the built in image system to edit and crop, as this is straight forward. If you prefer to use proper editing software, that's your call. We want to crop images accordingly, being mindful of the resulting size (it must not be lower than the training size, in this case 512x512). If the image is a good full body representation, then crop to that affect. If the image has too many obscuring elements, you may want to crop further, to a specific element, such as bust or headshot.
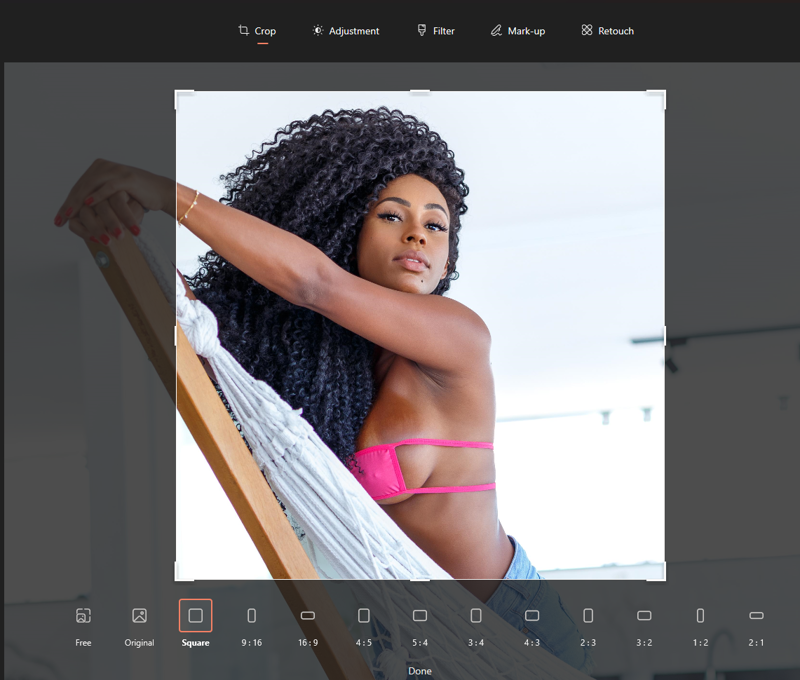
If the image (more for the brute force method) does not clearly show the subject, then we will be deleting this. In the below, there just isn't enough visible subject detail (face and the like), though this could have added to the trainings understanding of her hair (maybe).
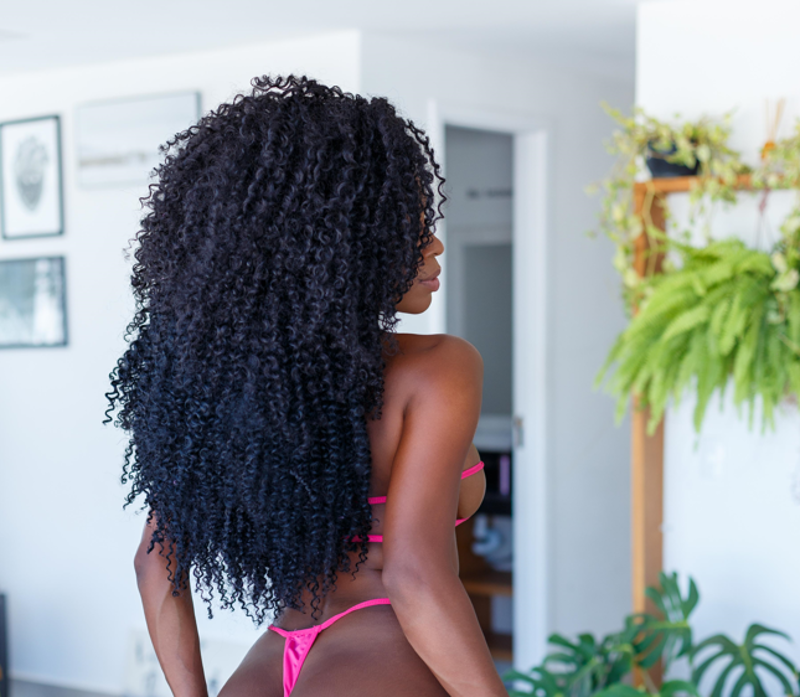
You may want to try keeping some "wild card" images and seeing what the affect is, but I tend to try and capture the look. A single random or obscure image is not likely to taint the dataset, but you would be very surprised by what can so, if you try, be prepared to have to start again with a controlled set, or just without the "wild cards".
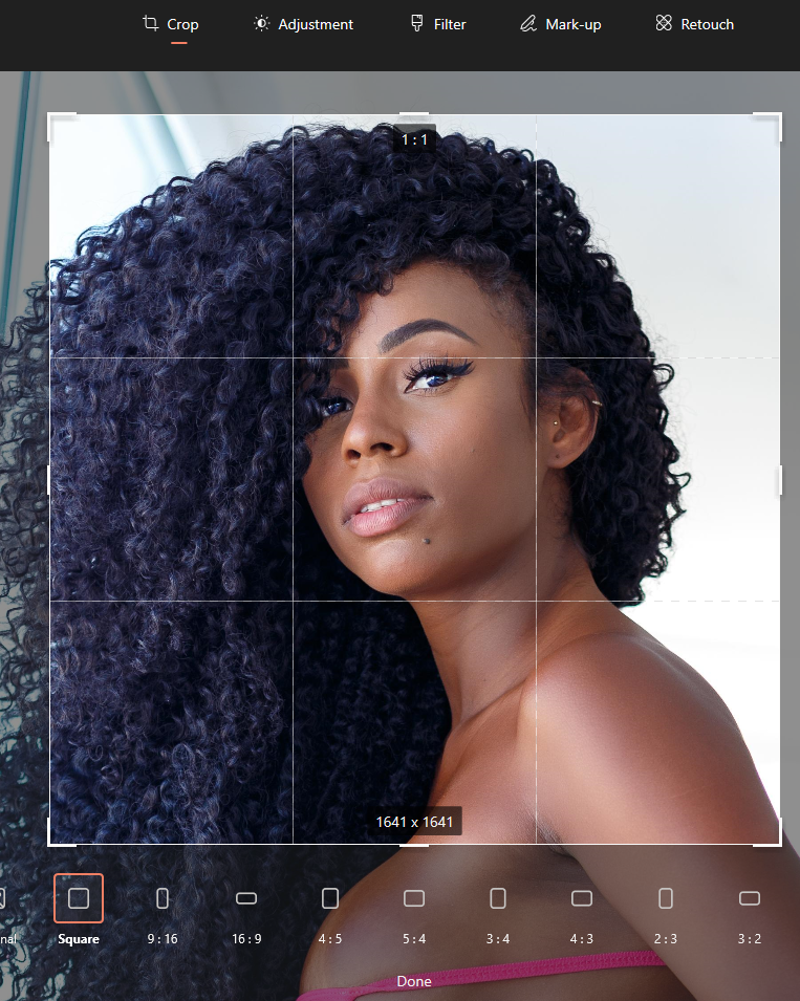
With a limited dataset you may find the size of the images allow for multiple crops, or even that you can't decide if the image should be cropped for head, bust, full body, or all three. This may be a bad habit or practice, and I'm sure someone will have comments on this, but in this case I duplicate the image so I can crop one to head, and one to bust, or similar. As long as the end images are not the same, I have not found this to be an issue.
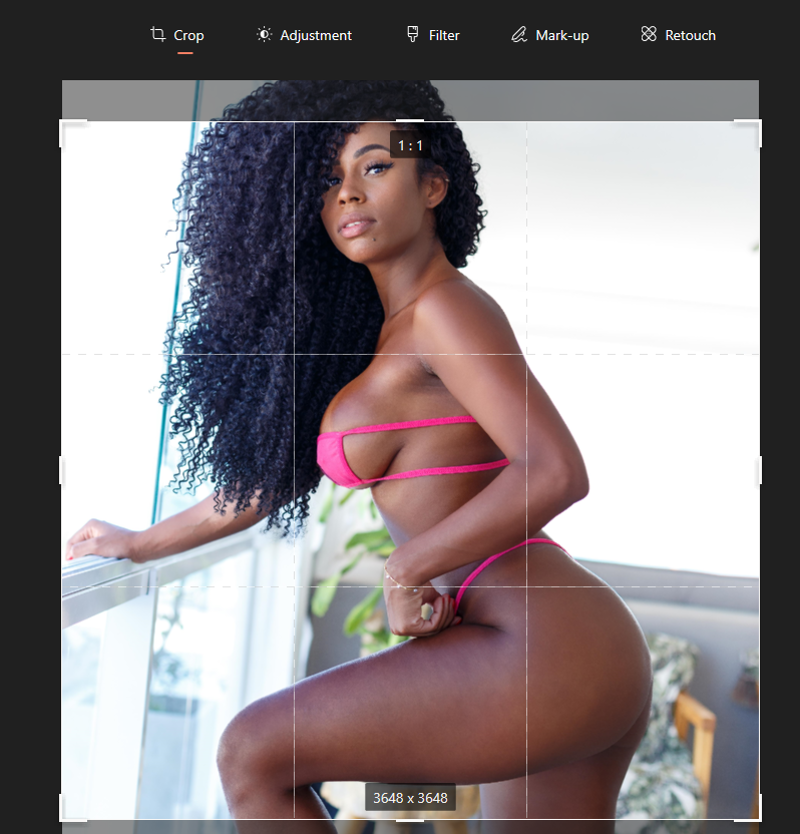
I really wanted to be sure I got plenty of headshot images, and as the size was good enough to crop down as well, I have duplicated the image to capture the face and body, and then cropped the second solely on head.
Finally, if you do find any images where the logo is just in the wrong place and you can't crop around it, then its time to retouch. again the built in tool will likely have an adequate means, but you will get better results from actual editing software.
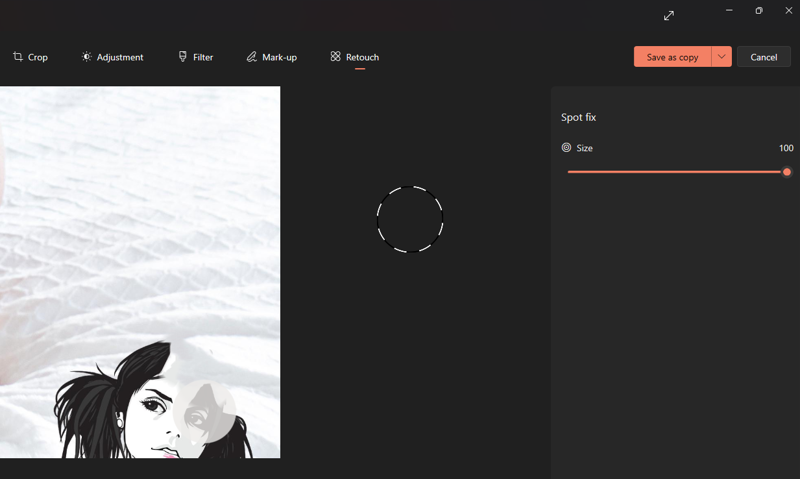
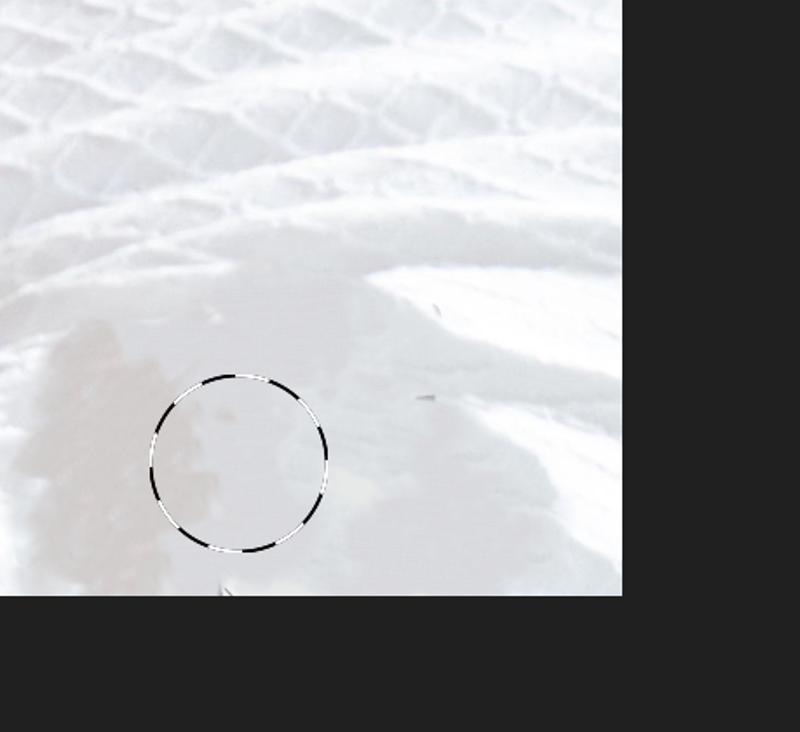
Don't get me wrong, it doesn't look great but when panned back out, this is ample.
Now after going through them all, resizing, retouching, and deleting. I think I was left with 114 images. Because I have taken these from limited galleries, there is a dominance for bust and full body. Thankfully the images were large enough to be able to reuse.
Welcome back my old friend duplication. I then go through the sample one last time and any image with sufficient clarity, size, and detail for the face, I have duplicated and re-cropped the new one for headshot alone. This pads out my dataset with more headshots ensuring I get a better balance (without being absolutely controlled).
Lets remember (and don't judge), I'm just brute forcing this one. I'm not tracking the balance or similar, I'm just trying to improve the balance without being precise. By the end I had 141 images cropped and ready, in beautiful little 1:1 ratio squares.
Training the dataset
Now that we have the dataset to our liking, its time to start the process of training.
Now I don't do much with the general settings of the training, and this is probably what will be killing my hardware slowly. I refer you all to the guide I started with (LINK TO THE GUIDE) as this covered better info about settings and the like. Caveat out the way, lets just get going. Going to the "Train" tab in automatic1111 we want to create the inversion.
Creating the embedding.
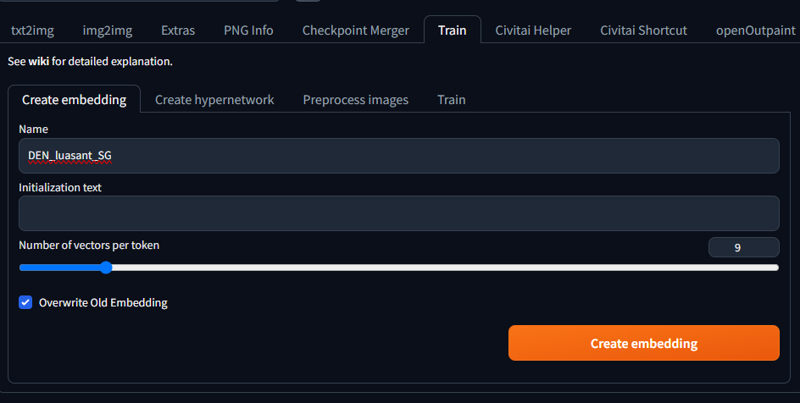
First things first, lets pick a name for the inversion. Remember that this is also a form of trigger for the inversion so avoid words that will affect over prompts. Best example, don't use "dog", as this will simply replace and affect the existing use of the word prompt. I tend to keep mine in a constant format.
The initialisation text should be for use with trigger words, but honestly I have had no luck using these, so I leave this blank. when you start it will likely have a * in the field. Just remove this. If you want to try it, then add other trigger words you want from your inversion, but I believe this is more down to the text files later on, and frankly I don't do the work I probably should.
The number of vectors, as I understand, is a reference to the number of tokens (or prompts) involved. As a minimum I have been setting this at 3, more recently I have been setting this to 8 or 9, and I'm not finding any real difference. i think the idea is that if you have one word for the name, and use 3 extra words for the initialisation text then you would want 4 vectors.
I leave the overwrite old embedding on, but this shouldn't matter. We can now click create embedding and we are done with this bit. The process is speedy if you know what you are naming.
Next we go to the "preprocess images" tab, inside the "Train" tab.
Preprocessing the images
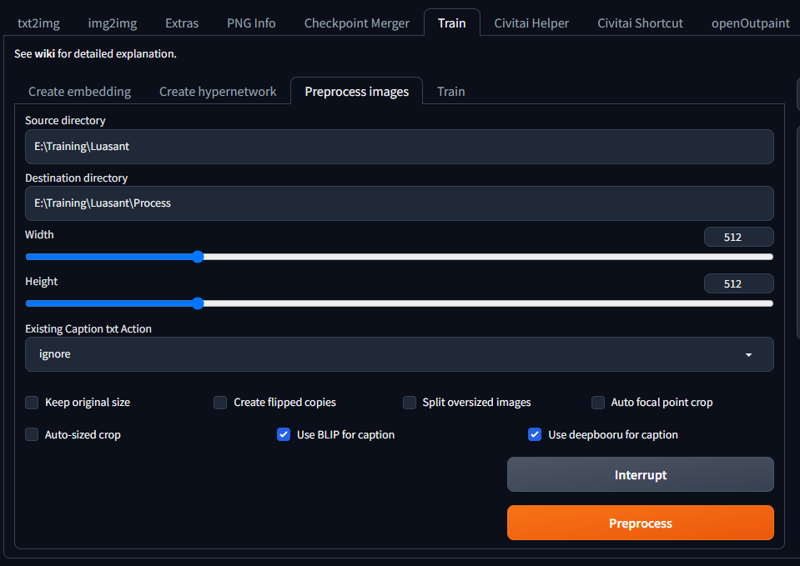
In here we will provide the path of the data set we have created in the "source directory". In the "Destination directory" I use the same path but append this with "\process" so the processed images are separated, but close by.
The width and height bars should be set to the output you require. If you are working with 1.5, as I am, then you want this at 512 and 512. if you have moved to 2.1 then I think this will be 768 and 768, and SDXL is 1024 and 1024 (I think).
Existing caption can be left as ignore (but this is because I trust the blip and Deepbooru caption systems). On that note, turn on the "Use BLIP for caption" and "Use deepbooru for caption". These options study the images and create a corresponding text file per image detailing the content of the image. Now there are other options for this, so you may want to try leaving these off and using these another time, but for now, lets trust this. (for future look into the "tagger" extension in automatic1111).
Skipping forward (additional settings)
Now if you skipped to this point, please read the beginning of the training section as well (if not done), and welcome back. If you didn't skip, and put the effort into cropping etc, then move on to the next section.
Those that skipped have more faith in the system, so lets allow the system to arrange our images during the "preprocess" stage.
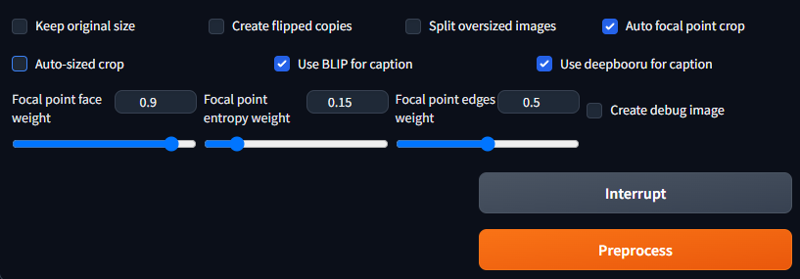
Turn on the "auto focal point crop" option. When I used this in the past I found the default settings were fine. This allows the system to study the image based on the settings and establish the best means of cropping. This will not crop inwards of the image. By this I mean it will resize the image first and then just crop from that. Another way to explain, if the picture only has a face in the dead centre of the image, it will not zoom into that face, it will just centre it in view. I'm hoping this makes sense but, worst case try it out and check the results for yourself.
The next section (if you didn't need additional settings)
OK, so we have our settings as we want so far. There is one more setting to be aware of. If you are dealing with a subject, I strongly recommend keeping this off. If you are working a style or similar, you can turn this on. "Create flipped copies".
Faces (generally) are not symmetrical. If you use this on subject training, it will taint the result. If you are doing a style or similar, then it will just double the dataset, which is not a bad thing.
Click "preprocess" and allow some time. The time depends on the amount of the dataset we have. A sample of around 60 takes less than a minute, over 500 may take 5 minutes. its not long, but varies with the data set and options.
now we can goto the "Train" tab within the "Train" tab (annoying i know):
Training the embedding
The first thing we should do is ensure we have a suitable model / checkpoint selected for the training. I have only ever done the training from the 1.5 EMA only bla bla bla. I don't think it is recommended that we use other models and should try to use only base models (1.5, 2.1, SDXL, etc) for the training, but if you want to try be my guest. Again, if you try, be prepared to have to try again.
once this is selected, we proceed.
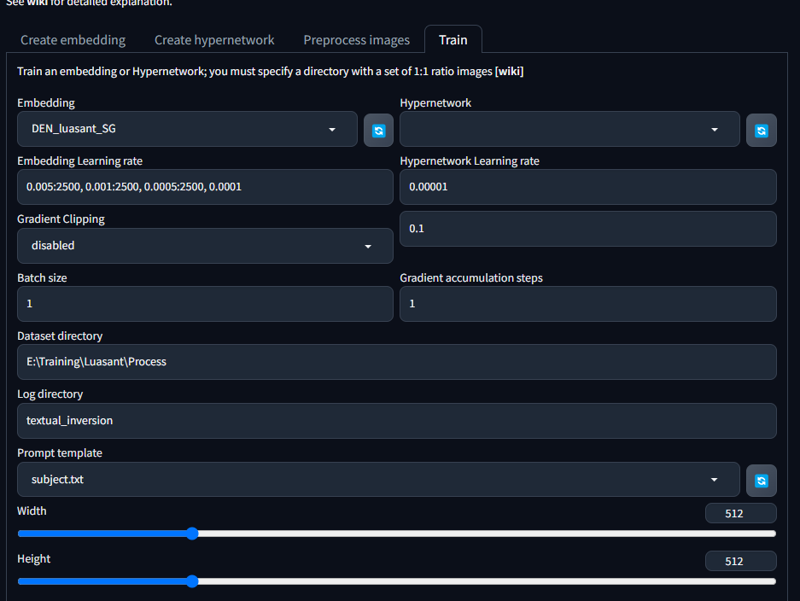
Firstly locate your newly made embedding from the "Embedding" drop down and select it.
We then define the "Embedding Learning rate". Now this has been my consistent setting for some time (in the example image), but for this embedding I changed it (see the next image). Think of the learning rate as inverted detail. The lower the number the higher the detail. So a learning rate of 0.1 will be very high level detail, where as 0.0000001 will be fine detail. You can control at what point in the process the tool changes from one rate to another, and this is why I had the setting as they are above. My understanding was that it would do each level of detail for the number of steps provided. My thought being I could stack the information. A comment on a previous model has made me doubt this and I changed to the below:

effectively this is saying, learn at rate 0.001 for 5000 steps and then continue at 0.00001 for the remainder. this has worked well in this example, but you may want to play with the rates and see what difference this makes.
resuming the other options, I leave "gradient Clipping" as disabled (not even sure what it is).
Batch size, as I understand, is effectively the number of images being worked. you can increase this but it wont speed the process, rather slow it down. where the training reviews images and such, increasing this will just increase the amount of work. you may get better details and results from a higher number but your card will work a lot harder for it. For now leave it at one.
"Data source" is the folder path of the processed data set.
"Log directory" leave it alone (just relates to where the logs are saved in the Automatic1111 folder structure).
"prompt template" is the text file relevant to the training. I wouldn't play around with the files, but pick one suitable to your needs. For a subject, I just pick the "Subject.txt" but the other has worked fine. I'm not sure what affect picking the wrong one would have, so if you want to try, be my guest. as before, be prepared to start repeat this process if it makes a mess.
"Width" & "Height" should be set according to the training (1.5 512x512, etc etc).
the lower half has a few more settings
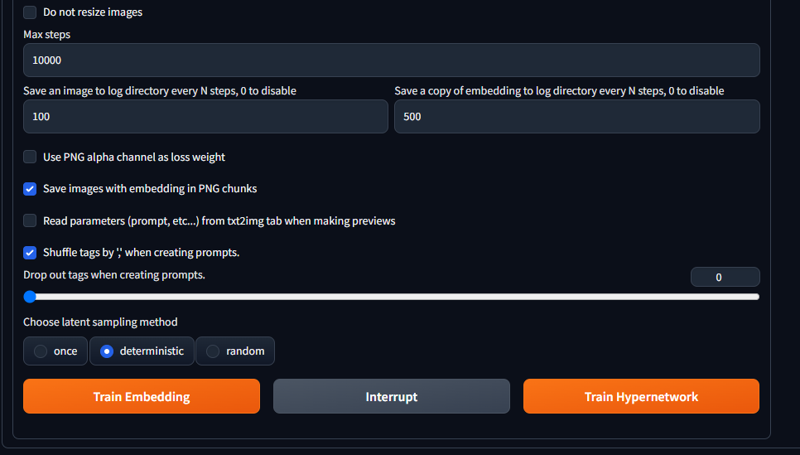
"Max steps" is the number of steps it takes breaking images down and back up to create the embedding. The higher the number the longer this will take. Now referring to the original guide I followed this can all be done at much lower levels effectively. I have taken to 10K as this seems to capture better detail, and my system has "umph" enough to do this. Just remember that the steps in this relate to the learning rate (if you have provided change over points and the like).
"Save a copy of ...." will save staged versions of the embedding. I like the 500 mark. This is good as you may find the end result lacking, but you can use the saved ones later to fine tune or improve if needed. Picking an earlier point to then refine or similar.
"Save an image to ...." dictates how often it will test generate an image. I like to have the system make an image regularly enough, so i can see how it is getting on. there is no real benefit other than you get a sample. Bare in mind that these may take time to take form and start looking the part, and may not look great till done and tested in a better checkpoint. here is some of the first steps in the example embedding so you get the idea.

I turn on the "shuffle tags". not found a pro or con to this as yet, but i think it helps vary the learning and sample generation.
Lastly, choose "Deterministic" sampling. I have read multiple things and nothing has clarified the differences or benefits, but everything says use deterministic. If it isn't broke don't fix it in this case.
And we are ready.
You can now click the "Train Embedding" and wait.
For me, this process at these settings, it takes roughly 40 minutes. depending on hardware and your settings etc you can expect longer (maybe less who knows). just wait patiently, make a cuppa, go for a run, whatever helps you pass the time.
once done this should be saved in the "...stable-diffusion-webui\embeddings\" directory, and readily accessible in the system.
Testing and demoing
Once the embedding is finished, you can test it out. I use the script option in Automatic1111 to produce images across a few checkpoints and see the differences:
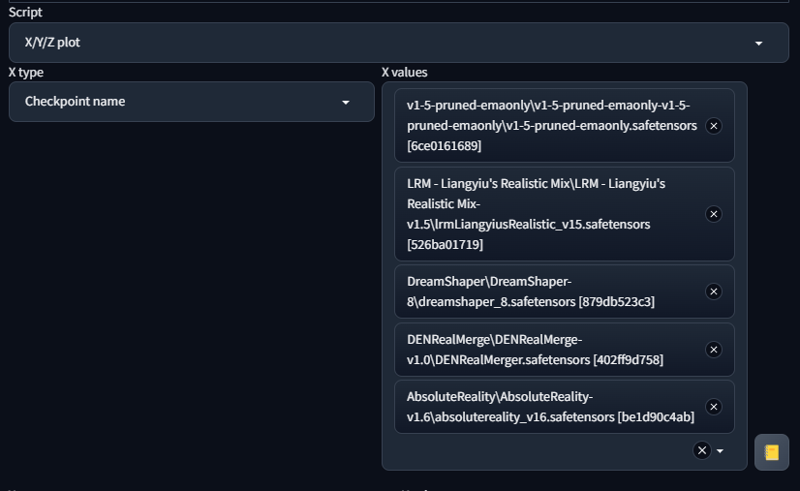
I use a clear prompt for the purpose with the embedding preceding it (so for the example):
"DEN_luasant_SG,
(headshot:1.1) portrait on a bright white background, (headshot:1.2), face focus, intricate (beautiful eyes:1.2), (wide open eyes:1.1), Big eyes, clean photo, side lighting, low contrast, low saturation,
bokeh, f1.4, 40mm, photorealistic, raw, 8k, textured skin, skin pores, intricate details"
I also use a consistent negative prompt:
"deformed, blurry, bad anatomy, disfigured, poorly drawn face, mutation, mutated, extra_limb, ugly, poorly drawn hands, two heads, child, children, kid, gross, mutilated, disgusting, horrible, scary, evil, old, conjoined, morphed, text, error, glitch, lowres, extra digits, watermark, signature, jpeg artifacts, low quality, unfinished, cropped, Siamese twins, robot eyes, loli"
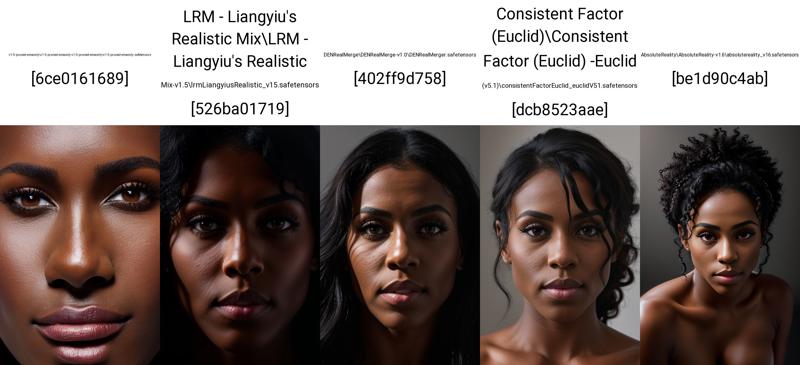
This shows me a varied result. The below is a good example as it shows that the EMA 1.5 is close but lacking, where as in other checkpoints we have a much better result:
Thanks and good luck
Now if you bothered to read my gibberish all the way to the end i want to say thank you. I would also thank hartman_bro for encouraging me. I hope this helps and look forward to seeing anything made.
Please like and review this article of it helps in anyway as I would love to see embeddings made as a result.
Comment links to your inversions if you make them. Anything to help me find them.
Finally I may do an update on this specifically for fine tuning and the like.
