Introduction
In this guide, we'll explore the steps to create captivating small animated clips using Stable Diffusion and AnimateDiff. This workflow, facilitated through the AUTOMATIC1111 web user interface, covers various aspects, including generating videos or GIFs, upscaling for higher quality, frame interpolation, and finally merging the frames into a smooth video using FFMpeg.
Prerequisites
Steps
Step1: Generating Frames with AnimateDiff
Begin by installing the AnimateDiff extension within the Stable Diffusion web user interface. After installation, make sure to download a motion model and place it inside the "stable-diffusion-webui/extensions/sd-webui-animatediff/model/" directory.
For this tutorial, we are using the "mm_sd_v15_v2.safetensors" motion model, which can be found here: Motion Model Link.
After successful installation, you should see the 'AnimateDiff' accordion under both the "txt2img" and "img2img" tabs.
Navigate to the "txt2img" tab and input your desired prompts.
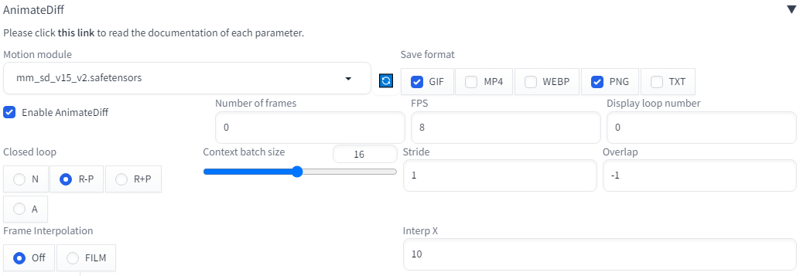
Set the dimensions to 512x768 and adjust other parameters as needed. You can opt for higher resolutions if your GPU VRAM allows. Configure AnimateDiff parameters as follows.

Click "Generate" to initiate the process. Once it's done, you'll find a GIF in the AnimateDiff folder and 16 PNG frames inside the "txt2img/<date>" folder. Generate multiple versions and select the best one, then copy the 16 PNG frames to a separate folder.

Step 2: Upscaling for Higher Quality with img2img
With 16 PNG frames ready in a separate folder, proceed to the "img2img" tab within the AUTOMATIC1111 web user interface.
Set the dimensions to 1280x1920 or the highest resolution your GPU can handle.
Use the same prompts you employed earlier for the positive and negative prompts. Assign a random number as the seed.
Enable ControlNet tile resample to maintain temporal consistency. Configure the settings as shown.


Set the denoising strength within the suggested ranges depending on your selected sampler. For DPM family it can be up to 0.35 and for Eular and DDIM family it should be below 0.25
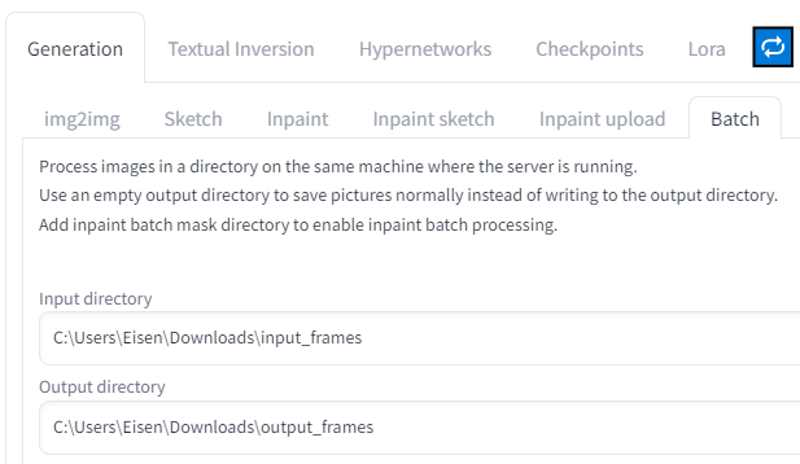
Enter "Batch" mode and specify the input folder where you've stored the frames. Also, designate an empty folder to store the upscaled images.

Click "Generate" to process all the images in the input folder. This step may take some time, and once completed, you'll have 16 upscaled images in the output folder.

Step3: Frame Interpolation for Smoothness with RIFE
Install RIFE-ncnn-vulkan using the provided link in the prerequisites section.
Open a command prompt and execute the following command, specifying your input and output directory paths:
rife-ncnn-vulkan.exe -i <input_directory_path> -o <output_directory_path>This command generates interpolated frames between every two frames, resulting in double the number of images in the output folder compared to the input.
Repeat this operation until you reach a total of 256 images, following this sequence:
16 → 32 → 64 → 128 → 256 images.
Step4: Merging Frames into a Video with FFMpeg
Ensure you have FFMpeg installed on your system.
Run the following command to merge the frames into a video:
ffmpeg -framerate 60 -i <output_directory_path>/%08d.png -crf 18 -c:v libx264 -pix_fmt yuv420p output.mp4You can customize the framerate, attach audio, and further upscale the video using tools like Topaz Video AI.
Check out this post for example outcomes: https://civitai.com/posts/722084
With these steps, you'll be able to create stunning animated clips with ease and creativity using Stable Diffusion and AnimateDiff.

