It's mainly some notes on how to operate ComfyUI, and an introduction to the AnimateDiff tool. Although there are some limitations to the ability of this tool, it's interesting to see how the images can move.
Introduction to AnimateDiff
AnimateDiff is a tool for generating AI movies. The source code for this tool is open source and can be found in Github, AnimateDiff.
If you are interested in the paper, you can also check it out.
Basically, the pipeline of AnimateDiff is designed with the main purpose of enhancing creativity, using two steps.
A Motion module is preloaded to provide the motion validation needed for the movie.
A base module is loaded for the main T2I and the T2I feature space is preserved for this model.
Next, the original T2I model features are transformed in the pre-trained Motion module into an animation generator, which generates a variety of animated images based on the provided text descriptions (Prompt).
Finally, AnimateDiff does an iterative denoising process to improve the quality of the animation. Denoising is actually a process of gradually reducing noise and ghosting (mainly incorrect images generated during the drawing process).
Basic System Requirements
t2vid requires a minimum of 8GB of VRAM, which is the minimum requirement when using a resolution of 512x512 with 2 ControlNets, in some cases this setup may use up to 10GB of VRAM.
In the case of vid2vid, the minimum requirement is 12GB of VRAM or more. Since my note uses 3 ControlNets, the maximum VRAM used could be as high as 14GB, so if that's not possible, reduce the number of ControlNets or lower the resolution.
ComfyUI Required Packages
First of all, you need to have ComfyUI. If you are a Windows user, he also provides a completely free version of the zip file, you can download it directly.
ComfyUI Standalone Portable Windows Build (For NVIDIA or CPU only), 1.44GB
If you are a Linux user, you will need to install ComfyUI yourself, so I won't go into the details here.
You can install ComfyUI-Manager first and then install the rest of the package through ComfyUI-Manager.
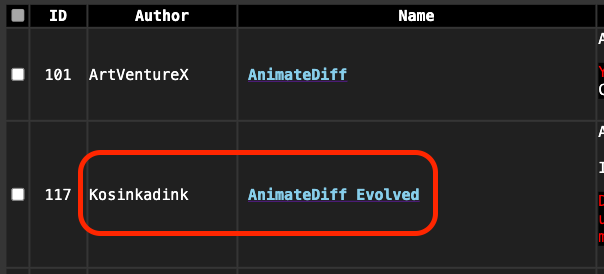
The following two packages are necessary to install, otherwise AnimateDiff will not work properly. Please note that the package I installed here is ComfyUI-AnimateDiff-Evolved, which is different from the one provided by ArtVentureX, so please be careful not to install it by mistake.
In addition, the following are commonly used with AnimateDiff, or if you've downloaded the Workflow I've provided, then you shouldn't need to install it again.
And last but not least, my personal favorite.
Models for AnimateDiff
Action figures and motion Lora can be downloaded here.
https://huggingface.co/guoyww/animatediff/tree/main
We also recommend a few animation models that can be used to generate animations.
These model files need to be placed in this folder.
ComfyUI/custom_nodes/ComfyUI-AnimateDiff-Evolved/modelsIf you are downloading Lora, you need to put it here.
ComfyUI/custom_nodes/ComfyUI-AnimateDiff-Evolved/motion_loraAfter downloading, if you need to use ControlNet, please put the files you need here.
ComfyUI/models/controlnetOf course, your master model needs to be in ComfyUI/models/checkpoints. If you have VAE, you need to put it in here,
ComfyUI/models/vaeIntroduction to AnimateDiff
At the beginning, we need to load pictures or videos, we need to use the Video Helper Suite module to create the source of the video.
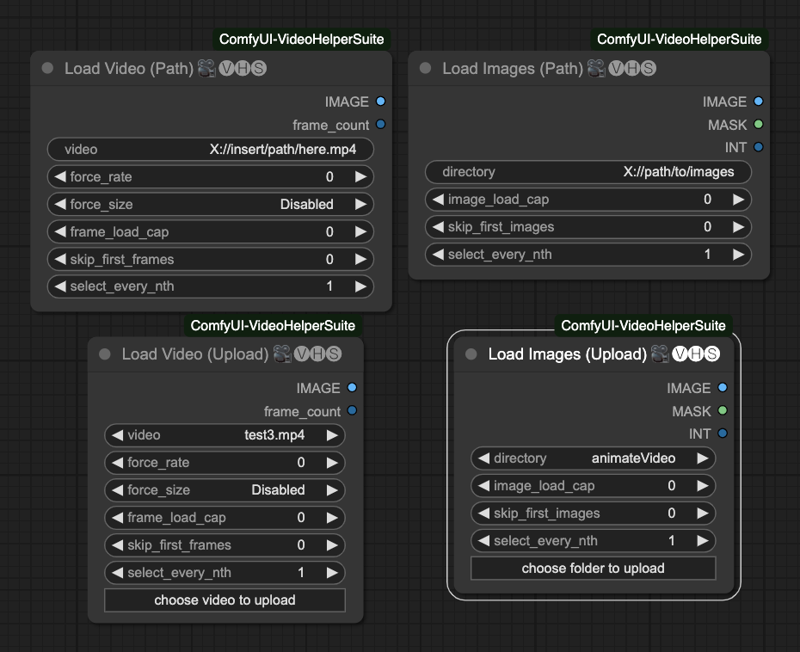
In total, there are four ways to load videos.
Load Video (Path) Load video with path.
Load Video (Upload) Uploads a video.
Load Images (Path) Load images by path.
Load Images (Upload) Uploads an image folder.
The parameters inside are these.
image_load_capThe default setting of0is to load all the images as frames. You can also fill in a number to limit the number of images loaded. This will determine the length of your final animation.skip_first_imagesSet how many images to skip at the beginning of a batch.force_rateWhen reading a movie, it is mandatory to use this FPS to extract the picture.force_resizeForces the image to be converted to this resolution.frame_load_capDefault is0, it means load all the frames of the movie. You can also fill in a number to limit the number of frames to be loaded. This will determine the length of your final animation.skip_first_framesSet the number of frames to be skipped at the beginning of a batch.select_every_nthSets the number of frames to be selected every few pictures, default1is every frame.
After setting up the necessary nodes, we need to set up the AnimateDiff Loader and Uniform Context Options nodes.
AnimateDiff Loader
The AnimateDiff Loader has these parameters.
modelAn externally linked model, mainly to load the T2I model into it.context_optionsThe source is the output of the Uniform Context Options node.motion_loraAn externally linked motion lora, mainly to load in the motion lora.motion_model_settingsAdvanced motion model settings, not explained here.model_nameSelect the motion model.beta_scheduleSelects the scheduler, by default it usessqrt_linear (animateDiff), you can also use thelinear (HostshotXL/default), I won't mention the difference here.motion_scaleThe application scale of the motion model, default is1.000apply_v2_models_properlyApplyv2model properties, default isFalse
Uniform Context Options
Uniform Context Options has these parameters.
context_lengthHow many images are processed per AnimateDiff operation, default is 16, which is a good number for current processing. Please note! Different action models will limit the maximum value of this number.context_strideDefault set to 1. If it's larger than that, it means how many times you need AnimateDiff to repeat the computation before a batch is considered complete. Although repeated operations can be used to make up the frame rate (to a limited extent), they can add a lot of time to the computation.context_overlapHow many images to reserve for overlaying each time AnimateDiff processes an image, default is4。context_scheduleCurrently, onlyuniformuniform can be used.closed_loopTry to make a loop animation, default isFalse, does not work with vid2vid.
AnimateDiff LoRA Loader
It is mainly used to load the node of the animation Lora, its parameters are these.
lora_nameSelect the model of the animated Lora.strengthThe strength of the action Lora, default is1.000
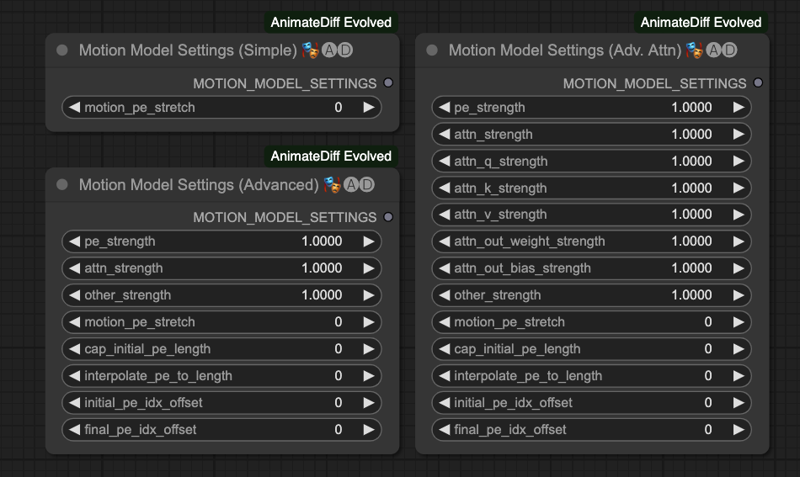
Motion Model Settings
There are three types of settings in this node, each of which can be used for more detailed settings of the motion model. However, since the author didn't describe this section in more detail, I won't introduce him here for now.
Video Combine
Finally, we're going to use Video Combine in the Video Helper Suite to export our animation.
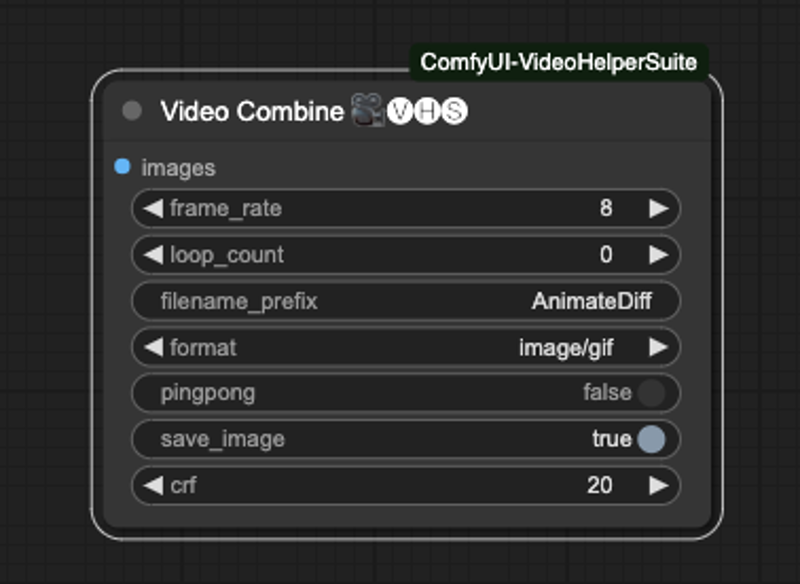
He has the following parameters,
frame_rateThe frame rate of the animation, if you use force_rate when inputting, please set it to the same number. If you read the movie directly, please set it to the same FPS as the movie. This number will determine the length of the final animation output.loop_countwill only work when save as picture, after the picture is generated, your ComfyUI will repeat the number of times to play this video.filename_prefixThe prefix of the saved file, it will be numbered automatically if it is generated consecutively.formathe output format, currently the following formats are supported, please note that if you need to output a movie, please make sure you have FFmpeg installed on your computer, and the related compression and decoding libraries are supported.image/gifimage/webpvideo/av1-webmvideo/h264-mp4video/h265-mp4video/webm
pingpongDefault isFalse, it will countdown 1, 2 frame data combination back to the original frame, and then merge all the frames, there is a kind of echo feeling, the main method isframes = frames + frames[-2:0:-1]so that the combination and then processed. If you using a video, may be keep it toFalse.save_imageDefault isTrueto save the last output data.crfDefault is20, it's a special parameter for the video, the full name is Constant Rate Factor, if you are interested, please do your own research.
AnimateDiff with ControlNet
Since we don't just want to do Text-To-Video, we will need to use ControlNet to control the whole output process and make it more stable for more accurate control. I've chosen 4 ControlNets to cross-match the operation, you can also try others.
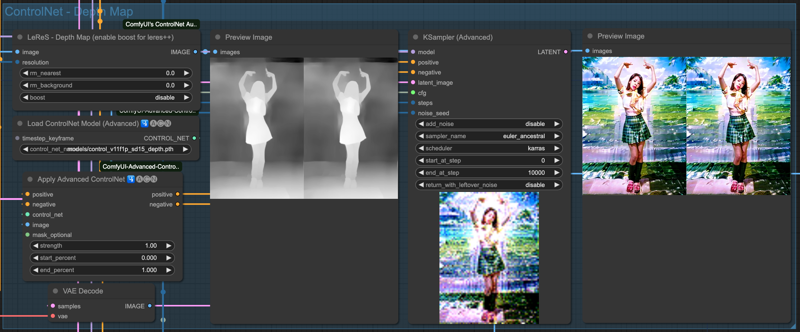
Depth is used to take out the main depth map.
SoftEdge for rough edges.
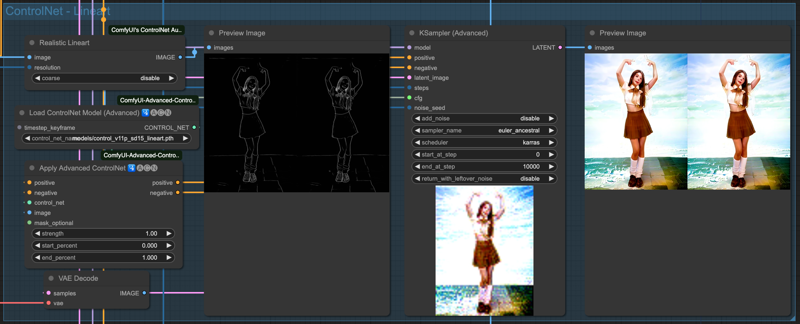
Lineart for taking out fine lines.
OpenPose for taking out the main character's movements, including hand, face and body movements.
All of the above requires the following two packages, if you have installed everything at the beginning of the article, you don't need to install them again.
I'm going to briefly show you the results of each of these ControlNet auxiliary pre-processors.
Depth
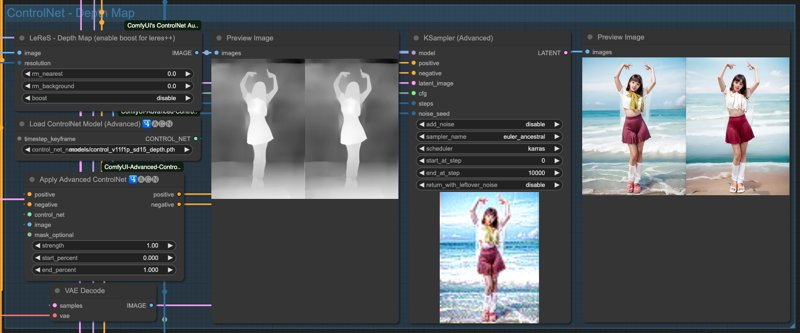
SoftEdge
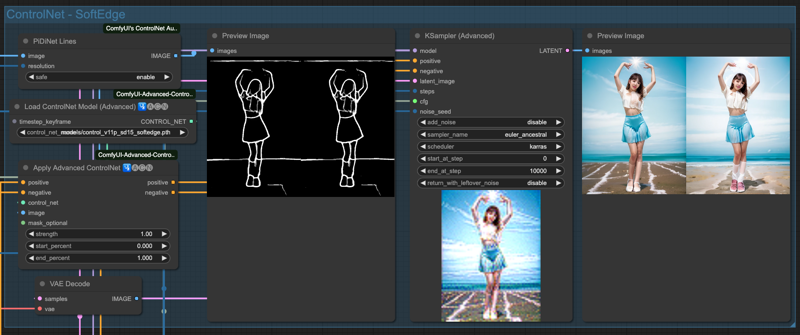
Lineart
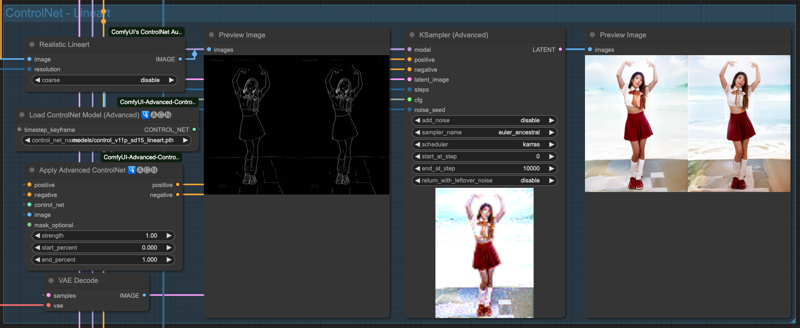
OpenPose
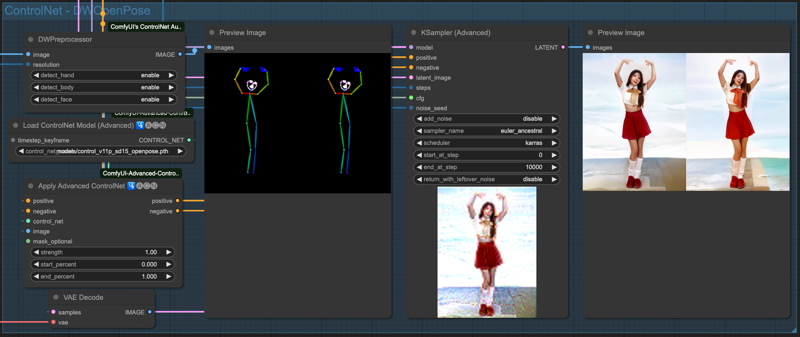
The above is the effect of the 4 ControlNets alone, of course, we have to string these ControlNet to use, as for which to pick a few to string, there is no certain rule, as long as the final result is good, then the combination used should be OK.
Basic Preparation
Now it's time to utilize ComfyUI's creativity. Here I just list some basic combinations for your reference. First of all, lazy engineers like me, of course, do not input too many things if you can, so, utilize some ComfyUI tools, let him automatically calculate some things out.
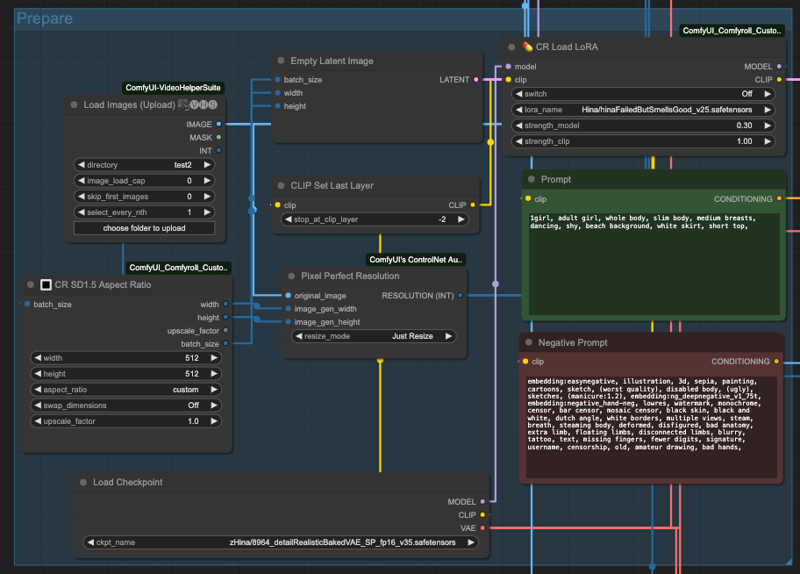
So, I use CR SD1.5 Aspect Ratio to get the image size and give it to Empty Latent Image to prepare the empty input size, and the batch_size is also obtained from the INT output of Load Images.
Also, since the ControlNet preprocessor will need a resolution input, I use Pixel Perfect Resolution and plug in theoriginal_imageand the dimensions from the CR SD1.5 Aspect Ratio into image_gen_width and image_gen_heightsize respectively and let it calculate a RESOLUTION (INT) to be used as input to the preprocessor.
Then you need to prepare the base model, positive and negative cues, CLIP settings, and so on, and then if you need Lora, you have to do it first, please pay attention! The loading of Lora may make the output very miserable, so far it is presumed to be related to AnimateDiff's model, and more tests and experiments are needed, so if it is not necessary, don't use Lora yet, or use it in another place. So if you don't need to, don't use Lora yet, or use it somewhere else, you can experiment with it yourself, so I won't go into that.
Next, we need to prepare AnimateDiff's action processor.
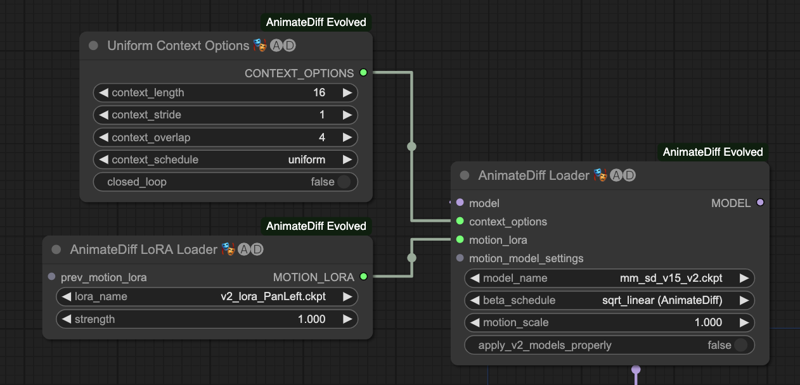
You need the AnimateDiff Loader, then the Uniform Context Options node. If you are using motion control Lora, connect motion_lora to AnimateDiff LoRA Loader, if not, ignore it.
Combine all workflow
Once the basics are in place, we're going to put them all together in this order.
Read the source (movie or continuous image).
Prepare the base model, Lora, cues, size and resolution preprocessing, etc.
Prepare the AnimateDiff Loader.
String together the desired ControlNets.
Output to Sampler for processing.
Finally, VAE Decodes are exported to Video Combine for storage.
First of all, let's take a look at how the whole thing looks like just now.
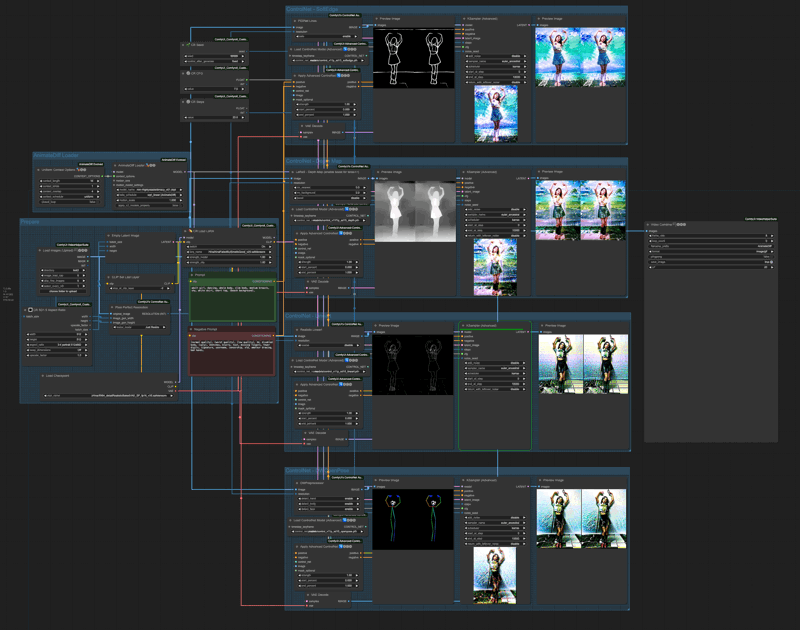
The positive terminology we use this time is,
adult girl, dancing, whole body, slim body, medium breasts, shy, white skirt, short top, (beach background),Negative prompt is,
(normal quality), (worst quality), (low quality), 3d, disabled body, (ugly), sketches, blurry, text, missing fingers, fewer digits, signature, username, censorship, old, amateur drawing, bad hands,The order in which ControlNet operates here is.
SoftEdge
Depth
Lineart
OpenPose
The result of each ControlNet process will be sent to the next stage, and the final result will be output by OpenPose.
We can see the result of each ControlNet process independently,
SoftEdge
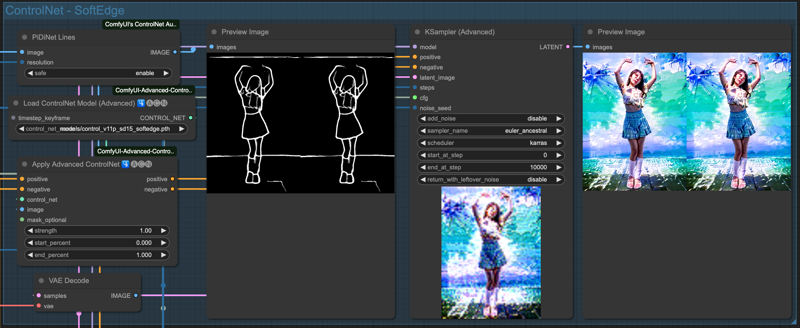
Depth
Lineart
OpenPose
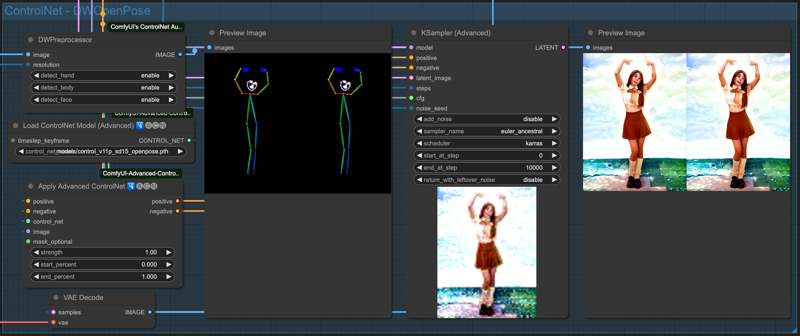
You'll notice that although we have emphasized the (beach background) , the degree of painting is not particularly noticeable due to the source image, so you can go back up and look at the ControlNet outputs before applying the AndimateDiff action model for comparison. In the whole process, all the control of the screen is done by the original input image, described by ControlNet, and finally handed over to Sampiler to draw the screen. Therefore, if you change the order of connection between ControlNet, the output result will be different.
For example, the following four pictures are processed in the reverse order of the previous sequence, and then each ControlNet output is output to the Video Combine component for animation.
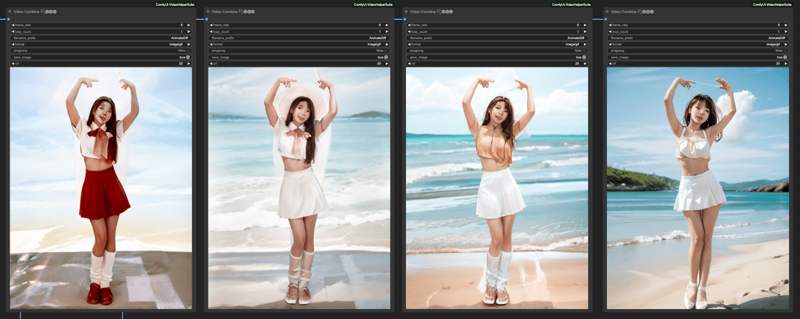
From left to right are
OpenPose -> Lineart -> Depth -> SofeEdge -> Video Combine
OpenPose -> Lineart -> Depth -> Video Combine
OpenPose -> Lineart -> Video Combine
OpenPose -> Video Combine
At first glance, it looks like OpenPose works just fine, but that's just because this example happens to work better with OpenPose, you still need to combine ControlNet yourself to get better results.
Follow up
There are a couple of things we usually do after the process,
Upscale the video
Face retouching (Face detailer)
Repainting
There is no certain way to do this, the combination depends on personal habits, there is no fixed form, there is a ready-made method on my Github, interested parties can refer to it.
AnimateDiff_vid2vid_3passCN_FaceDetailer
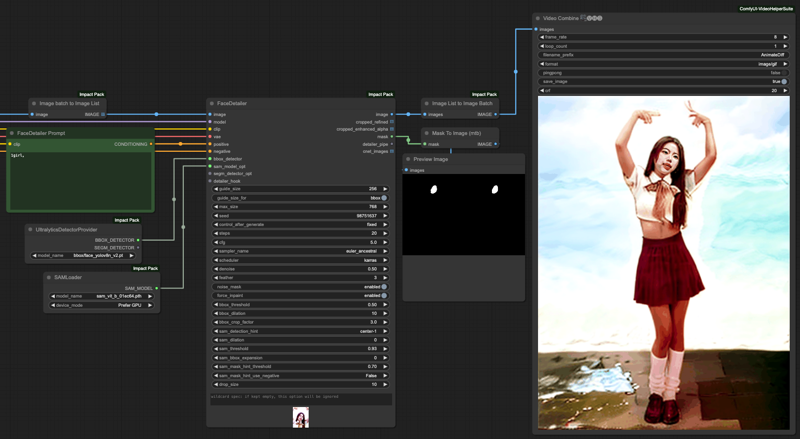
If you want to do face retouching, here is a reminder, the IMAGE output from VAE Decode will be in the form of Image Batch, which needs to be converted into Image List before it can be handed over to the FaceDetailer tool for processing. Similarly, you need to convert it from Image List back to Image Batch before you can send it to Video Combine for storage.
Final
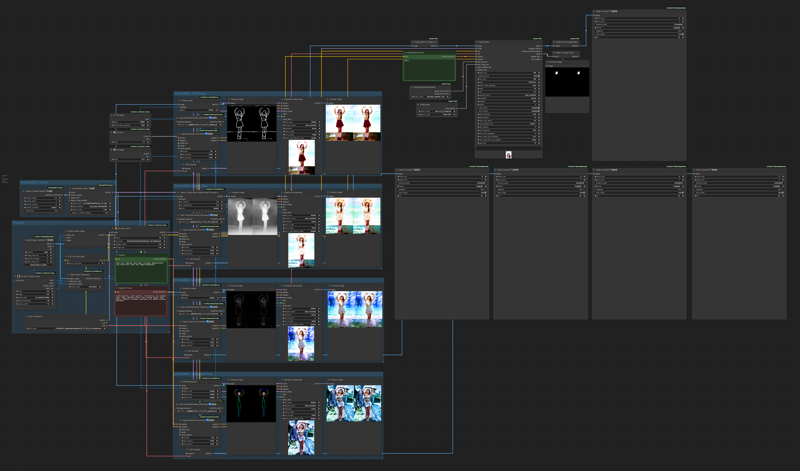
Although AnimateDiff has its limitations, there are many different ways to do it through ComfyUI. But honestly speaking, if you want to convert an image to a very detailed one, it may take 2 hours to process a 24-second movie, which is actually not cost-effective when you do some math. Finally, here is the workflow used in this article, interested parties can study it by themselves.


![[GUIDE] English Version for AnimateDiff Workflow with ControlNet and FaceDetailer](https://image.civitai.com/xG1nkqKTMzGDvpLrqFT7WA/f8bbe0ff-d3d6-4b65-91c6-db20f4b4e591/width=1320/f8bbe0ff-d3d6-4b65-91c6-db20f4b4e591.jpeg)