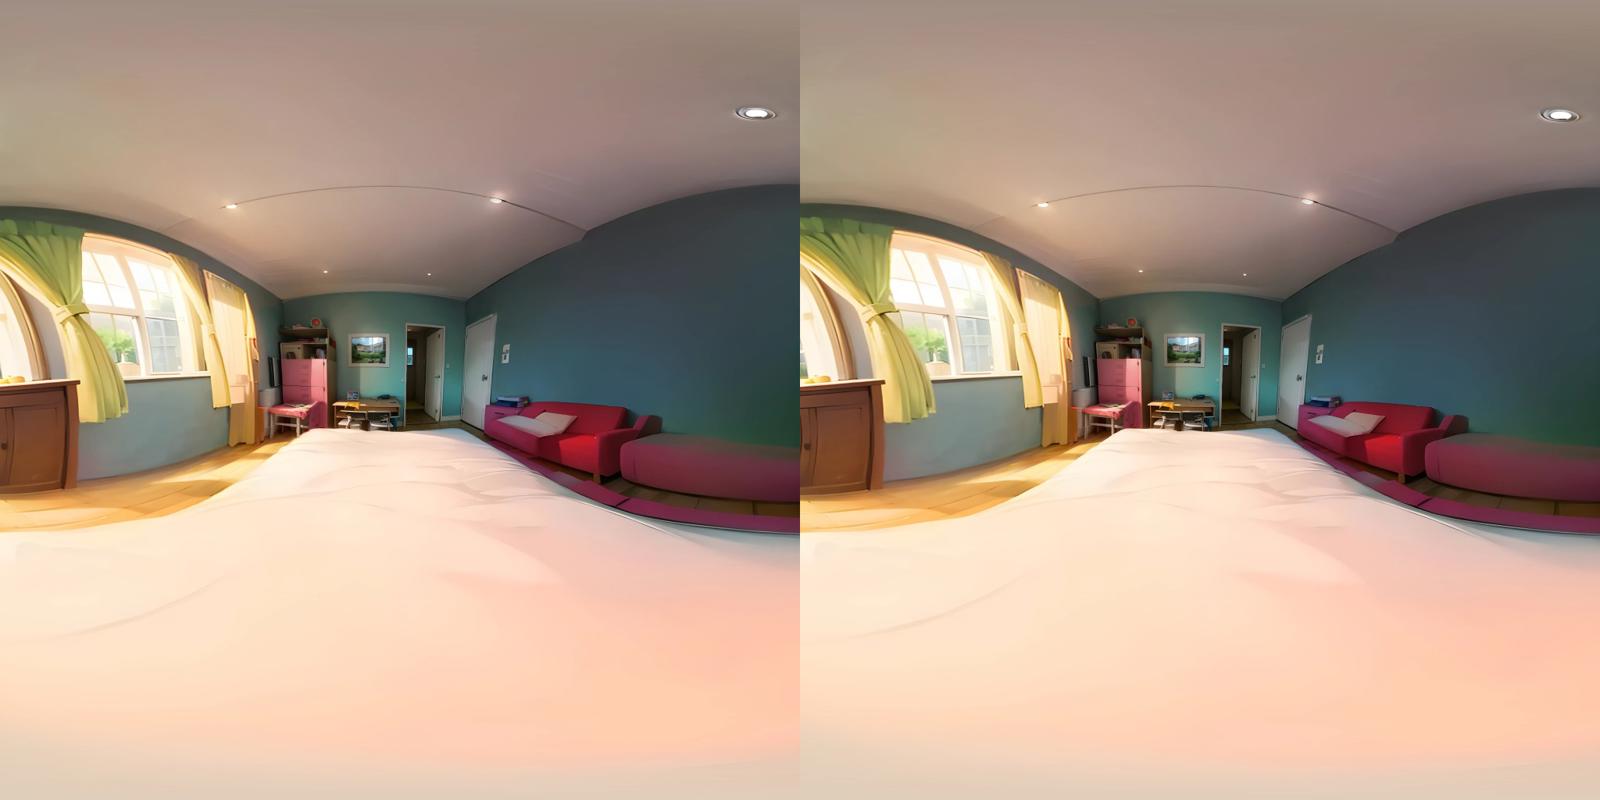
This is an attempt at a hands-on, results focused type of guide. It describes a sample workflow that you can use to get side-by-side 180 degrees stereograms that make sense while being viewed in a VR headset.
This workflow is not particularly optimized, but it is a workflow in which I learned about what Stable Diffusion was good and bad at, and adapted on the spot. I hope that you can also learn from this workflow and adapt it to your own knowledge.
What we are aiming to do
So what's a side-by-side 180 degree stereogram? Here is an example.
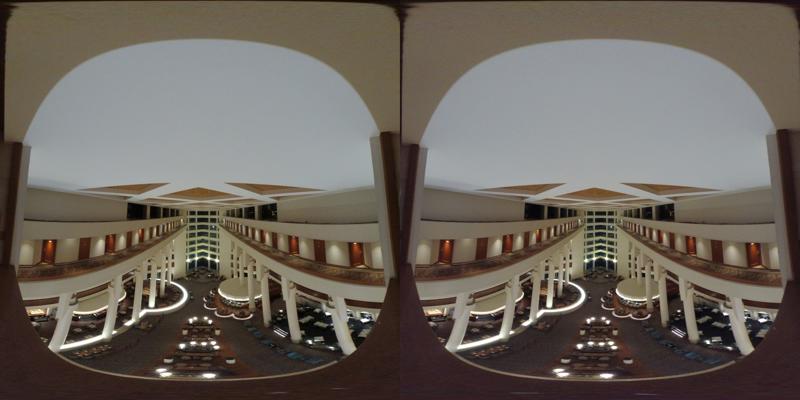

Credits: Hotel David Intercontinental, Tel Aviv, taken by Jochen Möller
Notice the features of this format: left side and right side, visible lens distortion going from center and especially strong on edges. At a first glance, it doesn't look like that kind of content is going to be very friendly to your models if they haven't been specifically trained on that kind of footage.
Fortunately, we can fix some of that through ffmpeg's v360 filter, going from hequirect to fisheye (more on that later).


This looks more manageable, although there is still distortion in there. But at least we know that fisheye lenses exist and models have been trained on that kind of footage at least partially.
Prerequisites
You already know how to use Stable Diffusion to generate 2D, flat content that you personally enjoy. Though you could pick up the basics on the spot by following this guide, I do advise you to experiment with 2D content first.
You have the GIMP image editor installed. If you know how to perform the tasks described here with another software, feel free to do so, but I will only be covering my point of view using GIMP. I'm assuming you're at least familiar with the basics of using layers.
You have
ffmpeginstalled somewhere (most conveniently available in your PATH) and know how to use it through the command line.
You have at least AUTOMATIC1111's web UI installed. It doesn't really matter with which UI you generate pictures with (I use EasyDiffusion personally), but the depthmap extension is most conveniently used on A1111's UI.
That's about it! Let's dive into it.
Getting a baseline image
There are multiple approaches to this. You could either go from an existing image (pre-generated or real, it doesn't really matter) or generate your own on the spot. You can even take a picture of your own bedroom or living room as a baseline: don't expect to be able to build a VR version of it right away, but seeing how reality gets altered throughout the steps is pretty interesting.
For this guide, I went with generating images until I caught something that I thought was usable as a baseline. As we're only generating a baseline, we can start with a relatively low resolution (I used 512x512, upscaled 4x with ESRGAN, but that's probably already too much).
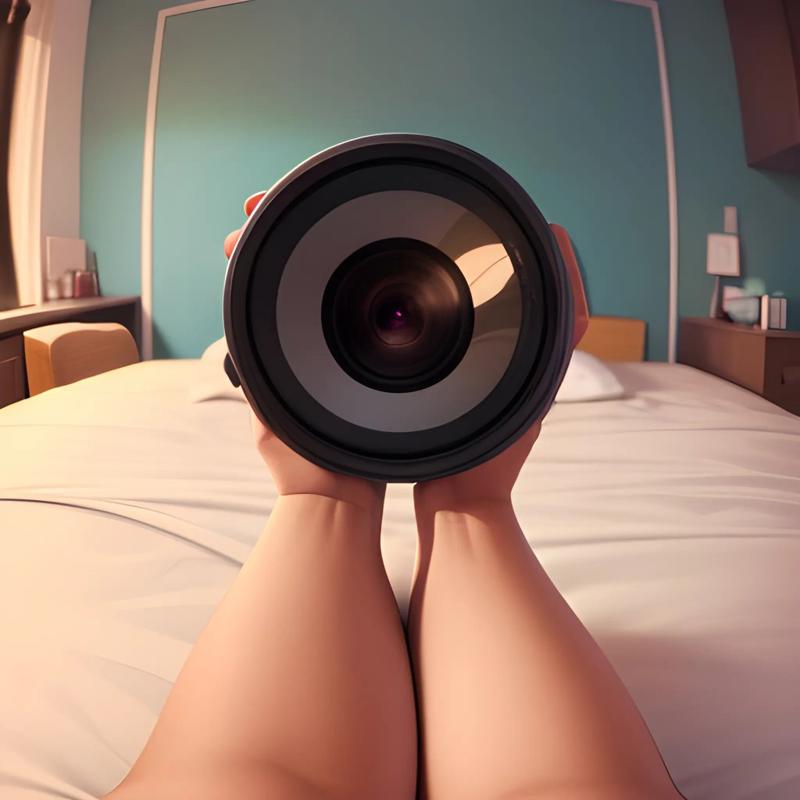

Prompt: background, no people, straight angle, fisheye lens, indoors, bedroom, windows, curtains, ceiling
Negative prompt: FastNegativeV2, (low quality, worst quality: 1.4), artifacts, monochrome, grayscale, watermark, logo, text
(Important note: Do not expect to get the same kind of outputs I got. It is all dependent on the model you use and whether you can find a good seed for it. This is just an example workflow. I was also running this on a laptop RTX 3060 so you may have to tweak your resolutions accordingly depending on your own specs. Feel free to just steal the baseline image above as an img2img input if you really wanna follow along. I ended up using AbyssOrangeMix2 as a model for this workflow but you can really use anything.)
Alright, so turns out fisheye lens can be taken quite literally. Anyways, I tried going with fisheye angled content in order to try and get a good view of both walls of the bedroom, left and right. Since we're aiming for a fisheye image, might as well go all in from the start.
Turns out it isn't that easy (and I'm not really that good at prompting). I also was specifically looking for a point of view from a bed, and this is the best I got. Fortunately, we can steer Stable Diffusion towards the direction we want through manual editing.
GIMP smudge tool, my beloved
We want to get rid of the hands, arms and literal fisheye lens. In order to do this, we are going to roughly smudge them out going from the bed to the stuff we want to get rid of.


As you can see, this is a very rough job, but Stable Diffusion can fix that job for us. Let's do an img2img, prompt strength 0.5 to roughly preserve the structure we already have, but with room to fix the mess that we've just made.


img2img input: The smudged image
Prompt: background, no people, fisheye, indoors, bedroom
Negative prompt: FastNegativeV2, (low quality, worst quality: 1.4), artifacts, monochrome, grayscale, watermark, logo, text
Prompt strength: 0.5
Looks clean enough! There's a pillow at the end of the bed I'm not really fond of, but we can fix that the same way as we did before (smudging). Don't mind the left-side lamp clipping for now, it doesn't really matter.
Anyways, I mentioned that I wanted to have a good view of both walls left and right of the bedroom, and we don't have that yet. Let's expand the canvas on GIMP a little bit.

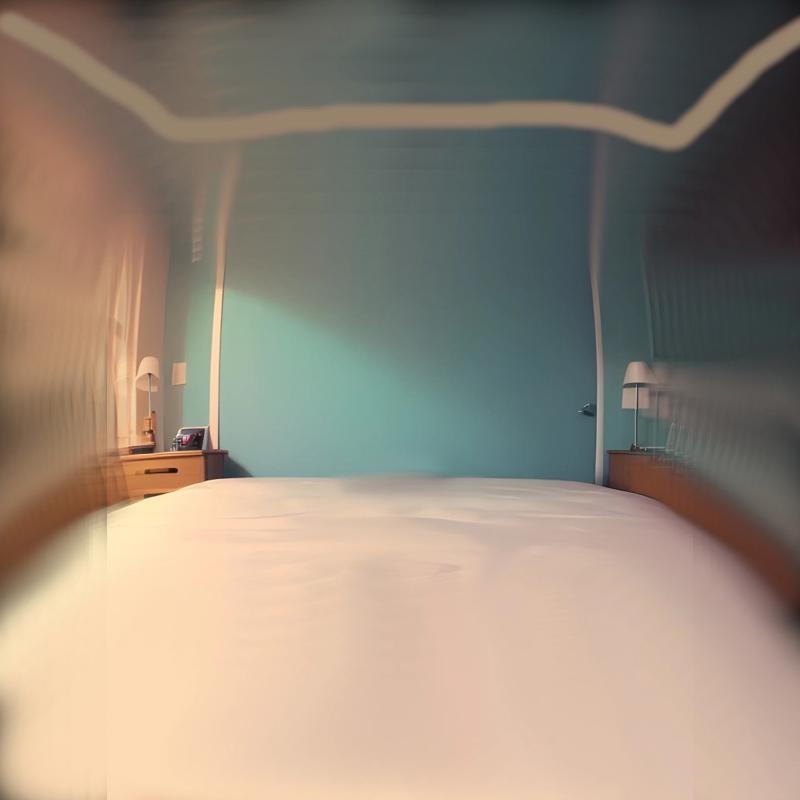
As you can see, more smudge happened, and a very rough ceiling outline was attempted. You can get some rough proportion references from looking at similar pictures taken with a fisheye lens, but it doesn't matter if you get them a bit wrong as your models will likely know how to deal with fixing it.
Let's try a couple of img2img with varying strengths.
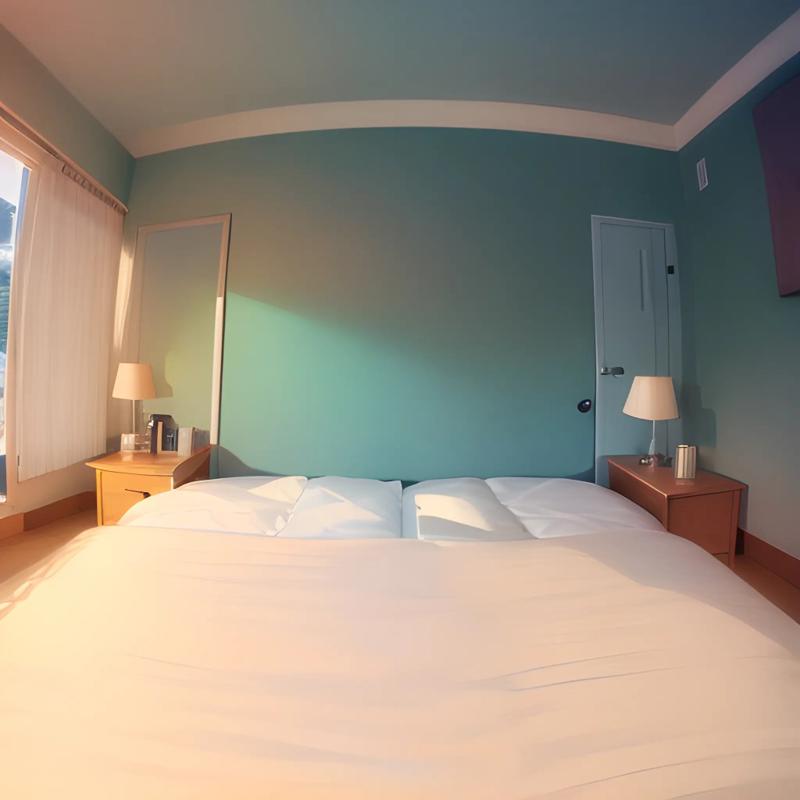

img2img input: The smudged image
Prompt: background, no people, fisheye, indoors, bedroom
Negative prompt: FastNegativeV2, (low quality, worst quality: 1.4), artifacts, monochrome, grayscale, watermark, logo, text
Prompt strength: 0.5
Alright, that fixes a lot of my mess, but the background still isn't particularly convincing. Let's use this as our img2img input and increase the prompt strength.
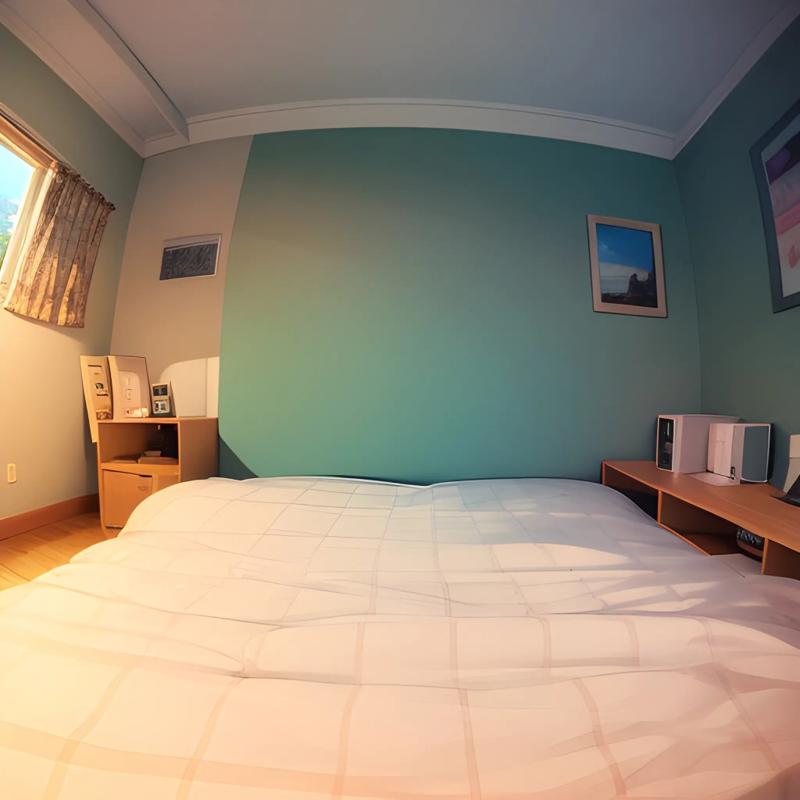

img2img input: The output we just got
Prompt: background, no people, fisheye, indoors, bedroom
Negative prompt: FastNegativeV2, (low quality, worst quality: 1.4), artifacts, monochrome, grayscale, watermark, logo, text
Prompt strength: 0.6
Alright, we're getting somewhere, there's a bit more furniture and we got rid of the lamps on the way. But we can do better, let's use this as our img2img input and increase the prompt strength even further.
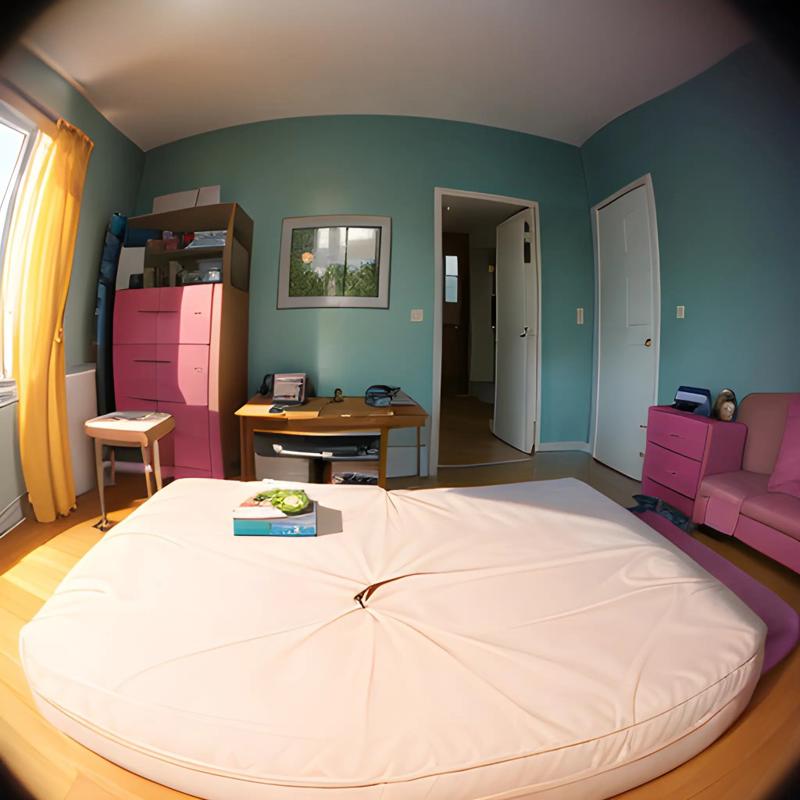

img2img input: The output we just got
Prompt: background, no people, fisheye, indoors, bedroom
Negative prompt: FastNegativeV2, (low quality, worst quality: 1.4), artifacts, monochrome, grayscale, watermark, logo, text
Prompt strength: 0.7
Ok, now that's a proper bedroom. However, you will notice that our bed went from vertical to horizontal, and that is not what we want. It does seem like our point of view isn't particularly favored by our model.
We can however fix this by merging this output with a previous one we have, along with some good ol' smudge to clean up our bed from undesired items.

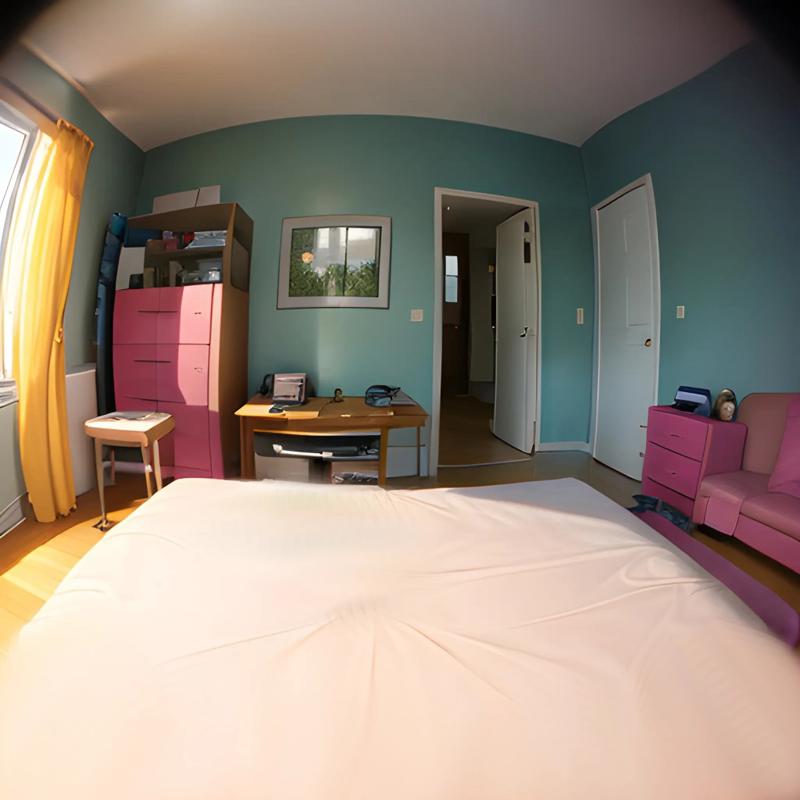
Let's img2img that, with a lower prompt strength to preserve that structure. Let's also increase the resolution (1024x1024, upscaled 4x with ESRGAN) since I'm pretty confident that this is close to be the final render.
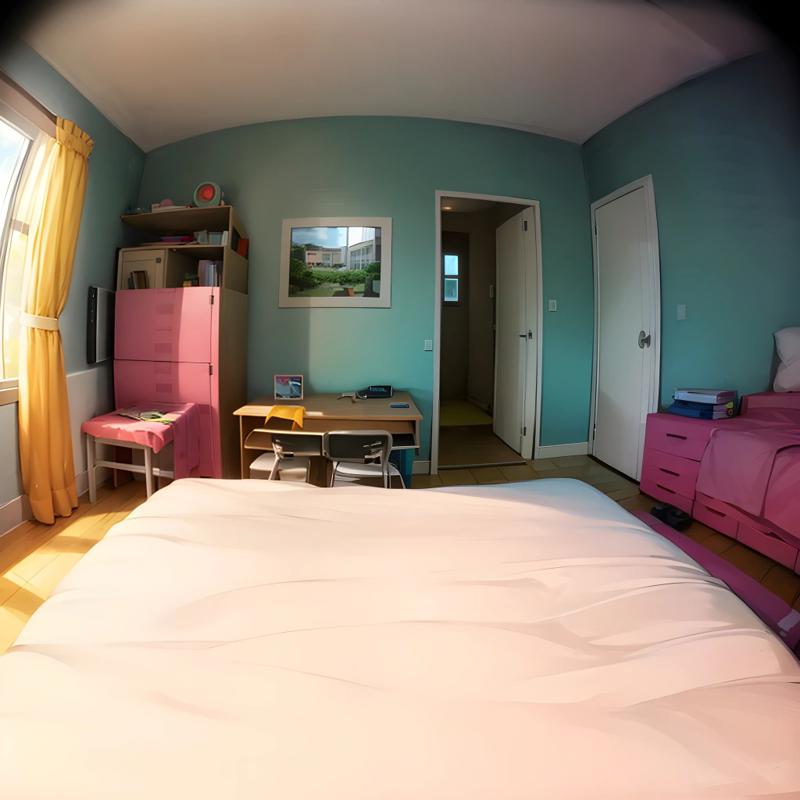

img2img input: The merged and smudged image
Prompt: background, no people, fisheye, indoors, bedroom
Negative prompt: FastNegativeV2, (low quality, worst quality: 1.4), artifacts, monochrome, grayscale, watermark, logo, text
Prompt strength: 0.3
Looks good enough! We're good to go for the next phase.
Making the stereogram
You will need to install the depthmap plugin on A1111's UI. Once you do that and restart, you should get a "Depth" tab. Let's slide our image in, and ask for a stereogram from it.

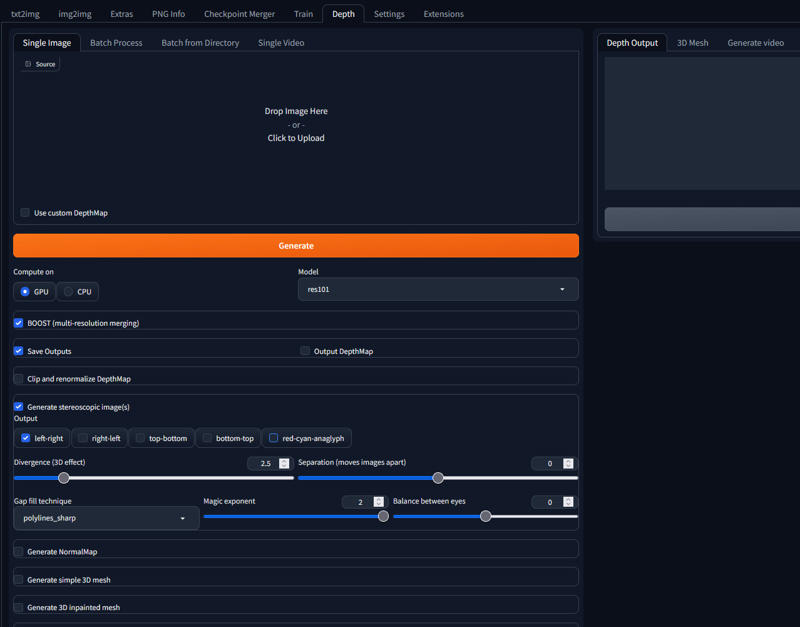
The settings that you see are pretty much the default settings and they should already net you something decent. Feel free to experiment with 3D strength and distance between images as they might give you a different 3D experience.


Cool! However, we still need to perform some transformations before we can get a true VR friendly, side-by-side 180 experience. Let's separate our stereogram between left and right.


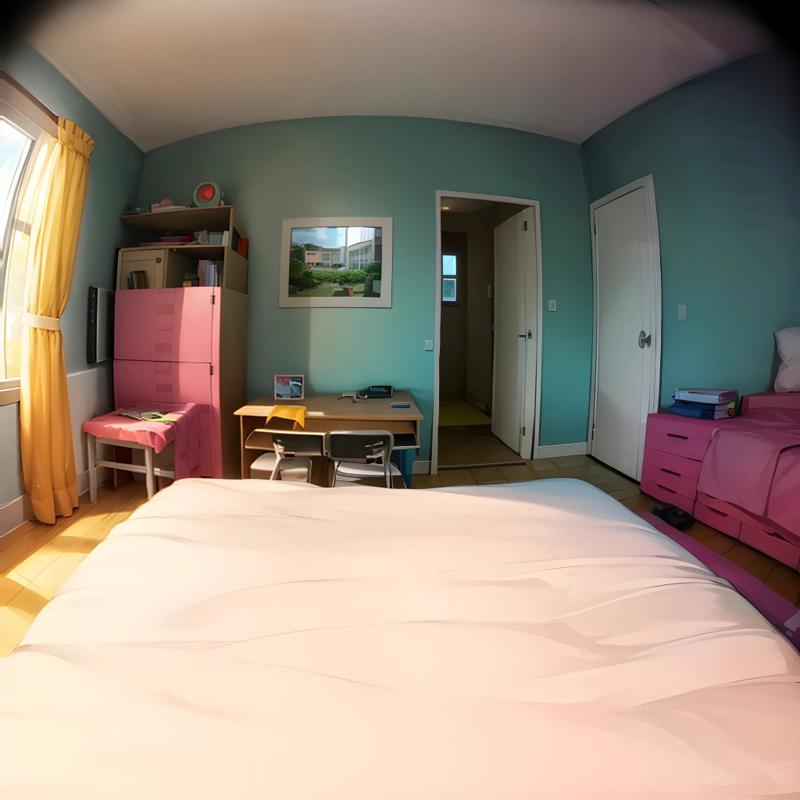

Now, open your command line and perform the following ffmpeg command on both sides (adapt .png file names respectively, obviously).
ffmpeg -i left.png -vf -v360 input=fisheye:output=hequirect left-equirect.png
You can read more about what the ffmpeg v360 filter does here, but we can essentially convert between different formats of panoramic content with it. Anyways, let's see what we got.


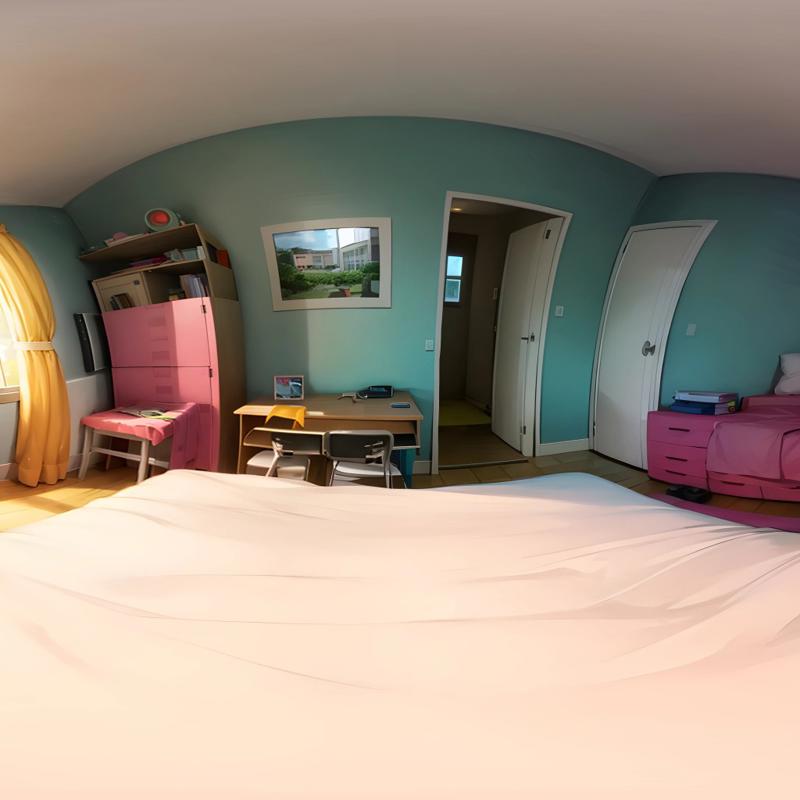

Alright, this looks pretty VR friendly to me! Let's merge them back and test it out.


To preview 180 SBS images, you can use this web app but you can also use whatever you're most comfortable with and what's most compatible with your VR hardware if you have it. Some other options include DeoVR, GizmoVR...
Let's see what it looks like inside there.


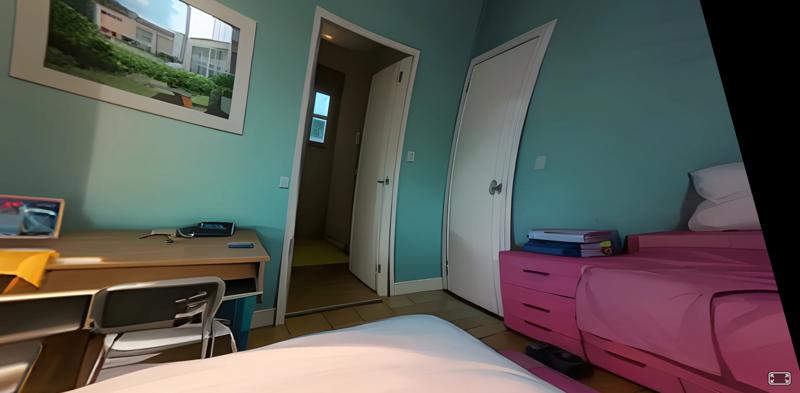
There's a few notes to take away from that:
We are actually on the edge of the bed. It didn't look like we were, going from the fisheye content that we generated, but distortions work in funny ways.
The door on the right (among other things) is very visibly lens distorted, so we need more fixes in order to rectify that.
Outside of that, the result looks relatively clean and high quality!
Let's work towards fixing the first 2 items.
And we distort some more
Let's open up the left side fisheye view again on GIMP. GIMP features tools that can deal with lens distortion: let's try it out (in the top bar menu: Filters > Distorts > Lens Distortion).


As you can see, the effect is fairly minor, even with "Main" at -100. So we perform the transformation twice on the image.


Looks like we got more of the inward walls, which is a good sign. Ignore the fact that those are covered by black blotches for now. Let's try running ffmpeg on those again, merging them back and previewing the result.


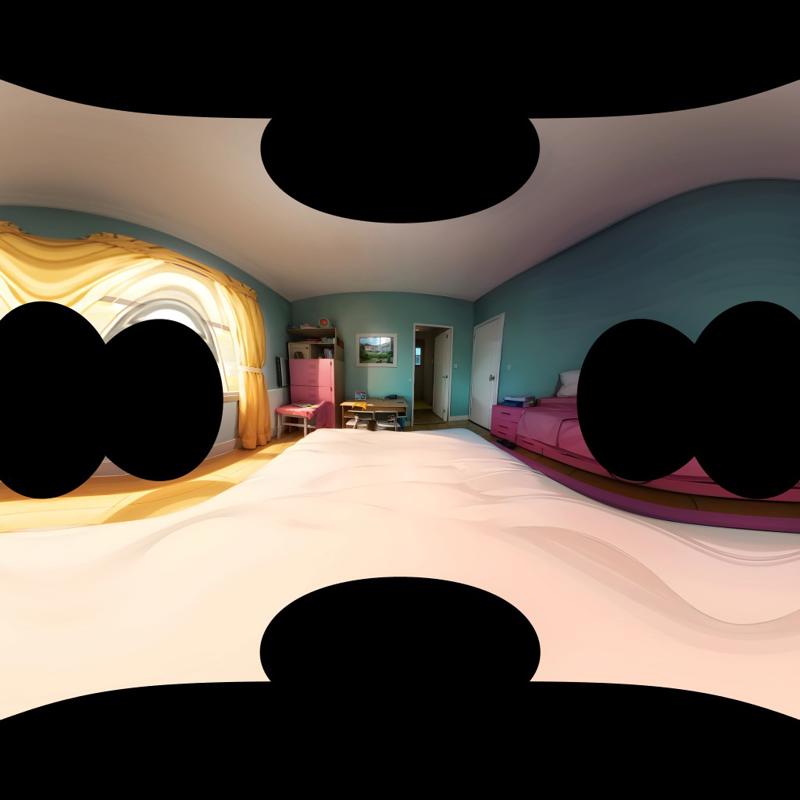

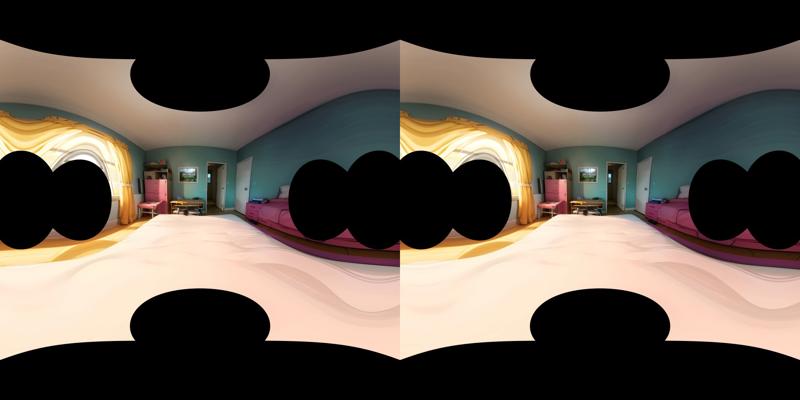


By virtue of what we generated being more in the center, we managed to fix the right door warp issue! It also looks like we got the bed depth just right.
As you can see, lens distortion can be particularly useful to shift your perspective further or closer within this bedroom. From the looks of it, if we can manage to fill those black blotches in, we should be able to expand upon our bedroom! So let's do exactly that.
Expanding your universe
So we're smudging again. Let's just take the left side of our fisheye stereogram, we will have to regenerate a new stereogram again anyway.
Since we're smudging again, there's no point keeping the full resolution as we're back on the drawing board, so we can go back to 512x512 (or lower).


A bit of img2img, mid strength to preserve structure
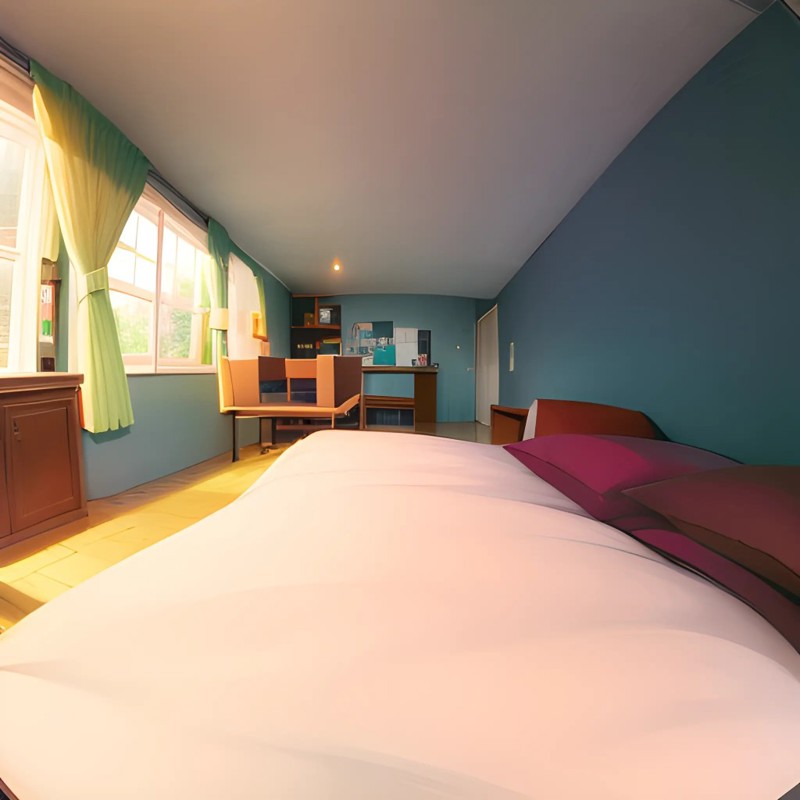

img2img input: The smudged image
Prompt: background, no people, fisheye, indoors, bedroom
Negative prompt: FastNegativeV2, (low quality, worst quality: 1.4), artifacts, monochrome, grayscale, watermark, logo, text
Prompt strength: 0.4
Left side looks almost okay, however, our bed has turned horizontal again... This is going to be a pretty recurrent issue with this uncommon image format, so we will use another common Stable Diffusion tool that we fortunately have: inpainting.
Let's start with the right side (your inpainting interface will most likely be different if you're not using EasyDiffusion, but you should get what needs to be done).
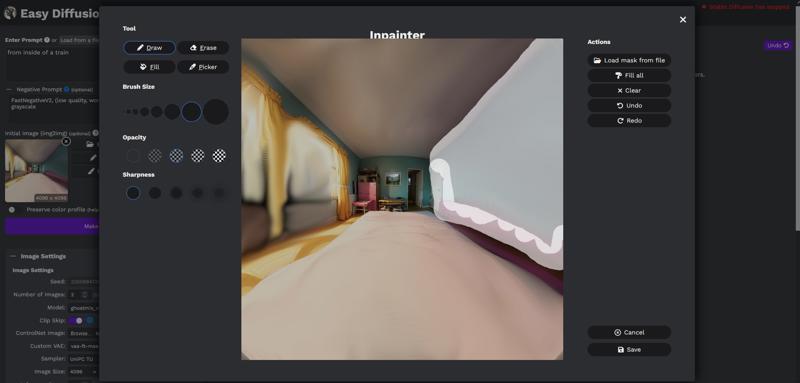
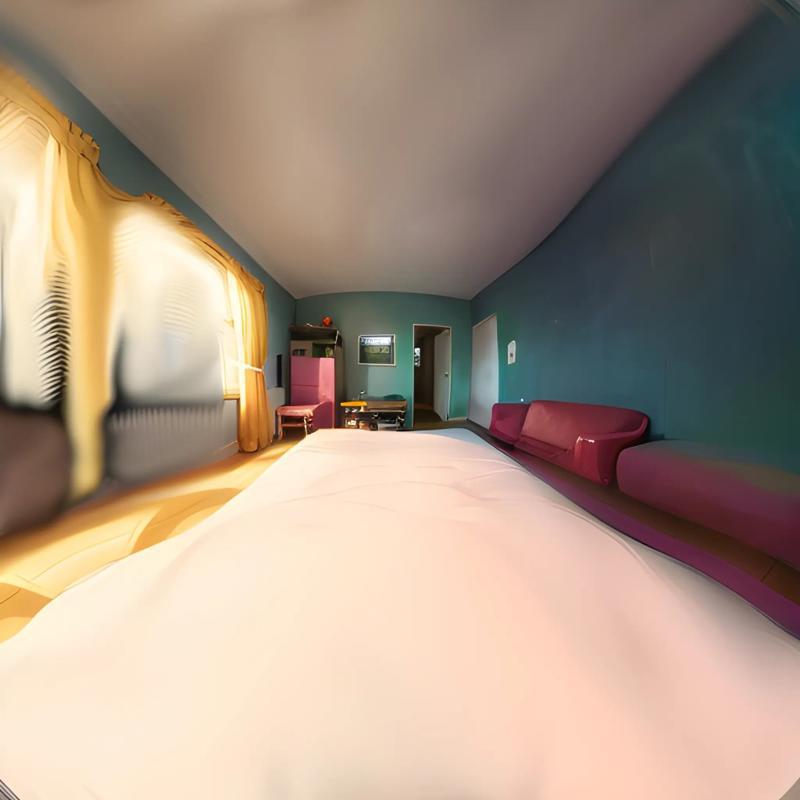


img2img input: The smudged image, inpainting right wall, preserve color profile
Prompt: background, no people, fisheye, indoors, bedroom, furniture, wall
Negative prompt: FastNegativeV2, (low quality, worst quality: 1.4), artifacts, monochrome, grayscale, watermark, logo, text
Prompt strength: 0.6
Looks a bit empty, but it's okay for now. To the left.


img2img input: The inpainted output, inpainting left wall, preserve color profile
Prompt: background, no people, fisheye, indoors, bedroom, windows, curtains
Negative prompt: FastNegativeV2, (low quality, worst quality: 1.4), artifacts, monochrome, grayscale, watermark, logo, text
Prompt strength: 0.6
Alright, cool! Now while we're at it, let's add some stuff to the ceiling.


img2img input: The inpainted output, inpainting ceiling, preserve color profile
Prompt: background, no people, fisheye, indoors, bedroom, ceiling, lights
Negative prompt: FastNegativeV2, (low quality, worst quality: 1.4), artifacts, monochrome, grayscale, watermark, logo, text
Prompt strength: 0.6
It looks like our model has actually taken the angle into account! From the looks of it, the particular ceiling shape helped put the lights where they need to be.
This also shows the point of inpainting: it allows you to worry about one extra thing at a time.
Let's consolidate what we have by performing another img2img, low-mid strength to preserve structure, at full resolution again (1024x1024, upscaled 4x).


img2img input: The inpainted image (this time without inpainting)
Prompt: background, no people, fisheye, indoors, bedroom
Negative prompt: FastNegativeV2, (low quality, worst quality: 1.4), artifacts, monochrome, grayscale, watermark, logo, text
Prompt strength: 0.4
We lost one (1) light on the left, but I'll call it good enough for now! However, let's overlay the background from the smudged original on this result.


As you can see, we lost a good amount of detail in the background, and that is most likely due to loss and artifacts incurred by downscaling and upscaling back and forth. However, since we used relatively low prompt strength to fill in our blotches, we can actually merge the original background with our new render (put the images as layers on top of one another and use the GIMP eraser with Hardness 75, 50 or 25), and it actually looks fairly seamless!


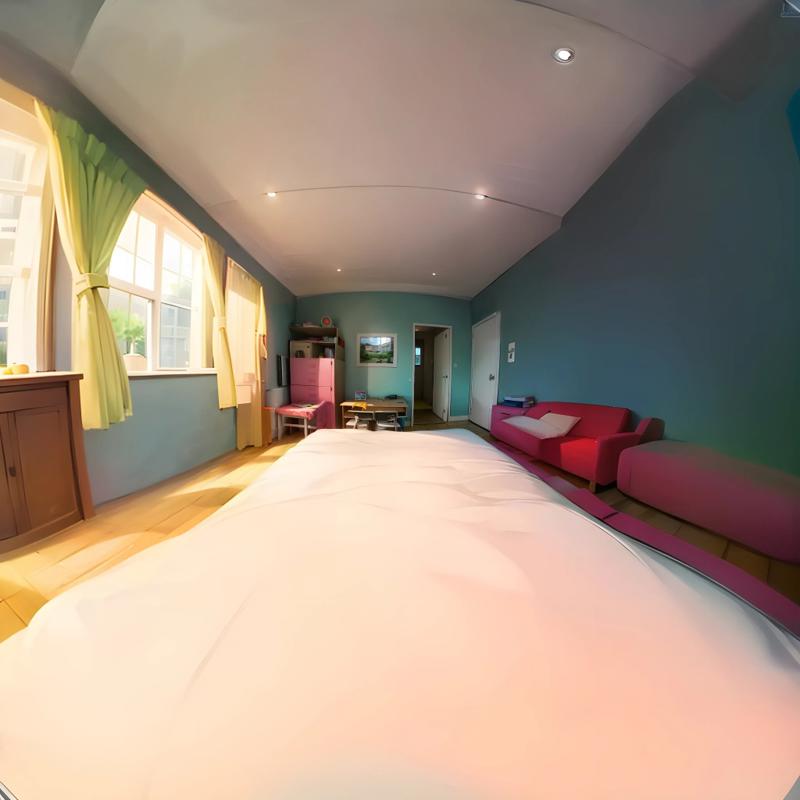
Another approach we could attempt is re-img2img'ing portions of our image with a lower upscale (or no upscale at all). Well, if we had enough resources to render the full 4096x4096 image without upscaling, we would do so, but it is incredibly demanding so we have to compromise.


However, unlike inpainting, Stable Diffusion doesn't get the context required to make merges as seamless as it was for the original background. All hope isn't lost however, as you can crop and delimit regions of your images that feel continuous enough.
In this example, cropping the left side wall from the ceiling to the floor, including the entire curtains, would most likely be a good approach. Additionally, you'll want to leave a good amount of margin in order to merge back that portion gracefully in your image editor. GIMP's eraser on Hardness 75, 50 or 25 is particularly useful to fix and erase sharp edges and transitions. I actually like the control that this strategy gives me compared to straight inpainting.
However, this guide is already getting lengthy, so we will just stop at the background merge that we just did before. Perfectionism is left as an exercise to the reader.
Final results
Let's do the stereogram, split, ffmpeg, and merge dance back again.


Let's see how it looks like.


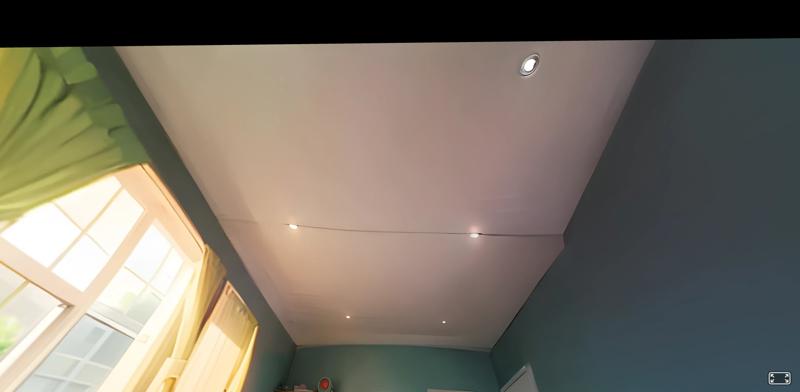

This looks pretty good! There's still some amount of distortion on the edges, but we have essentially done 80% of the work towards perfection! And I would say there's such a thing as "good enough" anyway.
Extra steps towards fixing edge distortion can involve applying more subtle lens distortion on GIMP again, but getting the right values will require a lot of trial and error depending on what Stable Diffusion gave you to work with.
Make sure to save the results that you liked in order to potentially reuse them as img2img sources, or even train your own LoRA or style to help you generate those results faster!
Further inpainting, and going for 360
It sort of just dawned on me after writing this guide and experimenting some more, but there's another ffmpeg v360 conversion that is particularly useful if you're going to work further on inpainting and fixing details.
The c3x2, c1x6 and c6x1 formats can output cube maps: essentially 6 different square images that display a flat image looking straight ahead, left, right, down, up and behind. Let's take a 360 equirectangular picture, convert it and see what it yields us.
ffmpeg -i 360-equirectangular.png -vf -v360 input=equirect:output=c3x2 360-c3x2.png

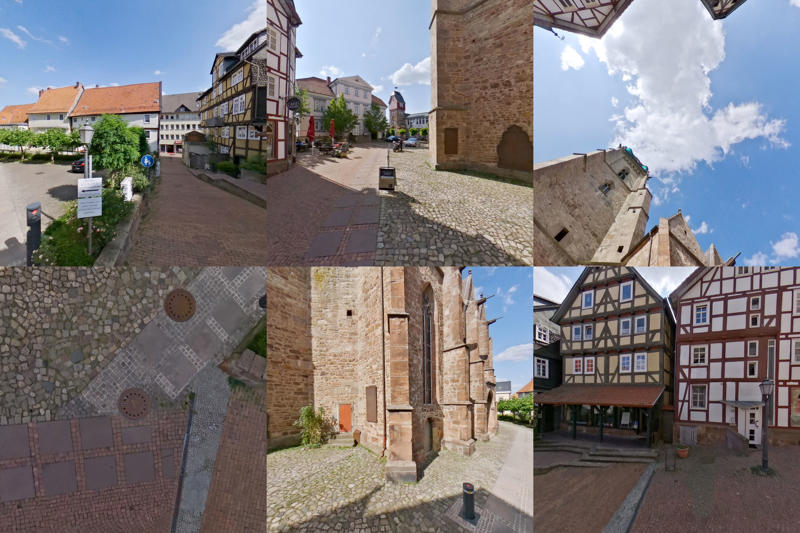
Credits: Bad_Wildungen_Stadtkirche, by j.nagel
As you can see, the 6 cube map faces are perfectly flat and very much SD friendly! We still have to resort to fisheye at first to roughly generate the 180 outline because generating and stitching cube map faces together would probably be a huge pain, but cube maps can be particularly useful in order to fix those remaining bits of distortion, and to generate further angles than just 180 degrees.
I'm still in the process of experimenting as I'm writing this, but I believe you can pretty much rotate your point of view if you mix the order of the cube map faces, which if you go back and forth with fisheye can allow you to outpaint your way from 180 to 360.
Another approach instead of going for fisheye at first is to straight up generate 360 equirectangular content if you know that your model has been trained on that kind of content.
Summary and conclusion
In this process, we learned a fair amount of tools and strategies:
Smudging and editing outputs and feeding them back into img2img
Using different prompt strengths for different purposes
More smudging and editing in order to expand an image to perform "guided outpainting"
Merging and editing parts of different outputs together
Using the depthmap plugin to generate SBS stereograms
Using ffmpeg's v360 filter to transform and distort images for VR
Navigating and viewing 180 SBS stereograms
Using lens distortion to alter perspective and as another tool for "guided outpainting"
Using inpainting to focus and target areas
Manually cropping images and merging back as a "poor man's inpainting"
Dealing with upscaling artifacts by mixing different outputs and crops
There's a whole rabbit hole of other variations, devices and techniques you can try and use in order to get more polished results, but you're on your own from now!
Thank you for following and reading all the way through. I hope you were able to learn something from this!

