Intro
In this guide, we'll explore the steps to create a small animations using Stable Diffusion and AnimateDiff. For this workflow we are gonna make use of AUTOMATIC1111. This guide will covers various aspects, including generating GIFs, upscaling for higher quality, frame interpolation, merging the frames into a video and concat multiple video using FFMpeg.
Prerequisites
Steps
Step1: Setup AnimateDiff & Adetailer
Begin by installing the AnimateDiff extension within the Stable Diffusion web user interface going into the extension tab.
Select "Available" then press "Load from:"
Type "Animatediff" inside the search bar and press install.
After installation, make sure to download the motion model below and place it inside the "stable-diffusion-webui/extensions/sd-webui-animatediff/model/" directory.
Motion Model: mm_sd_v15_v2.ckpt or the new v3_sd15_mm.ckpt.ckpt
Download the Domain Adapter Lora mm_sd15_v3_adapter.safetensors and add it to your lora folder.
After successful installation, you should see the 'AnimateDiff' accordion under both the "txt2img" and "img2img" tabs.
Navigate to "Settings" then to "Optimization"
Enable "Pad prompt/negative prompt to be same length"
Restart the interface.
Repeat step 1 - 2 but his time search for "Adetailer"and press install.
Restart again the interface.
Step2: Generate an Animation
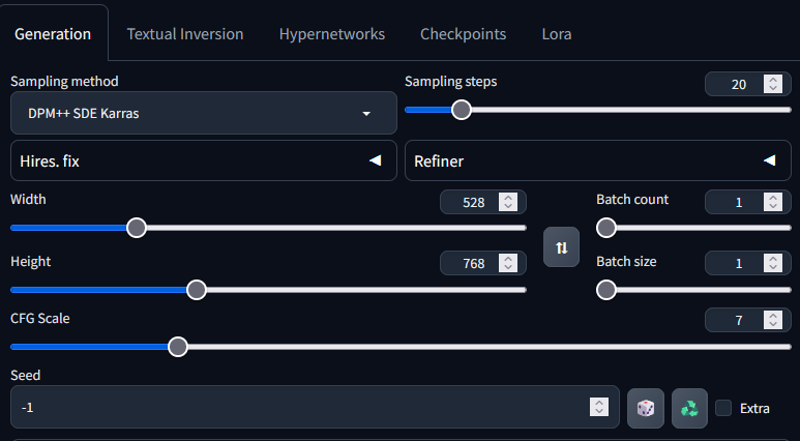
Navigate to the "txt2img" tab and select the DarksushiMix2.5D and set as below:
Sampling DPM++ SDE Karras;
Step 20;
CFG scale 7;
Desired/capable resolution based on your GPU. (I use 512x768);
Remember: Add into the prompt the new Domain Adapter Lora if you are going to use the mm_v3, suggested weight 0.5.

Set animatediff as shown below:
Model mm_sd_v15_v2.ckpt or v3_sd15_mm.ckpt.ckpt
Number of frame 16;
FPS 8;
Frame interpolation Off;

Click "Generate" to initiate the process. Once it's done, you'll find a GIF in the AnimateDiff folder and 16 PNG frames inside the "txt2img-images/<date>" folder. Generate multiple versions and select the best one, then copy the 16 PNG frames to a separate folder.

Step3: Upscaling
With 16 PNG in a separate folder, proceed to the "img2img" tab and set:
Prompt: same as generation;
Negative Prompt: same as generation;

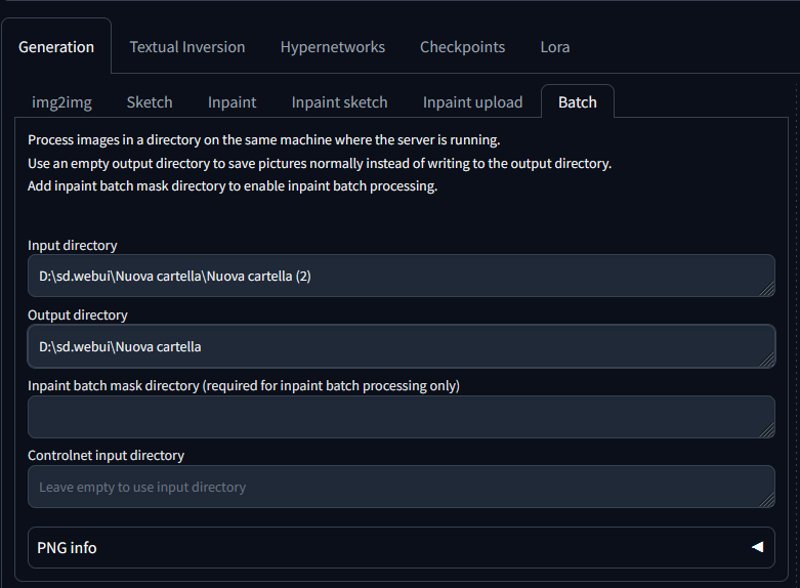
Select "Batch" tab:
Input directory: the folder path with 16 PNG images;
Output directory: the folder path where you would like the output imgs;

Set as below the settings:
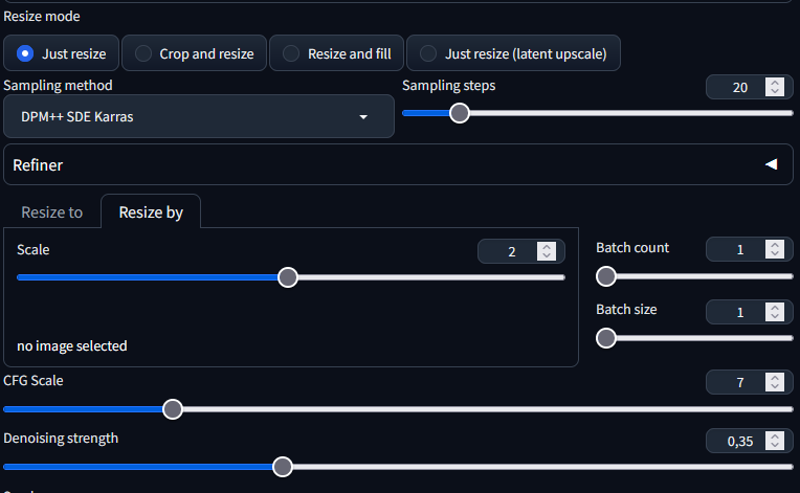
Sampling DPM++ SDE Karras;
Step 20;
CFG scale 7;
Denoising strenght: 0,35;
Resize by based on your GPU and img size. (I use 2);
Seed same as generation;

Expand and enable Adetailer tab:
Keep face_yolov8n.pt as model
Inside the Adetailer prompt i like to insert: the lora, loraname,eyescolor (and more face details if you want);

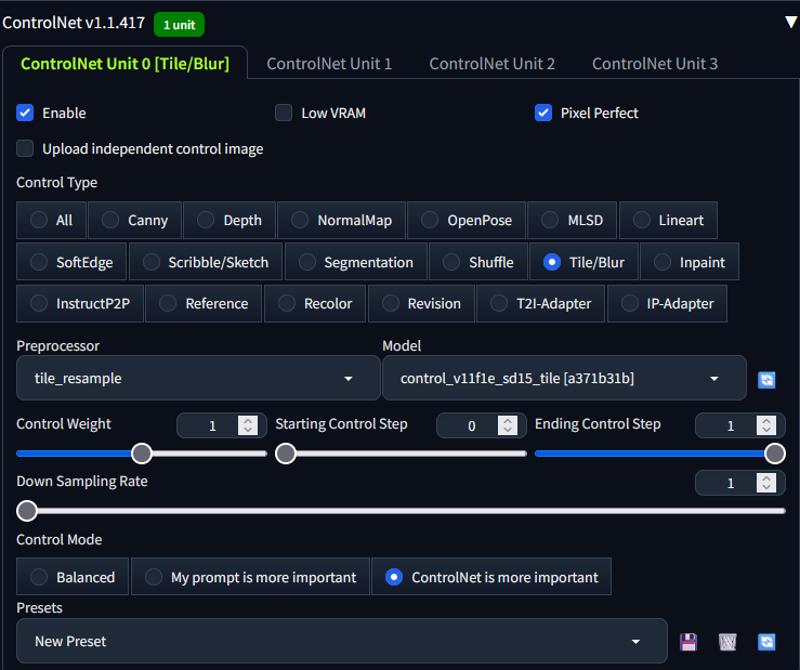
Expand and enable ControlNet tab:
Select Pixel perfect
Control Type Tile/Blur
Preprocessor tile_resample
Model control_v11f1e_sd15_tile (place it inside ...webui\extensions\sd-webui-controlnet\models).
ControlNet is more important

Click "Generate" to process all the images in the input folder. This step may take some time, and once completed, you'll have 16 upscaled images in the output folder.
Step4: Frame Interpolation with RIFE
Install RIFE-ncnn-vulkan using the provided link in the prerequisites section.This is what should be your downloaded folder:

Open a command prompt inside the folder and execute the following command, specifying your input and output directory paths (you can even drag and drop folder inside teh CMD)
rife-ncnn-vulkan.exe -i input_folder -o output_folderThis command generates interpolated frames between every two frames, resulting in double the number of images in the output folder compared to the input.
Repeat this operation until you reach a total of 128 images, following this sequence:
16 → 32 → 64 → 128 images
Remove the last 8 images to have a final number of 120.
Step5: Merging Frames with FFMpeg
Ensure you have FFMpeg installed on your system.This is what should be your downloaded folder inside the ffmpeg-master-latest-win64-gpl\bin\

Open a command prompt inside the folder and run the following command to merge the frames into a video:
ffmpeg -framerate 60 -i folder_with_120_imgs_path/%08d.png -crf 18 -c:v libx264 -pix_fmt yuv420p output.mp4You will found the output inside this path "ffmpeg-master-latest-win64-gpl\bin\"
Step6: Concat multiple videos with FFMpeg
For this step you can use whetever you want, i guess the most used software is TopazAI. I use FFMpeg by naming every merged video with 0.mp4,1.mp4 ... etc.
Inside the Bin folder with FFMpeg i have the generated videos and a txt file called input, the content of this file is:
file '0.mp4'
file '1.mp4'
file '2.mp4'
file '3.mp4'
file '4.mp4'
Open a command prompt inside the folder of FFMpeg and run the following command to concat the video:
ffmpeg -f concat -safe 0 -i input.txt -c copy output.mp4At the end you will find inside the Bin folder a file called output.mp4 as a result of the concatenation of our multiple video!
Check out my post for example outcomes:
https://civitai.com/images/3780695
https://civitai.com/images/3841601
With these steps, you'll be able to create animated Gif using AnimateDiff.
![Animatediff Workflow SD1.5 [OUTDATED]](https://image.civitai.com/xG1nkqKTMzGDvpLrqFT7WA/a987de2b-6c02-4bcd-8477-0ac5a249e553/width=1320/AnimateDiff.jpeg)