Introduction
IP-Adapter provides a unique way to control both image and video generation. It works differently than ControlNet - rather than trying to guide the image directly it works by translating the image provided into an embedding (essentially a prompt) and using that to guide the generation of the image. The embedding it generates would not be understandable in the English language and it can be detailed in a way text prompts struggle (ie. it hard to described the exact type of collar on a shirt or the shape of a partially opened mouth). As it is a bit more hands off it allows for heavier style transfer while keeping coherence.
It relies on a clip vision model - which looks at the source image and starts encoding it - these are well established models used in other computer vision tasks. Then the IPAdapter model uses this information and creates tokens (ie. prompts) and applies them. It is important to know that clip vision uses only 512x512 pixels - fine details therefore can still get lost if too small.
What is exciting about IPAdapter is that this is likely only the start of what it can do. There is no reason why you couldn't create a model that just focuses on say clothing or style or lighting.
You don't need to read this guide to get an understanding of what IPAdapter can do. The person who is developing the ComfyUI node makes excellent YouTube videos of the features he has implemented: Latent Vision - YouTube
This guide assumes you have installed AnimateDiff and/or Hotshot. The guides are avaliable here:
AnimateDiff: https://civitai.com/articles/2379
Hotshot XL guide: https://civitai.com/articles/2601/
**WORKFLOWS ARE ATTACHED TO THIS POST TOP RIGHT CORNER TO DOWNLOAD UNDER ATTACHMENTS**
Please note I have submitted my workflow to the OpenArt ComfyUI workflow competition if you like this guide please give me a like or comment so I can win! Links are here:
System Requirements
A Windows Computer with a NVIDIA Graphics card with at least 12GB of VRAM. There is also a VRAM spike that currently occurs and I will discuss in the Notes Section below
Installing the Dependencies
You need to make sure you have installed IPAdapter Plus. I would find it and install it from the manager in ComfyUI.
You need to have both a clipvision model and a IPadpater model. To save myself a bunch of work I suggest you go to the GitHub of the IPAdapter plus node and grab them from there. He keeps his list up to date - there are new models coming all the time: https://github.com/cubiq/ComfyUI_IPAdapter_plus.
For the purposes of the workflows I have provided you will need the ClipVision 1.5 model and IPadapter plus for both SDXL and 1.5.
IPAdapter Models
This is where things can get confusing. As of the writing of this guide there are 2 Clipvision models that IPAdapter uses: a 1.5 and SDXL model. However there are IPAdapter models for each of 1.5 and SDXL which use either Clipvision models - you have to make sure you pair the correct clipvision with the correct IPadpater model.
When it comes to choosing a model to use for animations the reason why IP-Adapter plus gets used is that is passing 30 tokens forward rather than 4 for regular IP-Adapater - this means more information and more information means tighter control.
It is worth however exploring other models - I have had good results with other models depending on what you are trying to use them for.
Unfold Batch
This is the newest setting as of the writing of this guide and certainly a powerful one. Usually when you give a bunch of images to IPAdapter it encodes each of them and merges them into a single embedding - this means one embedding for the entire animation. That is fine for many purposes, however by selecting batch unfold your batch of images are encoded separately - so you have a unique encode for each image. This way you can do things like have IPadpater follow a video closely or change styles part way through etc. In case you are wondering, if you feed less frames to an unfolded batch node it will simply repeat the last frame for the remainder of the animation.
Node Explanations and Settings Guide
I suggest you do not skip this section, it is likely you may need to tweak some settings to get the output you want. I will discuss them node by node.
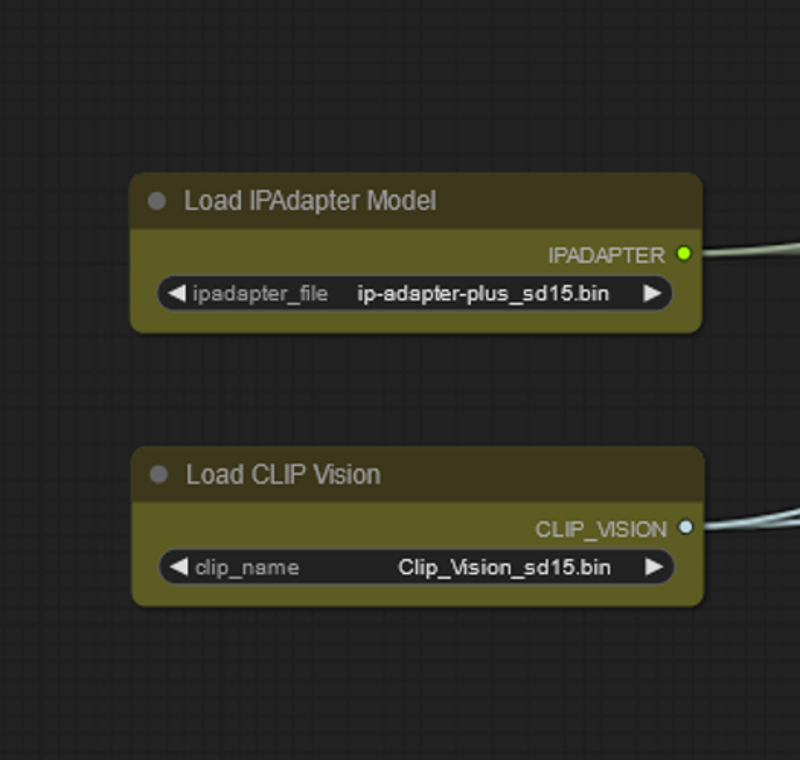
These nodes Load your Make sure your IPAdapter model and Clip Vision models are compatible. There is no reason why you can use different IPadpater/Clip vision models for several different nodes (like multicontrolnet) - do know it will affect VRAM.
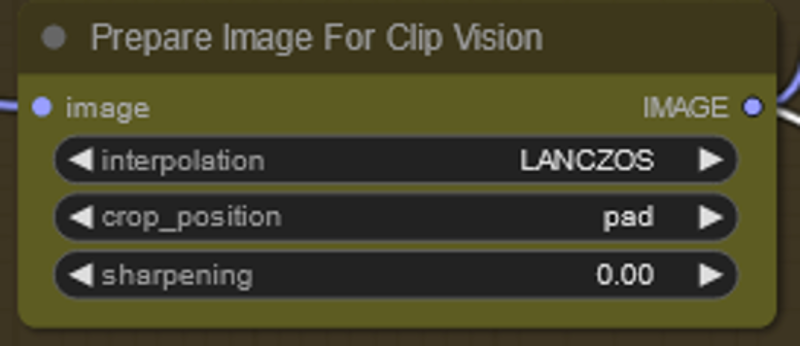
If you do not have this node and your image is not square Clipvsion will take a crop of the middle square of your image. Pad is OK but results in more down scaling. I selected this as a default because it is the most flexible, not because it is the best.
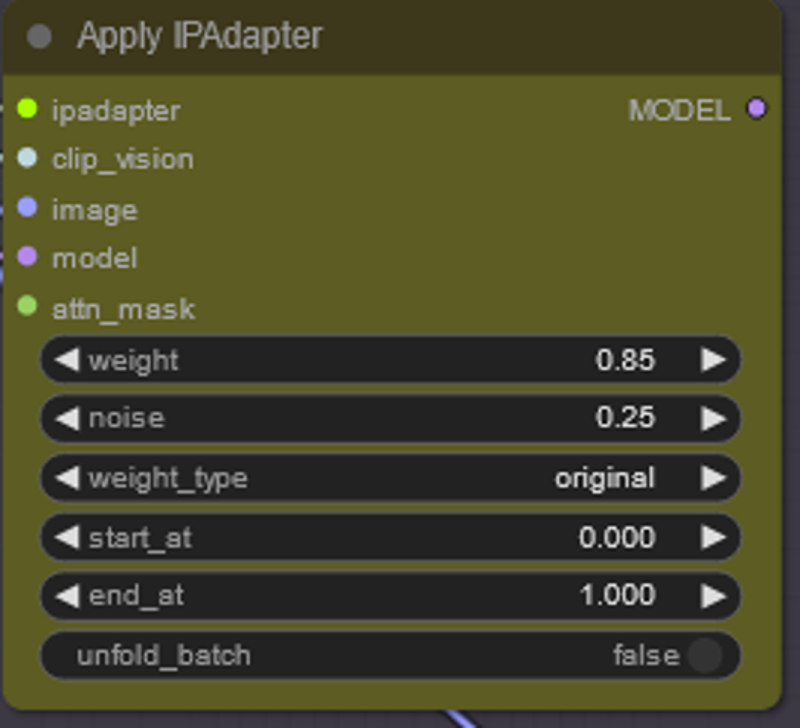
There is a lot to explore here in order to help get what you want and as of the writing of this guide not many people have looked into all the settings. The most important setting is strength and I have used anything from 0.4 to 1 to get good results. Noise helps your text prompt come through a bit more and can make it a bit more flexible.
There is of course the unfold batch option which I discussed above.
As for the start and end are worth exploring and can help with consistency/transformation.

For the workflows provided I have two IPAdpaters. The video reference uses the frames of the original video to guide the transformation in batch unfold mode. For SD1.5 this is the only one needed as most models are very heavily trained. However for SDXL if you use IPAdpater Plus the models will shift to wierd sort of realism - therefore by having a 2nd IPAdpater that references the style we can push back the stylization. Note the Second IPAdpater takes only a single image and is not in unfold batch mode.
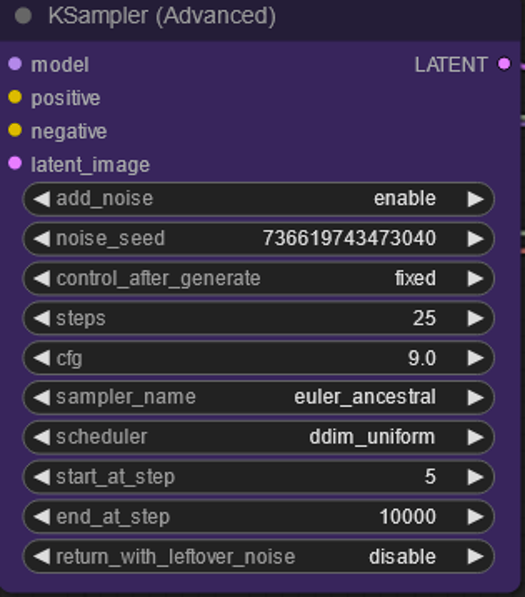
I am just pointing this out - for the workflows provided I am not denoising at 1.0 (see start step is at 5 rather than 0). This provides a bit of structure from the original video while still allowing for a good style transformation - and is easier to use out of the box.
You may need to adjust CFG a bit too if you are burning the image with the IPAdapters
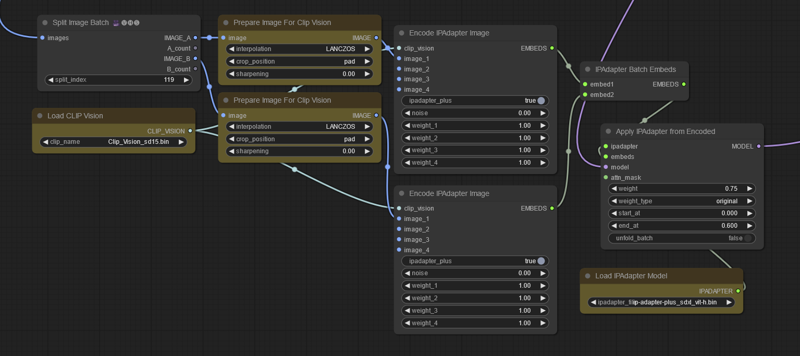
This is a workflow to avoid the vram spike on encoding - just an example in case you have this issue. You are splitting frames and encoding them separately - you could do this multiple times if your video is long enough - if you are starting - don't worry about this workflow - it is just documentation if you hit the vram spike for longer videos.
Making Videos with These Workflows
There are other great ways to use IP-Adapter - especially if you are going for more transformation (if that is your wish just use a Keyframe IP-Adapter setup). The purpose of the workflows are to stylize a video as cleanly and consistently as possible - not total character conversions. This allows us to use the original video in an IPAdapter to help with structure as well as incompletely denoising (see discussion above for details). If you wanted to push things there are other ways (using the keyframe IPAdpater by itself for example). There are other ways to use this node that I am sure the community will figure out!
I work mostly with Hotshot/SDXL now and my best settings are with that workflow. SDXL tends to be more flexible when it comes to recognizing objects, weird positions, backgrounds.
SDXL Workflow - I have found good settings to make a single step workflow that does not require a keyframe - this will help speed up the process. You do not have do a ton of heavy prompting to get a good result but I suggest doing a general description of the scene - 5 or 10 words worked for me. Do put in the trigger prompts for the lora/model you are using. Then RUN! If you are getting too much realism try turning down the IPAdapter strength a bit or make the end point less.
SD1.5 Workflow - This one is more straightforward you just prompt and run. I suggest doing a general description of the scene - 5 or 10 words worked for me. Do put in the trigger prompts for the lora/model you are using. I am not perfectly happy with this workflow but I didn't want to delay the guide much more to get it perfect.
Important Notes/Issues
I will put common issues in this section:
IPAdapters - especially the plus models when in their normal mode actively fight motion - that is why you need to balance with other controlnets/IPAdpaters. This took me a while to balance
There is a large vram spike when loading the IPAdapter apply node in batch unfold mode. I found that I get an OOM error somewhere around 150 frames (but depends on IPAdpater model I think). Have no fear.
If you hit prompt again it will turn on the smart memory allocation (uses ram as VRAM). Once the IPadpater is loaded and the ksampler is turned on the vram usage goes back down to normal. I hope this gets fixed and will update this once it does.The developer has pushed a fix - you can find an example of this above.Having two IPAdapters really slows inference times.
If you get a division by zero error - try restating comfy - I think it has to do with how it is caching IPAdapter stuff.
Having Issues? - Please Update Comfy and all nodes first before posting errors - this stuff is pretty new.
Where to Go From Here?
This feels like getting a whole new way to control video so there is a lot to explore. If you want my suggestions:
These are just starting settings - if you find something better let everybody know!
Work with different checkpoints/styles to see if this works with all styles and share what needs to change to get a different style.
Use IPadapter Face with a after detailer to get your character to lipsync a video.
Train a new IPAdapter dedicated to video transformations or focused on somthing like clothing, background, style.
Use IPAdpater with different videos from source and see if you can get a cool mashup.
In Closing
I hope you enjoyed this tutorial. If you did enjoy it please consider subscribing to my YouTube channel (https://www.youtube.com/@Inner-Reflections-AI) or my Instagram/Tiktok/Twitter (https://linktr.ee/Inner_Reflections )
If you are a commercial entity and want some presets that might work for different style transformations feel free to contact me on Reddit or on my social accounts (Instagram and Twitter seem to have the best messenger so I use that mostly).
If you are would like to collab on something or have questions I am happy to be connect on Twitter/Instagram or on my social accounts.
If you’re going deep into Animatediff, you’re welcome to join this Discord for people who are building workflows, tinkering with the models, creating art, etc.
(If you go to the discord with issues please find the adsupport channel and use that so that discussion is in the right place)
Special Thanks
Matt3o - For developing the node that makes this all possible (Latent Vision - YouTube)
Kosinkadink - for making the nodes that make AnimateDiff Possible
Fizzledorf - for making the prompt travel nodes
Aakash and the Hotshot-XL team
The AnimateDiff Discord - for the support and technical knowledge to push this space forward
Updates
Dec 4, 2023 - Made a Single Step SDXL Workflow
![[GUIDE] Adding IP-Adapter to Your Animations Including Batch Unfold - An Inner-Reflections Guide](https://image.civitai.com/xG1nkqKTMzGDvpLrqFT7WA/84a24b12-d226-4f53-b626-880f731515b5/width=1320/84a24b12-d226-4f53-b626-880f731515b5.jpeg)