What is After Detailer(ADetailer)?
ADetailer is an extension for the stable diffusion webui, designed for detailed image processing.
There are various models for ADetailer trained to detect different things such as Faces, Hands, Lips, Eyes, Breasts, Genitalia(Click For Models). Adetailer can seriously set your level of detail/realism apart from the rest.
How ADetailer Works
ADetailer works in three main steps within the stable diffusion webui:
Create an Image: The user starts by creating an image using their preferred method.
Object Detection and Mask Creation: Using ultralytics-based(Objects and Humans or mediapipe(For humans) detection models, ADetailer identifies objects in the image. It then generates a mask for these objects, allowing for various configurations like detection confidence thresholds and mask parameters.
Inpainting: With the original image and the mask, ADetailer performs inpainting. This process involves editing or filling in parts of the image based on the mask, offering users several customization options for detailed image modification.
Detection

Adetailer uses two types of detection models Ultralytics & Mediapipe
YOLO:
A general object detection model known for its speed and efficiency.
Capable of detecting a wide range of objects in a single pass of the image.
Prioritizes real-time detection, often used in applications requiring quick analysis of entire scenes.
MediaPipe:
Developed by Google, it's specialized for real-time, on-device vision applications.
Excels in tracking and recognizing specific features like faces, hands, and poses.
Uses lightweight models optimized for performance on various devices, including mobile.
FOLLOW ME FOR MORE
Ultralytics YOLO
Ultralytics YOLO(You Only Look Once) detection models to identify a certain thing within an image, This method simplifies object detection by using a single pass approach:
Whole Image Analysis:(Splitting the Picture): Imagine dividing the picture into a big grid, like a chessboard.
Grid Division (Spotting Stuff): Each square of the grid tries to find the object its trained to find in its area. It's like each square is saying, "Hey, I see something here!"
Bounding Boxes and Probabilities(Drawing Boxes): For any object it detects within one of these squares it draws a bounding box around the area that it thinks the full object occupies so if half a face is in one square it basically expands that square over what it thinks the full object is because in the case of a face model it knows what a face should look like so it's going to try to find the rest .
Confidence Scores(How certain it is): Each bounding box is also like, "I'm 80% sure this is a face." This is also known as the threshold
Non-Max Suppression(Avoiding Double Counting): If multiple squares draw boxes around the same object, YOLO steps in and says, "Let's keep the best one and remove the rest." This is done because for instance if the image is divided into a grid the face might occur in multiple squares so multiple squares will make bounding boxes over the face so it just chooses the best most applicable one based on the models training
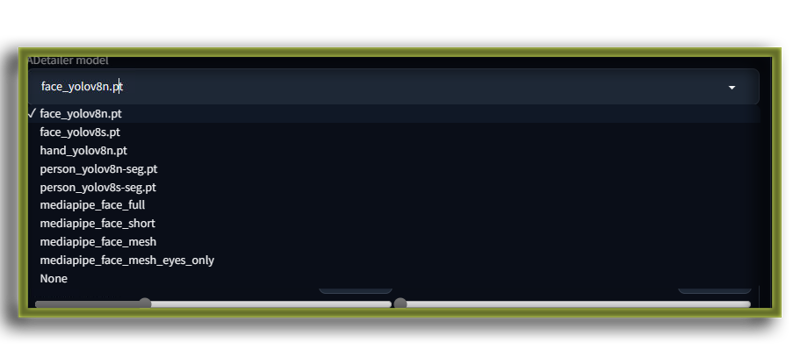
You'll often see detection models like hand_yolov8n.pt, person_yolov8n-seg.pt, face_yolov8n.pt
Understanding YOLO Models and which one to pick
The number in the file name represents the version.
".pt" is the file type which means it's a PyTorch File
You'll also see the version number followed by a letter, generally "s" or "n". This is the model variant
"s" stands for "small." This version is optimized for a balance between speed and accuracy, offering a compact model that performs well but is less resource-intensive than larger versions.
"n" often stands for "nano." This is an even smaller and faster version than the "small" variant, designed for very limited computational environments. The nano model prioritizes speed and efficiency at the cost of some accuracy.
Both are scaled-down versions of the original model, catering to different levels of computational resource availability. "s" (small) version of YOLO offers a balance between speed and accuracy, while the "n" (nano) version prioritizes faster performance with some compromise in accuracy.
MediaPipe
MediaPipe utilizes machine learning algorithms to detect human features like faces, bodies, and hands. It leverages trained models to identify and track these features in real-time, making it highly effective for applications that require accurate and dynamic human feature recognition
Input Processing: MediaPipe takes an input image or video stream and preprocesses it for analysis.
Feature Detection: Utilizing machine learning models, it detects specific features such as facial landmarks, hand gestures, or body poses.
Bounding Boxes: unlike YOLO it detects based on landmarks and features of the specific part of the body that it is trained on(using machine learning) the it makes a bounding box around that area
Understanding MediaPipe Models and which one to pick
Short: Is a more streamlined version, focusing on key facial features or areas, used in applications where full-face detail isn't necessary.
Full: This model provides comprehensive facial detection, covering the entire face, suitable for applications needing full-face recognition or tracking.
Mesh: Offers a detailed 3D mapping of the face with a high number of points, ideal for applications requiring fine-grained facial movement and expression analysis.
The Short model would be the fastest due to its focus on fewer facial features, making it less computationally intensive.
The Full model, offering comprehensive facial detection, would be moderately fast but less detailed than the Mesh model.
The Mesh providing detailed 3D mapping of the face, would be the most detailed but also the slowest due to its complexity and the computational power required for fine-grained analysis. Therefore, the choice between these models depends on the specific requirements of detail and processing speed for a given application.
FOLLOW ME FOR MORE
Inpainting
Within the bounding boxes a mask is created over the specific object within the bounding box and then ADetailer's detailing in inpainting is guided by a combination of the model's knowledge and the user's input:
Model Knowledge: The AI model is trained on large datasets, learning how various objects and textures should look. This training enables it to predict and reconstruct missing or altered parts of an image realistically.
User Input: Users can provide prompts or specific instructions, guiding the model on how to detail or modify the image during inpainting. This input can be crucial in determining the final output, especially for achieving desired aesthetics or specific modifications.
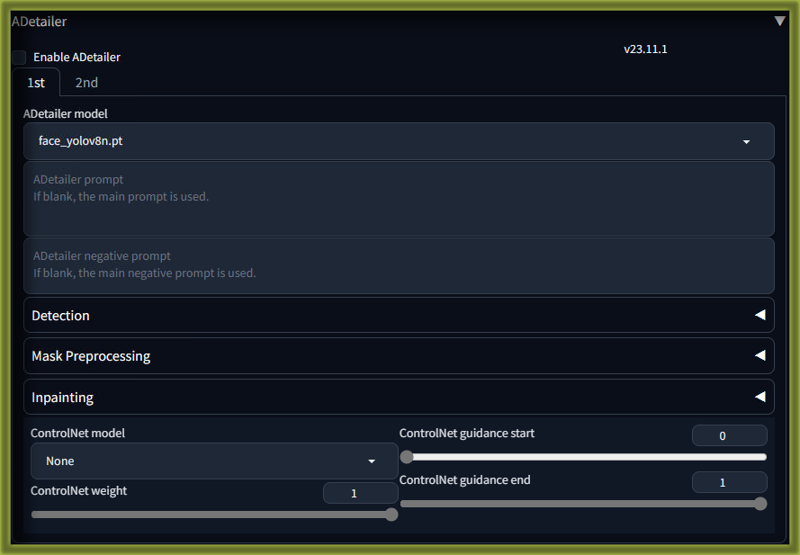
ADetailer Settings

Model Selection:

Choose specific models for detection (like face or hand models).
YOLO's "n" Nano or "s" Small Models.
MediaPipes Short, Full or Mesh Models
Prompts:

Input custom prompts to guide the AI in detection and inpainting.
Negative prompts to specify what to avoid during the process.
Detection Settings:

Confidence threshold: Set a minimum confidence level for the detection to be considered valid so if it detects a face with 80% confidence and the threshold is set to .81, that detected face wont be detailed, this is good for when you don't want background faces to be detailed or if the face you need detailed has a low confidence score you can drop the threshold so it can be detailed.
Mask min/max ratio: Define the size range for masks relative to the entire image.
Top largest objects: Select a number of the largest detected objects for masking.
Mask Preprocessing:

X, Y offset: Adjust the horizontal and vertical position of masks.
Erosion/Dilation: Alter the size of the mask.
Merge mode: Choose how to combine multiple masks (merge, merge and invert, or none).
Inpainting:

Inpaint mask blur: Defines the blur radius applied to the edges of the mask to create a smoother transition between the inpainted area and the original image.
Inpaint denoising strength: Sets the level of denoising applied to the inpainted area, increase to make more changes. Decrease to change less.
Inpaint only masked: When enabled, inpainting is applied strictly within the masked areas.
Inpaint only masked padding: Specifies the padding around the mask within which inpainting will occur.
Use separate width/height inpaint width: Allows setting a custom width and height for the inpainting area, different from the original image dimensions.
Inpaint height: Similar to width, it sets the height for the inpainting process when separate dimensions are used.
Use separate CFG scale: Allows the use of a different configuration scale for the inpainting process, potentially altering the style and details of the generated image.
ADetailer CFG scale: The actual value of the separate CFG scale if used.
ADetailer Steps: ADetailer steps setting refers to the number of processing steps ADetailer will use during the inpainting process. Each step involves the model making modifications to the image; more steps would typically result in more refined and detailed edits as the model iteratively improves the inpainted area
ADetailer Use Separate Checkpoint/VAE/Sampler: Specify which Checkpoint/VAE/Sampler you would like Adetailer to us in the inpainting process if different from generation Checkpoint/VAE/Sampler.
Noise multiplier for img2img: setting adjusts the amount of randomness introduced during the image-to-image translation process in ADetailer. It controls how much the model should deviate from the original content, which can affect creativity and detail.
ADetailer CLIP skip: This refers to the number of steps to skip when using the CLIP model to guide the inpainting process. Adjusting this could speed up the process by reducing the number of guidance checks, potentially at the cost of some accuracy or adherence to the input prompt
ControlNet Inpainting:

ControlNet model: Selects which specific ControlNet model to use, each possibly trained for different inpainting tasks.
ControlNet weight: Determines the influence of the ControlNet model on the inpainting result; a higher weight gives the ControlNet model more control over the inpainting.
ControlNet guidance start: Specifies at which step in the generation process the guidance from the ControlNet model should begin.
ControlNet guidance end: Indicates at which step the guidance from the ControlNet model should stop.
Advanced Options:
API Request Configurations: These settings allow users to customize how ADetailer interacts with various APIs, possibly altering how data is sent and received.
ui-config.jsonEntries: Modifications here can change various aspects of the user interface and operational parameters of ADetailer, offering a deeper level of customization.Special Tokens
[SEP], [SKIP]: These are used for advanced control over the processing workflow, allowing users to define specific breaks or skips in the processing sequence.
How to Install ADetailer and Models
Adetailer Installation:
You can now install it directly from the Extensions tab.
OR
Open "Extensions" tab.
Open "Install from URL" tab in the tab.
Enter
https://github.com/Bing-su/adetailer.gitto "URL for extension's git repository".Press "Install" button.
Wait 5 seconds, and you will see the message "Installed into stable-diffusion-webui\extensions\adetailer. Use Installed tab to restart".
Go to "Installed" tab, click "Check for updates", and then click "Apply and restart UI". (The next time you can also use this method to update extensions.)
Completely restart A1111 webui including your terminal. (If you do not know what is a "terminal", you can reboot your computer: turn your computer off and turn it on again.)
Model Installation
Download a model
Drag it into the path - stable-diffusion-webui\models\adetailer
Completely restart A1111 webui including your terminal. (If you do not know what is a "terminal", you can reboot your computer: turn your computer off and turn it on again.)
FOLLOW ME FOR MORE
THERE IS LITERALLY NOTHING ELSE THAT YOU CAN BE TAUGHT ABOUT THIS EXTENSION

