
This is a group of helpful resources/random tips that I use for my inpainting/photobashing workflow. It's more unorganized compared to the Resources for Inpainting article I made before since I'm still practicing with photobashing and learning how to blend things better. I don't have photobashing down to an exact science yet but I'm getting to the point where I need to organize my toolset before I accidently forget about something. (Some tools are repeated from the inpainting resources article due to it's helpfulness. For the record, this isn't a guide but a writeup for me to keep track of the things that I am learning. As a result, this is a fairly intermediate level topic, which could be difficult for a beginner to understand and that there might be mistakes!
What is Photobashing
Photobashing is a technique that is frequently used in concept art where you take multiple photographs or images and apply edits to them so that they blend together into your desired composition. In other words, it's taking a ton of images together and then creating an artistic Frankenstein.
Strengths of Photobashing
Lower reliance on prompts
Better control over image composition
Better control over image texturing
Reuse "failed" generations
Photobashing workflow is already very similar to an inpainting workflow
Weaknesses of Photobashing
Still need to be aware of art concepts such as lighting, perspective, shading, anatomy. It's not an excuse to ignore learning high-level art concepts.
Need to curate reference images
Still bound to model/checkpoint bias. Very uncommon poses such as upsidedown can be very difficult to work with or recoloring things to unnatural colors can be difficult. (e.g.: Turning tea into a purple color)
Requires strong knowledge of inpainting quirks.
To my knowledge, photobashing is still considered somewhat "controversial" in the art world, as some people consider it "cheating" and there are some potential legal implications for reusing art from anywhere for commercial use. (For historical context, if anything)
However, generations with Stable Diffusion img2img and ControlNet is a gold mine for photobashing as you can cut and paste "failed images" together and then try to let img2img fix the image. How to fix everything still requires some finessing as img2img cannot fix everything by itself and can still make mistakes.
How to Photobash
Photobashing can be as simple as using the eraser tool to add transparency to your reference image. If you want a more non-destructive workflow, then use transparency masks. I recommend looking up guides for photobashing on youtube since I can't provide a nuanced explanation of how to photobash for every situation right now.
The basic advice I can give right now is that it is easier to blend via erasing/transparency over blurring. Ideally, try to make sure that colors blend well and ensure that you don't have any sharp edges or pixels in your image as these types of artifacts can cause SD to hallucinate .
Related Tools
Blur
Liquify
Warp
Reference Images for Photobashing
Reference Images should be generated using the checkpoint that you will be mainly working with. I don't recommend bashing realistic images with stylized art together and vice-versa. (Realism and Anime) Realism has more of an advantage compared to stylistic mediums as you can take a camera along and take pictures.
Stylized art has the problem where a high denoising strength is required to blend the image together but a high denoising strength will quite often mess up the details which may or may not be desired. You can still work with it by applying another img2img step but I find it's just easier to create bulk images with wildcards. Also, img2img and controlnet can help if you have a set pose but need more variants on composition.
Krita Plugins
Krita AI Diffusion
https://github.com/Acly/krita-ai-diffusion
A plugin that connects an opinionated ComfyUI workflow to Krita. Has support for live rendering,basic inpainting, and controlnet support. It has the ability to create an open pose bone in a vector layer which can be helpful for adjusting poses in Krita itself. There doesn't seem to be an easy way to adjust for custom workflows from I noticed..
Cyanic SD Krita
https://github.com/DrCyanide/cyanic-sd-krita
A plugin that connects A1111 to Krita. Has more support for samplers, controlnet and it's preprocessors, and adetailer but no live editing. I personally prefer using this plugin for easier access to Stable Diffusion settings. You can also use ControlNet's generative fill with this plugin.
Krita Segmentation Tools
https://github.com/Acly/krita-ai-tools
A plugin that adds smart selection features to Krita. Very helpful for quick selecting objects in a canvas to cut out and transform.
Blender Layer
https://github.com/Yuntokon/BlenderLayer/
A plugin that connects Blender's viewport to Krita. Helpful blocking things out or for brainstorming. Live rendering mode can be used in conjunction with Krita AI Diffusion's live generation mode for getting real-time feedback with ControlNet. I generally only run this with a 512x512 canvas as my GPU isn't fast enough with real time at high resolutions.
Krita Photobash Images Plugin
https://github.com/veryprofessionaldodo/Krita-Photobash-Images-Plugin
A plugin that allows you can search reference images in a specified folder. Helpful if you have a ton of photobashing references and need a quicker way to search though them. I have a personal fork that has some extra capabilities such as extra search by a caption file. https://github.com/duskydd/Krita-Photobash-Images-Plugin I personally don't use this too often but I have occasionally found it useful. I'm not a skilled programmer so don't expect me to add new features.
ComfyUI Custom Nodes
These can be helpful for building some tasks regarding photobashing. Personally, I haven't found a need to build a massive workflow but I have occasionally found a need to automate some tasks.
ComfyUI Marigold
https://github.com/kijai/ComfyUI-Marigold
A custom node that supports depth maps created using Marigold Depth Estimation. Can provide more accurate depthmaps for use with ControlNet.
ComfyUI Toyxyz test_nodes
https://github.com/toyxyz/ComfyUI_toyxyz_test_nodes
A custom node that connects webcam output to ComfyUI. You can combine this with https://obsproject.com/ to create a virtual webcam send output from any program to ComfyUI. Helpful if you have better posing tools.
ComfyUI Browser
https://github.com/talesofai/comfyui-browser
A custom node that can keep track of saved workflows within ComfyUI. Helpful for me since I frequently use simple workflows.
ComfyUI- WD 14 Tagger
https://github.com/pythongosssss/ComfyUI-WD14-Tagger
Allows you to caption images in ComfyUI. The captions can be saved using the WAS node suite. Can be used in conjunction with the Krita Photobash plugin but will need to rename the files manually due how to the text save node's file naming system works.
ComfyUI Dynamic Prompts
https://github.com/adieyal/comfyui-dynamicprompts
Wildcards for ComfyUI. Useful for creating bulk reference images. You can find wildcards easily on civitai. I don't have any personal recommendations.
A1111 Extensions
Things found in A1111 that I haven't found a simple equivalent to in ComfyUI
stable-diffusion-webui-deepdanbooru-object-recognition
https://github.com/Jibaku789/sd-webui-deepdanbooru-object-recognition
Automatically split an image based on danbooru tags. Helpful for isolating objects in large images for use with photobashing.
Openpose Editor for ControlNet in Stable Diffusion WebUI
https://github.com/huchenlei/sd-webui-openpose-editor
I personally have found this to be easiest extension to use for quickly playing around with openpose.
Layer-Divider
https://github.com/jhj0517/stable-diffusion-webui-Layer-Divider
Similar to the deepdanbooru object but divides an image based on SAM and then saves it as a photoshop file. Objects detected by SAM can be downloaded individually. I would just recommend downloading things that are cut off well by SAM. SAM has a tendency to split unnecessary objects.
SD Dynamic Prompts
https://github.com/adieyal/sd-dynamic-prompts
Wildcards for Auto1111
Custom ControlNets:
https://civitai.com/models/80536/lighting-based-picture-control-controlnet
This controlnet is somewhat hard to use but can create a better lighting environment compared to using canny and lineart. It still changes the image like canny but it's a decent reference point if you plan on doing something dramatic such as changing the lighting from daytime to night time. I still need to do more research on some of the more 'niche' controlnets along with finding better methods to control lighting.
3D Pose Programs
You can find the 3d web apps in the Inpainting resources. I have a stronger preference for tools that don't require an online connection. Since this more personal than generic, I will be listing some paid tools that I use well. These tools are not necessary but I mostly have when trying out different 3D model software for better quality of life with my workflow.
Character bones that look like Openpose for blender
https://toyxyz.gumroad.com/l/ciojz
A blender rig set up to produce output images for use with ControlNet. The shape keys with this model are helpful if you want some specific body mass.
EasyPose (Paid)
A posing tool that contains a lot of general poses and hand poses. While I can't produce accurate depth maps with this tool, it can help get me started. I do like that I can easily pose a model with a prop.
VRM Posing Desktop (Paid)
A posing tool meant for use with VRM models. This is more anime-centric. I use this since it has import support and the background can be easily adjusted.
Model Limits
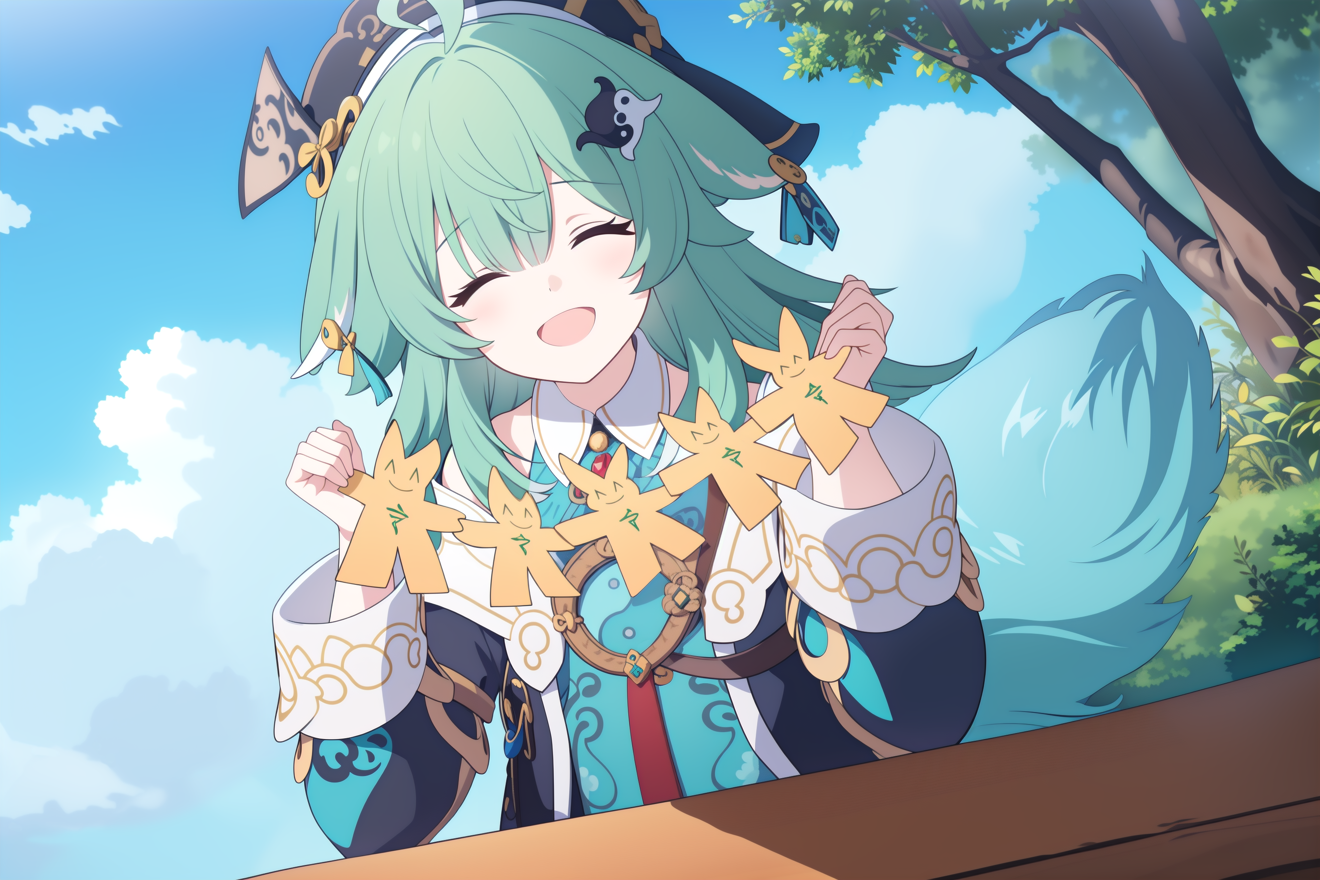
I'm honestly not sure what this issue is technically called but I usually refer to it as a "model limit." The model limit is reached when you run img2img and some element of your main composition is drastically changed at 0.5 denoising strength. In my case with the Huohuo image in the article's cover image, running img2img with 0.5 denoising turned the paper talisman chain into flowers. Note: This is from an earlier point from my photobashing of character details.
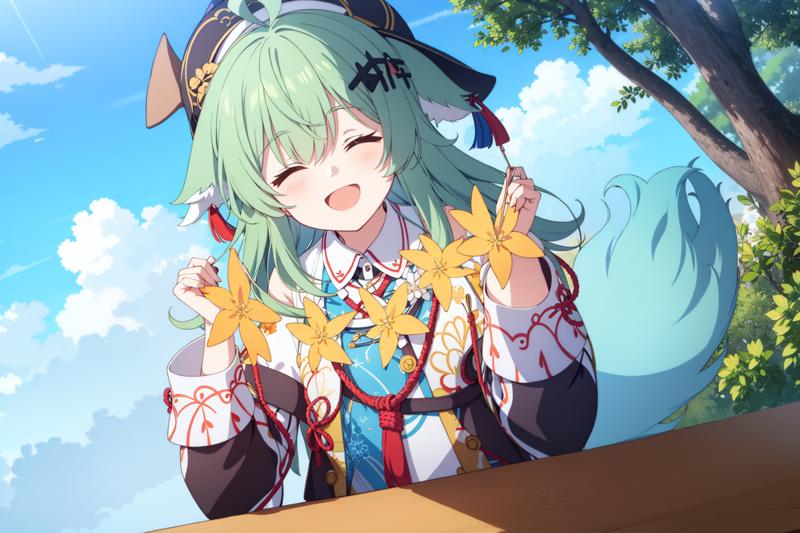
The main implication of this is that different denoising strengths will be needed depending on how complex your object is and that there is some inherit bias within a checkpoint when inpainting or using img2img. At this point, using img2img alone is not an option and that ControlNet, LoRa, or another checkpoint should be considered. In my case, I was able to use canny ControlNet to keep the overall chain structure. This can also be referred to lack of model knowledge, since hands are always infamously deformed with high denoising strengths.
Recoloring Subjects
This was mentioned earlier but a general weakness of Stable Diffusion is that it is very difficult to change the natural color of an object via inpainting or img2img. One example that I ran into was making purple tea. After recoloring the tea in an image editor, running inpainting or img2img with a strength of 0.3 or higher would always attempt to change the tea color to brown or black. In this scenario, I recommend recoloring using some kind of color blending via Krita or a similar and only denoise at a low strength if necessary.
Fixing Eyes: Iris and Pupils
I am not entirely sure why but in a lot of cases, many checkpoints have a somewhat strong focus on the eyes so I'm not sure if this would apply universally. For fixing things such as eyes and pupils, I will usually redraw the iris with a flat color and then draw an oval shaped pupil in black. Afterwards, I play around with the denoising strength 0.3 ~ 0.5 with 'only masked' with a batch of 4 and then blend the correct portions together.
For characters with very uniquely shaped pupils, a denoising strength of <0.35 is required along with the occasional usage of ControlNet. The ControlNet preprocessors might not pick up the outline of the pupil so you need to correct the preprocessor result yourself before inpainting.
Fixing Hands
If the hand pose isn't too difficult, you can always cut and paste the hand and fingers into the proper position. I recommend having some kind of reference nearby.
If repositioning the fingers is too difficult, then there is the option of redrawing + controlnet inpainting.
From any 3D modeling software, get a reference image of what the hands should look like.
Using the image from (1),
Overlay the reference image into the hand position
trace over the hand, (Lowering layer opacity can help with this) Make sure that the contours of the hand that you are tracing is a darker color than the skin
Fill that hand with the color of skin
Turn back opacity to normal if you lowered it.
Send the canvas to a controlnet preprocessor such as canny or lineart and preview the result.
Redraw any lines that canny or lineart might have missed. While ControlNet is very powerful, the preprocessors can make mistakes so be sure to correct them as necessary.
Afterwards, mask the hand and send the redrawn map from (6) to Controlnet without any preprocessor and then inpaint around 0.5 denoising strength.
If that doesn't work, then try to photobash the correct portions from the inpainting together and/or play around the controlnet map or denoising strength.
Inpainting Blurs
Inpainting blurs is the most frequent problem that you will generally run into after inpainting for awhile. Some of the most common fixes are running another img2img pass or by using an upscale. Img2img has a problem where you will lose quality if used 'only masked inpainting' and upscaling has it's own issues of changing the image too much depending on the upscaling method.
After learning some photobashing, I learned it's more forgiving to blend an image using transparency pixels instead of blurring and you don't universally apply transparency around the subject.
Unfortunately, the default choice of blending inpainting results together is blurring via a set amount of pixels around the image which causes the blurring to noticeable as that not everything blends together that way. You can get around this by setting the blur amount to 0 and then manually blend the result yourself.
Side Note: There is a guideline for blending things together but unfortunately, I can't explain it too well right now.
Img2Img Denoising Reference Points
These are just personal reference points, I am not sure if this will apply everywhere. ControlNet can help with using higher denoising strengths. The more "unique" details will typically require low denoising strength and ControlNet to retain shape.
0.1 : Text
0.2:
0.3 - strength for fixing any random sketches
0.4 - strength for fixing any random sketches
0.5 - Go-to strength for fixing any random sketches; This strength can destroy objects that the model is not aware of.
0.6 - Helpful for reducing style bleeding from LoRAs.
0.7 - Starts to significantly alter the image; Higher strengths only useful with ControlNet
0.8
0.9 - Helpful for night-time to daytime lighting changes; Can be used for more extreme style changes with ControlNet
1 - Completely changes the image; some color information somewhat retained with controlnet enabled
Things to Research
Photoshop's Match Color equivalent
Lighting Control
Cascadeur
End
This isn't at the level where I would consider this to be a guide but I want to write this down before I start going in circles again. Hopefully, this chaotic reference point helped somebody out.