
About
Current version: v1.4 (release date: 05-24-2024)
IMPORTANT: Since v1.3, IpAdapter required models have changed, refers to the Required IpAdapter Models section for download instructions.
This ComfyUi workflow focuses on txt2img and txt2vid only:
Auto1111 compatible: Copy/Pasting Auto1111 Civitai prompts should generate similar images (result will not be identical as ComfyUi seed is not GPU based).
Friendly user interface: All major controls centralized in one box.
Modular: Using simple shortcuts you can quickly activate/deactivate available outputs (image, hires image, video) or features (HiresFix, Face Detailer, ipAdapter, Model merger)
Model merger: Merge up to 3 models with configurable weights and use it as the reference model for your generation.
2 pass IpAdapter:
Pass 1 - Inject a custom image into the txt2img generated image and AnimateDiff (great to apply an external style)
Pass 2 - Inject the txt2img generated image into AnimateDiff (force the generated animation to mimic the base image).
Changelog
v1.5:
Fix FaceScheduler scheduler error.
v1.4:
Update Model Merger node to the latest required version.
v1.3:
Support IpAdapter latest version.
v1.2:
Simplified Anything Everywhere nodes.
Remove optional VAE in Model Merger.
Model merger load checkpoints with the recommended beta schedule (sqrt_linear) for AnimateDiff.
v1.1:
Add support for AnimateDiff V3 models.
Nb frames moved in the "Generation Parameters" group.
Add a new optional IpAdapater pass to inject an uploaded image into the base image and AnimateDiff.
v1.0:
Hires Image: The face detailer pass is done after upscaling to enhance face details.
An optional IpAdapter section using the base image as reference is added to guide AnimateDiff.
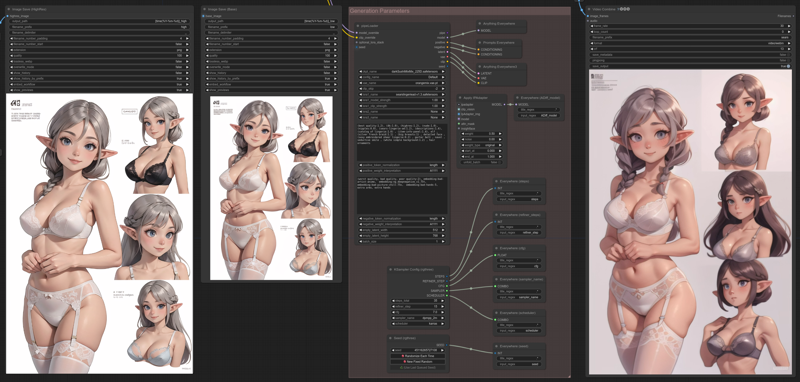
All image outputs displayed on the left, video output displayed on the right.
Node links simplified, added "Video quality switcher" and "Model Merger Switcher" groups.
Installation:
Download one of the 2 workflows available in attachments, then drag and drop the json file in ComfyUi: Both workflow are identical, they're just tuned with specific prompts, models, Loras and outputs:
edgBodytype version: Only video output (without IpAdapter) and base image are on.
sears version: Most features are on, merged models, video output, base image, HighRes image, IpAdapter Pass2.
I recommend to test first the edgBodytype version, and if it's ok, jump to the fully activated sears one.
ComfyUi Requirements:
Required custom nodes packs:
ComfyUI Impact Pack
ComfyUI's ControlNet Auxiliary Preprocessors
ComfyUI Frame Interpolation
WAS Node Suite
tinyterraNodes
ComfyUI_IPAdapter_plus
AnimateDiff Evolved
ComfyUI-VideoHelperSuite
rgthree's ComfyUI Nodes
Use Everywhere (UE Nodes)
Advanced CLIP Text Encode
Recommended custom nodes pack:
KJNodes for ComfyUI (Display % progression and status in the browser tab)
Simply use ComfyUi Manager to install the missing or recommended nodes.
Dataset Requirements:
Required AnimateDiff Models:
mm_sd_v15_v2.safetensors -> ComfyUI/custom_nodes/ComfyUI-AnimateDiff-Evolved/models/
v3_sd15_mm.ckpt -> ComfyUI/custom_nodes/ComfyUI-AnimateDiff-Evolved/models/
v2_lora_ZoomIn.ckpt -> ComfyUI/custom_nodes/ComfyUI-AnimateDiff-Evolved/motion_lora/
v3_sd15_adapter.ckpt -> ComfyUI/models/loras/
Required IpAdapter Models:
ip-adapter_sd15.safetensors -> ComfyUI/models/ipadapter/
ip-adapter_sd15_light -> ComfyUI/models/ipadapter/
ip-adapter-plus_sd15 -> ComfyUI/models/ipadapter/
ip-adapter-plus-face_sd15 -> ComfyUI/models/ipadapter/
ip-adapter-full-face_sd15 -> ComfyUI/models/ipadapter/
ip-adapter_sd15_vit-G-> ComfyUI/models/ipadapter/
CLIP-ViT-H-14-laion2B-s32B-b79K.safetensors -> ComfyUI/models/clip_vision/ (rename the downloaded file to CLIP-ViT-H-14-laion2B-s32B-b79K.safetensors)
Dataset used by default generation:
Checkpoints:
ESRGAN Model:
LORAs:
VAE:
Negative Embeddings:
IpAdapter images:
How to use:
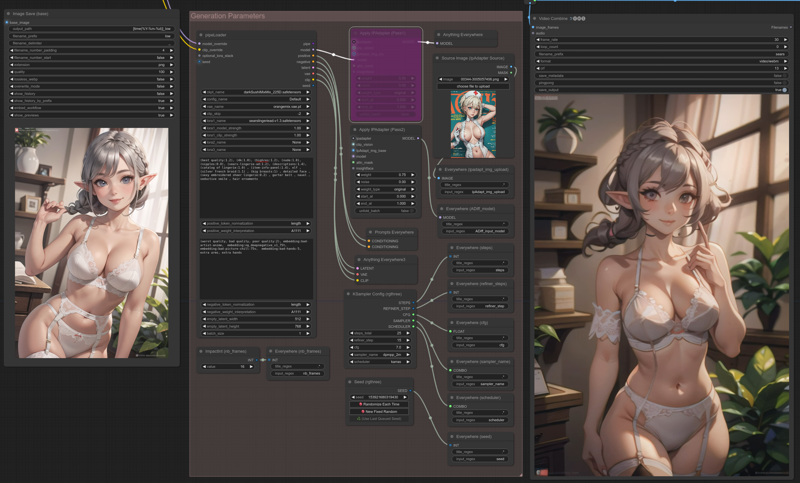
The Generation Parameters group is the central place to control your work. Use the left column nodes to tweak your parameters. If you're coming from Auto1111, everything should be pretty self explanatory, except for loading the model, and two IpAdapter node:
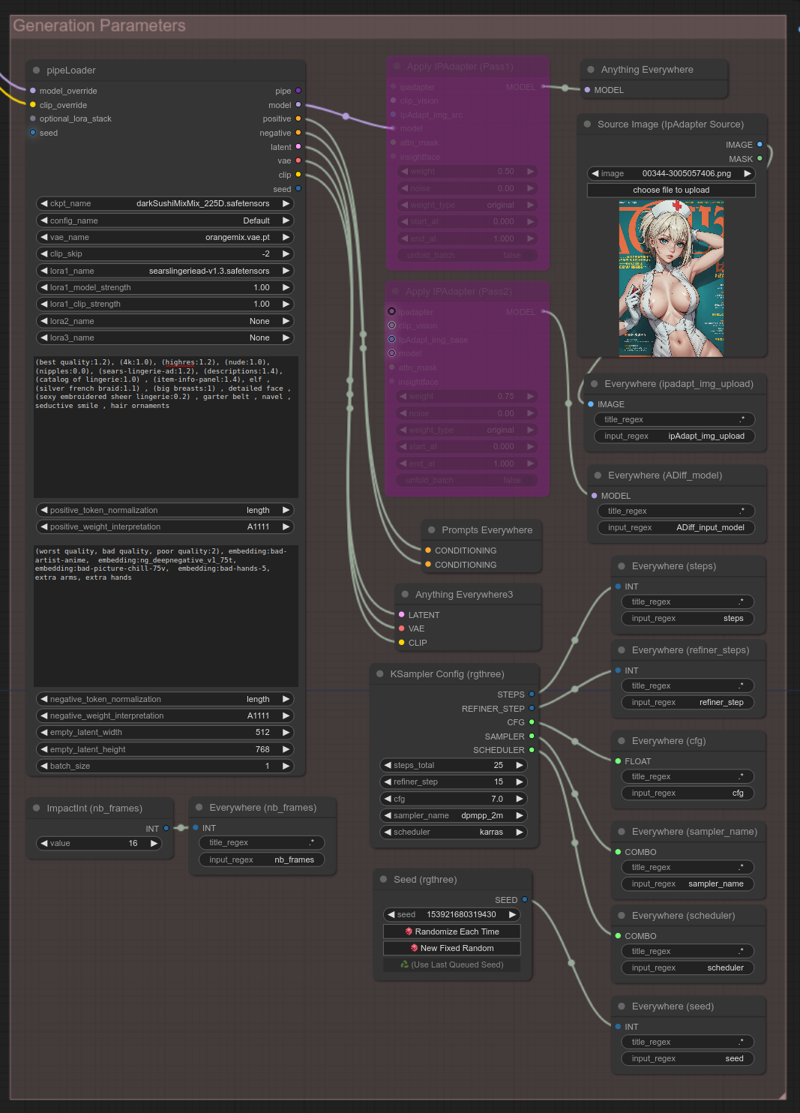
Overridden model:
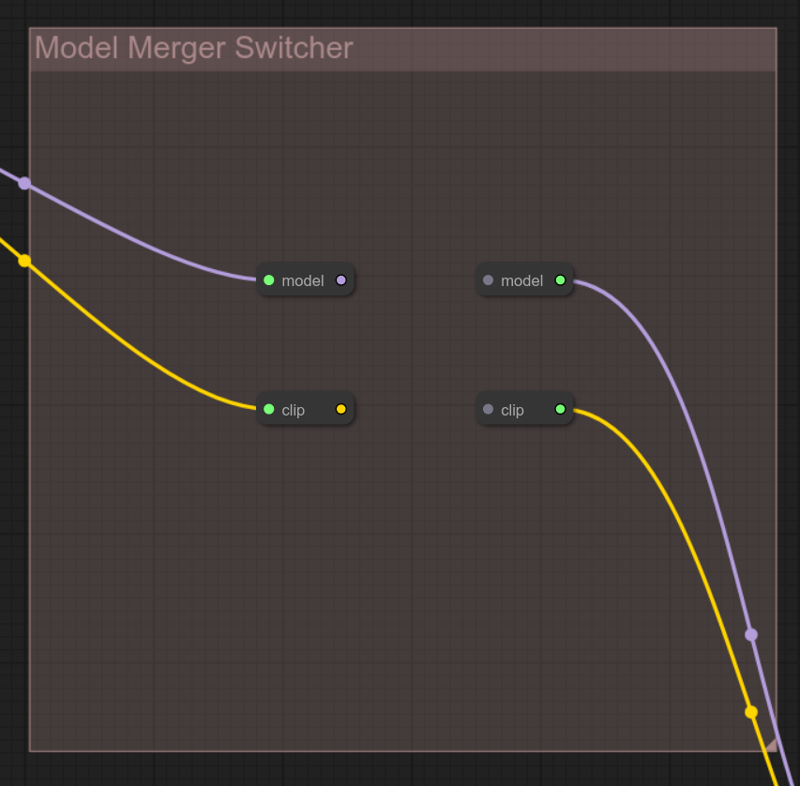
As shown in the above screen capture, model and clip are overridden (coming from the Model Merger Switcher group). If this merger switch is on, the ckpt_name field is not taken in effect, the model is directly loaded from the Model Merger group output.
Disabling the Model Merger feature: Just break the 2 links in the Model Merger Switcher group, and the pipeLoader will behave as usual by loading the model you have selected in the ckpt_name field.
Sadly, I haven't found a way to override the VAE: The VAE used for generation is always be the one configured in the vae_name field from the pipeLoader
Model Merger feature
The Model Merger group allows dynamic merging of up to 3 different models and Loras, if the feature is activated, the blended model will be used as input for your generation.
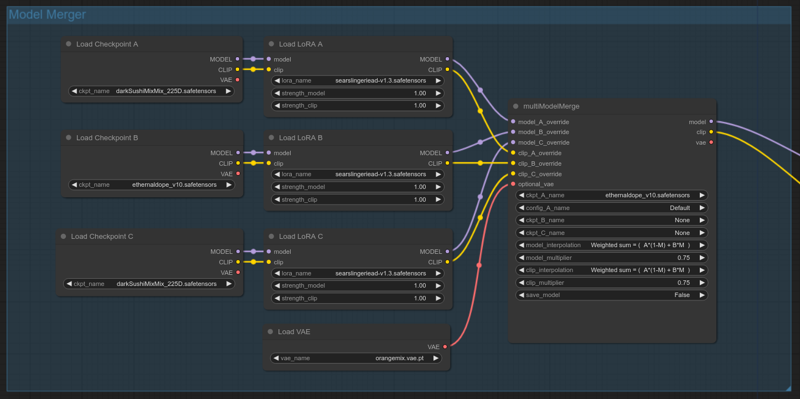
Select your 3 base models and loras, adjust loras weights to suit your need.
If you don't want to inject Loras in your merged model, just bypass the 3 Load LoRA nodes (CTRL+B)
multiModelMerge node:
3 Modes are available in Model interpolation and Clip interpolation fields for mixing:
Sum: Sums model A and B according to your weights (model C is discarded)
Diff: Diff model B and C, add the difference to model A.
A only: (model B and C are discarded)
Don't bother with ckpt and config fields as they're overwritten entries.
Use multiplier fields to mix weight between models.
By default, the merged model is only kept in memory, meaning you can tweak and test without fearing a disk full of waste, but the save_model option from the multiMergeModel node is also available in case you want to export your custom model as a safetensors file for later or external use.
Disabling the Merger feature: As explained before, just delete the 2 centered links in the Model Switcher group. As the whole merger group will become orphan, ComfyUi will simply skip the entire stuff.
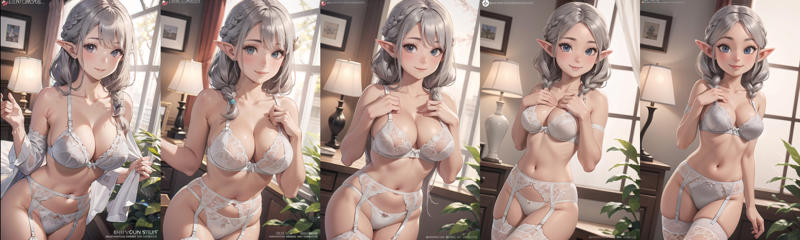
Here is a sample result for 5 images:
All having the same generation parameters and using a merge from darkSushiMixMix_225D and ethernaldope_v10. Merge weight is varying from 0 to 1, first image beeing 100% darkSushi and 0% ethernaldope, last image 0% darkSushi and 100% ethernaldope.
Toggling outputs
There's 3 outputs, all centered in the interface to ease interactions:
Image Save (Base) in the middle.
Image Save (HighRes) on the left.
Video Combine on the right.
Just select the desired output node and bypass it (CTRL+B) to toggle on/off the entire stack involved in processing it.
Selecting video output quality
There's 3 different quality available for video output:
Base: Standard AnimateDiff rendering (fast).
High: Standard AnimateDiff rendering + HiresFix (slow).
Face: Standard AnimateDiff rendering + HiresFix + FaceDetailer (very slow).
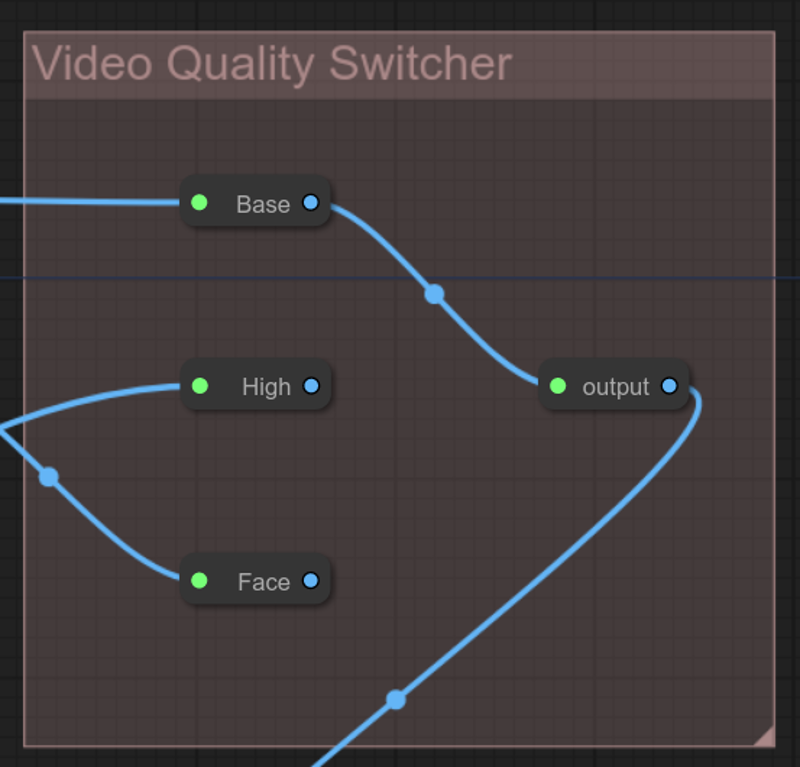
To select your quality mode, in the Video Quality Switcher group, just connect the desired mode to the output node.
Tips: As ComfyUi is always trying to cache everything. From one rendering to another, if you only change the quality, only the needed quality pass is recompute, resulting in a significant performance boost.
IpAdapter feature
ipAdapter injects an image into a model, perfect for style transfert.
In this workflow, you can use it with two different optional passes:
No Pass:
Deactivate the Apply IPAdapter (Pass1) node.
Deactivate the Apply IPAdapter (Pass2) node.
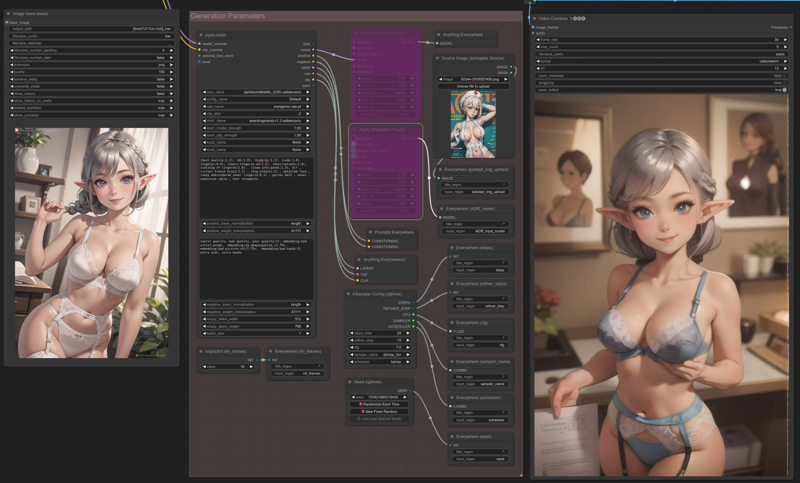
In this case, IpAdapter being off, generated image and animation are default.
This is just showed here as reference for comparison with the other cases.
Pass1:
Activate the Apply IPAdapter (Pass1) node.
Deactivate the Apply IPAdapter (Pass2) node.
Select/upload your image in the Source Image (IpAdapter Source) node.
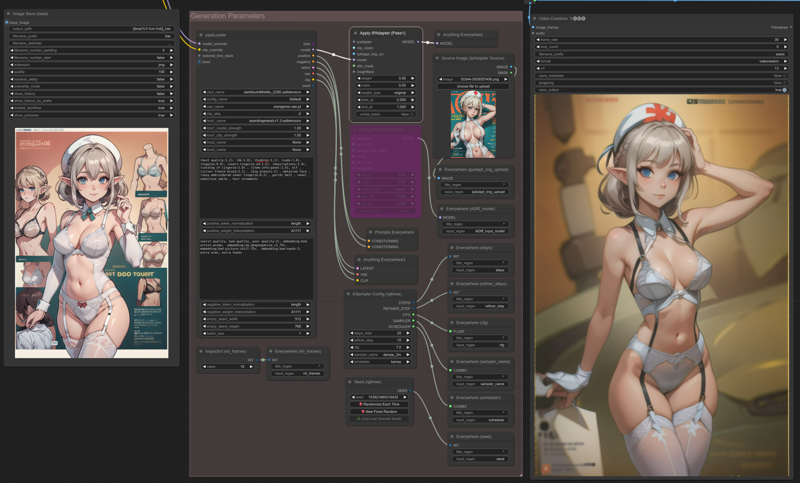
The uploaded image is injected in both txt2img and AnimateDiff:
The style transfer is clearly visible here, especially with the girl hat.
Please also note, the composition between image and animation is not related at all.
Pass2:
Deactivate the Apply IPAdapter (Pass1) node.
Activate the Apply IPAdapter (Pass2) node.
Nothing is injected into txt2img, but the generated image is injected into AnimateDiff:
The resulting animation is more in relation with the original image, see the flower pot or the window.
Pass1 & Pass2:
Activate the Apply IPAdapter (Pass1) node.
Activate the Apply IPAdapter (Pass2) node.
Select/upload your image in the Source Image (IpAdapter Source) node.

The uploaded image is injected in txt2img, the uploaded image + generated image is injected into AnimateDiff:
In both Apply IPAdapter nodes, the main parameter is weight: Just be careful not pushing them too high. This is where this approach reaches it's limit: Apdapter tends to reduced the animation motion, more than 0.5 and expect very little motion.
Another important point about the generated ipAdapter_img:
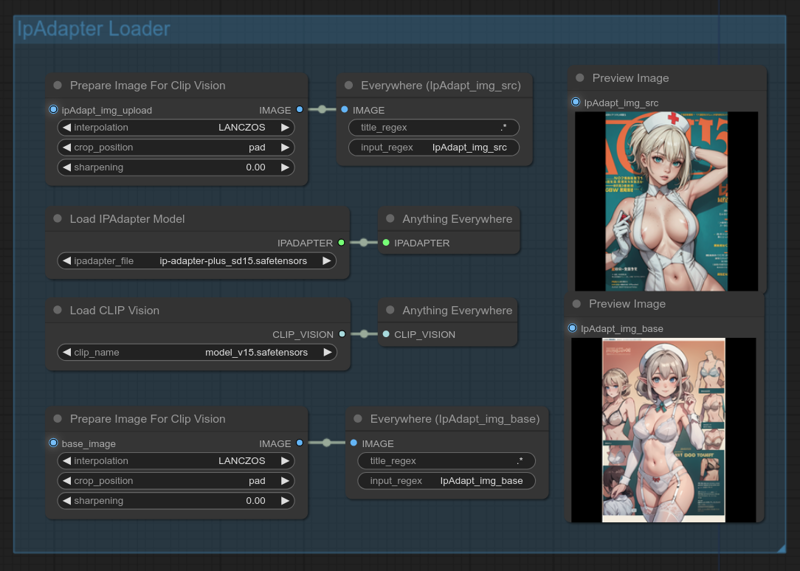
IpAdapter only accept 512x512 squared images, that's why they are preprocessed in the IpAdapter Loader group: Depending on your initial ratio, or what you want to focus on, it's perhaps a good idea to change crop_position in the IpAdapter Loader group.
'Pad' will get everything, but as you can see here, precision is lost with black bars when using 512x768.
Disabling IpAdapter for good:
If VRAM is an issue, you can also disable the IpAdapter Loader group.
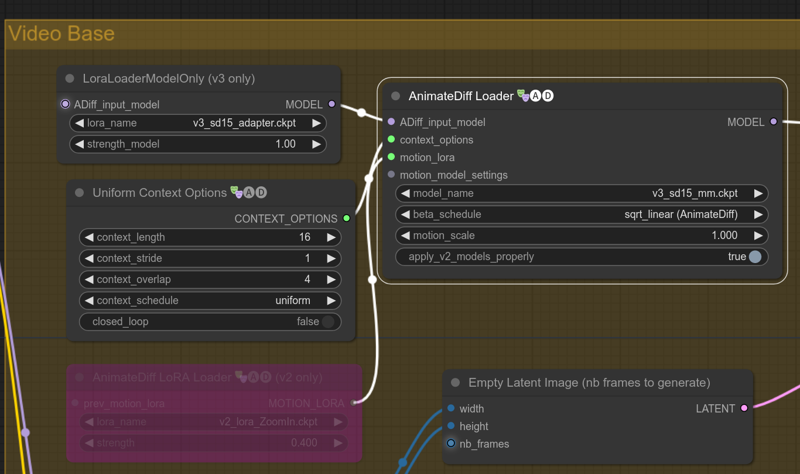
AnimateDiff V3 model
V3 model is supported, I have not tested them intensively, but I don't expect much. It's not an evolution of v2, but a new thing in their own, and clearly it focuses on vid2vid.
To swap from v2 to v3, in the Video Base group:
Activate the LoraLoaderModelOnly (v3 only)
Deactivate the AnimateDiff LoRA Loader (v2 only)
Select v3_sd15_mm.ckpt model in the model_name field.
A word about the beta scheduler from V1.2
I completely missed that point , it's partially fixed in workflow V1.2:
I supposed loading a checkpoint sum up to loading a model, a clip, a vae and nothing more, I was wrong...
When loading a model, you can also specify a Noise scheduler to use with it, and AnimateDiff recommend to use a special one for models (sqrt_linear). It's not mandatory, not using it is ok, but the motion will not be the same. I have replace the 3 checkpoint loaders in the model merger group to force the sqrt_linear on models.
Sadly I haven't found a way to do it in the pipeLoader, if you want sqrt_linear in it:
Just use the model merger in "A Only" interpolation mode, or connect clip_override and model_override from the pipeLoader with the output from a Load Checkpoint w/ Noise Select node.
VRAM usage
It's very hard for me to tell how much VRAM is needed, especially with such a modular workflow, add to this the fact than I'm using an AMD card, it's even more difficult...
But, prior to v1.0, people have reported it was ok but slow with all features enabled on a 8Go Nvidia hardware.