Our tutorials have taught many ways to use ComfyUI, but some students have also reported that they are unsure how to use ComfyUI in their work. In addition, there are many small configurations in ComfyUI not covered in the tutorials, and some configurations are unclear.
So, we decided to write a series of operational tutorials, teaching everyone how to apply ComfyUI to their work through actual cases, while also teaching some useful tips for ComfyUI. This will help everyone to use ComfyUI more effectively.
First, we'll discuss a relatively simple scenario – using ComfyUI to generate an App logo.
1. Generation using prompt
The simplest way, of course, is direct generation using a prompt. But if you have experience using Midjourney, you might notice that logos generated using ComfyUI are not as attractive as those generated using Midjourney.
This is because the model used by Midjourney has been optimized for logos during training, but we have not done the same detailed optimization when using Stable Diffusion v1.5 or Stable Diffusion XL directly on ComfyUI.
However, this doesn't mean we can't achieve similar results; we simply need to use some extra techniques.
The first approach most people think of is probably to use models specifically fine-tuned for App Logos. While this is a viable strategy, fine-tuning models can be costly, so there aren’t many models fine-tuned for App Logos available on the market, to my knowledge.
For this reason, I usually suggest using LoRA rather than fine-tuning models. In addition, you can search Civitai to see if there are Checkpoint models matching your scenario. If not, you might want to consider LoRA.
The following is the workflow for LoRA, which is easy to set up. If you want to further understand the principles of LoRA, you can refer to the tutorial about LoRA :

Here are some points to focus on in this workflow:
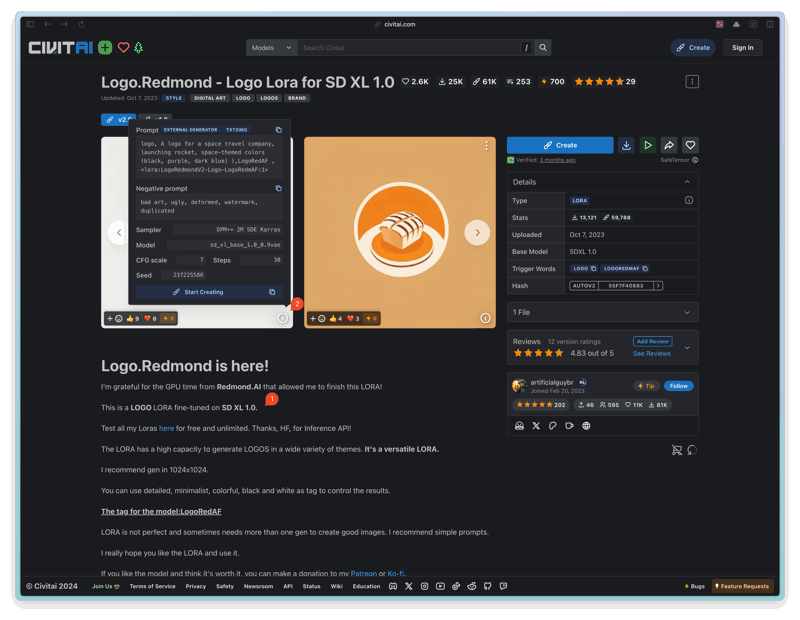
Checkpoint: I first found a LoRA model related to App Logo on Civitai. When you use LoRA, I suggest you read the LoRA intro penned by the LoRA's author, which usually contains some usage suggestions. For instance, the author of this model mentions that this LoRA is fine-tuned from SD XL 1.0 (as shown on point ① in the figure below), so it's advisable to use the Checkpoint with the same base model. So for the Checkpoint, I directly used SD XL 1.0.
Prompt: I recommend using the author's example prompt for your first time using LoRA to check the results. Then, you can write your own prompt based on the author's prompts. You can click button ② in the figure below to see the author's prompts.
Batch_Size: In the empty latent image node, there's a batch parameter, which I've set to 4. This means that ultimately, the model will generate 4 images consecutively. Regarding efficiency, you can set the batch_size to 1 during testing to speed up the generation process. Once you've finalized your prompt, you can set the batch_size to a larger value and go about other tasks or have a coffee😆. After a while, you'll see several images, and you can select the ones you like.
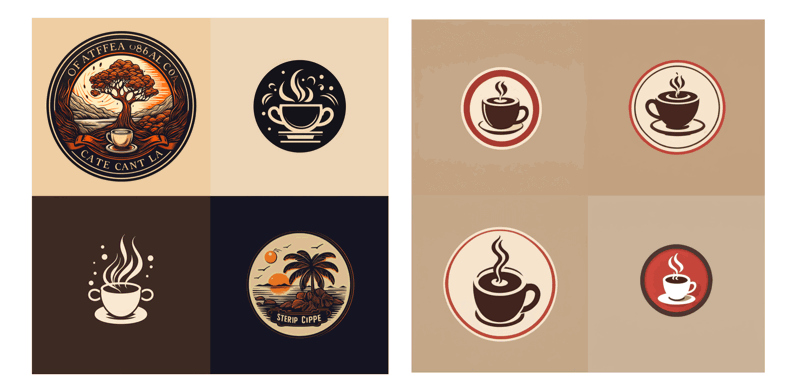
Finally, let's compare the logos generated by Midjourney (left) and ComfyUI (right) using the same prompt. Which one do you prefer?
2. Generation using ControlNet
The first method is mainly used to generate ideas with AI's help. You can continuously adjust the prompt to generate different logos, then pick your favorite one and import it into Photoshop for further adjustments.
However, during the actual design process, your requirements might not be content-based only. Suppose you already have a preliminary idea, for instance, the logo should include the letter 'R’. In this case, you can utilize the ControlNet technology to assist you in logo creation.
You can use different ControlNets based on your workflow:
If you are accustomed to hand-drawing drafts, you should consider the Scribble ControlNet Workflow. You can import your draft, then use the Scribble ControlNet Workflow to generate a logo.
If you want a logo with a sense of depth, consider drawing a simple depth map and using the Depth ControlNet Workflow for its generation.
If you are used to drawing drafts with graphics software, I recommend using the Canny ControlNet Workflow.
I'll mainly introduce Canny. You can use various drawing tools to make a simple draft, then use the Canny workflow to redraw the original image (for other workflows, please refer to this tutorial).
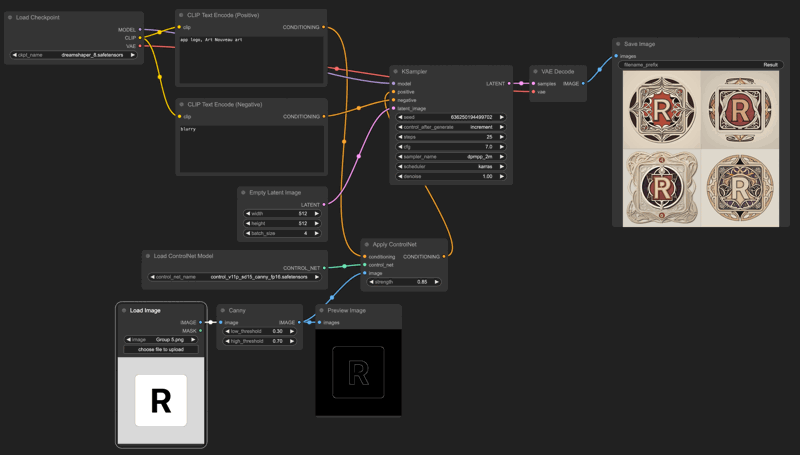
When using ControlNet, note that the Checkpoint and ControlNet's base model must be consistent, or you'll encounter an error. For instance, in the mentioned example, I used Dreamshaper in the Checkpoint, and its base model is SD v1.5, so I need to use SD v1.5 canny in ControlNet.
Furthermore, if you aim to redraw some App's logos (say, your task is to create a mobile theme), you can include several App logos as ControlNet's input, allowing you to produce multiple App logos at once.

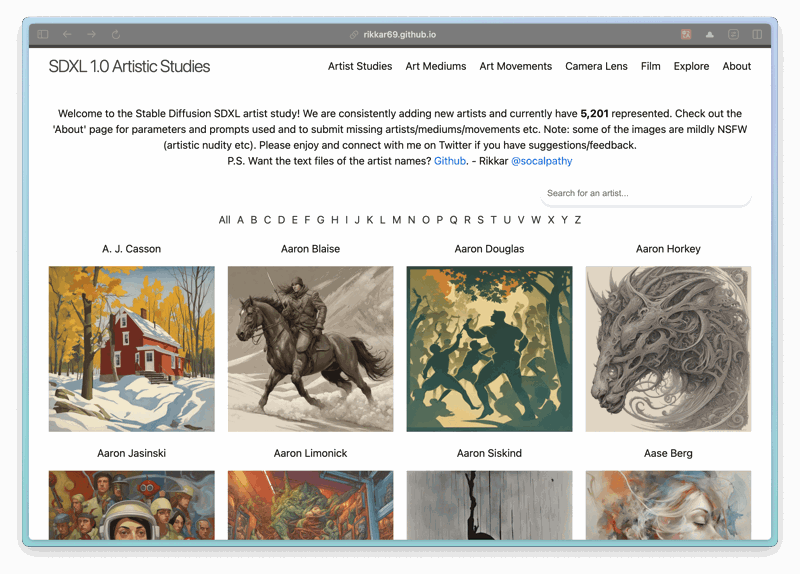
I quite like the bread theme above, and the second style is Art Nouveau. Here's a recommended website with a list of Stable Diffusion usable Prompt styles. You can check out this website to see which styles suit you and then use them in your prompts.
3. Generation with Reference
Lastly, you may encounter a situation where your client provides reference images for you to design the logo. In this case, besides letting the AI generate directly, you can also use these reference images to let AI produce a new logo.
Currently, there are two methods to accomplish this.
The first one is the Reference-only ControlNet method. Simply put, the model uses an image as a reference to generate a new picture.
To set up this workflow, you need to use the experimental nodes from ComfyUI, so you'll need to install the ComfyUI_experiments plugin. You can use the ComfyUI Manager for installation or download and import manually. If you're unsure how to install it, you can refer to the plugin installation tutorial.
After installing, you just need to replace the Empty Latent Image in the original ControlNet workflow with a reference image. First double-click on the space, search for Reference, and you'll see the ReferenceOnlySimple node. Add this node and connect it to Ksampler. Since this node only supports importing latent, you need to use VAE Encode to convert the image into latent. The final workflow is as follows:
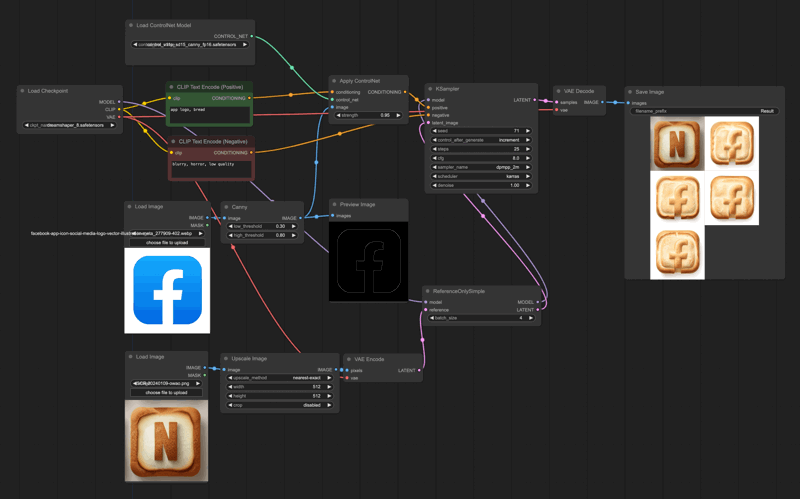
From the above diagram, you can see that using this method doesn't perfectly generate a new image according to the reference, but the overall design style is quite close. Also, you might notice that I've added an upscale node. Because my reference image is rather small, it needs to be enlarged first. If your reference image is large, you may not need this node.
The second method is the IPAdapter + ControlNet method. This method similarly uses an image as a reference to generate a new image, but comparatively speaking, its effect is not as good as the first method. From my experiments, this method shows superior results in generating human portraits.
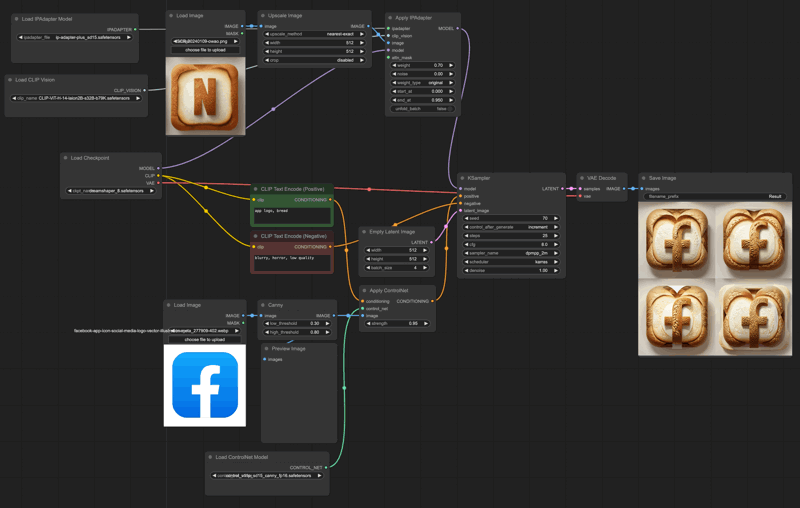
However, I believe this method is still a great way to generate images using a reference picture. Although the rendering effect is not good in my example, you can still give it a try; you might generate some pretty decent images.
4. Conclusion
In the end, I would like to give a few suggestions to all the beginners using ComfyUI, or friends using other AI image generation tools:
Regardless of the method you choose, as long as it meets your needs, it's a good method. I've come across quite a few novices who install various plugins and download complex templates right off the bat. Many times, you don't need these, and what suits you best is the best. Instead of spending time fixing errors caused by various plugins, spend more time thinking about how to use AI to make your work more efficient.
Have a little more patience and try more. I've encountered many friends who have just started learning ComfyUI. They download all sorts of pre-made workflows, run them, and realize they can't generate good images at all, so they give up. Frankly, AI technology has not yet reached the point of completely replacing humans; it still needs human participation. You need to try more, adjust more, and think more to get what you want. After all, if AI could generate perfect images without the intervention of a designer, then you and I would be out of jobs, wouldn't we? 😂.
