Backstory (skippable)
After the first week of using A1111 to generate images, I had already downloaded dozens of checkpoints from CivitAI. The collection quickly grew, and even though I occasionally cull a checkpoint or ten, it's currently sitting at 650+
I quickly created a system where I used the same prompt and settings for each thumbnail to be able to see how they differed, but this was time-consuming, and it only let me have one type of picture.
If I showed off the capabilities to create photorealistic portraits, how would I know how good the models were at creating nature environments, or sci-fi abstract space wallpapers?
Forward to now (skippable)
Since then I have been wanting a tool like this. I knew exactly how I wanted it.
Not until now did I feel confident enough that I could create this myself together with ChatGPT.
After a week of coding, 755 pages of ChatGPT conversation (2.2M characters), I can now present the result :)
Links
https://civitai.com/models/266313
https://github.com/MNeMoNiCuZ/sd-webui-thumbnailizer
Installation
It's an officially listed extension, so you can find it in the Extensions section of A1111 as you would with any other extension. Follow the Github installation steps for help with the setup.
How to use it
Once installed, restart your A1111 and find the Thumbnailizer extension tab at the top bar.

Once here, you should be greeted with a gallery of thumbnails for your checkpoints, if you have any thumbnails for them already. If you don't have any thumbnails, this is fine. It's what this extension can help you with.

Switching Sets
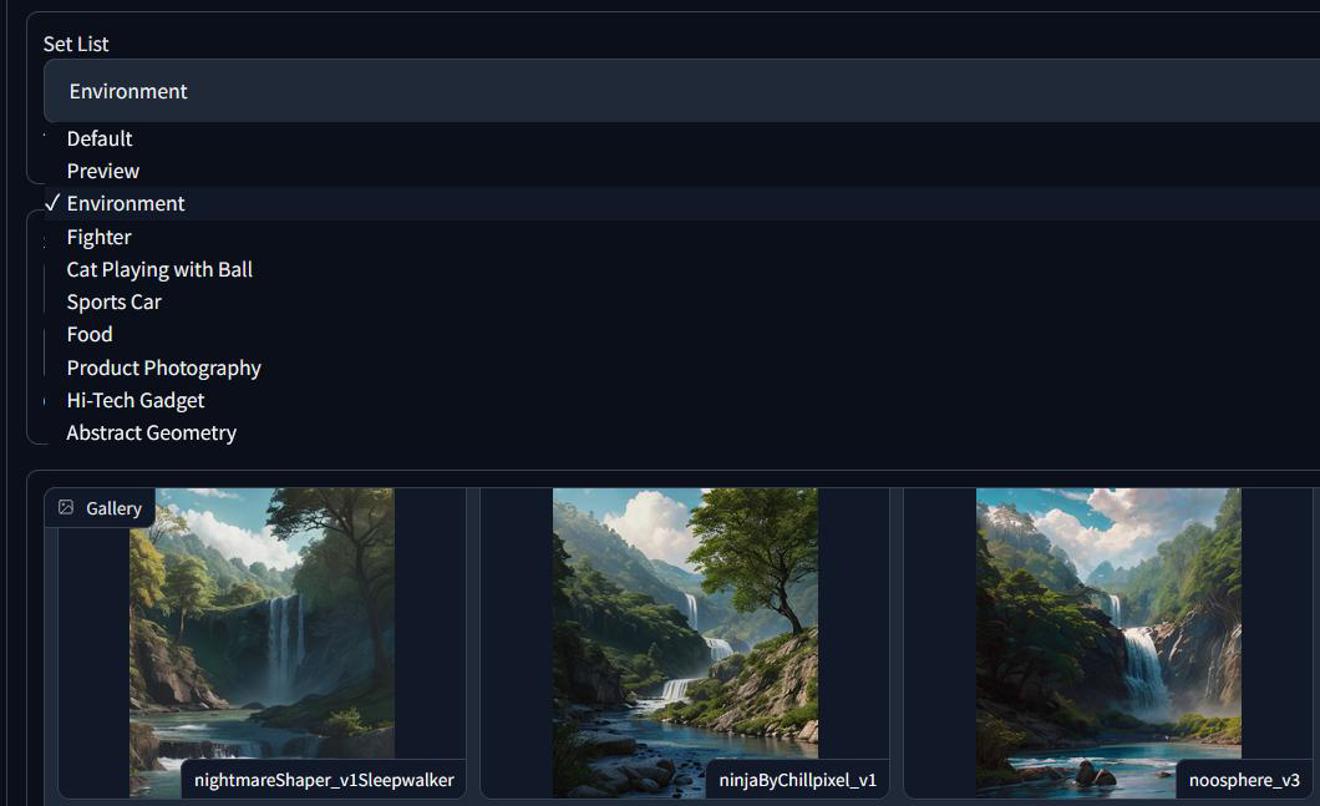
The first thing you'll see in the interface is a "Set List" selector drop-down at the top of the page.
This is where you choose what type of set you want to preview. The extension comes with a bunch of presets, but you can also customize this list and create your own prompts.
Choose a category that you would like to generate thumbnails for, and we'll go through the steps. Do not pick Default or Preview for now. I'll explain more about them below.

I went with Environment.
Generating Thumbnails for the Chosen Set
Once you have chosen the set, the gallery will refresh. This may take a minute if you have hundreds of checkpoints. Once it's done, you will be able to create new thumbnails. Please wait for it to finish loading before you generate new thumbnails.

You have a few options here.
If you wish to generate thumbnails for ALL models that don't have thumbnails of your selected Set List yet, you can press Generate Thumbnails. Leave the "Last Index" at -1.
If you wish to generate only a few test thumbnails, you can pick a number in the "Last Index" field. It will start from your first model (sorted by folder(s) & alphabetically), and then do X number of generations, where X is the number you put in Last Index, +1.
To try it out and generate 6 thumbnails, set the Last Index to 5.
When you press the Generate Thumbnails button, it will now tell you to see the console for the progress. Switch over to your Automatic 1111 console window (the black "Command" window that you launch with webui-user.bat).

If all goes according to plan, it should now be generating your images and telling you its progress as it does so.
Once its done, or before if you like, you can go to the folder where you have your checkpoints, and see the new thumbnails being created.
As of right now, the gallery doesn't update automatically, so you have to switch to another tab and then back again to refresh it. You can also fully restart the server, but this is slower.

Hopefully, you now have a list of a few or all of your thumbnails.
You can now repeat this, or set the "Last Index" to -1 to generate "the rest".
To force-re-generate thumbnails, click the "Overwrite Existing Thumbnails" checkbox. This will save over any existing thumbnail for this set. Use with caution as there's no undo for this.
Customizing the Set List
Underneath the Set List, there's a link to the sets_user.json-file.

Open this file with a text-editor of your choosing.
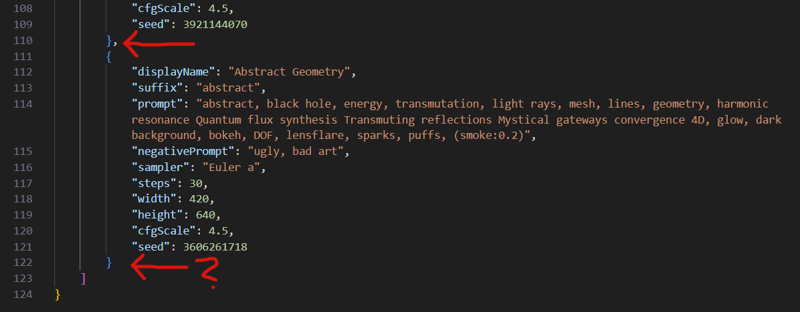
It should look something like this:

Feel free to edit this as much as you like.
Make sure that you're editing the sets_user.json, this is what's used for the extension.
This is where you edit the Prompt, Steps, CFG, Seed etc. for your thumbnail generation.
Note: You can indeed use -1 seed here.
Feel free to edit and remove the default ones in there and come up with your own list. If you have any good recommendations, please share them in the comments below.
Heads up: The last set doesn't have a comma after the } concluding the set.

Make sure that your last set doesn't have any comma. All other sets must have one after their ending }.
Blocklist

Below your thumbnails, you will have a dropdown list of all your checkpoints.
You can open this up and select any checkpoints that you do not wish to generate a thumbnail for.
Default SD1.5 models, LCM, Turbo or SDXL-models may not generate nicely with the settings you have for the sets, so feel free to block them as you need.
There is a plan to be able to switch blocklist/allowlists, but right now there's only one. You can manually rename and switch between multiple though if you want to generate for SDXL with one blocklist, and non-SDXL with another as an example.
Default Set
The "Default" set is what will be shown in the "Checkpoints" sub-page (previously called Extra Networks). So whatever you generate for this is what you will see throughout the rest of the program.
It is perfectly fine and safe to generate these. The default prompt will be: Closeup of brown hair woman knightin shiny metal armor, detailed skin, wearing jewellery, masterpiece, in front of a castle, extremely detailed, sunny day, best quality
Keep in mind that if you had thumbnails from before, and you check the "Overwrite Existing Thumbnails", you will overwrite your old checkpoint thumbnails.
Preview Set
Similar to the "Default" set, the preview set is slightly special. If you use the excellent "CivitAI Helper" extension, you may already have the CivitAI default thumbnails for your checkpoints.
If you combine this with having manually created thumbnails before, the CivitAI thumbnails will have a filename of CheckpointName.preview.png.
This is why I have a Preview Set.
It let's you switch to these thumbnails if you wish to see the original ones from CivitAI.
If you should want to generate your own thumbnails for this, the default prompt will be: closeup of a handsome bearded man, detailed skin, in a bar, colorful lights.
Development Conclusion (Optional)
There are some known issues and a todo/wishlist that you can find on the Github page. Feel free to request features below.
To reiterate the backstory section, anyone can create an extension like this. I managed to do it with no coding background. It takes time and effort, but you will learn a lot by doing it.
If you have any cool extension ideas, don't hesitate, start developing them today!
I used the Developing Extensions-article on the A1111 Wiki on Github to take my first steps, and then I went to ChatGPT for all the functionality step by step. The steps went something like this:
Create a Gradio gallery
Fill it with images from the checkpoints folder
Switch between sets of images with special names to control it
Create a JSON-file as a config for the sets (at first I had a set-editor on the page but it grew complex and error-prone)
Block models from a blocklist json
Generate new images based on sets-file
Switch checkpoints to the list of non-blocked checkpoints
Polish and reworked the code
Feedback after code review from good helpful programmers
Towards the end I was doing a bunch of the coding without ChatGPT. Around 50-50 as I learned a lot of the basics and structure of the code throughout the process.

