Wasabi’s Dataset Cleaning Manual
This is a copy-paste of what I wrote and shared on google doc, which might be a bit easier to navigate.
Google doc version: https://docs.google.com/document/d/1jX8-alRpvfRx21x4Fq15yvPEo-UQlhMvfLQHmeWO2vE/edit?usp=sharing
Author: Wasabiya
last edited 2/7/2024
Twitter: https://twitter.com/CatNatsuhi928
Pixiv: https://www.pixiv.net/users/20843430
CivitAI: https://civitai.com/user/Wasabiya/models
Discord Server: https://discord.gg/AmdETXDfHs
Change log:
2/7/2024:
additional info and img added to step 2 "Useful Knowledge: bucketing"
added new section, step 3 "my idea of a good tag distribution"
2/4/2024:
made the document
These are the steps I take for creating a “good” dataset. The main purpose of this manual is to present a detailed guide on something many tutorials often ignore or don’t put enough emphasis on, which is the importance of having a clean dataset. My old loras do not follow all of the steps listed here because I’m also learning and improving. I’ll keep this updated each time there’s something worth sharing.
You can use this information to make your own lora (I recommend blending my guide with Holostrawberry’s online trainer guide: https://civitai.com/models/22530 ) or follow these steps and send a Lora request/commission with the cleaned dataset to Wasabi’s request form: https://forms.gle/nyEofFWZB2TyBf8d8.
Some of the examples in this guide contain a bit of NSFW [censored for civitai].
Some may notice that I’m heavily influenced by Holostrawberry’s work because I started my lora training with his Google Colab resources. I currently use a modified version of his tagging code, and the dataset cleaning is one major addition to his methodologies, which greatly increased the quality of my loras.
I recommend skim-reading all of the steps first then going back and following each step at a time because knowledge of what needs to be done later might help you make decisions in the previous steps.
Table of content:
Step 0: getting useful softwares/tools
Step 1: Collecting data
Step 2: Cleaning, cropping, and editing data
Transparent Backgrounds
White Borders
Signatures, Hearts, Speech Bubbles
Useless Whitespace
Useful Knowledge: bucketing
Step 3a and 3b: Organizing the data into folders and renaming files
Example 1: Tsunade (Naruto)
Example 2: Rukia (Bleach)
Example 3: Ushiromiya Rosa (Umineko)
My idea of a good tag distribution
Other Examples:
Simple Character: Ushiromiya Natsuhi (Umineko)
Pose: middle finger + bulk flip online
Background: Torii
Step 0: Getting useful softwares/tools
Here are the software/online tools I commonly use for making a dataset (I use Windows so you might need to find a different tool for some if you’re using Mac or Linux):
Grabber, [for step 1], useful tool to batch download images from sites like rule34 and danbooru. Doesn’t support Pixiv or Kemono so those are surfed manually.
URL: https://github.com/Bionus/imgbrd-grabberMS paint, [for step 2], you can use GIMP, Krita, or any other free image editing software, but I like to use a lightweight software because I open and edit A LOT of images.
Lamacleaner, [for step 2], you can use photoshop if you have it, it’s a software that helps remove objects from the image, basically a magical object remover. I use LamaCleaner for edits that’s difficult with MS paint.
URL to github: https://github.com/Sanster/lama-cleaner
The one-step installer is $5 but it’s also available for free if you manually install it. A good instruction on installing LamaCleaner is on youtube (Turn on English captions if needed): https://www.youtube.com/watch?v=3BfXZwQPJkI&t=320sPowerRename [for step 2] and ImageResizer [for step 3] from Microsoft PowerToys.
Both tools come in a bundle of extensions by Microsoft, very lightweight and useful when doing batch processing. PowerRename is used in step 3 and ImageResizer is optional (you can use any image software to edit the size of the images)
URL: https://learn.microsoft.com/en-us/windows/powertoys/DupeGuru, [Optional, for step 2], helps find duplicates in your dataset (I only use it if I’m not sure if there are dupes or not)
URL: https://dupeguru.voltaicideas.net/VLC player, [Optional, for step 1], get it from the Microsoft store or something. Useful taking screenshots (CTRL + S) of anime if you want to add that to the dataset. I use it because it has easy rewind with arrow keys and speed up and down features.
Bulk flip image online, [for step 2], URL: https://pinetools.com/bulk-batch-flip-image
You can upload multiple images and download a zip with the horizontally flipped images. I use it for asymmetrical datasets and flip as much to make one (left or right) overpower the other (Check example for more info, I used it in Pose Example 1)
Step 1: Collecting data
Basic Collection: I mainly collect images for my dataset using Grabber. This is sufficient for simple characters, concepts, backgrounds, etc. (70%~80% of all my Loras are done with just Grabber)
Extra Collection: For characters and the occasional “difficult” concepts, I spend a bit more extra time (2~5 hrs). I do additional searches on Pixiv, Kemono party, and Pinterest. I also check the anime/manga for characters and take screenshots (VLC comes in handy). I only use .jpeg, .jpg, and .png, if you have a .webp or something, just open the file and take a screenshot and save as a png.
I try to get a minimum of ~100 images for a lora. Average is 150~200 and some of the larger datasets can go up to 400~600 images. Many tutorials will claim, 20 or 40 images are enough, but if you want a high quality and flexible lora, I recommend using at least 100 images. If the concept is new or rare and you only have 60 or so images, you just gotta live with it and add more effort in the tagging or something to compensate for it.
I’ll show how to use grabber for the basic collection, and skip the extra collection because the extra collection step is just a time consuming manual search.
Grabber UI and explanation:
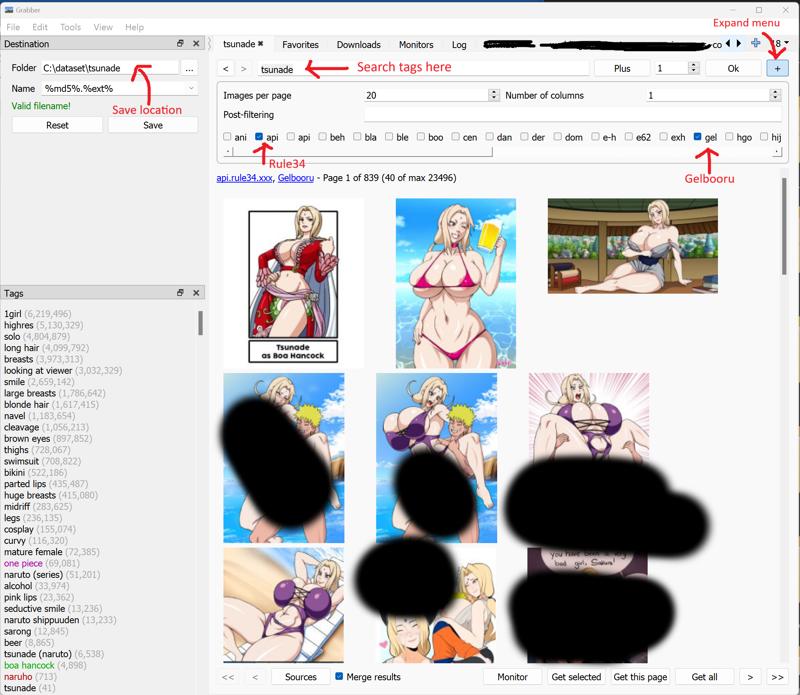
The images shown are the thumbnails, you can CTRL + left click and select multiple images in a page, then click on “Get Selected” on the bottom.
TIP: you can add the minus sign in front of the tag to remove images with those tags. Also some sites will have different tags for the same thing so you might need to do multiple searches.
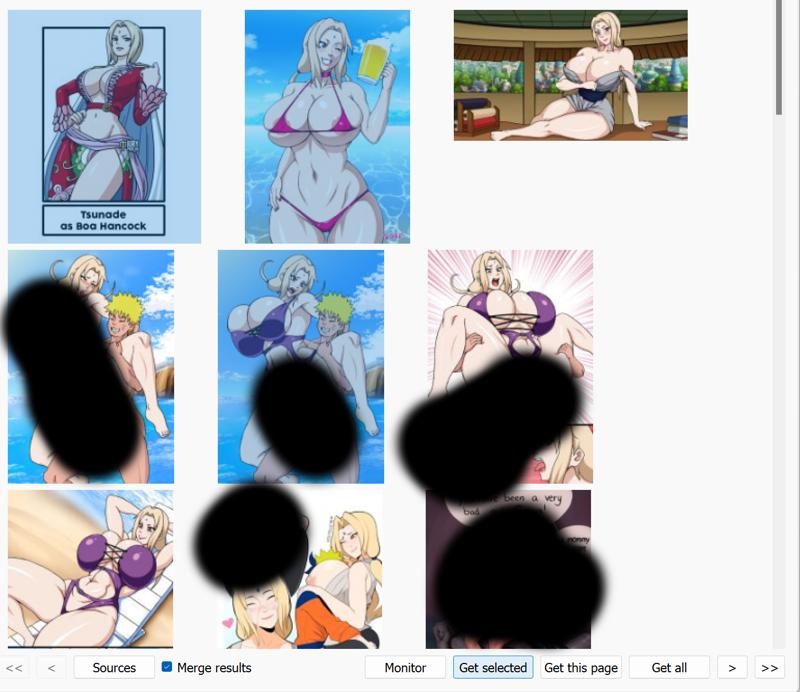
Here I have selected img 1, 2, and 5 then I click on “Get selected”. Once you’re done with the current page click on the arrow on the bottom to move on to the next page. In practice, I select as many “high quality” images that have something to contribute to the lora. I like to make my loras flexible so I include many art styles, angles, poses, etc. Don’t include AI art in the dataset unless the quality is indistinguishable from real art. Learning from AI generated art is basically inbreeding and the lora might learn the errors and bad traits of other models.
After selecting all the images you want to include in the dataset, move to the “downloads” tab
In the downloads tab, you’ll see the image links that were selected (in this example I see 3 items). Click on CTRL + A to select all, then click on “download selected”
You get a pop-up for the download progression, wait for the images to download (pretty fast), and check your folder. If all goes well, you’ve successfully collected a set of images for a dataset.
Step 2: Cleaning, cropping, and editing data
Many tutorials skip this step, and I think it's an often ignored critical step and may provide the answer for many wondering about the quality of my loras.
What I do is basic editing and cropping, nothing advanced, because I'm optimizing the time spent editing each image. For most cropping and editing, I spend 5~10 sec per image and difficult edits take max 5 min. The degree of importance with cropping changes depending on the type of detail needed to be persevered: micro, macro, or both. Cropping is important if there’s small details that need to be learned by the lora.
When I'm selecting images in step 1, I have the potential tags and the time/effort needed to edit the image in the back of my head. If I'm doing a minor concept with only a few hundred result then I may choose difficult to edit images if it's a great addition to my dataset, but for common concepts (like tsunade from naruto) with thousands of results, I skip difficult images and choose the high quality images that doesn't need much editing.
There are a lot of case-by-case edits, but I’ll list the most common problems below. The case-by-case problems are variations of the common examples so try to use common knowledge and the best tool for the job.
Transparent backgrounds:
Open with MS paint or any other image editing program, add a layer, and fill in the new layer with white (or any neutral color) background using the bucket tool then merge the layers. DON'T use a bucket directly on the subject layer, there may be transparent or semi-transparent pixels that’s not filled by the bucket which may cause issues.
Images with white borders:
Try cropping the white borders, if there’s something important on a side of the white border, you can leave that side in, but try to crop as many white borders. The white border is not something the Lora needs to learn, if there’s too many white bordered images in the dataset, that might be an unwanted feature.
Signatures, logos, floating hearts, and speech bubbles:
Try cropping them out or draw over it if the background is mono-color. For gradient background or if the object is overlapping with something else, use lamacleaner. We remove hearts, stars, symbols, and other floating objects because they’re going to be tagged and especially hearts are problematic because a huge portion of images has hearts, which could unintentionally bleed into the lora. If you use a lora and see random signatures, hearts, or speech bubbles commonly show up, it’s the fault of the creator of skipping this step. Signatures and hearts can show up due to randomness, but it should be less than 5%~10% if the lora creator puts in some effort.
MS paint example: Just use white and paint over the hearts and signature next to the tail
Lamacleaner example:
Small Subjects/useless whitespace:
Some images have a lot of whitespace around the subject and it’s best to crop as much useless space because the loras are trained on a set of small resolutions between 512~1024, more detail in the bucketing section below. I chose this bird image as an example to showcase the problem of too much “empty space”.
Useful knowledge: bucketing in regards to lora training
When we train loras (depending on the Lora training program) the images are automatically resized into specific sizes that match the model (Ex: 512x512, 768x768, or into multiple “buckets” of pixel sizes). Usually images get resized into small or medium sized resolutions and I will show you what the lora will see if we didn’t crop the bird in the example above.
The original bird image was [2048x1535] and we resized the uncropped image to [768 x 576], which is one of the bucket sizes. The resized image is shown below. It looks ok at a glance, but let's dive deeper.
Below is a comparison of what the lora sees (both are zoom-ups of the neck and body after they were resized to fit a bucket size). If the lora is trying to learn the bird, style, or the feathers from the uncropped image, then it’s going to struggle to properly learn the fine details. This bird is fairly simple and we can easily imagine what would happen to a complex character with fine details.
Here, I want to present one simple method of preserving information by properly using the bucket feature. We usually set one value for the height and width in the trainer (usually 512px, 640px, or 768px) to be the main resolution. I will use 512px for my following example. Buckets are used to prescribe similar max pixel counts for each image during training and I list the common bucket size for a 512px setting with a 64px pixel difference (you can adjust these parameters to have finer buckets, but I’ll use 64 for my example).
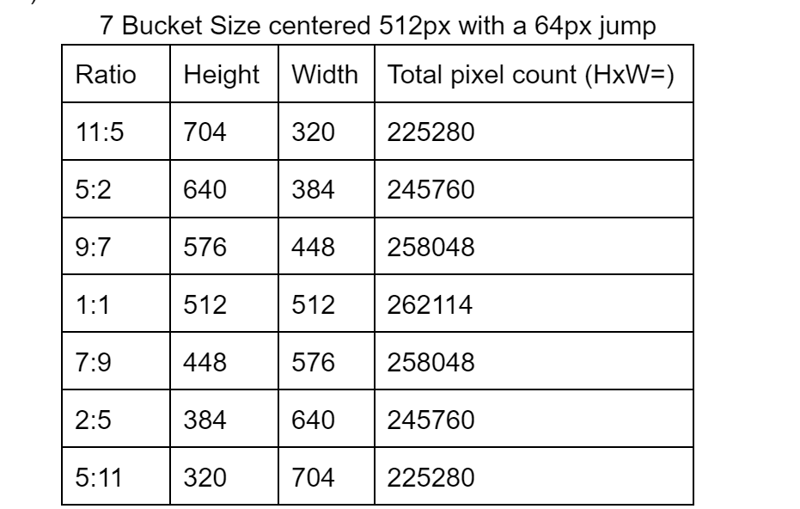
Here the height and width are going up or down by 64 pixels in the opposite direction and the number of pixels (aka information) is relatively conserved. The bucket feature allows you to have different aspect ratios and the lora is able to learn from them.
Below is an example from my peace sign lora that I’m making while writing this section. My focus of the model is to properly learn the peace sign (both V and W variants) so I want to preserve and provide as much information to the model while keeping the image looking natural. My cropping of choice would be the 3rd crop and we can observe that it’s basically double the pixel count compared to the original (I’m surprised by the x2 because I never did a true calculation, but my god that’s a lot)!!!
I believe I have presented a strong argument for why I put such a huge emphasis on cropping. It only takes a few seconds, but depending on the edit, it can easily provide double the pixels (or 1.45x height and width) as shown in this example.
Step 3a and 3b: Organizing the data into folders and renaming files (optional)
There’s 2 steps to organizing the data. I first separate the images into smaller subfolders, then I add “identifier phrases” onto the file names [step 3b]. The reason why steps 3a and 3b are optional is because you need to know what are some clothings/accessories/objects that may be ignored or mistakenly tagged by the auto-tagger [not included but tagging is step 4]. I have this extra step to efficiently counter the common problems with auto-taggers (You can test taggers in automatic1111’s stable-diffusion-webui-wd14-tagger extension). For those curious minds, I use swinv2-v2 as my default tagger and I do a bit of cleaning up and filling in missing tags.
I organize my data into separate folders mostly based on common features in the dataset. For characters, I separate the major outfit(s) into separate folders and put the nude, bikini, leotard, and other clothings into a separate folder. I then use PowerRename to add acronyms or some identifier to each image for each object that should be tagged (I do this because I have my own code that adds specific tags based on certain phrases in the filenames). The PowerRename is pretty useful in adding an “identifier phrase” so I can filter and check the images.
PowerRename UI:
Select images with specific concepts in your folder, then right click → PowerRename → you get a popup for powerrename. I use a “.” in the first field and “_[identifier phrase].” in the second field, which will add the phrase to the end of the file. Check the Tsunade example images to see how the file names changed after using PowerRename for each special item.
Here I’ll list some of my folder structure to show what I mean by organizing the dataset.
Tsunade (Naruto) folder:
She has one main outfit which is the green haori + gray kimono + dark obi and the rest of the images are dumped into the etc folder.
Some examples in the Tsunade’s outfit folder below. The images just need to have her “outfit” and not all of the clothes or accessories need to be present. The names have phrases at the end to identify the object in the image using PowerRename.

Rukia (Bleach) folder:
3 outfit folder: School uniform, Snow (Bankai) form, and Shinigami clothing
1 general folder for nudes, bikini, and alternate clothings
1 alts/misc folder used for images with higher repeats.
Here’s some of the identifier phrases I added to the file names:
"paleskin", "snowuniform", "hagoromo", "tabisandals", "tabisandals", "icehair", "blackkimono", "whitesash", "haori", "armband", "school", "whiteshirt", "grayskirt", "grayjacket", "sidepony", "snowwhite"
And here’s the corresponding tags that were added in the final version:
"pale skin", "white dress", "hagoromo", "hair ornament", "black kimono", "sash", "white haori" , "armband", "school uniform", "white shirt", "gray skirt", "gray jacket", "side ponytail", "albino"
Ushiromiya Rosa (Umineko) folder:
Anime and fanart are separated in this case because I have a high count for the anime screenshots and I need to put a lower multiplier (repeat) value so it doesn’t overpower the fanart.
My idea of a good tag distribution:
In my opinion, something like the figure below is a good tag distribution (shape varies based on the concept of the lora but this distribution shape is common for my models with 1 main concept and a few sub-features). Having a sudden drop in the beginning allows the main trigger to be learned really well and we can place different repeats on main and secondary features to control the influence of each tag. The frequency’s distribution shape feels natural and good for me because it shows that the important tags are well concentrated together and the fat-tail provides the “noise” to influence the main tags and makes the lora flexible.
I probably unconsciously try to tailor my image selection to make this kinda distribution. If I’m missing a good “noise” tag, then I deliberately search for those tags and add it to the dataset. I often find myself sprinkling in conceptual variants of the main concept to purposely hinder/challenge the training. I also try to elevate the representation of underrepresented tags or difficult tags in checkpoint models like dark-skinned female, milfs, multiple people, and other related tags when applicable. By forcing flexibility it also makes the model compatible with multiple loras.
Dataset Examples:
Simple Character: Ushiromiya Natsuhi (Umineko)
Dataset consists of fanart, PS3 and Pachinko CG, and anime screenshots. There’s 2 folders, outfit and the etc folders, and I added the identifier phrases for the corset, ascot, gem earring, and gem brooch
Pose: middle finger + bulk flip online
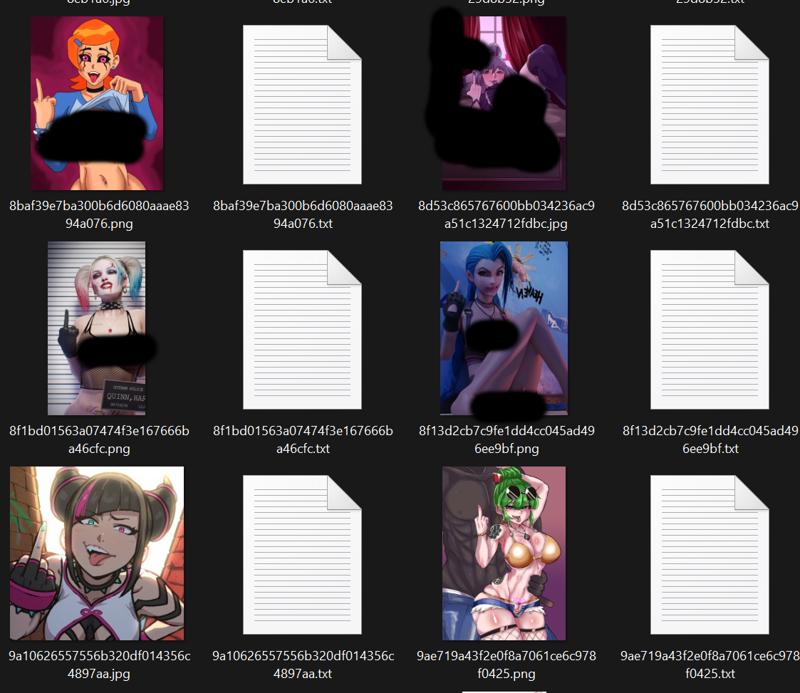
I separated the left and right hand middle finger, then uploaded the separate folders to the bulk flip site and I got 2 versions of each image, left and right handed versions. I then made 2 separate loras for the left and right hand version.
Screenshot of dataset (txt files are the tags associated with the image):
Background: Torii
Torii example: one folder, no identifier phrases, nothing special

