Cascade Lora Training Study, lots of tips and observations:
In depth study looking at Stable Cascade Lora training.
Installation and Quickstart:
Training Lora's for Stable Cascade with OneTrainer
We will cover installing OneTrainer and how to start training with Stable Cascade. We can train checkpoints with this method but will walkthrough training Lora on Stage C here. This trainer is installed locally to your computer, so you will need a GPU capable of Training.
Training Lora's is a deep subject, this guide presumes some experience with training AI models
Consider the onsite CivitAI Lora trainer if you prefer an easy to use web based solution.
It's not Learning!
Adjust the Learning rate.
Adjust the repeats.
Adjust the Epochs accordingly.
Aim for 1000-2500 steps.
(Image Count * Repeats * Epochs / Batch Size) = Steps.Training Study, Sample Images per epoch: https://www.figma.com/file/6VSLi9w4lyg1G2NQaZA7Sy/OneTrainer-Stable-Cascade
example Cascade Lora: https://civitai.com/models/320332

if you see the left image using this lora with the test prompt, the lora is not being correctly loaded, wait for an update from your webUI provider, or check your settings.
Overview
1. Installing OneTrainer
2. Preparing Dataset
3. Loading OneTrainer Presets
4. Training settings
5. Defining Concepts
6. Start Training
After we have finished training, we can test the model in comfyUI. At the time of writing, Lora training was only viable for 24 hours. Although you could train Lora, most UI were unable to fully load them. Currently the Up, Down and Alpha Lora Layers are not being loaded, but UI updates can fix this.
ComfyUI custom node "Inspire Pack" contains a custom node for loading "Lora with Block Weights", which i have used to get accurate to ground truth images out of my Trained Cascade Lora. This will be shown and explained in the video.
Installing OneTrainer
https://github.com/Nerogar/OneTrainer
We will walkthrough installing in the video
Preparing Dataset
Your dataset should be 1024x1024, Image+Text Pairs of matching filenames.
advised to use a small dataset for your first tests.
Loading OneTrainer Presets
When you open up the UI, there are dropdown lists at the top.
After choosing the version you wish to train on here, we can move on.
When you find a nice config, you can also save them.
be sure to select "lora" on the right hand top drop down menu.
Finetuning is used for training Checkpoints.
Training settings
Created a new folder named "/models/" inside Onetrainer
Download "effnet_encoder.safetensors" & copy it inside the /models/ folder.

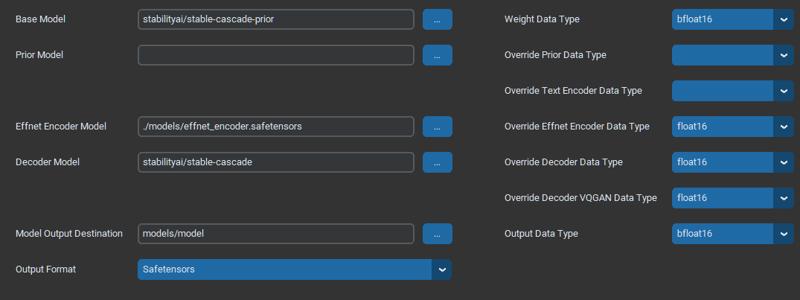
Set Base Model Path to "stableai/stable-cascade-prior" (not cascade)
Set Effnet Encoder Path to "./models/effnet_encoder.safetensors" (local file)
Decoder model path "stabilityai/stable-cascade"
For the Model Output Destination remember to use a unique name for your model.
replace "models/model" with "models/pretrainedLora.safetensors"
Training Tab shows all the actual Training Run parameters.
We will use the same settings as what is recommended for our first run, then make small adjustments and repeat the training until we find a good result. Then we can try to use larger datasets or entirely new ones. We will always need to do multiple training runs until we have an understanding for the approach. As with all previous Lora Training methods on previous Diffusion models, settings can vary from project to project. If you do not know, do not change it. By making one change and repeating the training, you can learn how to improve your model outputs.
Defining Concepts
OneTrainer uses the "concepts" tab to define the path to your datasets.
Click add a concept and then click on the new concept in the UI.
Set your dataset path here, there are a lot of options, which you do not need to change.
They can be very useful once you are up to speed. Any concept that you toggle to the on position will be included in the Training run.
Start Training
Once everything has been configured click the button in the bottom right to start training.
once Training starts, you can Open Tensorboard to view the Loss Graphs and other information during training.
Training Completed
If you completed all the steps, and set it up as shown here, you will find your Trained Lora inside:
"OneTrainer/models/trainedLora.safetensors"
This can be loaded in ComfyUI, Auto1111 or similar to get your images. Remember to run your prompt with and without your Lora Loaded, this can prove your training was completed.

