DREAMYDIFF
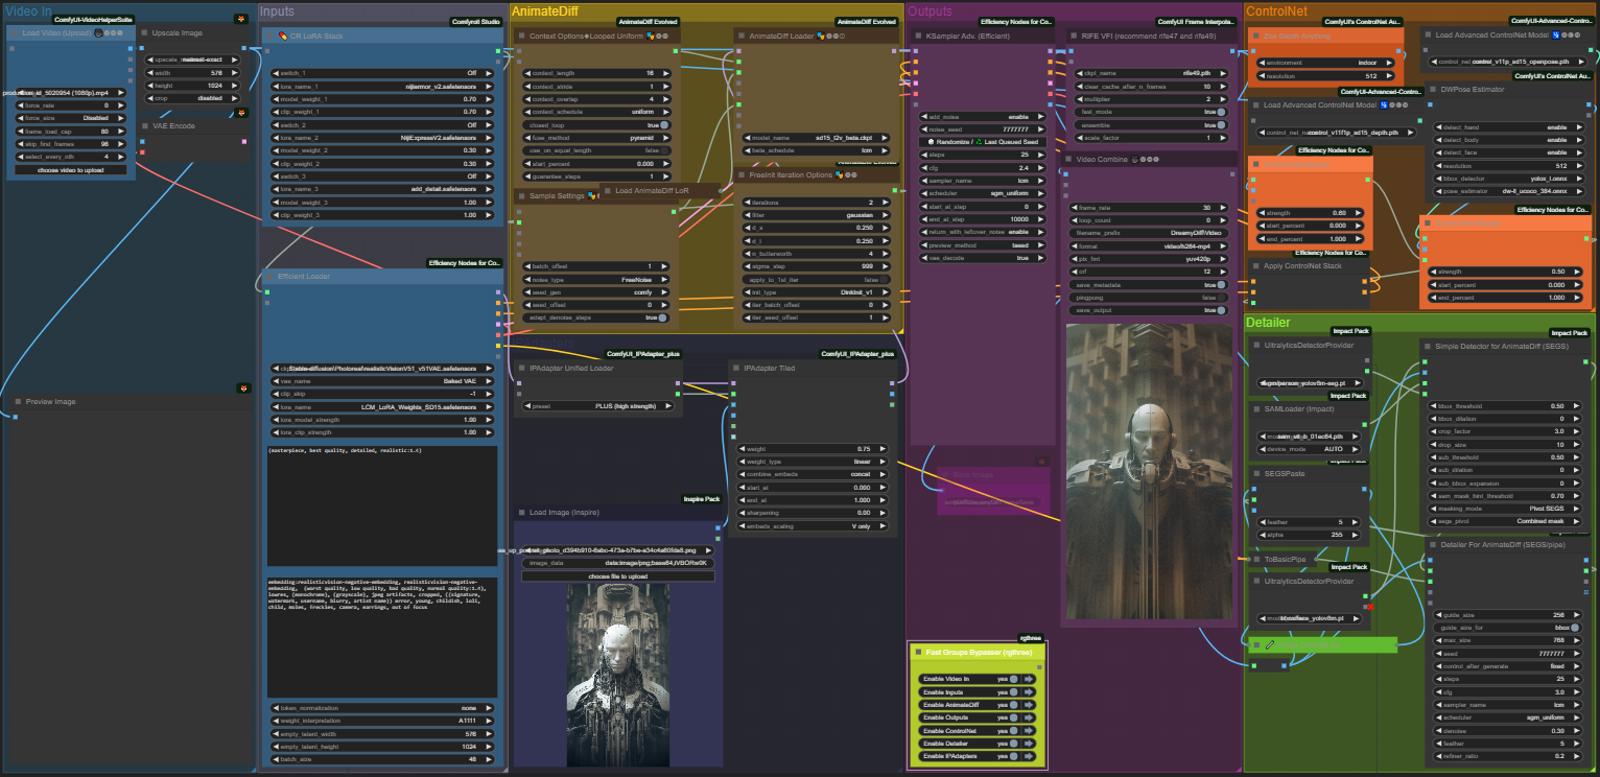
This is a relatively simple workflow that provides AnimateDiff animation frame generation via VID2VID or TXT2VID with an available set of options including ControlNets (Marigold Depth Estimation and DWPose) with added SEGS Detailer. You will see some features come and go based on my personal needs and the needs of users who interact with me about this project.
My goal here is to create an incredibly compact yet robust, all-in-one personal template for the kind of animations I often enjoy creating using AnimateDiff. I often remote into my PC using a smaller laptop screen so this was built to fit everything into one screen (given a 16:9 resolution.) and I just straight up do not enjoy scrolling around workflows and zooming in and out a lot.
Efficiency Nodes help a lot with this endeavor, alongside the others I have chosen to include, a huge thank you goes out to the authors/devs working hard on these all the time. They make all of this possible. If you have the means to, please donate to developers like IPAdapter's Matteo.
This workflow assumes you know how to Install Missing Nodes using ComfyUI Manager, as well as having the ability to Install Models into correct directories. You can use the manager to basically install everything you need, including most if not all of the models (outside of SD 1.5/SDXL checkpoints and lora's associated with their prime use.)
Motion Module & Lora Downloads:
https://huggingface.co/vdo/AnimateLCM/tree/main
The workflow is setup with great LCM sampler settings for speed as shared from guides by Inner-Reflections here: https://civitai.com/articles/4138/guide-comfyui-animatediff-lcm-an-inner-reflections-guide Having said that, you can change to other samplers and run different motion modules for AnimateDiff, it's fun to experiment.
2x ControlNets here are DW Pose and Zoe Depth Anything in VID2VID use, I didn't have the VRAM to do Marigold combined with DW Pose so I reverted that change...
This will work really well for dance videos and accurately tracking people turning around, spinning, jumping, ideal for action sports and fight scenes in my opinion. For best results, be careful of negative prompts that will conflict with what your video is trying to achieve as it tracks a person moving all over the place it can attempt to "correct" fluid anatomy during movement. The CN's are split up so they can easily be modified for your use case.
ELLA *Gone for Now improves prompt-following abilities and enables long dense text comprehension of text-to-image models. This is very new and afaik enables the user to apply MidJourney type prompting to yield more accurate results. Only the positive prompt is hooked up and the negative still comes from the normal efficient node, you can rewrite to change back to normal prompting. No idea what I'm doing here just experimenting. As of this release only SD 1.5 is released.
1x Tiled IPAdapter this part uses most basic and simplified Tiled IPAdapter group I've had so far and it is working out great, the new update is incredible. Thank you Matteo! There are many ways you can personally decide to use IPAdapter, this is the biggest part of what makes this workflow fun! I would refer you to Matteo's channel Latent Vision on YouTube, lots of different ways to combine the weight types.
The Detailer group is pretty great for the most part, it makes for clearer details and sharpness in characters and faces, especially eyes. Some models do not require this kind of interference so feel free to test with/without for realistic or anime faces. This can add an extreme length of time to your generation particularly if a lot of SEGs get picked out of the frames so proceed with caution, especially considering that iterations are run twice as part of smoothing generating a more coherent animation using FreeInit in the AnimateDiff group.
Interpolation node is here for smoothing/filling in skipped nth frames from Video In but can also be applied to TXT2VID animations, you can bypass this Node and match the frame rate of source video for "Video In"
The Fast Groups RGTHREE Bypasser Node within the [Outputs] group makes it easy to toggle Groups ON & OFF, necessary in order to easily swap between VID2VID and TXT2VID features.
VID2VID = Everything On, Detailer Optional
TXT2VID = Video In & Both ControlNets Disabled, Detailer Optional
To easily swap between TXT2VID & VID2VID features you are basically just checking YES or NO on to Bypass any given [Group] and then connecting the correct Latent to the KSampler based on that decision. I created small NOTE nodes nearby the Latents in question to clue users in on the location of these latent connections. Once I find a more effective way to toggle these I will include it.
VID2VID [Video In] (VAE Encode) Latent -> [Outputs] (KSampler)
TXT2VID [Prompts] (Efficient Loader) Latent -> [Outputs] (KSampler)
EXAMPLES
// TXT2VID
// VID2VID
Pretty much every animation here is made with this workflow
https://www.threads.net/@dreamerisms


