The beginning
June 30, 2024:
-> Fixed wd taggers and BLIP captioning + now all taggers run on onnx run time. Keras run time has been removed since it's actually much slower.
-> Now you can use paths to specify where you want to setup the LoRA folder instead of just a name on the root of drive/google colab.
-> Added the ability to give different file names for downloaded models and VAEs. Additionally, now you can save them on your own google drive.
-> Fixed a bunch of bugs and errors.
July 29, 2024:
-> Added the new wd-vit-large-tagger-v3 and wd-eva02-large-tagger-v3 taggers.
August 7, 2024:
-> Removed support for Forked trainer version as it's likely that won't get any update.
November 16th, 2024:
-> Added emojis to make sections separation easy to the eyes.
-> Added Illustrious v0.1 and NoobAI 1.0 (Epsilon) to the list of default checkpoints available to download.
If you use Colab to train LoRAs and are tired of putting in settings every time you load the notebook, this is your guide! I've developed a Colab notebook using Derrian's Lora Easy Training Scripts Backend which allows you to load the training configuration from a .toml file saved locally on your PC. Features:
Access to almost all of the settings of the UI, as if you were training locally.
Saving previously used training parameters to a .toml file, then loading them later (rather than manually inputting every field for each training).
New features that other training Colabs don't have (e.g. the CAME optimizer or REX scheduler).
A more optimized script (ideal for free Colab users!).
Training 1.5 or XL using the same notebook.
Bigger batch sizes.
Saving the state of a training to be resumed later, if you run out of training time.
Prerequisites
A computer or laptop with the UI installed.
Knowledge about training LoRAs; these two guides can explain the process far better than I could here.
justTNP's LoRA training guide: Explains the overall process of preparing the environment and settings in depth. Covers various concepts such as characters, poses, and more.
holostrawberry's LoRA training guide: Mostly focused on setting up the environment for his own Colab, but contains helpful and easy-to-understand explanations of settings that can be applied in local training as well.
Patience. Creating a good LoRA requires time and experience with tweaking settings. Trial and error will get you far. Join us at Arc en Ciel Discord Server if you want to discuss the process with some helpful people!
Step 1: Starting off
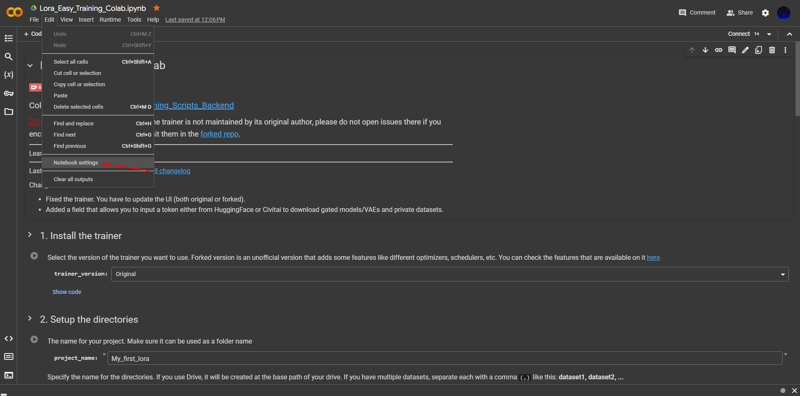
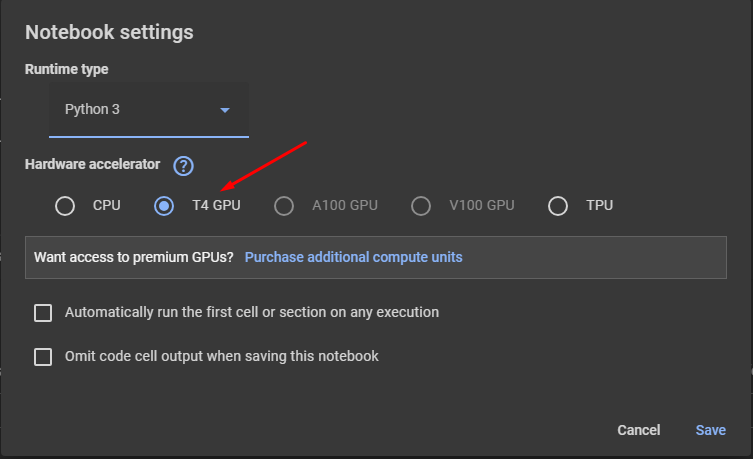
Access the Colab and make sure that you are connected to an environment with a GPU.
Step 2: Installing the trainer
Select the trainer version that you want to use and run the cell.
Original: The original version mainatined by Derrian.
Forked: An unofficial and slightly modified trainer by me which adds some features like new optimizers, schedulers and so on. These features may be subject to change depending on whether Derrian implements them in the future.
DISCLAIMER: The Forked version of the trainer is not supported nor maintained by Derrian, please refrain from opening issues on his official repository, instead submit them in the forked repo.

Step 3: Setting up the directories
Set up the directories where your dataset(s) and training outputs will go. Depending on whether you are loading from Google Drive or not, the paths should look as the following:
Not using Drive: /content/<project_name>/<subdirectories>
Using Drive: /content/drive/MyDrive/<project_name>/<subdirectories>
After this, place your dataset in the specified dataset directory (as described in the paths above). If your dataset is in a .zip file, or if the dataset is untagged, scroll down for further information.

Step 4: Downloading the model and VAE
The next step is to download the base model on which your LoRA will be trained. It is essential to pick the right model for what you want to train. For example, if you are planning on training an anime character on SD 1.5, you will most likely want to use NAI (animefull-final-pruned on the colab) for maximum compatibility. The models provided in the colab are some of the most popular models used for training on 1.5 and XL. You can add a link to another model if you would like to train on it; note that for now, the notebook only supports Civitai and Huggingface links. A VAE is not needed in most cases for training, but for Pony Diffusion XL trainings, I tend to use the default SDXL VAE. If you'd like to use another VAE, as with the models, you need to provide the link into the input. To skip using a VAE, select "None" in the dropdown. Check how to get the correct download link. If there's an error an error saying "Authorization failed" you have to input either your Civitai API Token or HuggingFace Access Token depending from where you want to download the model/VAE.

Step 5 (Optional): Unzip your dataset
If your dataset is compressed in a .zip file, you can unzip it into your dataset directory as long as you are uploading it to one of the following:
Colab local files.
Google Drive (only if use_drive was checked in step 2).
HuggingFace.
Add the path of the .zip file or URL if you are using HuggingFace to host it, select the directory to which it will be extracted, then run the cell. Huggingface links to .zip files follow the same rules as those specified for models and VAEs in the previous step. If your dataset is located on a private HuggingFace repository you must introduce a HuggingFace Access Token to download it.

Step 6 (Optional): Tagging your dataset
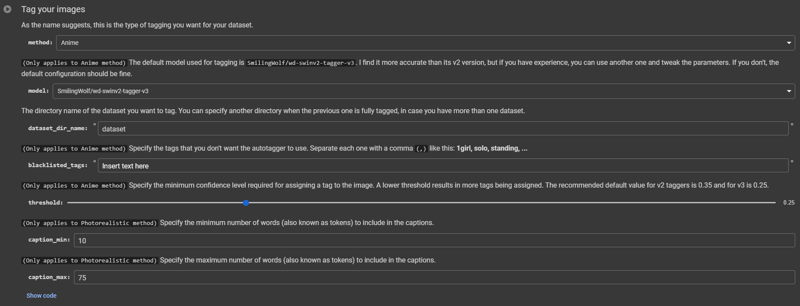
If your dataset is untagged, you can tag them using this cell. You will need to adjust a few parameters here. The default settings provided are the ones that I use for most of my models (however, they might not be ideal for photorealistic trainings). After the dataset is automatically tagged, you will most likely need to curate the tags manually for best quality; the guides mentioned in the prerequisites should be helpful in aiding you in this process. Otherwise, refer to the instructions as provided in the Colab cell.
Step 7: Tweaking the training parameters
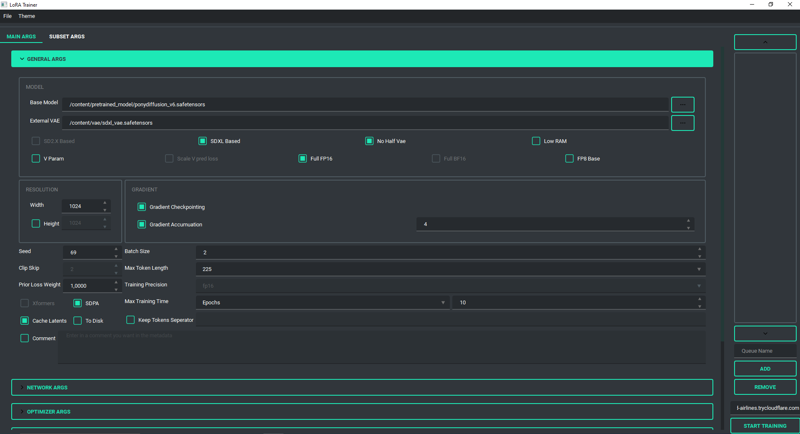
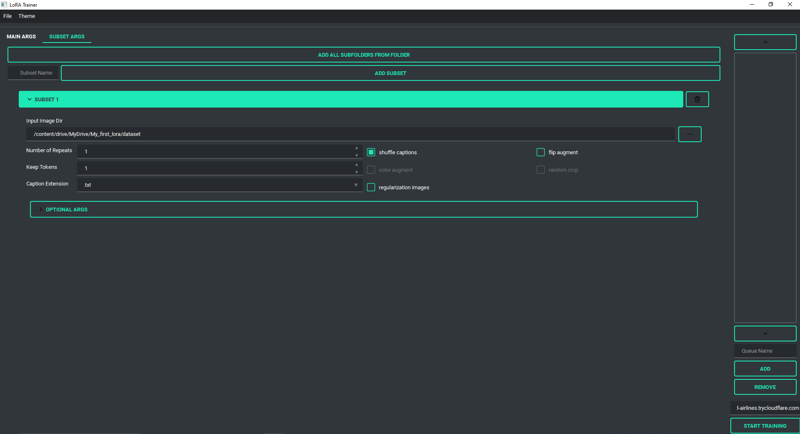
Now that everything is set up, it's almost time to "cook" the LoRA; however, we must first select the settings that will be used for training in the UI. Run this cell to obtain the paths that need to be input:

Finally, we can set everything up in the UI. NOTE: Colab (at least the free version) does not have bf16 support. 😔
Step 8 (Optional): Save the state of your training
If your LoRA training exceeds Colab's maximum GPU usage time for the day, consider saving the training state. This allows you to resume the training the next day from where you left off. Keep in mind that saving the state will significantly increase your Google Drive storage usage. For users on the free plan with a maximum storage limit of 15 GB, it is advisable to limit the number of saved states to 1-2. In the "Saving Args" section of the UI, you can save a state; if you don't select "Save Last State," it will save a state after each epoch. Adjust the settings according to your needs.

To save the state, it will be stored in your output folder. To later resume the state, simply select the directory created within your output folder.

Step 9: The training starts
You're almost done! Now run the cell below the one we saw above to create the tunnel that will send our training settings to the colab. Once you run the cell, you should see in the terminal a URL of this kind (if using cloudflared): https://weak-atm-ways-provides.trycloudflare.com/. Paste the URL you've got into the UI and hit "Start Training".
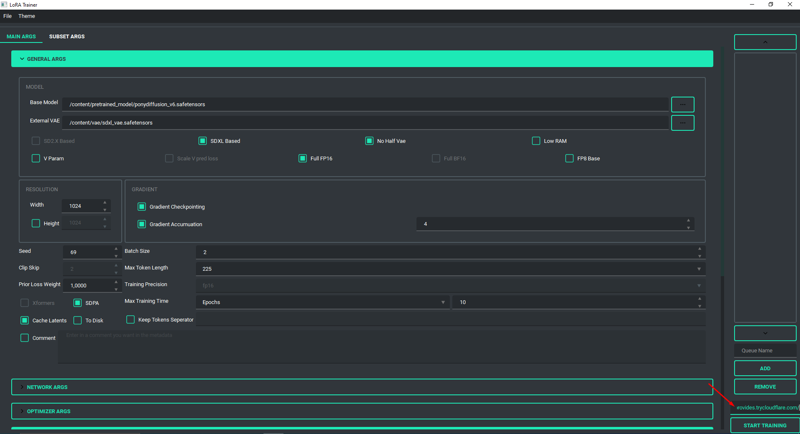
If Cloudflared is down/unavailable/gives problems, you can use Ngrok as an alternative method to obtain the URL for passing settings from the UI to the Colab. Just check "use_ngrok" and place your Ngrok token, then run the cell.

Now that the settings are stored on the colab as the last step run the cell at the very bottom of the colab to start the training. Don't forget to check the checkmark if you're training on sdxl.

Credits
Derrian Distro: developed the backend, enabling the development of this Colab.
Bluvoll: incorporated CAME and REX into the original scripts, allowing their implementation here.
Holostrawberry: I took a little of code from your colab, teehee.
Richyrich515: self-proclaimed as the best LoRA maker globally, is also the creator of richy-sized characters.
Anzhc: who never uploaded the thousands of models he created and fueled Bluvoll's obsession with CAME and REX.
Novowels: proofreaded the guide, correcting my grammar mistakes. (Thanks!)

