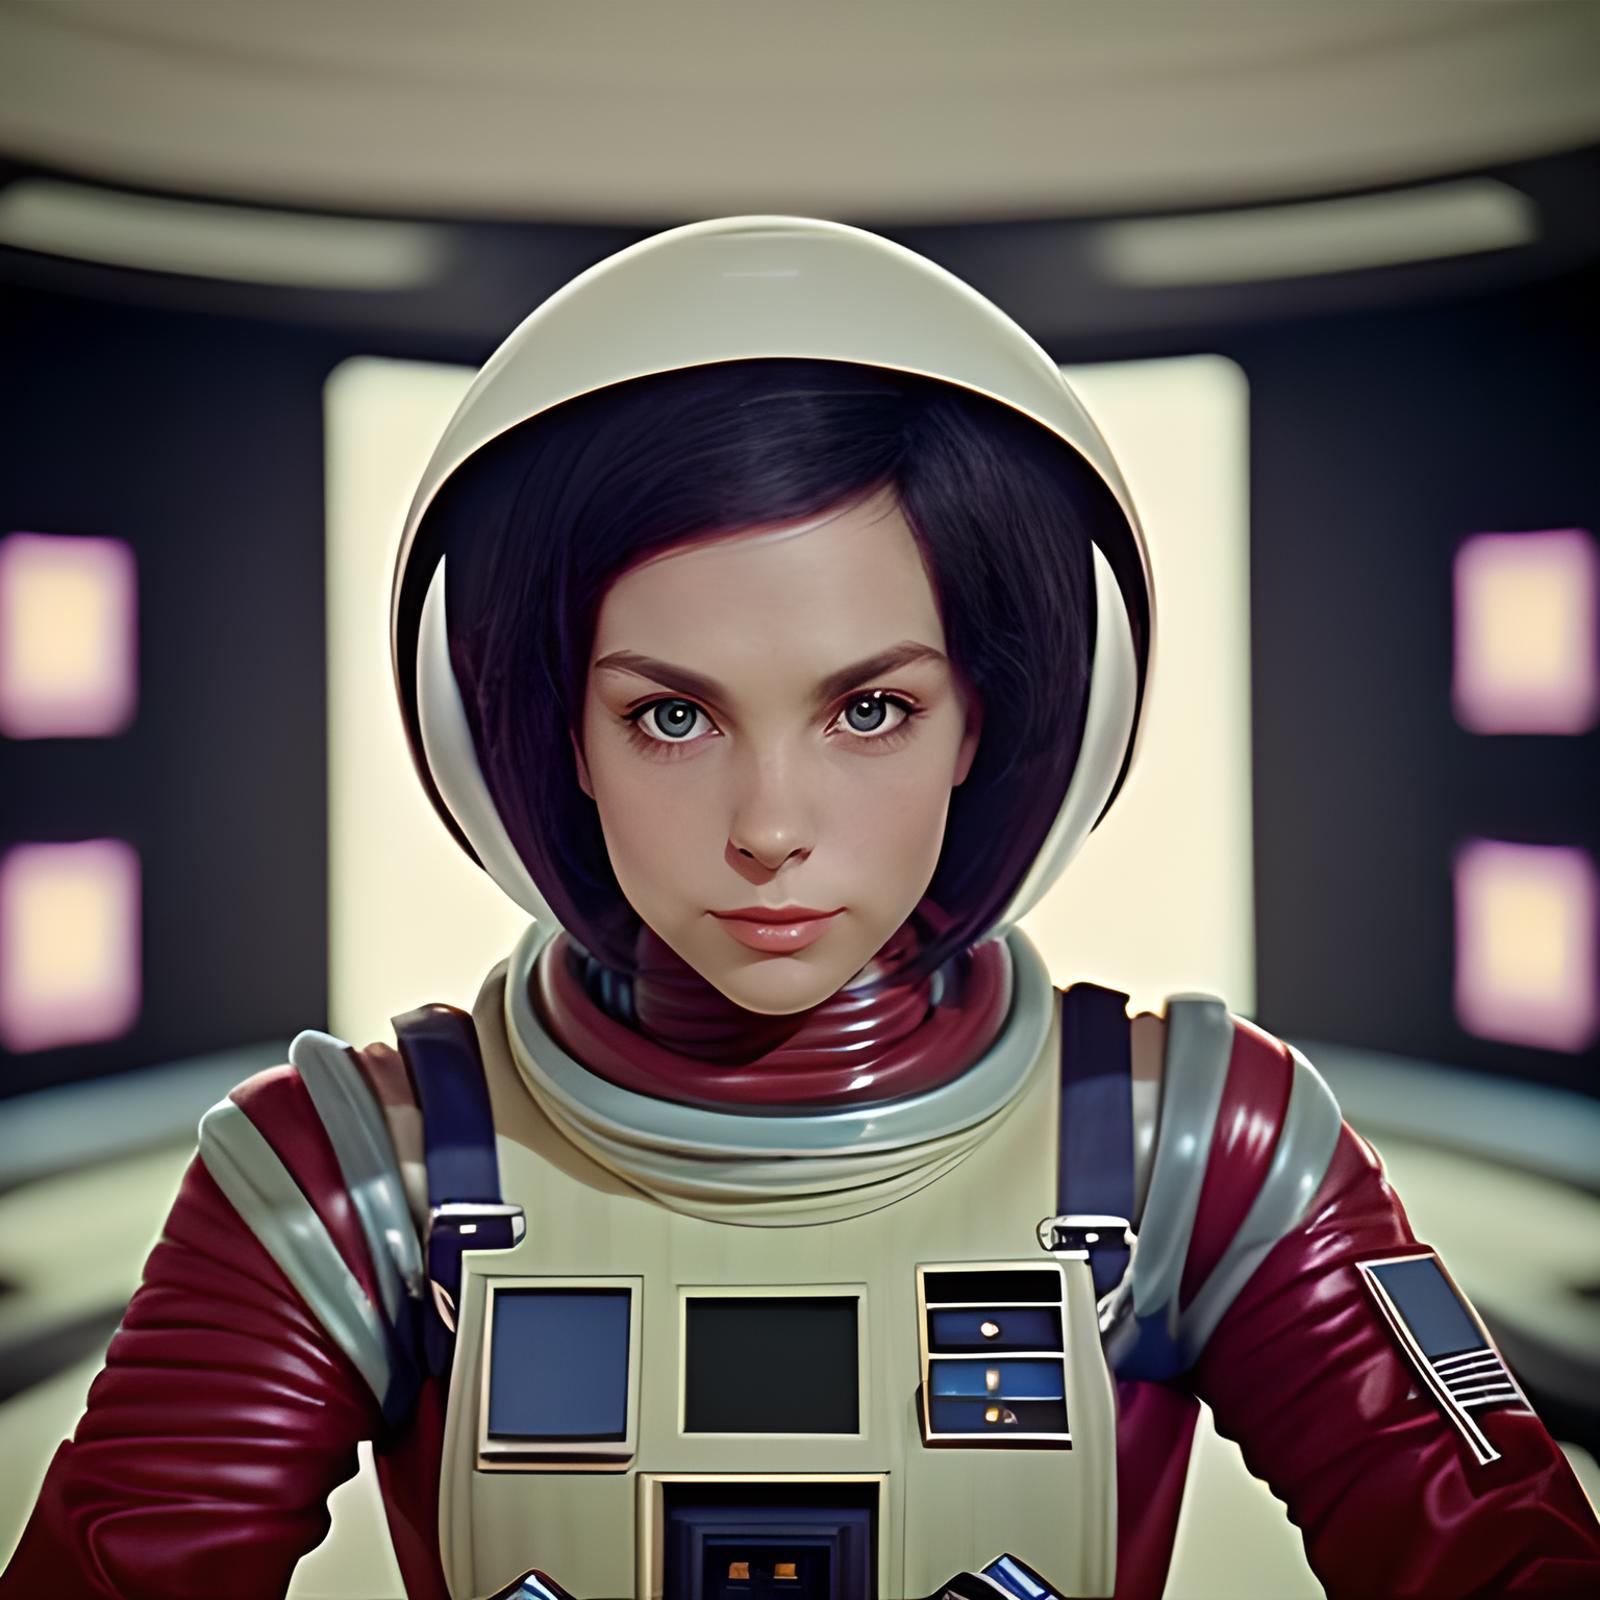
For some time now I have been using video files as a source of images for training aesthetic LoRAs. This text is a description of the methodology I have been using. I hope someone else might find it useful.
The idea behind this method is that a video file containing a movie or a music video can be used as a source of a large number of images that can be used to train a LoRA which would capture the general aesthetics of the original material. Many movies have quite distinct visual look and feel to them. Think about for example Sin City (2005) or 2001: A Space Odyssey (1968). Costume dramas and historical pieces can also serve as a good source of training material to capture the historical costumes, architecture, or interior design of periods in which they are set.
I never tried this myself, but I don't see why this method could not be used to train specific character LoRAs provided that you first cherry-pick scenes containing just the character of your interest.
This method is meant for training LoRAs on your local machine. However, once you have your dataset prepared there is no reason why you couldn't upload it to one of the online training tools.
The method assumes that you are using a Windows machine but all software presented here is available for Linux and Mac as well and operates in exactly the same way so instructions should be easy to follow.
The method also assumes you have needed software up and running and have a basic grasp of LoRA training. You can find a nice tutorial about the LoRA training here.
The hardware on which I do my training is nothing too fancy or expensive:
Nvidia GeForce RTX 3060 (12GB Vram)
2 x Intel(R) Xeon(R) CPU X5650 @ 2.67GHz, 2661 Mhz, 6 Core(s), 12 Logical Processor(s)
18 GB Ram
Software:
ffmpeg - a tool for extracting still images from a video file - download link
Kohya_ss - a tool for LoRA training - an installation guide, and documentation
Step 1 - Get the Movie
Well, this is obvious. You should first obtain a video file that you wish to use as a source of your material. I will not go into details of how and where you can obtain a video file. Luckily, the Internet is full of such resources. Just keep it legal. We don't want to get in any trouble.
Your file should be in a suitable format. Luckily ffmpeg software that we are going to use to extract images supports a huge number of video formats and codecs including the most popular ones such as MP4, MOV, AVI, WMV, etc.
Step 2 - Prepare the Stills
Step two involves extracting still images from the video file. We use ffmpeg to do this. This is a command line tool so you should copy your video file in a separate folder, fire up your Command Prompt (Windows) or Terminal (Linux/Mac), navigate to your folder, and use the following command to extract the still images.
ffmpeg -i movie.mp4 -vf "fps=1/10" -q:v 2 output_frames_%04d.jpgWhat this will do is extract one still image every few seconds of the movie and store it as a .jpeg file in the same output folder.
Replace movie.mp4 with the actual name of your video file!
The parameter "fps=1/10" is important! It basically tells how often ffmpeg extracts a still image. For example, 1/15 will tell it to extract one frame every 15 seconds of the movie. Depending on the length of the movie this will give you a lot of still images. I usually go with values of 1/10 or, 1/15.
The process of extracting stills on my hardware takes a couple of minutes so be patient!
After extracting the stills be sure to inspect the result. All movies contain various bits that are of no interest to you. You should discard anything that is not going to contribute to the aesthetics of the LoRA. This almost always includes the intro with the studio and production house logos and the end credits of the movie. You will also probably be surprised how many still shots you will get that are either too blurry, too dark, or simply unrelated to what you want to make. Discard anything that seems obviously out of place, such as completely black screens, white screens, nondescript explosions, or frames of blue sky, etc. We are going for quality over quantity! With this method, you should anyhow have plenty of stills to play with.
Example of things you don't want:
Step 3 - Tagging
The next crucial step is image tagging. For this, I use the Kohya_ss WD14 Captioning tool. You will find it in the utilities tab. You can use any other automatic tagging software or if you really have time do your own manual tagging and captioning. Tagging tends to have a significant effect on the results of the training so proceed with caution!
I usually prefix all WD14 tags with a descriptive tag for each LoRA I train.

Step 4 - Organizing the Data
We are going to use Kohya_ss to train our LoRA. It expects a pretty rigid folder structure so you should replicate it. It should look as follows:
LoRA <name>
├─ images
│  ├─ 3_<trigger word>
├─ model
│  ├─ samples
│  ├─ log
Basically, you should have one main folder for your LoRA, i.e. LoRA <name>. Replace the <name> with whatever you want. Underneath, that folder you should have three folders:
images - where your training data will go
model - where the results of training will go
log - where log files about training will go (this is entirely optional)
Underneath the images folder, you should have another subfolder which should contain the actual movie stills and caption files that you prepared in Step 3. CAUTION this folder needs to have a name in particular format <number>_<trigger word>. The first part of the name is a number. It will represent the number of times each of the stills is presented to the training algorithm. The second part of the name is the actual trigger word that will be used to trigger the output of this LoRA. I typically use for example:
<number> = 3 - as you already have plenty of still images there is no need to go higher
<trigger word> = SSTStl - as an acronym of Starship Troopers Style. Use something unique to avoid accidental triggering of LoRA and concept confusion!
The folder name is thus: 3_SSTStl
Copy all the still images and captioning text files here!
Finally, under the model folder, you should create a samples sub-folder. This is where the training algorithm will output its samples created during the training process.
My folder structure for Starship Troopers Lora looks like this.
LoRA_Starship_Troopers
├─ images
│  ├─ 3_SSTStl
├─ model
│  ├─ samples
│  ├─ log
After you have your dataset neatly organized you should proceed with training.
Step 5 - Training
We use Kohya_ss. LoRA training is under LoRA tab.
Go to the Folders tab within LoRA tab:
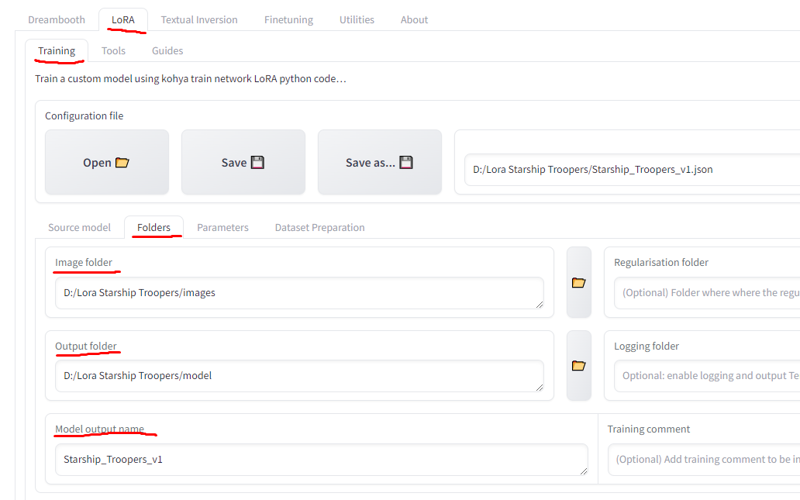
Point the Kohya_ss to your LoRA training folders you just created, specifically to images, model, and optionally to log folders within your main LoRA folder. Give a descriptive name to your LoRA file.
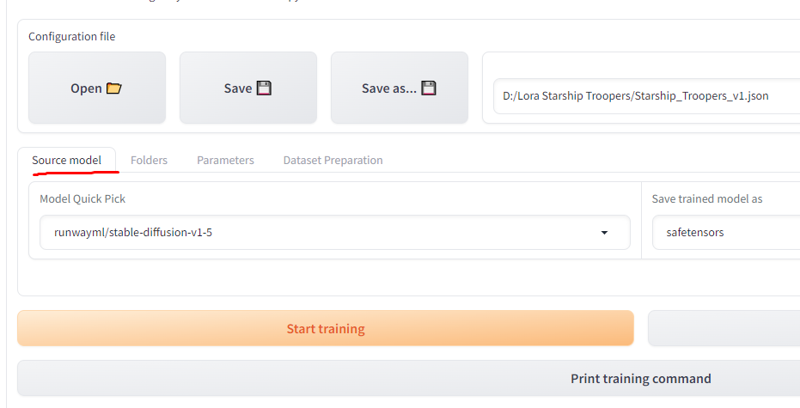
Go next to the Source model tab and select the training model you want to use as a base. I usually use the basic SD1.5 model. Keep in mind that LoRA will be influenced by whatever is in the model you are using as a basic model and that will have effect on LoRA's behavior when applied to other models.
Go next to the Parameters tab and set the basic parameters. I use the following:
Training batch size = 3 - This depends on the size of Vram you have. The value of 3 works for the 12GB
Number of CPU threads per core = 4
Epoch = 100
LR Scheduler = cosine_with_restarts
Learning rate = 0,0003
Optimizer = AdamW8bit
Text Encoder learning rate = 0,0001
Network Rank = 128
✅ Enable buckets
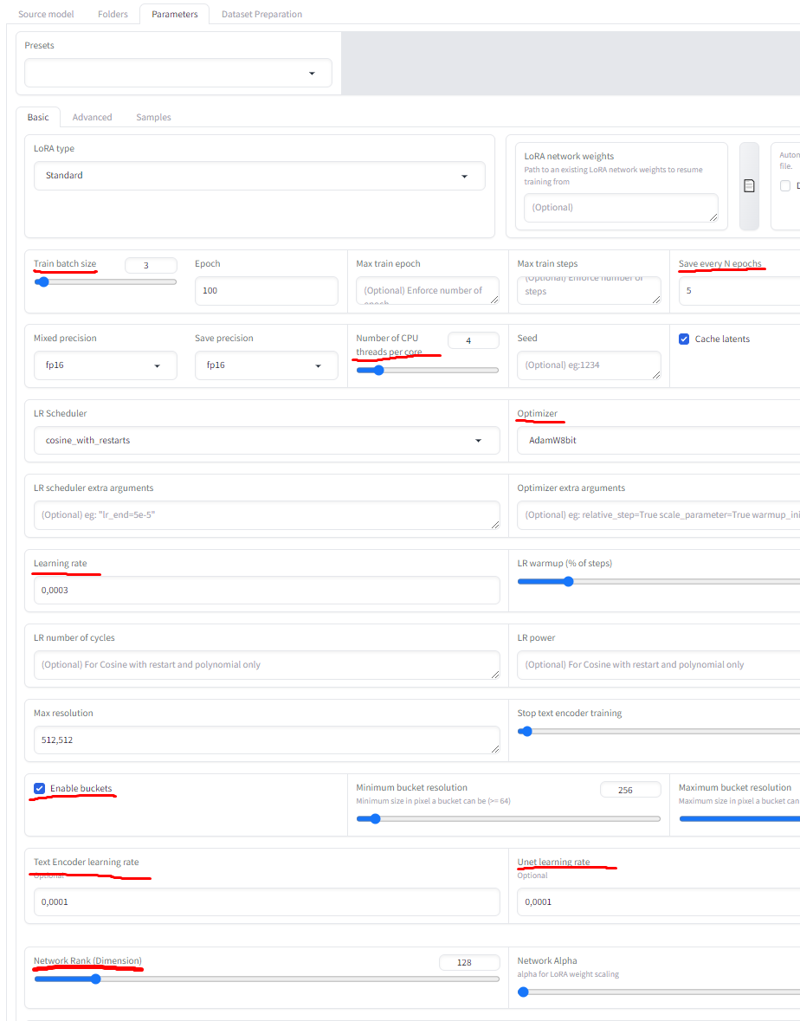
You will notice that I go for a lot of epochs. This is likely to result in an overtrained LoRA. In my experience, it is better to go overbake than undertake. In order to address this I set Kohya_ss to save the output every 5 iterations.
Finally, if you want to see the progress of your training go to the Samples tab and set it to actually create sample images.
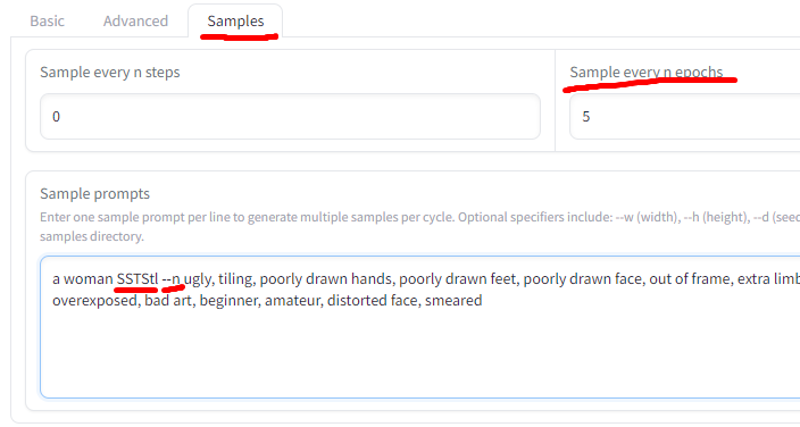
I set it to create a sample every 5 epochs as there is no point in making samples of epochs that I am not going to save.
Make sure to use your trigger word in the prompt. In the case of my example, this is SSTStl, i.e. the word I have been using when creating the folder structure. Also, pay attention to the syntax and specify the negative prompt behind the --n option.
Finally, you should be ready to hit the Start training button. Training with these settings takes hours on my rig, so be prepared to let it run overnight. You will end up with a bunch of files named something like:
Starship_Troopers_v1.safetensors
Starship_Troopers_v1-000005.safetensors
Starship_Troopers_v1-000010.safetensors
Starship_Troopers_v1-000015.safetensors
...
Starship_Troopers_v1-000095.safetensors
The file without the trailing number is the final output of the training after epoch 100. The rest of the files are intermediate outputs. You should test which one produces the best result, neither overtrained nor undertrained. You can use sample files to help you judge where the sweet spot is.

