


START ➲ GENERATION GUIDE


https://civitai.com/models/926443/ntr-mix-or-illustrious-xl-or-noob-xl <------------------
Model's like Pony will be added in the future. NTR Mix is very beginner friendly, In the sense that creating high quality and consistent images is extremely easy which is why I'm using it.


Subject | Composition/Scene | Quality
Composition/Scene | QualityRefer to Prompt Organization for more info.

The closer a prompt is to the beginning, the higher its priority will be.
Want to force a weight change?
( Thing1: WEIGHT )
the weight/emphasis of that token or prompt will be altered by 0.1 in either direction.
You can also just input your own value as well manually since the format can be typed.
This feature is possible on on-site generator
Refer to the section: Prompting Extras for more info
Common Tags:
Subject Descriptors:
"1girl": Specifies a single female subject.
"portrait": Focuses on a person's face or upper body.
"landscape": Depicts natural scenery.
Artistic Styles:
"digital art": Generates an image in a digital art style.
"oil painting": Emulates a traditional oil painting appearance.
"watercolor": Produces a watercolor painting effect.
Quality Enhancers:
"highly detailed": Encourages intricate details in the image.
"4k": Suggests a high-resolution output.
"HDR": Implies high dynamic range for vivid colors and contrasts.
Lighting and Environment:
"cinematic lighting": Promotes dramatic and film-like lighting.
"studio lighting": Indicates controlled, professional lighting conditions.
"bokeh": Adds a blurred background effect, enhancing depth of field.
Art Platforms and Trends:
"trending on ArtStation": Aims for styles popular on the ArtStation platform.
"deviantart": Targets styles common on DeviantArt.
Camera Perspectives:
"close-up": Specifies a near view of the subject.
"wide shot": Requests a broad view, capturing more of the scene.


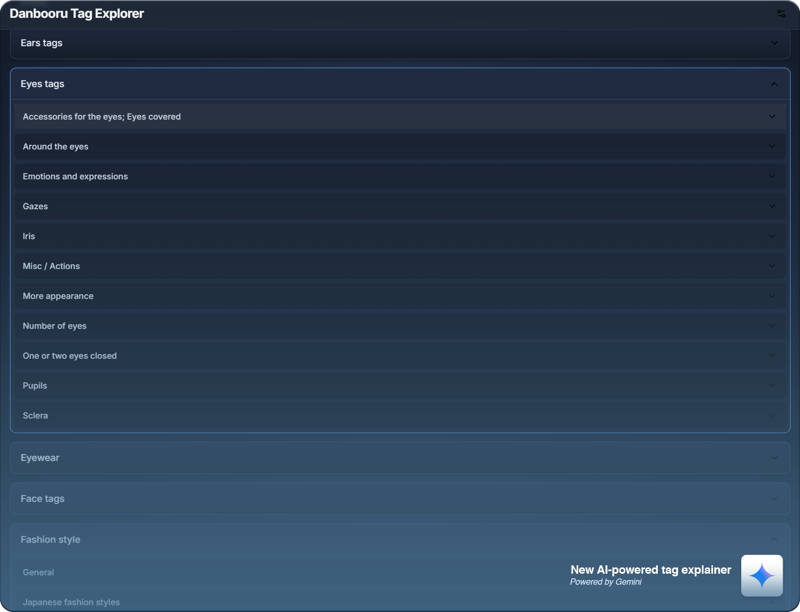
https://a13jm.github.io/MakingImagesGreatAgain_Library/
Fold all and move to top: Shift + F
Search from 201,018 tags and 167 libraries!

Basic Settings:
Let's set our Sampling Method to DPM++ 2M. This Sampling Method tends to give the best results with this model.
And let's also change our Scheduling Type to Karras for the best results, Beta works as well.
Let's also set our Sampling Steps to 30, this will ensure a quick but accurate enough generation.
Since this model is an SDXL model here are my recommended aspect ratios for the best results:
(The pixel count is approximately 1,048,576, with the following recommended resolutions for common aspect ratios.)
1024 x 1024 - 1:1
1254 x 836 - 3:2
1365 × 768 - 16:9
Want to use any ratio without worrying about having to calculate the amount of pixels?
Check out my Aspect Ratio Converter:
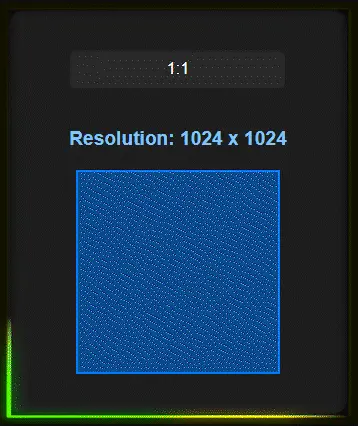
https://a13jm.github.io/MakingImagesGreatAgain_Ratio/
And you can keep the CFG Scale to 6 for now, this just determines the models "creativity". the higher the number the more it follows your prompt but it will also distort your image more.

Generating an Image ➲

First, let’s start with our idea. But how do we get there? It might change along the way, but to start, you need a base to build on.
I like to start with my quality tags as well as my negative prompt then build off that.

✦ masterpiece, high quality, absurdres, best quality, very aesthetic, newest,
⊘ worst quality, ugly, low quality, bad anatomy, bad hands, ugly faceᴛʜᴇsᴇ ᴀʀᴇ ʙᴀsɪᴄ ǫᴜᴀʟɪᴛʏ ᴘʀᴏᴍᴘᴛs, ɴᴏᴛ ᴜɴɪᴠᴇʀsᴀʟ, ʙᴜᴛ ᴡᴏʀᴋ ᴀᴄʀᴏss ᴍᴏsᴛ ɪʟʟᴜsᴛʀɪᴏᴜs ᴍᴏᴅᴇʟs.
Next we'll add in our subject.

You may notice that the way I prompt doesn't align with the Basic Prompting's organization.
I've prompted using Quality | Composition/Scene | Subject for a long time and found that it works best for what I want to achieve. I would highly suggest you experiment with different variations of Prompt Organization to find what best suits your needs. For more information on this subject, refer to Prompt Organization.

Icon Meanings:
✦ ---> Quality Section✾ ---> Subject Section⊘ ---> Negative Prompt✏ ---> Added Prompts/Tokens✿ ---> Environment Section
✦ masterpiece, high quality, absurdres, best quality, very aesthetic, newest,

✾ 1girl, Mai Sakurajima, ✏
⊘ worst quality, ugly, low quality, bad anatomy, bad hands, ugly faceThen hit GENERATE ➲
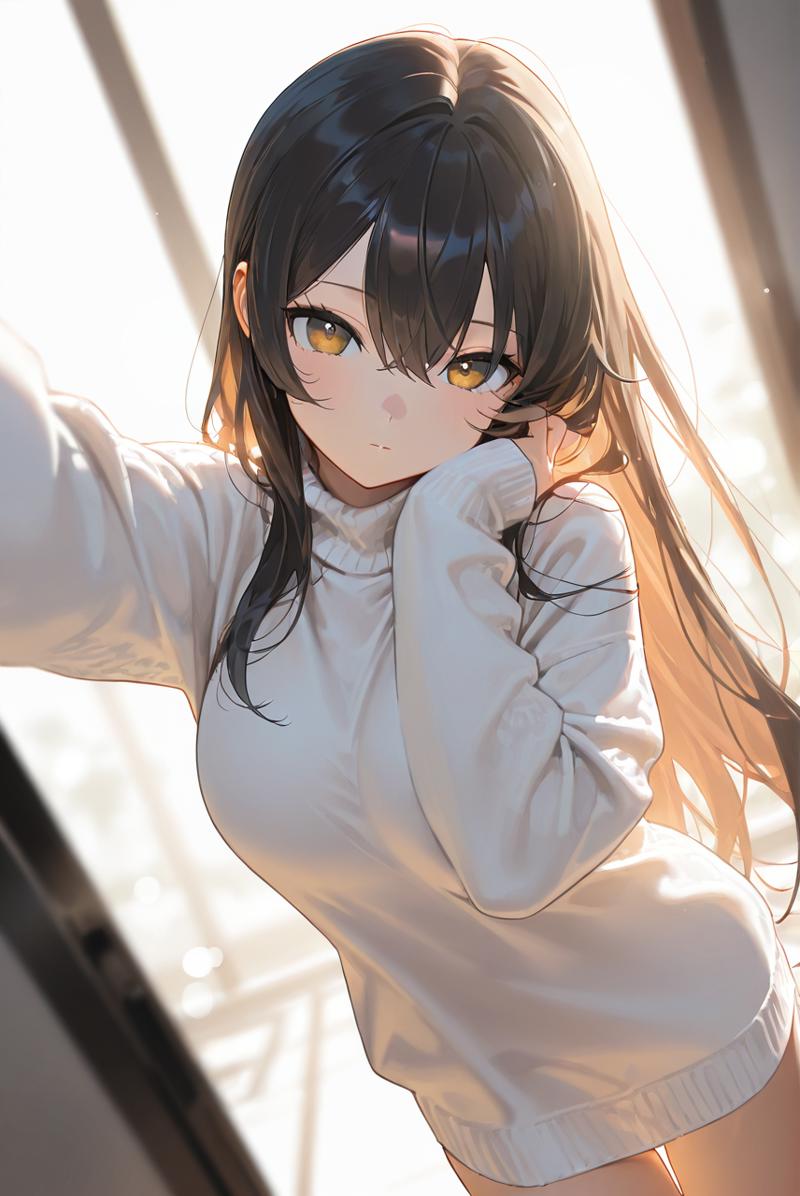
This isn't bad but I want the character to resemble her a little better. Let's add in some of her key features and what we want her to be doing.
✦ masterpiece, high quality, absurdres, best quality, very aesthetic, newest,

✾ 1girl, Mai Sakurajima,
│
└➝ blush, looking at viewer, large breasts, bunny outfit, hands on face, ✏
⊘ worst quality, ugly, low quality, bad anatomy, bad hands, ugly faceNotice how bunny outfit doesn't generate a bunny outfit as you'd expect as it does in the next image. That's because this specific seed generates a noise that resembles a sweater more than a bunny outfit, that's why the image above and below are similar, same seed. This means we either need a new seed or change the environment more. Since I'm running the same seed let's do that.
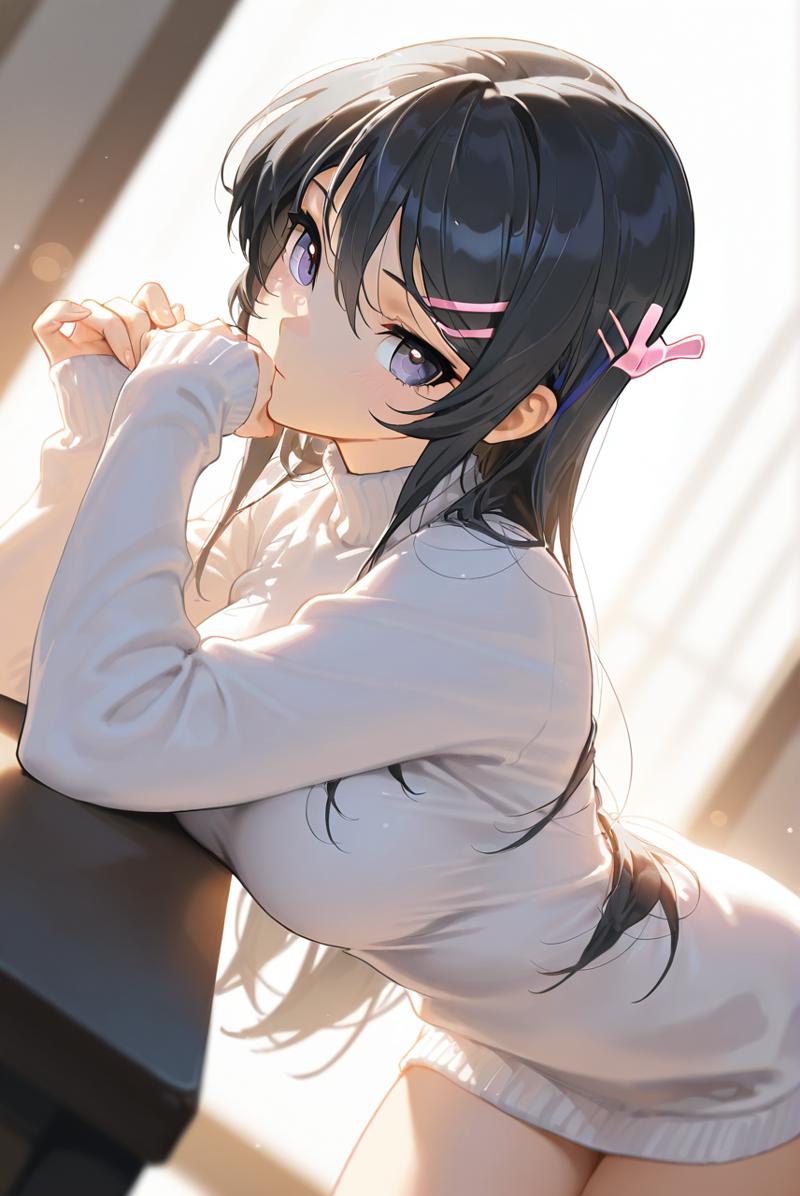
Alright, so let's add some scene details to widen the dataset and bring in more variety.
✦ masterpiece, high quality, absurdres, best quality, very aesthetic, newest,

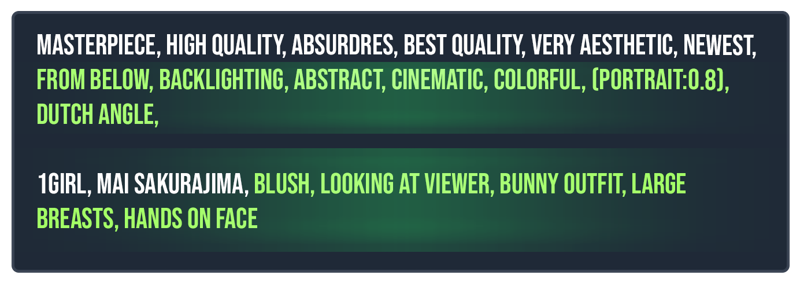
✿  from below, backlighting, abstract, cinematic, colorful, (portrait:0.8), dutch angle, ✏

✾ 1girl, Mai Sakurajima, blush, looking at viewer, large breasts, bunny outfit, hands on face,
⊘ worst quality, ugly, low quality, bad anatomy, bad hands, ugly face
(portrait:0.8) "𝑊ℎ𝑎𝑡 𝑑𝑜 𝑡ℎ𝑜𝑠𝑒 𝑝𝑎𝑟𝑒𝑛𝑡ℎ𝑒𝑠𝑖𝑠 𝑎𝑛𝑑 𝑡ℎ𝑎𝑡 𝑐𝑜𝑙𝑜𝑛 𝑑𝑜? 𝑊ℎ𝑎𝑡’𝑠 𝑡ℎ𝑎𝑡 𝑛𝑢𝑚𝑏𝑒𝑟 𝑚𝑒𝑎𝑛?"
In the Stable Diffusion Web Ui, by highlighting text and pressing either CTRL + UP or CTRL + DOWN, you can increment the weight of the prompt by 0.1, or just enter the value manually.
( Thing1: Weight )
Refer to Weight Adjustment for more information.
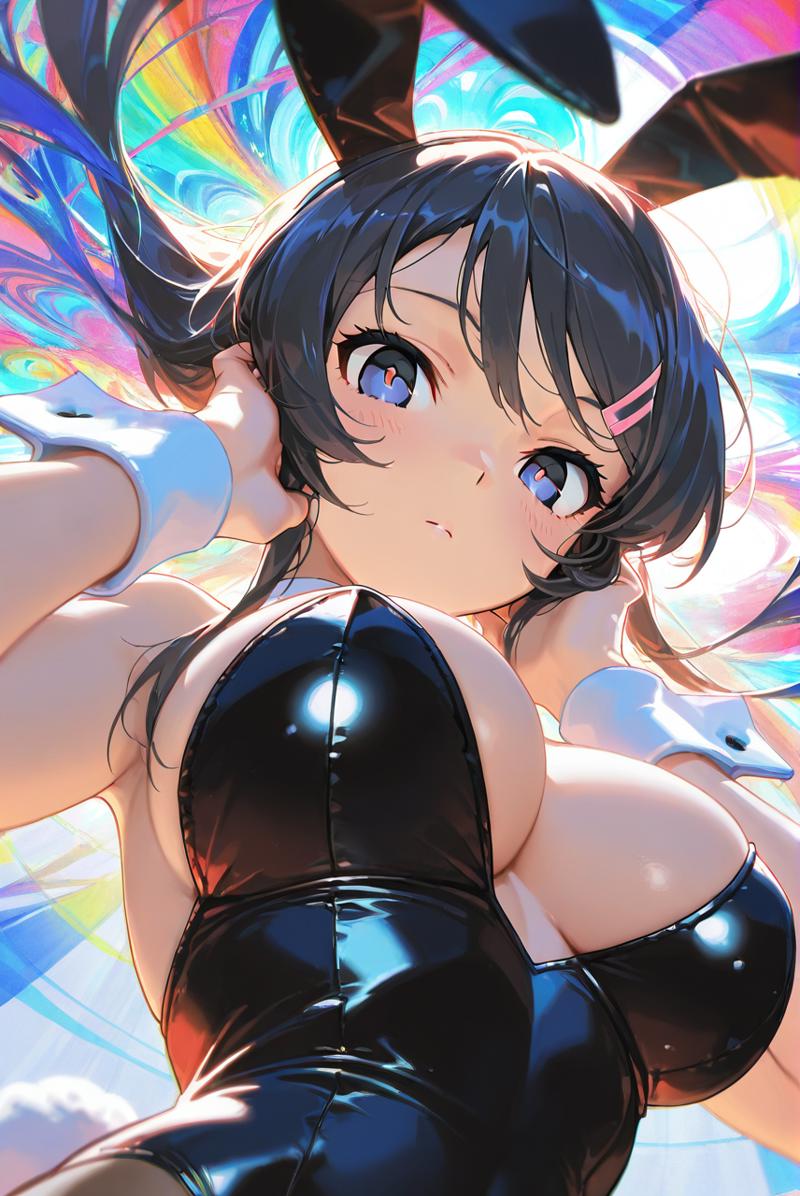
There we go, that's what we were looking for!
This is a process of adding, generating, adding, and generating over and over, fine tuning the prompt to give the desired output.
The same goes for the negative prompt as well. 𝑆𝑒𝑒 𝑠𝑜𝑚𝑒𝑡ℎ𝑖𝑛𝑔 𝑦𝑜𝑢 𝑑𝑜𝑛’𝑡 𝑙𝑖𝑘𝑒? 𝑐𝑜𝑚𝑝𝑙𝑎𝑖𝑛 𝑎𝑏𝑜𝑢𝑡 𝑖𝑡 𝑡𝑜 𝑡ℎ𝑒 𝑛𝑒𝑔𝑎𝑡𝑖𝑣𝑒 𝑝𝑟𝑜𝑚𝑝𝑡!

This looks good, but we can make it even better! I introduce to you...


Let's send our image into Inpaint and work on it some more there.
𝐷𝑜𝑛’𝑡 𝑘𝑛𝑜𝑤 ℎ𝑜𝑤? Refer to the video below! ☟
Once you're inside Inpaint, Here's the setting I'd recommend and why I recommend them.
Soft Inpainting = True

Mask Blur = 4

Inpaint Area = Only Masked

Denoising Strength = 0.45 - 0.6

Seed = -1

Aspect Ratio = Press: [📐]

Sampling Steps = 60

Sampling Method = DPM++ 2M

Scheduling Type = Karras
Soft Inpainting. This will allow the masked area to blend seamlessly with the unmasked area.Mask Blur. This is the feather of the mask's edge, higher numbers mean a larger fade.Inpaint Area. Having it set to Only Masked means that only the area in the mask is altered.Denoising Strength. Ranging from 0-1, this determines how much the image is altered.Seed. Make sure this is set to -1 so you aren't repeating the same generation.Aspect Ratio. This is the size/shape of the Inpainting area.Sampling Steps. This is how many steps it takes to diffuse the image. Higher numbers will generally make higher quality generation, up to a point.Sampling MethodandScheduling Type. I like to use a more slow and accurate sampler and scheduler, such as DPM++ 2M and Karras.
Let's mask the face and change our prompt. Remember, the more area masked, the lower the quality of the Inpaint so only Inpaint what you have to.
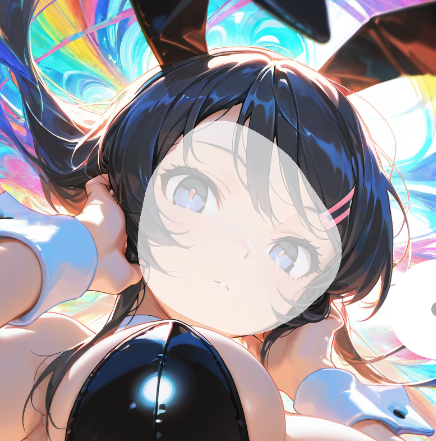

✦ masterpiece, high quality, absurdres, best quality, very aesthetic, newest,

✾ 1girl, Mai Sakurajima, blush, looking at viewer, ✏
⊘ worst quality, ugly, low quality, bad anatomy, bad hands, ugly faceIt's always good practice to start from the bare minimum and build back up your positive and negative prompts each Inpaint to ensure you get exactly what you want.
Your masked section is acting as a new canvas, your prompt is what will be generated in that area.
GENERATE ➲
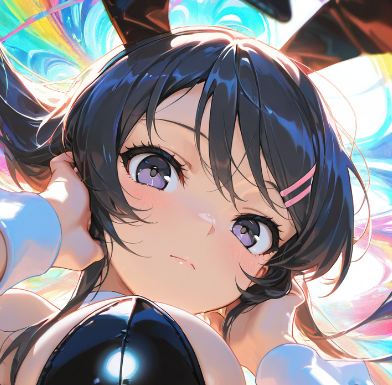

You can repeat this process over and over as many times as you'd like anywhere in the image!
But wait, how do I get the image back onto the canvas? Simply hold click the generated image, and drag it back onto the canvas.

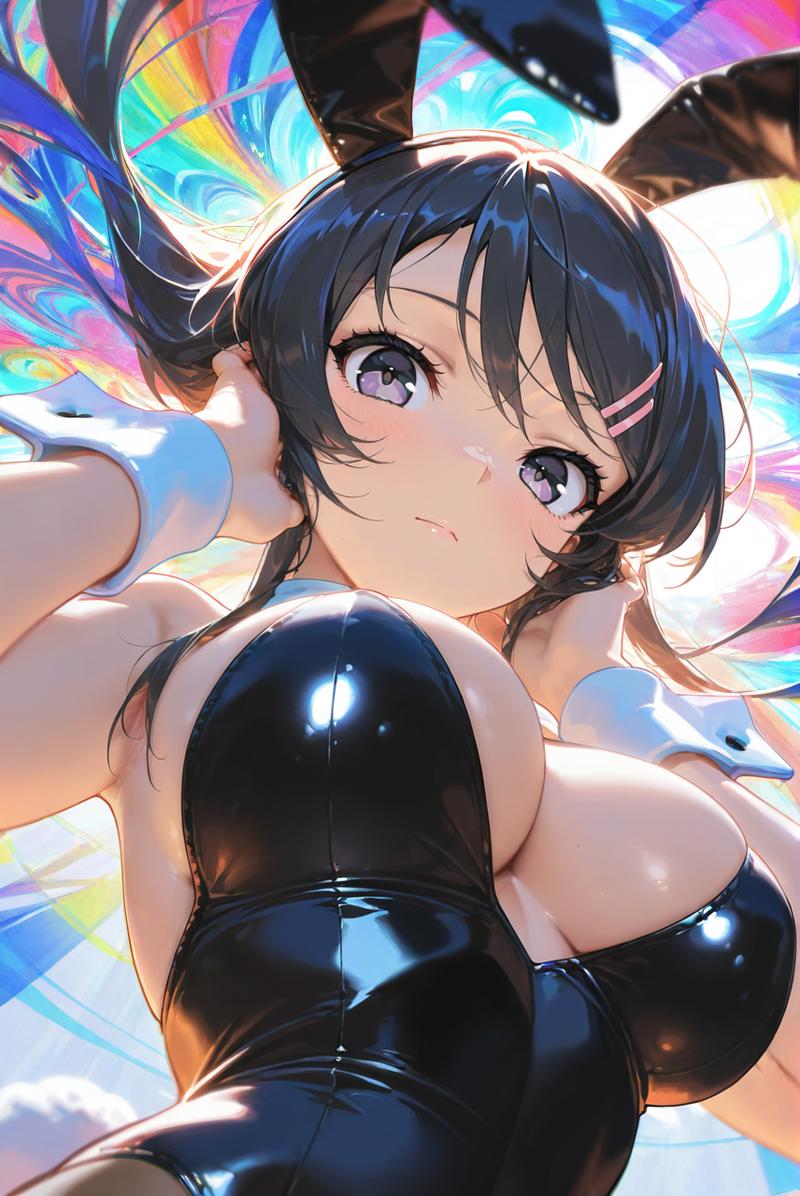
I would highly recommend you play around with the Denoising Strength depending on what you're changing.

It can be, but you can take it one step further! (you can also edit an image externally then Inpaint the edited image for more precise changes.)


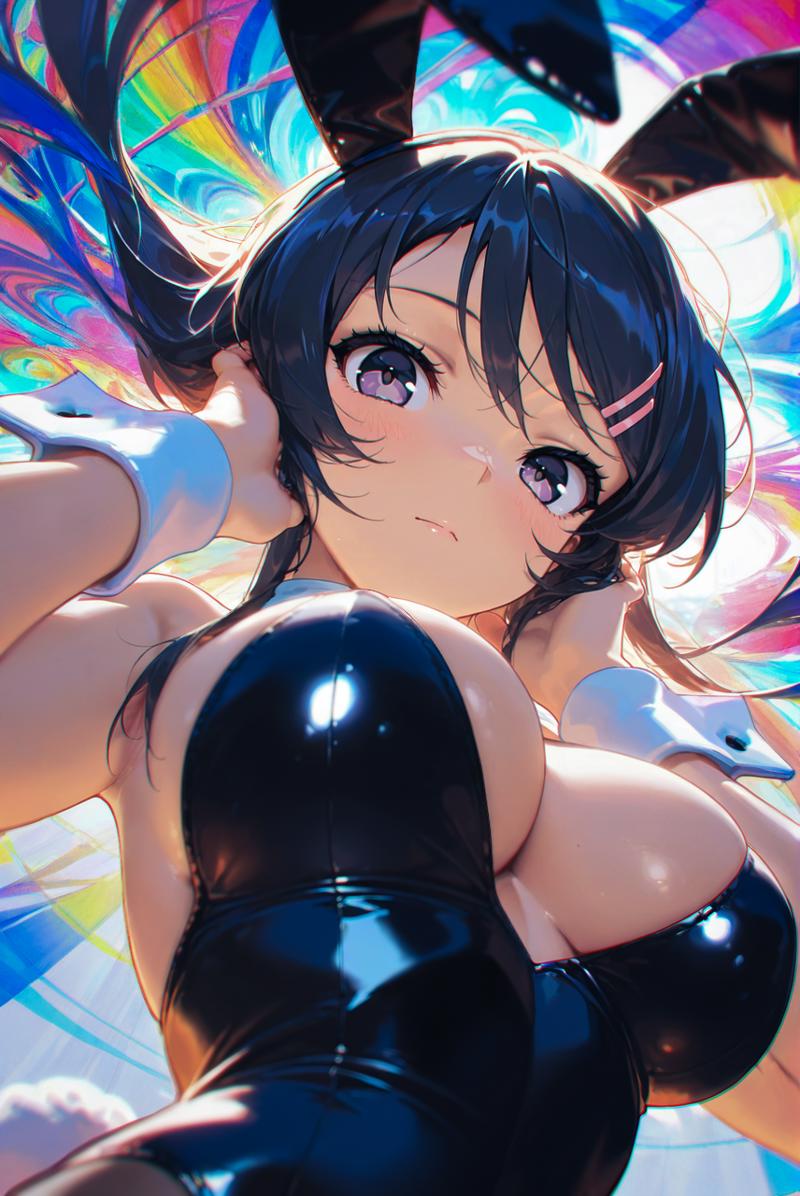

Using Photopea you can enhance your images even more for free!
And voilà, you've done it, you've learned the basics to creating your very first image!
This article will be receiving up-to-date information on how to create the best images possible, utilizing every aspect of Stable Diffusion.
I hope to see you here again! Happy Generating!

Is it better to describe your prompt with a full sentence instead of just listing tags?
Let's unpack this.
When you write a full sentence, the AI breaks it down into small pieces called tokens. These tokens are created by a text encoder, usually a CLIP model, which splits your text into words or parts of words. The model then converts these tokens into numerical vectors that guide the image generation process. How these tokens are arranged depends on the training data, so if the model learned from full sentences, it will better understand natural language.
When you list tags using commas, you give the model a clear and concise set of attributes. This style often matches how some training datasets, such as those from Danbooru, are formatted. In these cases, the model has learned to recognize separate features from each tag, which can sometimes result in more consistent outcomes, especially if the model was fine-tuned on tag-based data.
For models like SDXL that use two CLIP-based text encoders, the system is built to understand both full sentences and lists of tags. Natural language prompts capture context and relationships in a more natural way, while comma-separated tags make sure each element is clearly represented. In the end, the choice between a full sentence and a list of tags depends on the specific model and the type of training it received.
In summary, neither method is universally better. If the model was trained on natural language, full sentences can work very well. However, if it was trained on comma-separated tags, then using that style may produce more predictable results. The most important point is to match your prompt style to the training style of the model you are using.
Sources:
Stability AI, “Announcing SDXL 1.0” – notes on SDXL’s improved language understanding.
Reddit discussion on SDXL prompt styles – users report full sentences vs tags.
Kohya SS GitHub issue – recommendation that SDXL’s two text encoders may prefer different language styles (natural vs tags).
Novita AI blog – explains that Stable Diffusion does not inherently prioritize commas, but they help structure prompts.
Stable Diffusion Art blog – detailed explanation of CLIP tokenization, 77-token limit, and cross-attention mechanism in diffusion.
Cloud.tencent guide – discusses models trained on tags vs sentences and the need to match prompt style to training
Extra Information:

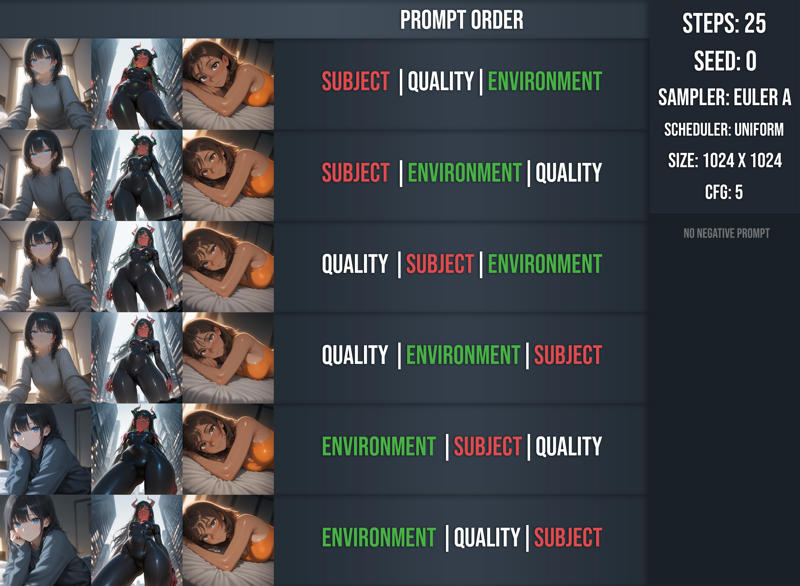
Model: ntrMIXIllustriousXL_xiii
Batch 1: (Not in this order)

Subject:
1girl, looking at viewer, sweater, blue eyes, black hair,

Environment:
bedroom, soft lighting, depth of field,

Quality:
masterpiece, high quality, absurdres, best quality, very aesthetic, newest,
Batch 2: (Not in this order)
Subject:
1girl, looking at viewer, demon girl, red skin, horns, green eyes, bodysuit, black hair, long hair,
Environment:
city, backlighting, depth of field, from below,
Quality:
masterpiece, high quality, absurdres, best quality, very aesthetic, newest,Batch 3: (Not in this order)
Subject:
1girl, laying on bed, looking at viewer, dark skin, freckles, brown hair, brown eyes, medium hair, orange crop-top, breasts,
Environment:
bedroom, soft lighting, depth of field,
Quality:
masterpiece, high quality, absurdres, best quality, very aesthetic, newest,
Conclusion from data regarding organization:
In most cases, whether you put quality or subject tokens first won't make a substantial difference. As long as the environment token isn't first, you likely won't notice much of a difference.

And in general, the position of the quality tokens does not significantly impact the overall quality of the image.


This is just a way to stay organized, it is not a rule. Anything closer to the start is prioritized more.
By this logic, the best way to position your tokens would be: Subject | Environment | Quality


Conclusions are based on findings using ntrMIXIllustriousXL_xiii.

How it works:
In the default Stable Diffusion and Forge Web UIs, prompts are limited to 75 tokens due to the CLIP text encoder's limitations. Any text beyond this limit will be ignored, meaning that only the first 75 tokens influence the image. However, web UI implementations like AUTOMATIC1111 and Forge UI, allow chunking, where prompts exceeding the limit are split into segments of 75 tokens and processed sequentially. This allows for longer prompts, but the impact of later segments diminishes. To optimize prompts, prioritize more important details within the first 75 tokens and use tools like weighting (token:1.5) to emphasize important tokens.
Sources:
https://stable-diffusion-art.com/prompt-guide/
https://github.com/huggingface/diffusers/issues/2136

Operations / Syntax
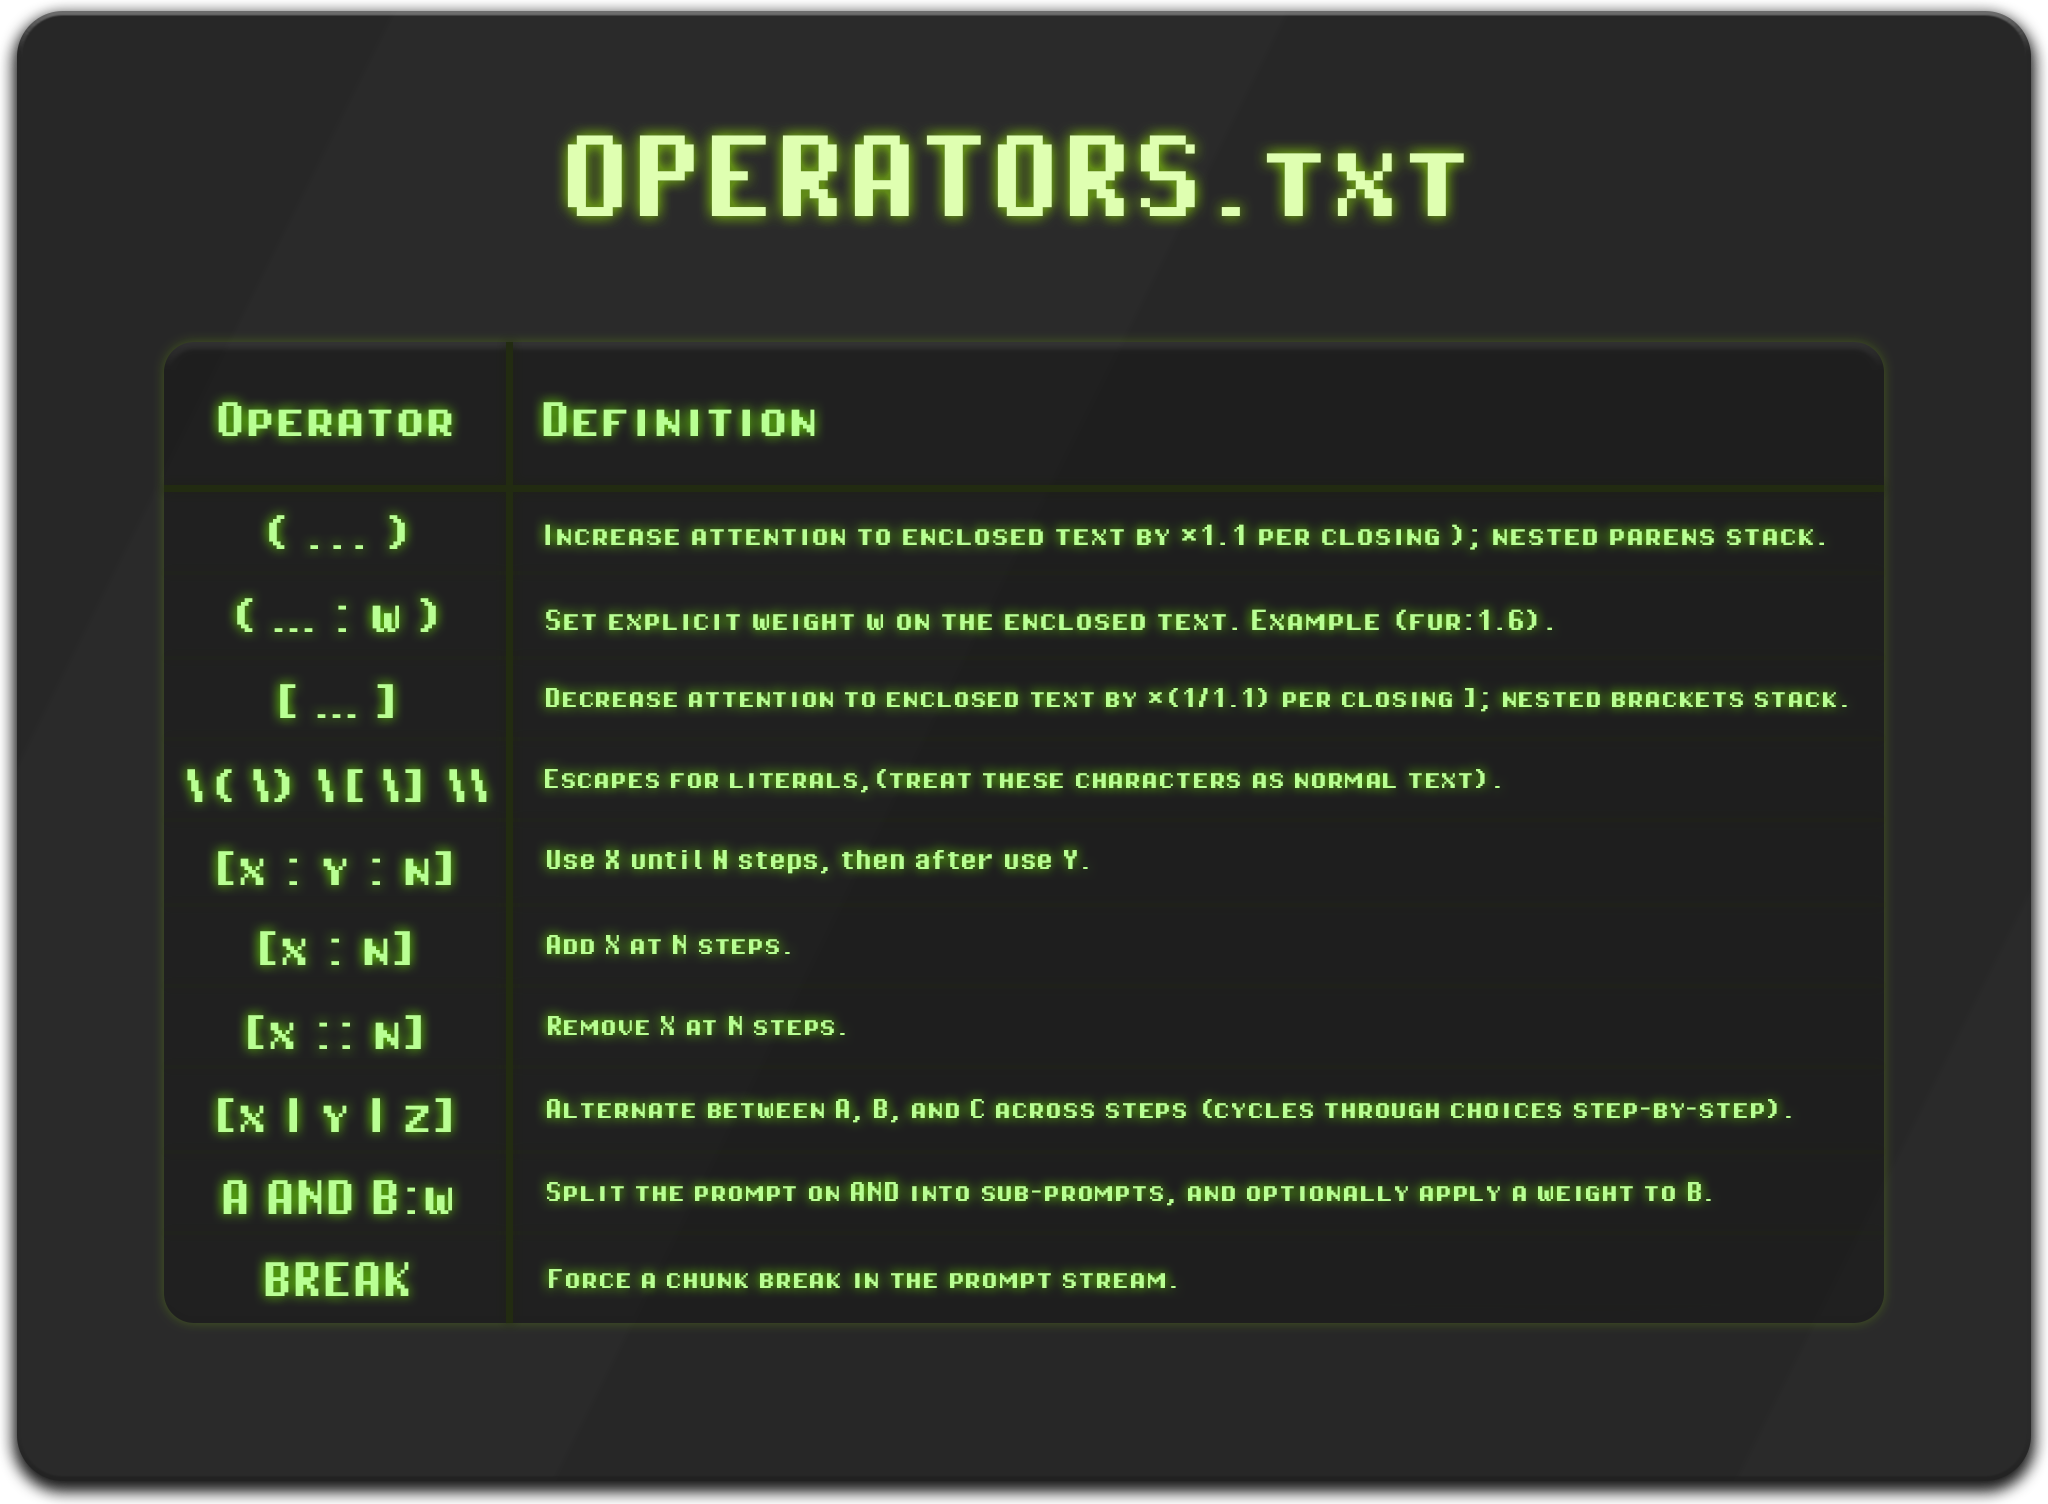
Definitions located in [modules.prompt_parser.py]
Classic Weight Adjustment:
parenthesis: (a rainy day) ⇡ 10%
parenthesis: (((((a rainy day))))) ⇡ 50%
square brackets: [a rainy day] ⇣ 10%
square brackets: [[[[[a rainy day]]]]] ⇣ 50%

Not possible if using on-site generator.
Forms of Prompt Scheduling:
[Thing1: Thing2: Ratio]Ratio controls at which step Thing1 is switched to Thing2. It is a number between 0 and 1.
This means that if you use a value of 0.5 while running with 30 steps, Thing1 will run from steps 1 till 15, and Thing2 will run from steps 15 till 30.
[Thing1:STEP]This delays a prompt until the specified STEP, for example: [a cow:5] at step 5, the generation will introduce a new prompt: a cow.
[Thing1::STEP]From steps 1 till STEP, Thing1 will be used to generate the image, example: [a cow::5] at step 5, a cow will no longer be used to generate the image.
Inputting a value between 0 and 1 will act as a percentage marker rather than a specific step.
Comparing the effects of Comma (,), Full Stop (.), Semicolon (;), Pipe (|), and BREAK.
(These are not officially supported syntax within Stable Diffusion. Exceptions being comma and BREAK)
Common prompt structure: (# = Variable)
Prompt1# Prompt2
Analyzing Visual Differences Across Labeled Image Batches Using the Sum of Absolute Differences (SAD) and Structural Similarity Index (SSIM) Metrics

Abstract:
The experiment analyzed visual differences across ten batches using SAD and SSIM metrics, visualized in heatmaps with interpolated gradients. The heatmap showed that "BREAK" caused the largest composition differences, while other labels were marginally similar.

The experiment examined visual differences between labeled images across ten batches using the Sum of Absolute Differences (SAD) and Structural Similarity Index (SSIM) metrics. Each batch comprised five labeled images: ",", ".", ";", "pipe", and "BREAK". The "," image served as the principal for calculating the SAD values of the other four images within each batch. SAD, a pixel-wise measure of dissimilarity, was determined by summing the absolute differences between corresponding pixel intensities of the principal and compared images. SSIM, a perceptual measure of similarity, was also determined by evaluating the structural information, luminance, and contrast between corresponding pixel regions of the principal and compared images.The resulting data was visualized in a heatmap to facilitate comparative analysis both within and across batches and image labels. To improve readability, the SAD and SSIM values were interpolated to create smoother gradients, and a plasma colormap was applied to represent the intensity of differences. In the heatmap, the vertical axis represented the batches (B1 to B10), while the horizontal axis denoted the labeled images.Key takeaways of the analysis included the identification of patterns in visual differences within and between batches, as well as the detection of potential outliers with significantly high SAD values or low SSIM values.

Higher values = less similar.
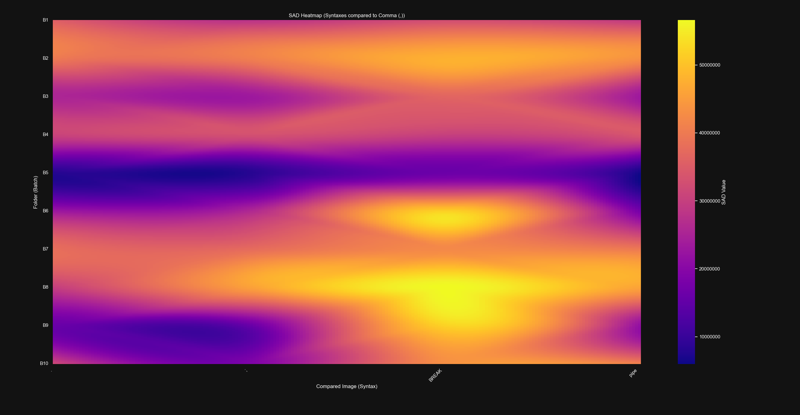
https://i.ibb.co/1Lfbvdq/SAD-Map.png

Lower values = less similar.
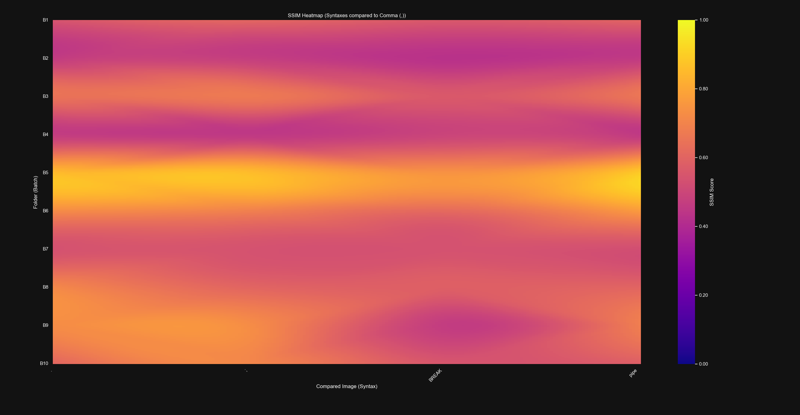
https://i.ibb.co/s94WJmm/SSIM-Map.png

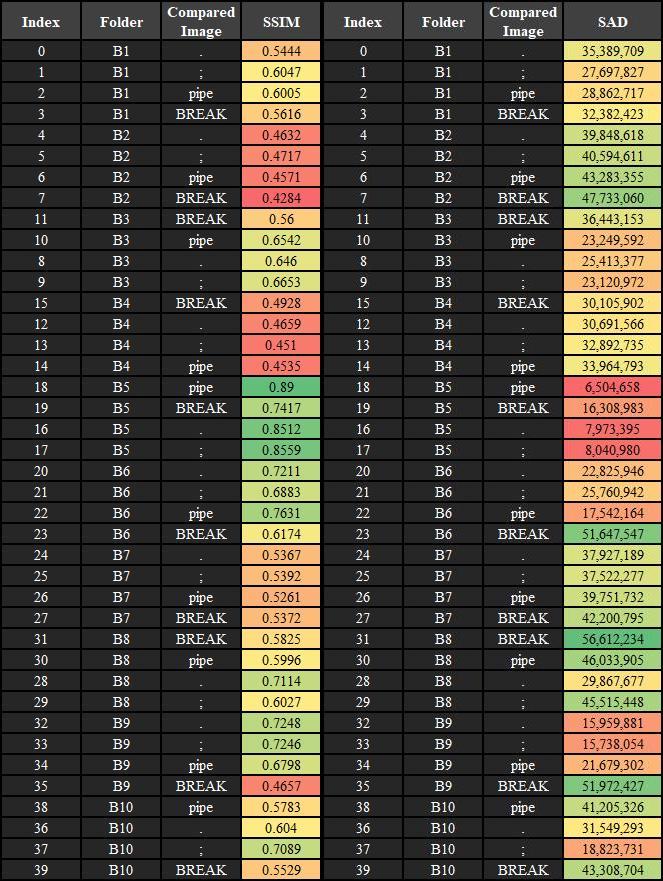
SAD Table:
Deviation from Principal:
Average Value: 31,598,675
Full Stop Average: 27,744,665
Semicolon Average: 27,570,758
Pipe average: 30,207,754
BREAK Average: 40,871,523
SSIM Table:
Deviation from Principal:
Average Value: 0.608085
Full Stop Average: 0.62687
Semicolon Average: 0.63123
Pipe average: 0.62022
BREAK Average: 0.55402
Experiment Data:
https://www.mediafire.com/file/e518w2runacwo4y/Data.zip/file
Link to the GitHub repo for SSIM and SAD:
https://github.com/A13JM/SSIM_SAD

Based off the Heatmap, BREAK seems to create the biggest differences in image composition, whilst the rest are marginally similar.
BREAK is also the only supported "syntax" in our data.
As of right now, this is the only measurable statistic I can think of to compare syntaxes.
Since this is only a batch size of 10 = 40 images, the results can be better. In the future I plan on trying a batch size of 50 = 200 images.
Source: https://en.wikipedia.org/wiki/Sum_of_absolute_differences
Source: https://en.wikipedia.org/wiki/Structural_similarity_index_measure
Understand Tokenization:
https://platform.openai.com/tokenizer
Basics of AI:
https://www.theverge.com/24201441/ai-terminology-explained-humans
Image Masterclass - Complex Scenes


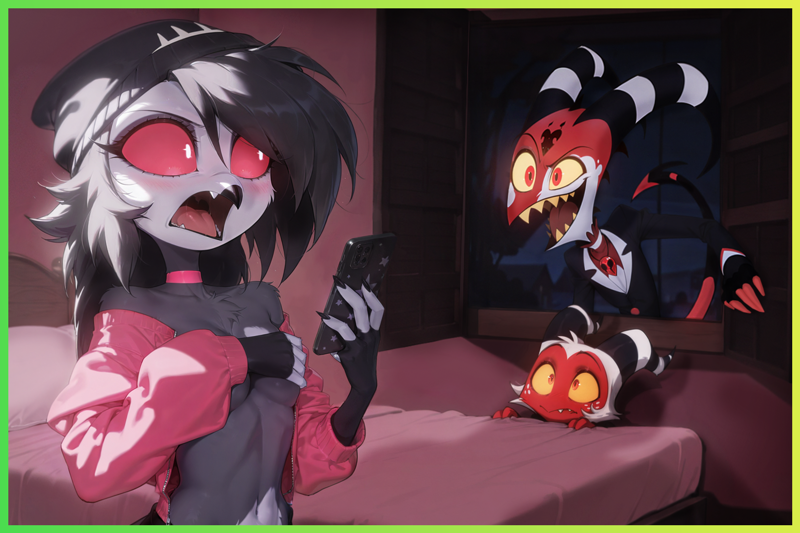
Using AI to generate exactly what you envision, with the characters you want, can be challenging.
The image above took several hours to create because I had a specific idea, and specific characters in mind.
This is a very different workflow, and may be difficult for some users so I'll go through it step-by-step.
First, we need a base.
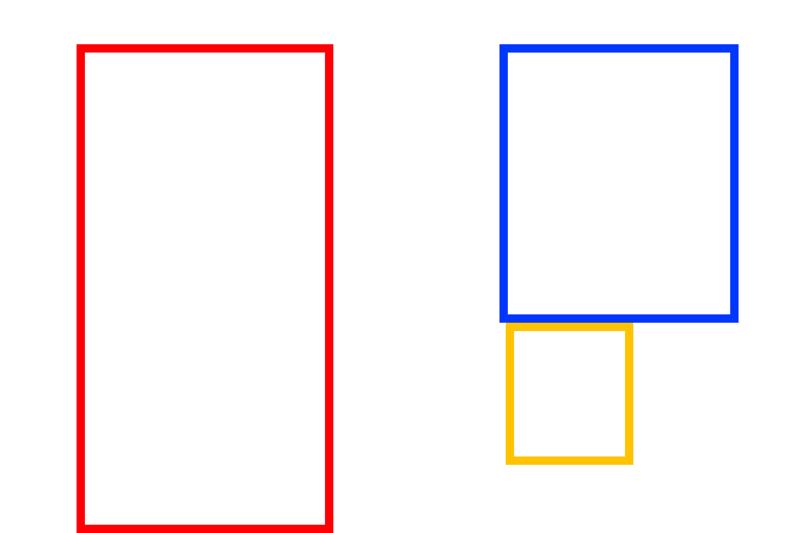
This will be where we will position our characters, red is Octavia, blue is Blitzo, and yellow is Moxxie.
We’ll need a more powerful txt2img tool, so we’ll be using ChatGPT. This will allow us to place specific characters in our desired positions.
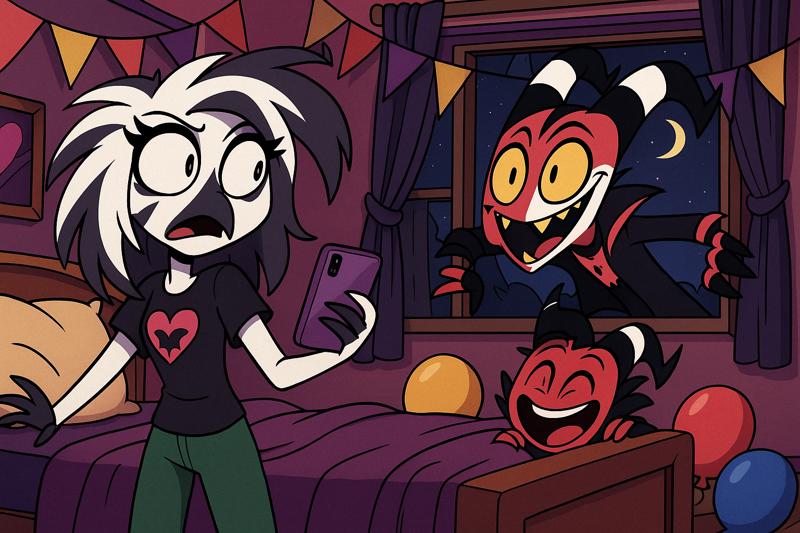
ChatGPT Prompt:
I have an idea for an image but its hard to explain so I'll try my best. This is the general composition I'm looking for, the red box is a person trying to take a selfie this person is Octavia, they are looking to their left at the person breaking into their room from the window, this is Blitzo, they are smiling whilst the person taking the selfie looks surprised, the yellow is Moxxie, they are hiding behind a bed, they are laughing. make it like a surprise party, this is in a bedroom.We have our new base but, Yikes... This is going to take some work.
This is where things get tricky, What we need to do next is start Inpainting.
Censored to Avoid Removal
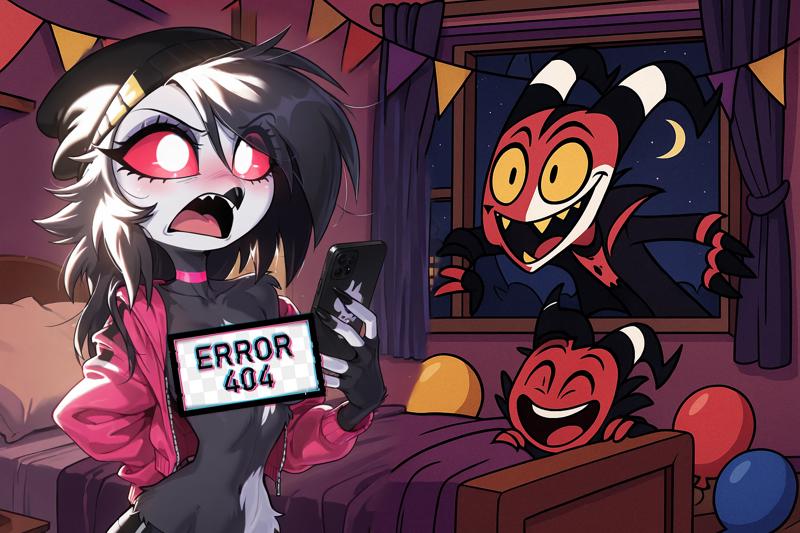
This part takes the longest as our main challenge is keeping the background and composition consistent.
I recommend you use an inpainting strength of around 0.65-0.75, as well as a step count around 30-40. Also, make sure your aspect ratio for each Inpaint respects the size of the masked area.
Great, now we have our base poses for Octavia, Blitzo, and Moxxie.
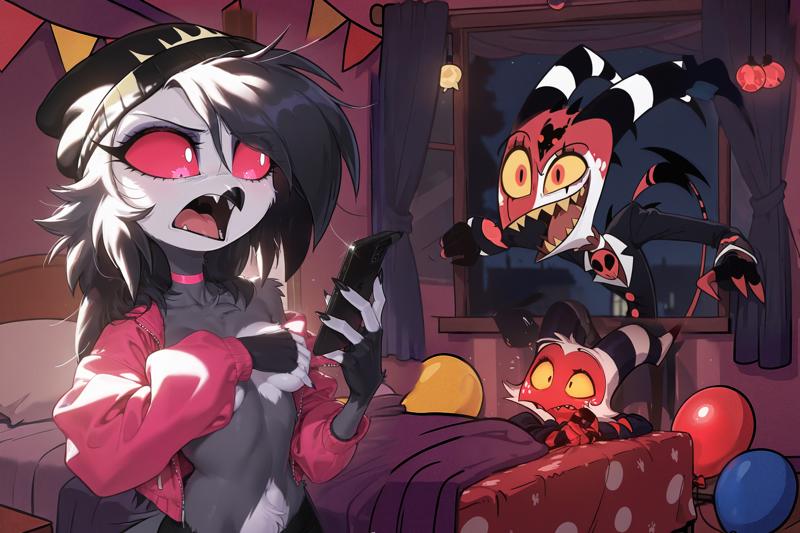
But... the background is terrible, how can we improve it?
To fix this, apply a light img2img pass over the entire image and let it reorganize itself.
I recommend a strength of around 0.35-0.45 and steps around 35-45.
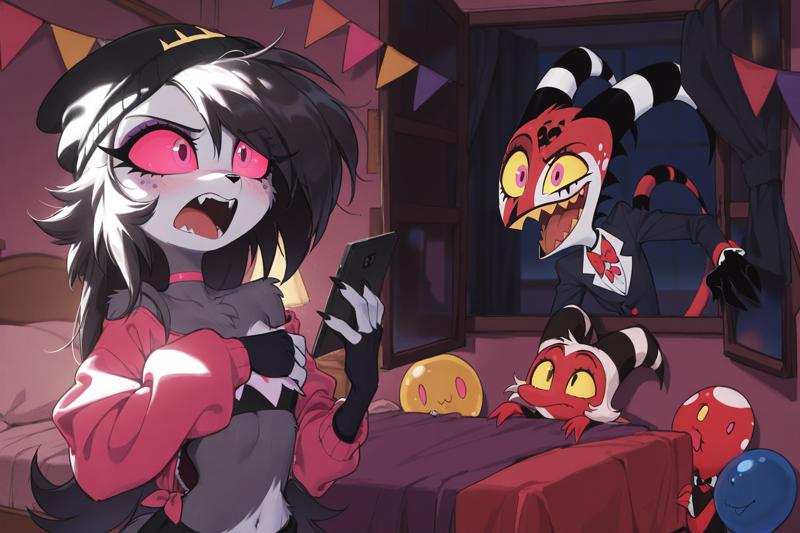
The characters take a small hit in quality but it won't matter in the end.
Now, we have a more consistent background.
If there’s anything in the image you’re not happy with, simply paint over it using an external editor like Photopea. (more information located at the end of the main tutorial)
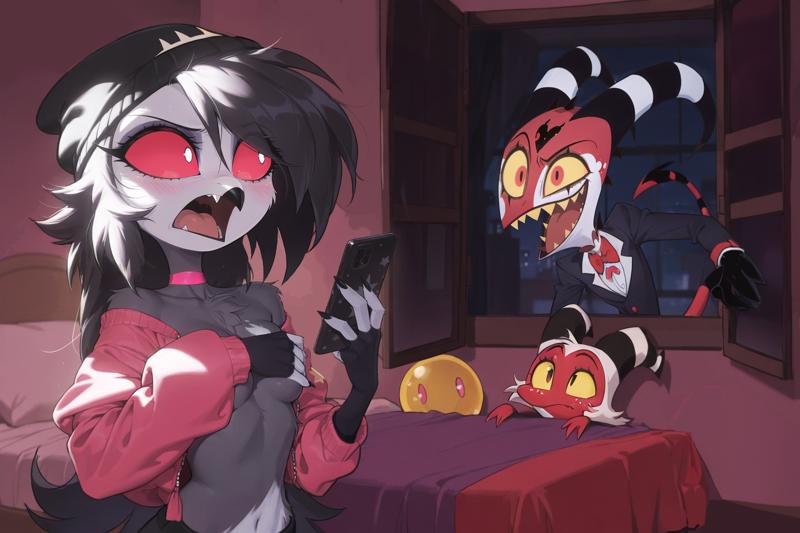
We’ll continue with this approach, digitally removing unwanted elements, Inpainting where needed, and repainting externally, until we achieve our desired result.
You can add effects, shadows, and highlights externally then have Stable Diffusion blend them in.
This is just a process of making small tweaks and adjustments over time, but in the end you'll achieve the image you were looking for.
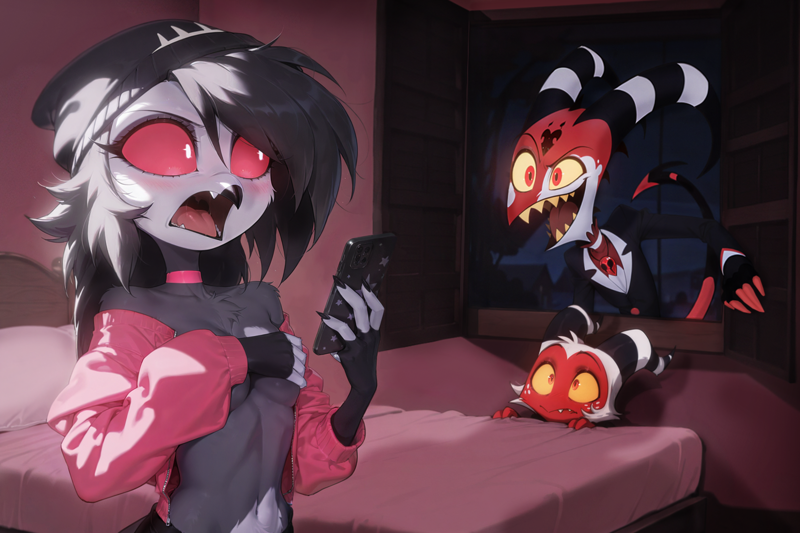
Wow, that was a lot of work, but it definitely pays off.
If you have any questions about this section don't hesitate to ask.
And as always, Happy Generating!
On the Limits of Measurement in Prompt Engineering
One of the harder truths about AI image generation is that very little behaves in the fully measurable, provable, or universal way people often hope. Unlike in mathematics or physics, there are no clean invariants to test against. Absolute image quality cannot be captured by a single metric, and no token or technique can be guaranteed to work across every model.
That said, this does not mean analysis is impossible, only that it is limited. We can quantify relative effects in a given setup using tools like aesthetic predictors, CLIP-based similarity scores, or human preference studies. These provide useful signals, but they remain approximations: rigorous within one model and configuration, not proofs of universal laws.
Even something as seemingly straightforward as “adding more steps increases quality” illustrates the point. While it often improves results, the benefit diminishes quickly, and in some cases oversampling can even harm composition. The outcome depends entirely on the checkpoint, sampler, and training distribution. The AI itself defines what “quality” means within its learned space; our role is only to measure how its tendencies surface.
This is why findings in prompt analysis should be treated as local rather than universal. Any token-reduction experiment, syntax comparison, or tagging observation offers insight, but only in the context of the checkpoint and parameters under test. Extrapolating from one model to all others oversimplifies a system that is fundamentally data-driven and contingent.
In practice, prompt engineering is best understood not as the discovery of absolute rules, but as the mapping of tendencies and heuristics. Insights remain valuable, but they should be recognized as contextual and probabilistic rather than definitive. The most we can do is identify patterns that seem to hold, and remain aware that they may shift the moment the dataset, architecture, or training conventions change.
Special Thanks:

MarcianoTheVoyager
https://civitai.com/user/MarcianoTheVoyager
Helped refine and polish as well as come up with unique and distinct ideas to further progress the article.


