In the realm of user interface (UI) development, customization is key to creating unique and tailored experiences. ComfyUI, a versatile Stable Diffusion image/video generation tool, empowers developers to design and implement custom nodes, expanding the toolkit beyond its default offerings. If you're like me and have a specific task in mind and want to create a custom node to perform this task, this guide will walk you through the process of creating custom nodes for ComfyUI.
Getting Started
Before diving into the creation of custom nodes, ensure you have the necessary tools at your disposal. You'll need a capable code editor such as Visual Studio Code, equipped with extensions for Python and JavaScript development. Additionally, a foundational understanding of both Python and JavaScript will be invaluable.
Understanding ComfyUI Nodes
ComfyUI operates on a node-based architecture, where UI elements are represented as interconnected nodes. Each node encapsulates a specific functionality or behavior, facilitating modular and scalable UI development. To extend ComfyUI's capabilities, developers can create custom nodes tailored to their project requirements.
Creating Custom Nodes
Let's delve into the process of crafting custom nodes for ComfyUI, utilizing Python and JavaScript for seamless integration.
1. Define Node Parameters
Start by defining the parameters and properties of your custom node. These parameters dictate the node's behavior and appearance within the UI. Here's a basic example of a custom node definition in Python that accepts an integer input and returns an integer output. Create and edit a file named BasicTutorialTimesTwo.py`:
class TimesTwo:
    @classmethod
    def INPUT_TYPES(cls):
        inputs = {
            "required": {
                "input1": ("INT", {}),
            }
        }
        return inputs
    RETURN_TYPES = ("INT",)
    RETURN_NAMES = ("RETURN VALUE",)
    FUNCTION = "AnyFunctionNameCanGoHere_SeeStep2"
    CATEGORY = "CivitaiTutorials/BasicNodes"
2. Implement Node Logic
Next, implement the logic and functionality of your custom node. This may involve processing user input, performing calculations, or interacting with external data sources. This processing is done in the function we specified in Step 1. See how we created our own function name:
    def funcTimesTwo(self, input1):
        returnval = 0
        returnval = input1 * 2
        return (returnval,)
If you put it all together, you get this. Make sure to pay attention to the FUNCTION property, as well as the proper indentation that Python requires:
class TimesTwo:
    @classmethod
    def INPUT_TYPES(cls):
        inputs = {
            "required": {
                "input1": ("INT", {}),
            }
        }
        return inputs
    RETURN_TYPES = ("INT",)
    RETURN_NAMES = ("RETURN VALUE",)
    FUNCTION = "funcTimesTwo" # <---- look here
    CATEGORY = "CivitaiTutorials/BasicNodes"

    def funcTimesTwo(self, input1):
        returnval = 0
        returnval = input1 * 2
        return (returnval,)
3. Integrate with ComfyUI
Finally, integrate your custom node with the ComfyUI framework to make it accessible within the UI editor. Register your node with ComfyUI's node registry, allowing users to add it to their projects effortlessly.
Create and edit your __init__.py file to look like this:
from .BasicTutorialTimesTwo import TimesTwo

NODE_CLASS_MAPPINGS = {
    "btTimesTwo": TimesTwo
}

NODE_DISPLAY_NAMES_MAPPINGS = {
    "btTimesTwo": "Basic Tutorial - Times Two"
}

__all__ = ['NODE_CLASS_MAPPINGS', 'NODE_DISPLAY_NAME_MAPPINGS']
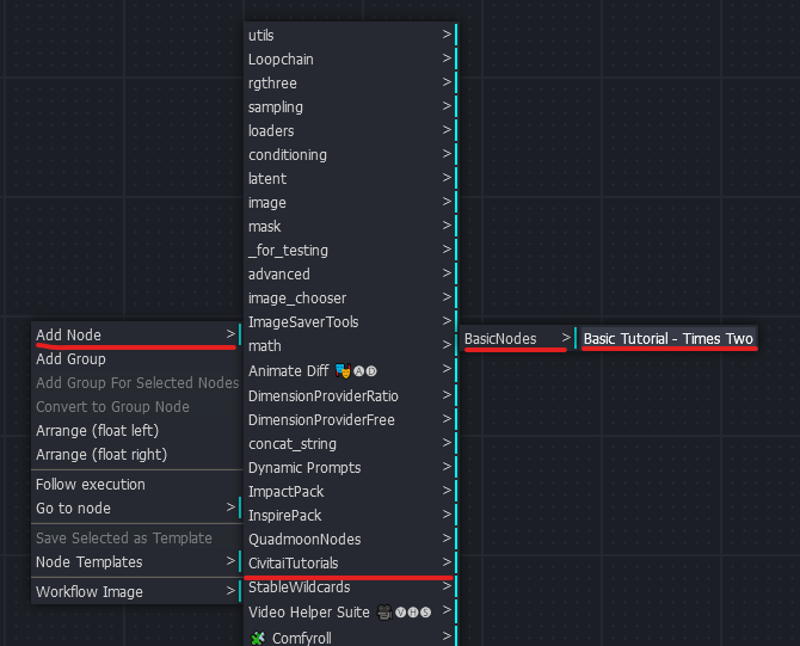
At this point, you are ready to test the node. Load up ComfyUI and open your webbrowser to the ComfyUI interface. Right click in the empty space to add a node. If you did this correctly you should see a new menu option called CivitaiTutorials. Within this menu, there should be a sub menu called BasicNodes. Within this sub menu, you should find the node we just created. See below screenshot:

Click on the node to add it to the workflow.
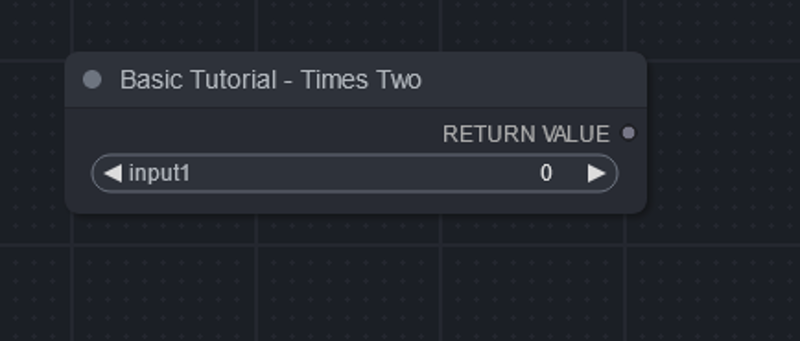
It will look pretty basic, but if you did everything right, it should look something like this:

Two things immediately come to mind here:
You have to input your value manually. If you wish to use the output of another node as your input, then you have no way to connect them.
You have no way of checking the output.
To solve these issues do the following:
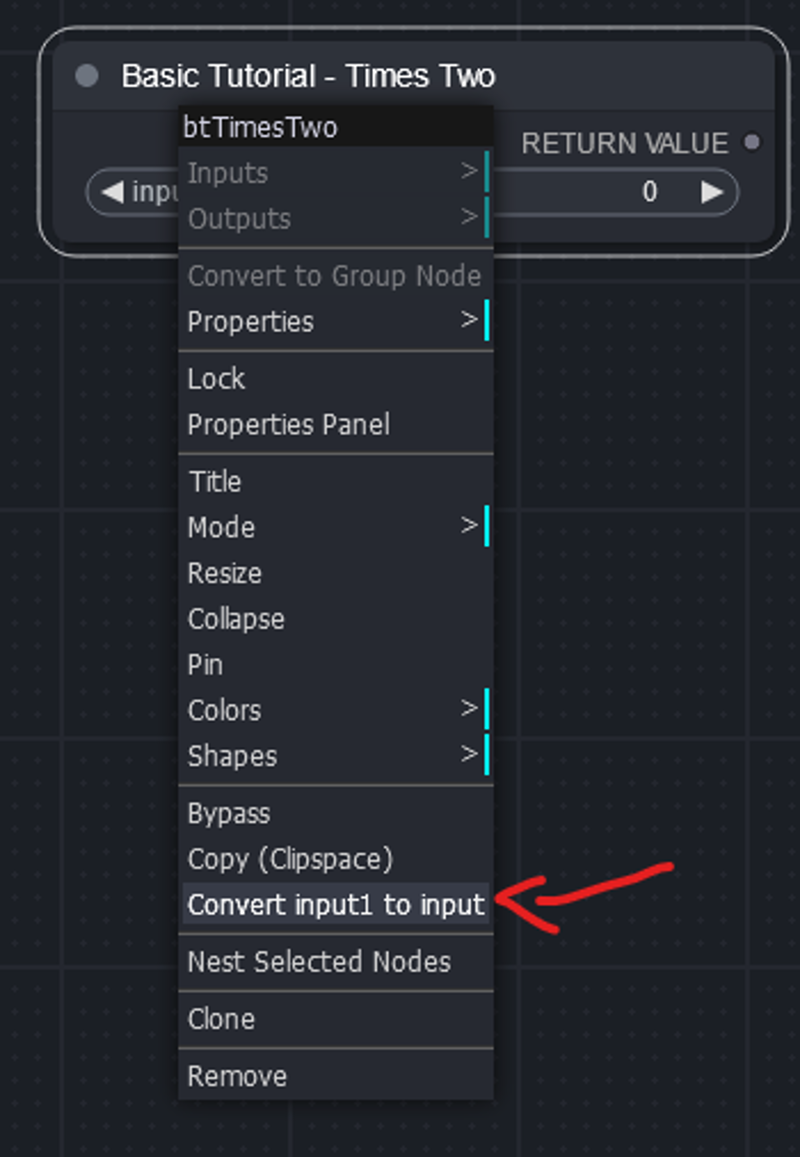
Right click your new node and select this option "Convert input1 to input":

Connect the output to some other nodes that will allow you to display text.
For now, leave the node as it is (undo your change if you converted input1 to an input) and connect the RETURN VALUE to something. I recommend installing my node package (https://github.com/traugdor/ComfyUI-quadMoons-nodes) to get the INT to String converter node and then installing the pythongosssss/ComfyUI-CustomScripts custom node package to get the "Show Text" node (https://github.com/pythongosssss/ComfyUI-Custom-Scripts). If you do this, refresh your browser, and connect these nodes, you should see something like the screenshot below. You may have to convert the integer_input of the "Convert Integer to String" node to an input. Your setup should look like this:

Press CTRL + Enter on your keyboard to queue up ComfyUI and you should see the Show Text node display the number 1024 in the box like this:

If you made it this far, and everything worked, then you have successfully created your own custom node for ComfyUI and integrated it with other nodes. Because ComfyUI is written in Python a lot of information about what you can do with nodes can be gleaned just by looking at the source code!
Best of luck in your endeavors and happy coding!


