

I resisted ComfyUI for quite a while. I loved my A1111, and I still do prefer it for inpainting (though once I get Krita AI working the way I want, I'm sure that will change.) But once I jumped in, I jumped in with both feet! This UI is messy and probably incomplete, but it's what I use today for img2img work, and you probably should too unless you already have something better!
JSON Download: https://gist.github.com/TylerZoro/0159fff734bdf70074445997bba255e2 (also attached to this article)
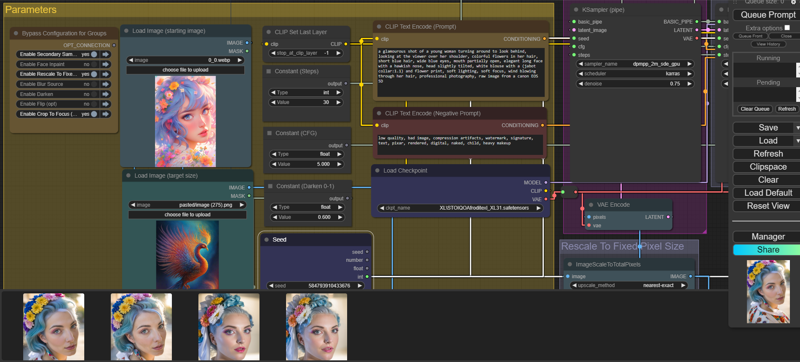
Features:
Toggleable groups for all sorts of features.
Optional darkening
Optional resize and crop to fit a target image with focus (face) detection for centering the crop
Optional fixed pixel count output (needed if you have memory constraints)
Optional second sampling pass with a different sampler (same model)
Optional auto-detecting face inpainting step
All the knobs are together, with no scrolling around the workflow to find a setting to tweak (most of the time)
You can add any new group to turn off.
Okay, so let's walk through this.
Getting Started
The first steps are are easy. Just load up the JSON, go to the manager and click "Install Missing Custom Nodes".
There are a couple of models you may not have for bounding box detection, and I've given URLs for where those come from. Just place them into the models tree under the appropriate folder for the widget they go with. See the notes in the workflow for details on this.
Now that it's loaded up, paste one image that you want to base your output on into the "Load Image (starting image)" node.
Next, you will want to paste an image that defines the output size (or aspect ratio) into the "Load Image (target size)" node. You can skip this if you're going to turn off the "crop to focus" group in the "Bypass Configuration for Groups" panel (not recommended).
Select the model you want in the "Load Checkpoint" node and set the CFG and Steps values next to it to the recommended values for the model you are using.
Hit "Queue Prompt" and watch your image generate!
Options
All options are controlled by the "Bypass Configuration for Groups" panel on the left of the main parameters group.
Darken
The darken option blends your source image with an empty black image to darken it. This results in a darker output image and can be very useful for switching between day and night. The value ranges from 0.0 (no darkening) to 1.0 (all black). Make sure you toggle on the "Darken" option on the left or this value will have no effect.
Flip
This option turns on a horizontal flip of the input image. This can be super useful for getting the right angle on a subject, but it's pretty self-explanatory and has no additional options.
Secondary Sampler
This is on by default and causes a second pass over the input. This is not a latent upscale, just a second pass over the same latent. Make sure you use different samplers in the two KSampler nodes (right of the parameters), as they use the same seed and will cause problems if you just run the same sampler again. I tend to use DPM++ 2M SDE/Karras on the first sampler and Euler Ancestral/Normal on the second, and that should be the default when you load the workflow.
If you turn this option off, the second sampler is completely skipped.
Face Inpaint
This option is potentially very slow. It will do a separate inpainting step for each face in your image, that's why it's off by default. If you turn it on, you can scroll all the way to the right of the workflow to change any parameters you like, but the defaults should work fine. At some point I may try to pull them over to the Parameters group, but that's getting crowded.
Blur Source
Sometimes you want to reduce the amount of detail for your model to try to focus on. Enable the "Blur Source" group to cause the input to be blurred before sampling.
Crop to Focus
This was explained above, but I just recommend you leave it on. The group that implements this feature is a total mess because it has to have a fallback to the center of the image if there are no faces detected. I should probably just write a custom node for this.
If you don't want to crop the input at all, you can turn this off, and then the "Load Image (target size)" node will have no effect. You might still resize the output if you didn't also disable the "Rescale to Fixed Pixel Size" group.
Rescale to Fixed Pixel Size
This causes your output to be scaled to a specific megapixel output size at its current (after cropping) aspect ratio. I use this on my machine because I can only do SDXL at 1.2 MP before my VRAM gets eaten up, so I just scale every image to 1.2 MP and that keeps me safe.