Introduction
Hi!, my name is Jesús "VERUKY" Mandato, I am from Argentina and I love playing with AI.
Artificial intelligence image generation is a fascinating world. From the first moment I used it I fell in love, I knew there was incredible potential although at that time the results had quite a few errors and low resolution. One of the first things I tried was to obtain new "improved" versions of photographs that had low resolution. Using img2img I could take a reference photo and, through a prompt and some parameters, obtain some improvements thanks to the generative contribution of AI. But there was a problem: the more detail was added to the image, the more the person's original features were distorted, making them unrecognizable. I started to obsess over it.
I spent hours and hours testing different resolutions, changes in denoise values, cfg... I started testing the ControlNet module when it was incorporated into Automatic1111 but although I could better direct the final result, the distinctive features of the images continued to be lost.
I started having very good results a couple of months ago and ended up making a workflow on reddit about the first version of SILVI. Currently I greatly improved the previous method and I think I am obtaining incredible results that I want to share with you.
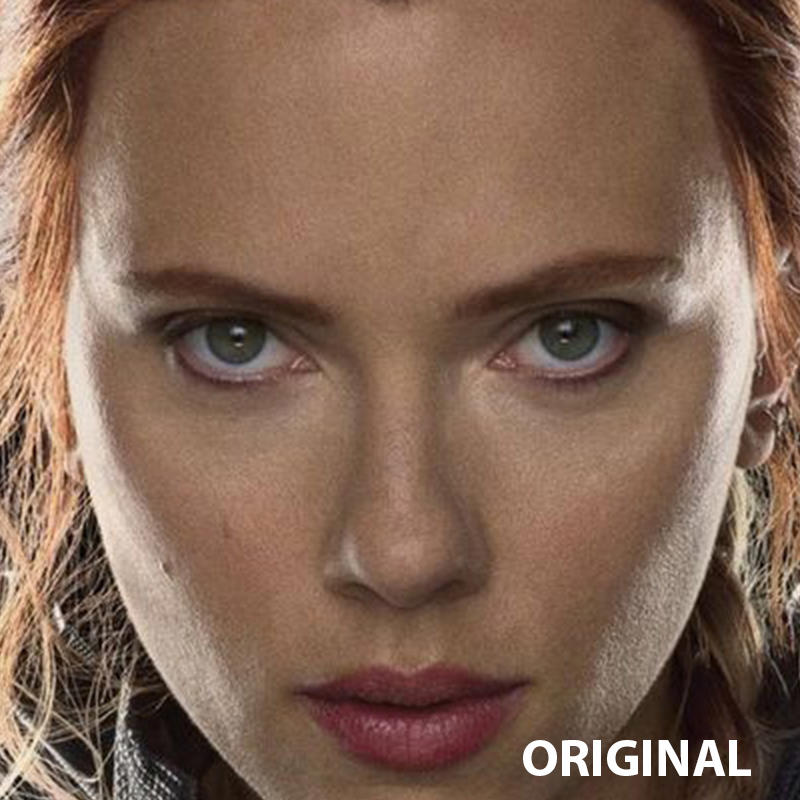
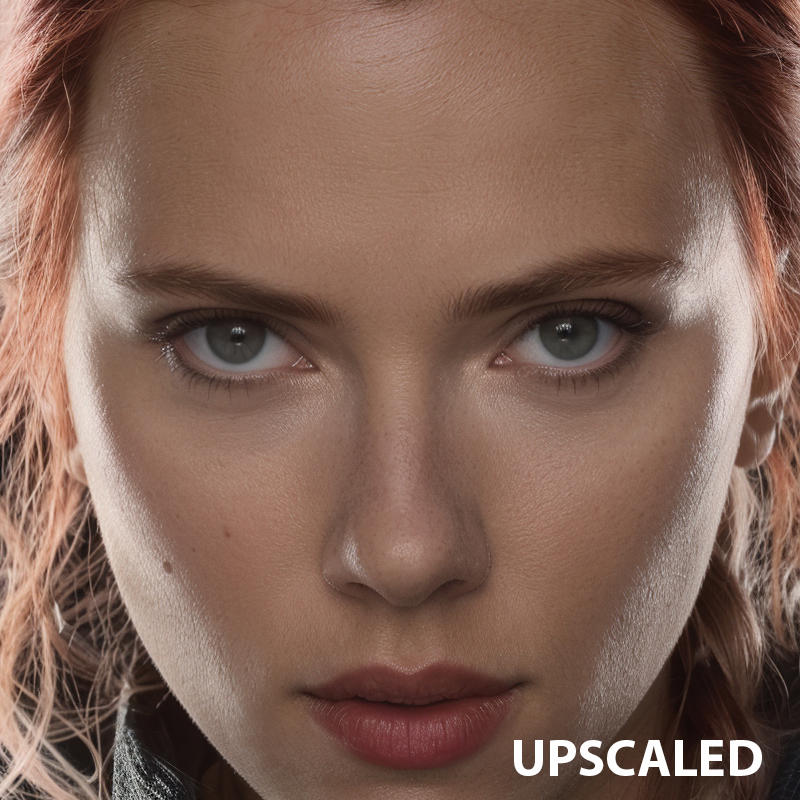
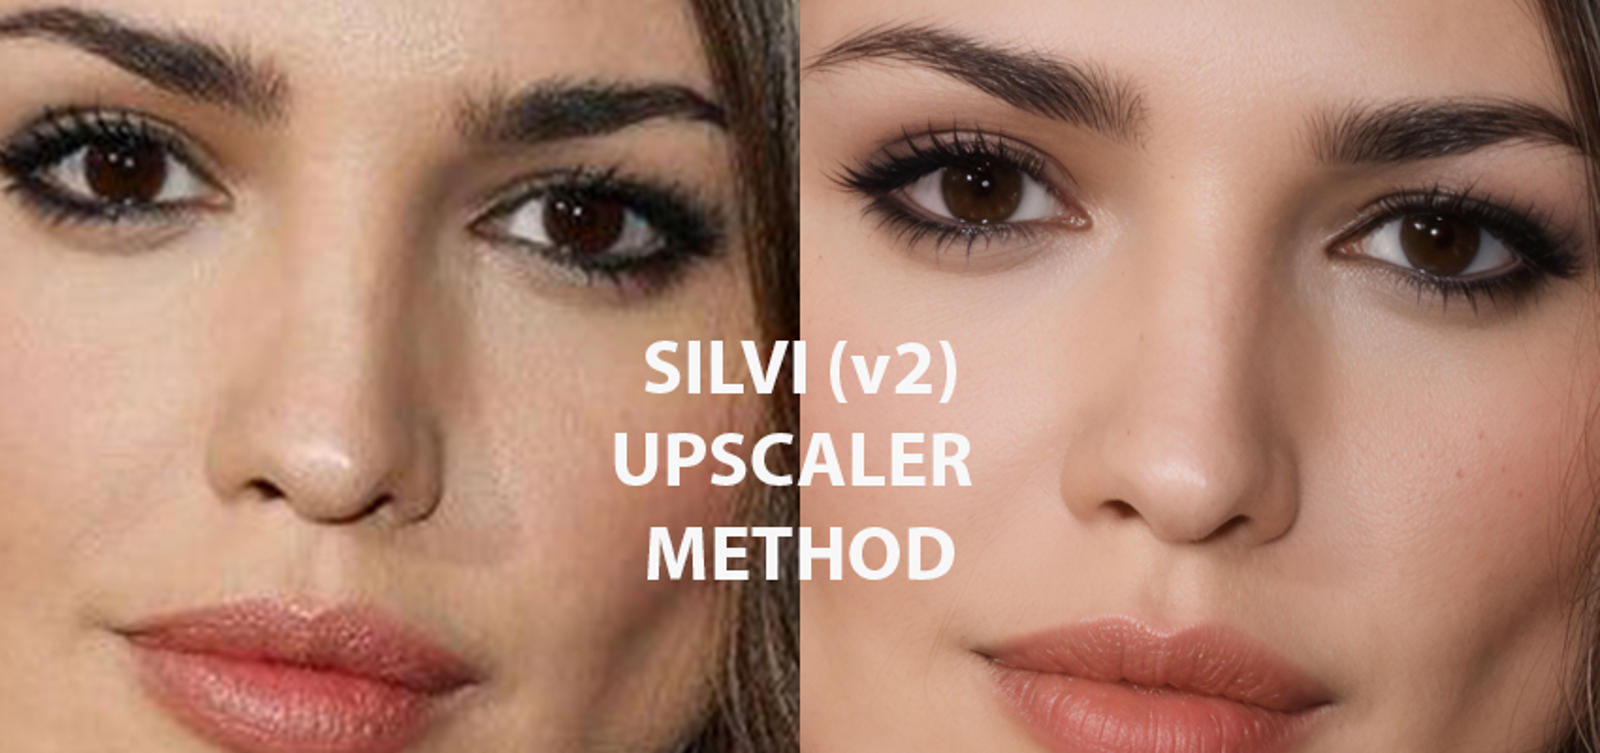
Perhaps there are methods that achieve similar results, but one of the problems they have is that they often create hallucinations (eyes or hair where there should not be any). SILVI in its current version allows the upscaler to be very creative in the details without creating these hallucinations.
One of my obsessions developing this method was to be able to scale faces while maintaining the features, since some methods, when being creative in the details, lost the characteristics of the person, making it different from the original. SILVI manages to maintain these characteristics by introducing a lot of detail.
The method can be modified through the parameters of the ControlNet modules, where we can control how creative we want the scaler to be.
Preparations
We will need to have these things:
Automatic1111 updated
A version 1.5 model (in my case I am using Juggernaut Reborn) (https://civitai.com/models/46422/juggernaut) - SILVI works with SD 1.5 models since the SDXL ControlNet modules do not give me good results.
The 4xFFHQDAT upscaler (https://openmodeldb.info/models/4x-FFHQDAT)
The Lora LCM for SD version 1.5 (https://civitai.com/api/download/models/223551) - This lora must be placed in its corresponding LORA models folder.
First we will go to the img2img tab and load the image we want to scale. Then we will follow these steps:
1 - Choose the checkpoint and the VAE

Other checkpoints can be used but Juggernaut was one of the ones that worked best for me.
2 -Select the sampling method and number of steps

We use the LCM method because it introduces a lot of detail. Other sampling methods can be used, but the steps must be increased to 20 and the CFG Scale between 5 and 7.
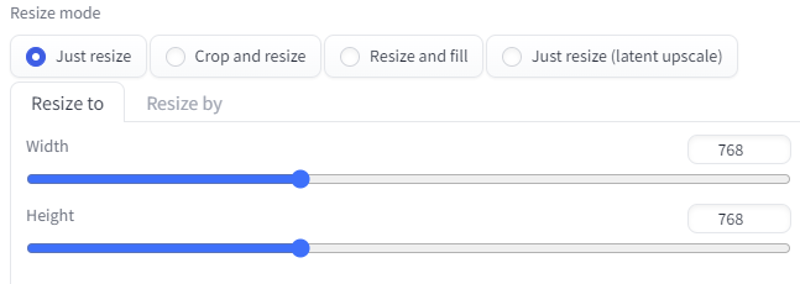
3 - Select the Tile Size (768x768 give good results). This size will be used by the SD UPSCALE script to generate the tiled image.
4 - Select the CFG Scale

5 - Select the Denoising Strength

The denoise strength has to be at its maximum so that the upscaler can be very creative in the details. The ControlNet modules are responsible for controlling that hallucinations or artifacts do not occur.
6 - Select the first ControlNet module
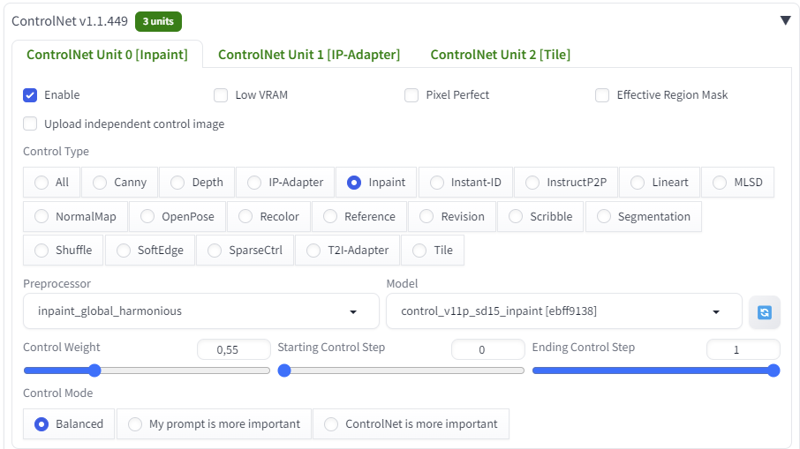
The Control Weight value controls the creativity of the scaler's fine stroke. It should always be left at this value. Modifying the Ending Control Step value by placing it between 0.7 and 0.8 of this module will allow us to introduce a lot of creativity in objects and composition, but fidelity in the features will be lost in most cases. (KREA AI or MAGNIFIC AI style).
7 - Select the second ControlNet module
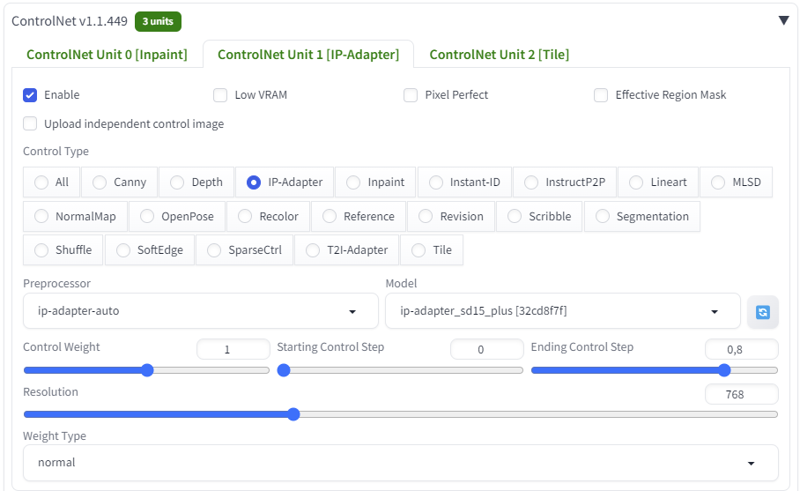
This is the ControlNet module that keeps hallucinations at bay.
8 - Select the third ControlNet module
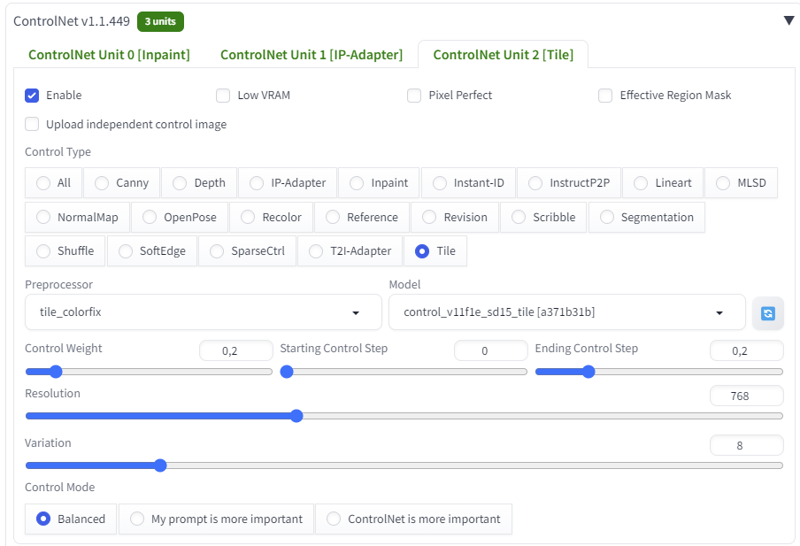
This third module is responsible for maintaining color coherence with the original image since we have the denoiser strength at its maximum. Thanks to Reddit user Medium-Ad-320!!!!
9 - Select the SD Upscale Script and setting it
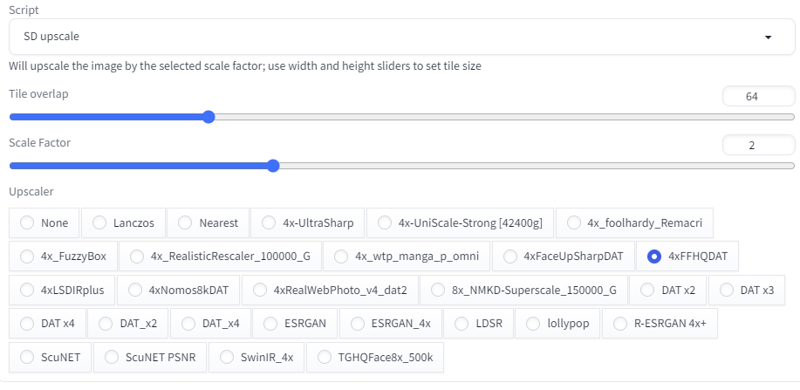
Other upscaler models can be used (4xUltrasharp, for example) and we will have different results. The one I use gives good results in most images, but you can do your tests.
10 - At the prompt, make a description of the image and place the LORA LCM. We can use the "clip interrogator" below the GENERATE button to get the prompt (don't forget to add the LORA LCM afterwards)

If they use another sampling method, it is not necessary to add this LORA, but we may not have as much detail in the generated image.
For NEGATIVE PROMPT we can use anything, In my case I use:
simplified, low resolution, canvas frame, ((disfigured)), ((bad art)), ((deformed)),((extra limbs)), blurry, (((duplicate))), ((morbid)), ((mutilated)), [out of frame], extra fingers, mutated hands, ((poorly drawn hands)), ((poorly drawn face)), (((mutation))), (((deformed))), ((ugly)), blurry, ((bad anatomy)), (((bad proportions))), ((extra limbs)), cloned face, (((disfigured))), out of frame, ugly, extra limbs, (bad anatomy), gross proportions, (malformed limbs), ((missing arms)), ((missing legs)), (((extra arms))), (((extra legs))), mutated hands, (fused fingers), (too many fingers), (((long neck))), Photoshop, video game, ugly, tiling, poorly drawn hands, poorly drawn feet, poorly drawn face, out of frame, mutation, mutated, extra limbs, extra legs, extra arms, disfigured, deformed, cross-eye, body out of frame, blurry, bad art, bad anatomy, 3d render, digital art, bad art, (deformed iris, deformed pupils, semi-realistic, cgi, 3d, render, sketch, cartoon, drawing, anime:1.4), text, close up, cropped, out of frame, worst quality, low quality, jpeg artifacts, ugly, duplicate, morbid, mutilated, extra fingers, mutated hands, poorly drawn hands, poorly drawn face, mutation, deformed, blurry, dehydrated, bad anatomy, bad proportions, extra limbs, cloned face, disfigured, gross proportions, malformed limbs, missing arms, missing legs, extra arms, extra legs, fused fingers, too many fingers, long neck, 3d render, digital art, bad art, 3d render, digital art, bad art, 3d render, digital art, bad art
Once we have everything set we are going to generate the image.
This method also applies to images in which we want to add details to objects that are not well determined in the original image, in the style of KREA AI or MAGNIFIC AI. For this we will have to modify the parameters of the first two ControlNet modules.
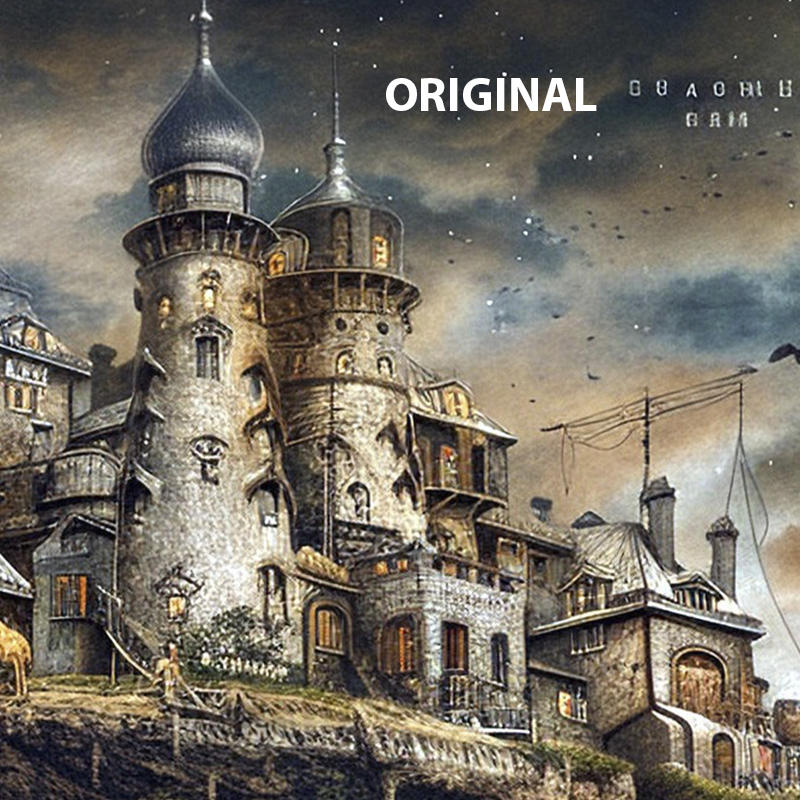
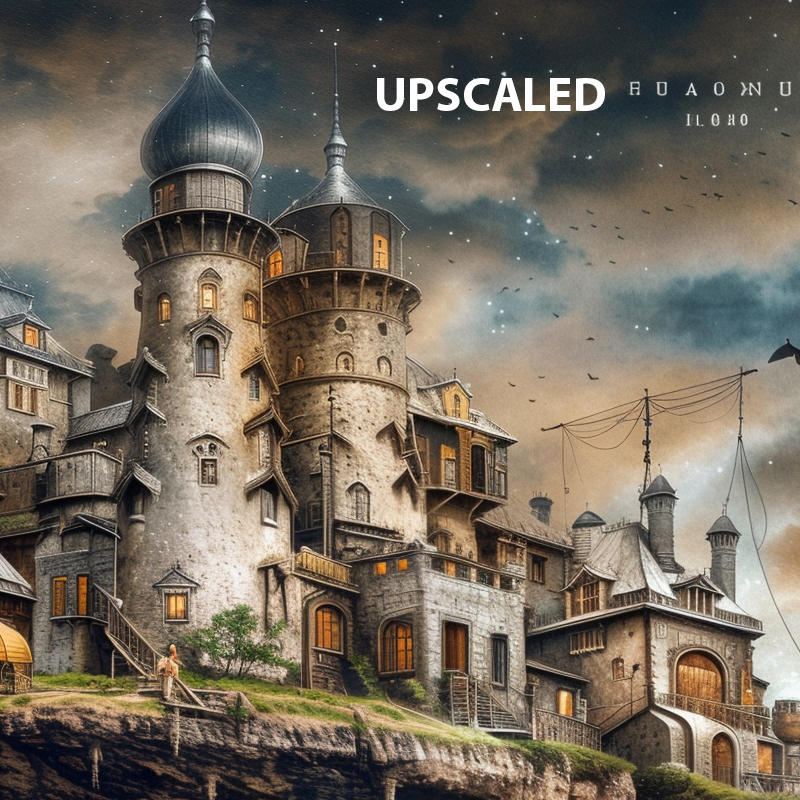
To achieve these results we will only have to modify the Ending Control Step value of the first two modules, placing them between 0.7 and 0.8 in both cases. Lower values will create unwanted hallucinations.
Considerations about this method
Cons:
Does not maintain much fidelity in the texts (common problem in generative AI)
It takes a little learning to know which scale can give us the best results. For example, to improve 2000x2000 px images, we can set the scale value of the SD UPSCALER Script to 1.1. For 400x400 images that value could be 3.
It can be very addictive
Pros:
Virtually eliminates hallucinations
It maintains the facial features very well.
It works with any type of image (realistic, vectors, paintings, etc.) thanks to the IP ADAPTER module.
