

Workflow: https://civitai.com/models/381021
00:00 Example video
00:20 Intro & Planning
02:58 Create Faces (LOKI)
05:59 Render RGBA !
07:42 ComfyUI Stack
11:33 ComfyUI T-Pose Workflow
18:24 Photoshop
23:00 Character Animator
28:27 After Effects
32:40 Hedra
34:20 After Effects Tracking
38:44 ComfyUI Backgrounds
42:41 Premiere Final Comp.
54:26 Example video
55:02 Conclusions
T-Pose 2 Puppet
Full detailed explanation is provided in the video, with full walkthrough steps and tips for using your own assets beyond copying exactly what was done.
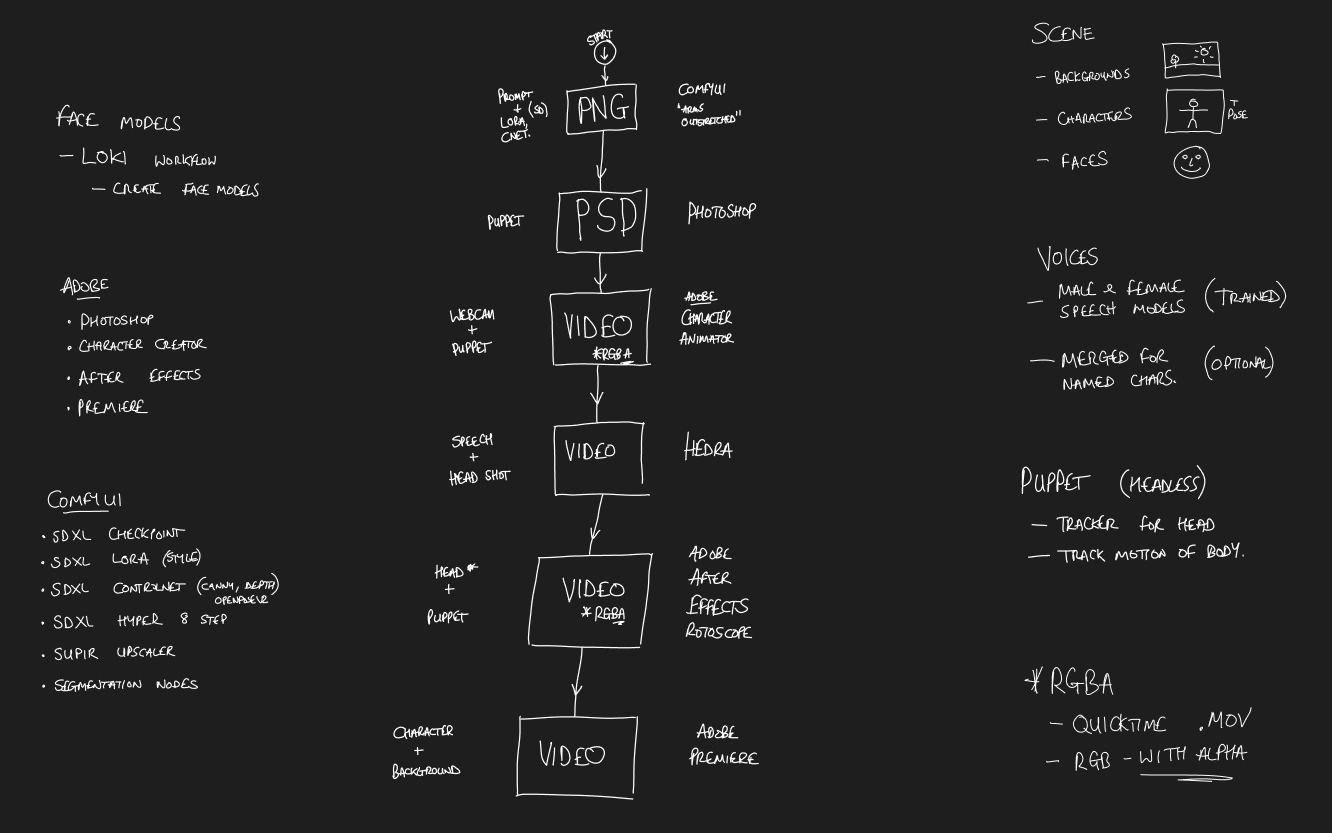
Breakdown is simple in concept, we will replace the head of a puppet with a lipsync video.
However due to the number or moving parts and the number of tools used, you MUST save all your project files somewhere easy to find, this means moving rendered clips to a "library" of your design. This will prevent madness when you cannot find the parts you just created.
ComfyUI
We will use Loki workflow to create Face Models
We will use Trio-Tpose workflow to create the TPose PNG
We will then remove references to humans, disable controlnet and create background for the actors to be placed into at the end.
Photoshop
Using the structure i demonstrate in the video, we will create a 2D puppet by splitting it into named layers, allowing for dangling capes and such like. This PSD file imports directly into Adobe Character Animator
Character Animator
The PSD is imported and then setup with a few simple actions, the puppet can be driven by either keyframe animation by hand, by live manipulation or by combination with Webcam input.
(render to Quicktime .MOV RGBA)
Kits.ai and Hedra.com
We use Kits.ai to train and generate speech for our characters.
We use Hedra.com with the Puppet Face to lip sync the speech.
we use Rotoscope to isolate the Head, allowing it to be tracked to the puppet.
After Effects
Now we have a video format talking head, which is speaking lip synced lines. by doing simple motion tracking on the puppet movement we can attach the new head using the tracker markings we included in the puppet design (neck markers). Once the Puppet and talking head are attached now we call this the actor.
Premiere
By taking the correct backgrounds and the correct Actors speaking the lines required for the scene in a script, we can now shoot the scenes easily. Consider adding some background noise or SFX samples to enhace the scenes.
Conclusions
Characters can easily changed clothing and wear uniforms which will not change because they were only generated once and the puppet body is used many time, maybe with many characters. Generating the Lines for the heads is much cheaper than generating every single full HD frame. The locations will always be familiar as they are the same place.
Any and All Improvements to Talking Face Animations will only enhance this approach.
It's easy to build a library of Speech models, Face Models for characters and also Puppet models for use as bodies.