Introduction
This is a simple Automatic1111 extension to create AI videos, just a wrapper to ffmpeg tool within a Colab environment. It must be used paired with img2img batch tab.
The reader must be familiar with Automatic1111 tool.
Installation
Inside A1111 extensions/ folder, run this command:
git clone https://github.com/scuti0/sd-webui-v2v-helperOr paste this link in: A1111 "Extensions" tab, then in "install from url" tab, paste inside "URL for extension's git repository" field. Then, hit "Install".
For windows, you must install ffmpeg separately. Don't forget to add ffmpeg bin\ folder to your "Path" in Windows variables.
Obs.: if you use --share or --listen options in A1111 launch command line, don't forget to add --enable-insecure-extension-access, or it could not work.
Motivation
I've been using mov2mov for video-to-video works. It was an excellent extension, but it seems it will be no longer updated. There are lots of pull requests in github repository, but the owner could't maintain it in the last months.
So, I created a very rough extension to help in my current workflow process to create videos inside A1111.
Advantages
- You can separate frames and remount your video after img2img processing inside A1111, without the need of running ffmpeg separately;
- Since you use img2img batch, you can create your video using extensions mov2mov does not support, like Adetailer.
- You can download your original and generated frames to process them in another program you like.
Disadvantages
- It was tested inside a Google Colab environment. For example, you can use SimpleSD notebook. For windows, you must install ffmpeg for Windows separately.
- It's not possible to use different prompts to a specific range of frames. In this case, use mov2mov or any ComfyUI workflow that already implements this feature.
You can also divide your video in small semantic pieces, run img2img with a different prompt for each of them, then put everything together in any video software to combine them.
Workflow / How to use
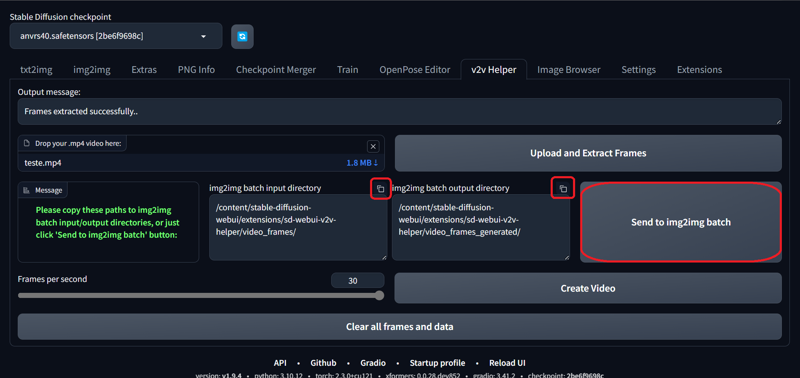
1- On v2v helper tab, upload your .mp4 video and hit "Upload and Extract Frames" button;

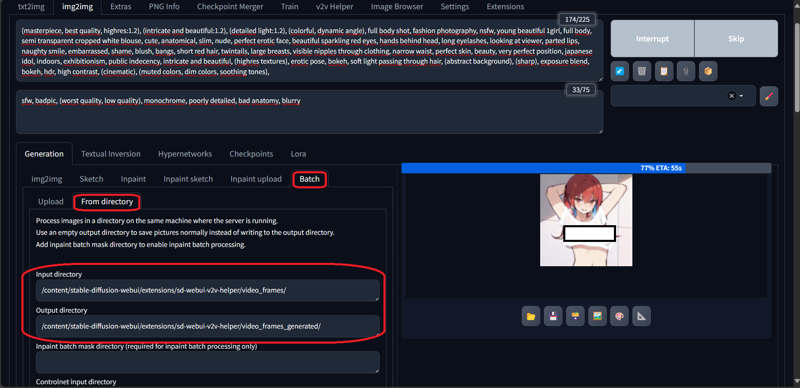
2- After process, copy the input and output directories to img2img batch "from directory" tab: just hit "Send to img2img" or you can use the small copy button in the upper right corner of textboxes;

3- Configure all your prompts, controlnets, adetailer or upscaling in img2img tab. Then, click Generate button and wait for batch processing;

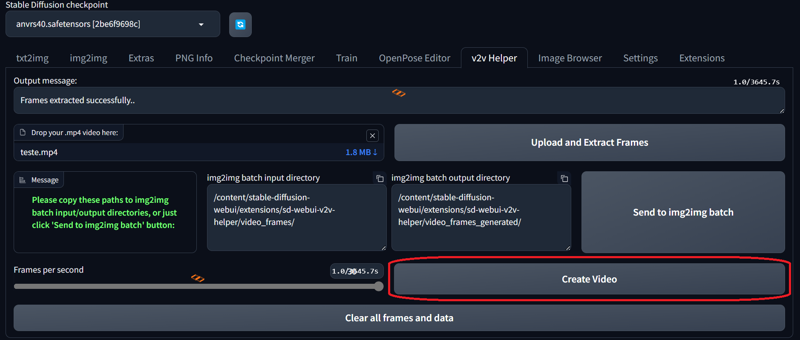
4- After img2img finishes processing, go back to v2v helper tab, select your desired fps, and hit "Create Video";

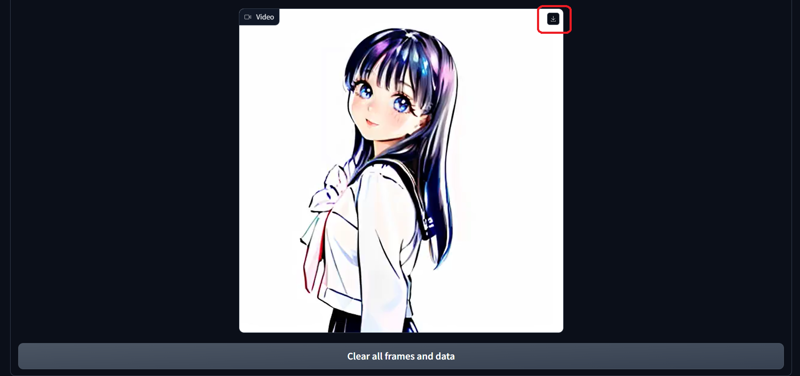
5- Wait processing, then you can download your video!

6. If you want to download frames to backup or process in another program, you can download a .zip file with the button "Download frames", as an option after clicking "Clear all frames and data";


7. If you want to improve video quality, I recommend TensorPix site.
How to create an extension for A1111?
First, read this Automatic1111 article.
Then, you need to learn the basics of Python and Gradio. It's not necessary to learn everything, inside the article there is a section with some basic examples that you can use as a start.
And, you can use a free ChatGPT account to generate some codes to you. Inside a Pro Colab environment, you can use Gemini. You still need to test and make some adjustments, because sometimes these AI models allucinates and generates broken code.
I will place here the colab notebook I used to create it.
Be careful to check gradio version in your current Automatic1111, before setup. You can see the current used version in requiremens_versions.txt file inside A1111 root directory.
I hope this article can help anyone who wants to create vid2vid works inside A1111, or even implement new extensions.
Thank you for Reading!
