Introduction
Hello!
This article explains SimpleSD, a Google Colab Notebook I've adapted for my own workflow and needs. I currently* use Automatic1111 to create my images and videos.
The reader must be familiar with AI generative tools, technologies and terms.
All information you will read in this article is from I've learned with Olivio Sarikas and Nolan Aatama videos. I hope it helps newcommers to start using a generative web UI like Automatic1111, and creating their own IA art.
Before starting, I really apologize for any mistakes, exaggeration of acronyms or technical misunderstandings. The purpose here is just help new users to use the tools and create their content based on my own experiences.
What is Google Colab?
Google Colab is made for collaboratory research, mainly for machine learning purposes, and it's free to use. It hosts Jupyter Notebooks, and works like a remote computer where you can use a hosted Python environment and good GPUs.
Unfortunately, Google kind of wrinkle it nose for the use of Stable Diffusion inside their collaboratory environment.
But, it's currently the best option for those who can'a afford a good GPU.
Then, I highly recommend to sign up for a Colab "Pay as you go" plan, because of restrictions listed here. With this plan you avoid annoying frequent disconnections and loss of work.
You always can try some workarounds you find on stackoverflows, discords and reddits to avoid it happening in a free use, but it's really a pain in the heck.
And this plan gives you 100 computer units, it takes a while to use it all in the T4 GPU option, and its enough for a "weekend" use.
Notebook explained
All you need to do is to follow these steps:
1- Download the SimpleSD notebook;
2- Purchase a "Pay as you go" plan (optional, but recommended);
2- Access Google Colab;
3- Upload the notebook using the "File" menu in the upper left corner. It's pretty much the same process described in this Nolan Aatama video;
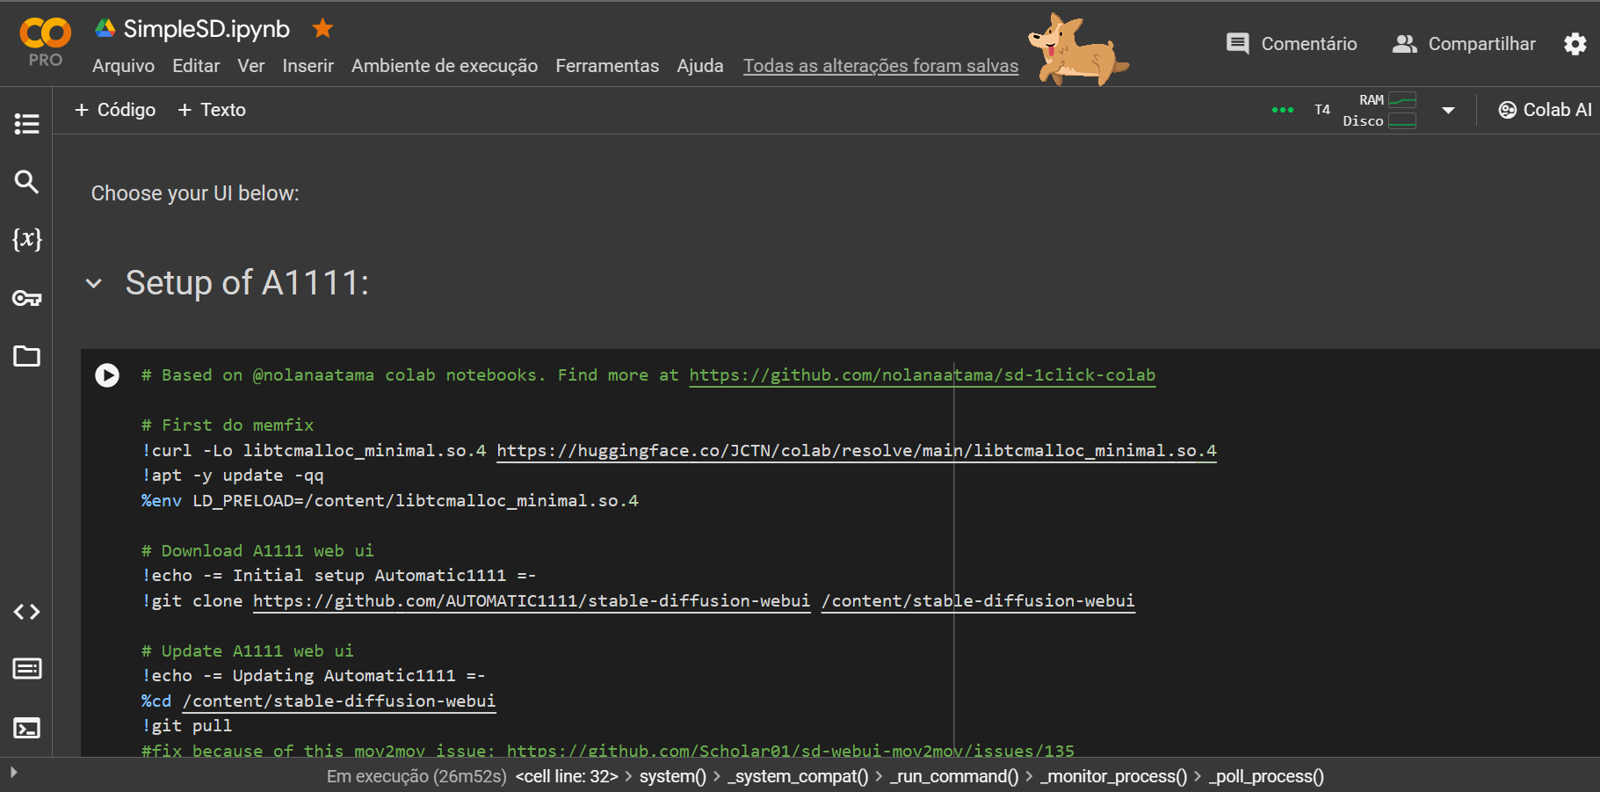
4- You will see a lot of sections with commands and code, but all you need to do is to run each cell (play button) in the order provided:
1- Setup Automatic1111
This first part of notebook downloads and install A1111 most recent version in your Colab environment. It will prepare the environment, and then download a lot of other important extensions, embeddings (mainly textual inversions), upscalers, and one of the most common VAEs, that is necessary to create pixel images from the latent data generated by the IA model.
It will take a while to download all data and files, then you can clear the output after finishing.
On this section, the following extensions are installed:
Tunnels
ControlNET
OpenPose Editor
Tag Complete
!Adetailer
v2v Helper
Ultimate Upscale
Remove Background
Images Browser
AnimateDiff
StylesSelectorXL
CivitAI browser
Advanced Euler sampler
For upscalers, it downloads:
4xUltrasharp
4xfoolhardyRemacri
4xNMKDSuperscale
For textual inversions, it downloads this list:
bad-artist, bad-artist-anime, BadDream, bad-hands-5, badhandv4, bad-picture-chill-75v, bad_prompt_version2, EasyNegative, FastNegativeV2, NG_DeepNegative_V1_75T, verybadimagenegative_v1.3, negative_hand-neg, NegfeetV2, badpicGood toys for starting.
Of course, you can add other extensions you like in a new command, or install it inside the "Extensions" tab inside A1111 web UI.
2- Download Models
This section downloads the model checkpoints you will need to generate your images. These models can be find here at CivitAI or at huggingface.co .
If you want to download a different model, just remove the '#' symbol from the front of command. It will change from green to white and it will be executed next time you press play button.
It will take a while to download all the files, then you can clear the output after finishing.
Try to not download too much models at same time, to avoid reaching storage limit or disconnection.
Currently, I've worked mainly with the following models:
Aniverse - impressive 2.5D anime-like model;
MistoonAnime - good quality anime-like model, with high contrast linearts and cartoon-like style;
MeinaHentai - another excellent anime model, the name explains itself;
AnythingV5/Ink - use it mostly for inpainting;
ToonYou - high quality Disney-like model;
MajicMix realistic - create impressive realistic idol-like characters;
epicRealism - create impressive realistic photography portraits;
PicX real - well-known model for creating astonishing and realistic chars.
These models are pretty stable and good quality, easy to use, you don't need to create those huge negative prompts to get something acceptable.
You can download the motion models for the Animatediff extension too. mm_sd_v15_v2 and mm_sd_v14 works better. You can leave commented this part of the cell if you don't use it.
I don't use SDXL models too much, but no problem, you can use any of them if you like.
3- Download LoRAs
This section downloads the LoRAs, they are a kind of a "small model" that influences the principal model to create the image with a specific style, object, scene, etc. Sorry for the poor explanation, but it is what it does.
Currently I use the following:
Detail Tweaker / Add More Details - good for adding new details when upscaling image;
Doodle Art TUYA5 - for surrealistic doodles;
Mecha - for futuristic armor and robots
If you use AnimateDiff, you can add its LoRAs too.
4- Download ControlNET Models
ControlNET is a must-have extension, because as the name says, you can control how the IA will generate your images, based on some techniques, like character poses, depth maps or linearts.
On this section, the following ControlNET models are installed:
control_v11f1p_sd15_depth
control_v11p_sd15_lineart
control_v11p_sd15_normalbae
control_v11p_sd15_openpose
control_v11p_sd15_softedge
control_v11p_sd15s2_lineart_anime
diff_control_sd15_temporalnet_fp16
ip-adapter-plus_sd15.pth
Those are the ones who works better to me, but you can remove the '#' on the other lines to download your preferred models.
5- Launch the Web UI
Now here is when the fun begins! But attention: first time you execute this cell, it will still configure and install lots of dependencies. It takes a while, just wait and don't forget to close warnings saying you are not using the GPU.
When the gradio link appears, you can click it and start using A1111.
I highly recommend to use this first run to prepare some configurations:
go to Settings -> ControlNET and change the number of units from 3 to 4. If you use more than 1 ControlNET unit, you need to change it to enable the multiple ControlNET.
go to Settings -> User Interface and add CLIP_stop_at_last_layers and sd_vae to the user interface. Some models works better with clip skip 2, so it's good to have this slider to configure it when necessary. And some models does not come with a baked VAE, so you need to select the VAE before rendering.
After doing that, stop the cell and run it again. Enjoy creating!
6- Extra tools
You really don't need to use them. They are "work savers" cells, because the extension mov2mov sometimes crashed, and you could save all the frames generated to create a video directly, using the ffmpeg tool. With new v2v Helper extension, they are not needed anymore.
The last one you can use to generate some short songs with MusicGen tool. I use it for creating background songs for videos.
7- How about ComfyUI?

I've tried ComfyUI recently.
It's clearly an advanced tool that gives you more freedom to create your own workflows. It's a node-oriented UI that's is well known in AI community. You can connect with "wires" all the elements used in the process, models, ControlNETs, upscalers and KSamplers. Maybe faster and lighter than A1111.
Also, it was the first UI that could manage SDXL 1.0.
But, I still prefer A1111. My workflow changes depending on what I'm thinking to create, and in A1111, everything is placed there when I need, it's not necessary to connect all those wires in ComfyUI, it really sucks when you forget to connect something.
I understand that A1111 UI is more intuitive for beginners, and more productive for an old-school internet user like me.
ComfyUI demands an advanced knowledge to connect all the nodes correctly, and I see it as a good tool if you already have a well-defined workflow to all what you do, of if you want to provide a service using this workflow. The learning curve to prepare your workflow for those purposes pays off in the end.
I hope all this information can help you at least a little bit. That's it, thank you for reading!
Updates section
16: Added new nodes for video generation in ComfyUI section.
15: fixed ComfyUI-Impact-Pack installation, and added new nodes for wasquatch-node-suite, ipadpted and advanced controlnet.
14: removed mov2mov and added new extension v2v Helper . You still can use mov2mov if you uncomment indicated lines in notebook.
13: temporary fix in mov2mov extension because of this issue.
12: some small fixes in ComfyUI setup (controlnet and stable cascade models), and a new workflow version.
11: since those xformers fix are constant, I'll not log all of them. Try to download the most recent notebook using the link in the article, before starting your job.
10: some fixes for mov2mov, OpenPose editor, adetailer and xformers, to work with new A1111 1.8.0 version.
9: temporary fix for A1111 because of this mov2mov issue;
8: xformers fix for A1111/ComfyUI ; added ComfyUI-DiffusersStableCascade node for ComfyUI.
7: added negative_hand-neg and NegfeetV2 embeddings and ControlNet qrcode_monster model; temporary adetailer fix because of this issue.
6: setup dependencies of A1111 fixed because of this and this issue.
5: fixed ComfyUI setup with new CUDA 1.21 version (compartibility with UltimateUpscaleSD custom node)
4: new version of SimpleSD has ConfyUI setup nodes for Stable Diffusion Videos. Use the workflow provided in this Olivio Sarikas video.
3: new notebook version has Fooocus as alternative for your Web UI.
2: sharing my current ComfyUI workflow too.
1: new notebook version has a section to setup ComfyUI as your web ui, with the most common nodes.
