Open the link:
Save in your Google Drive (Copia en Google Drive):

Now that we're working from the safety of our drive, let's start creating the magic.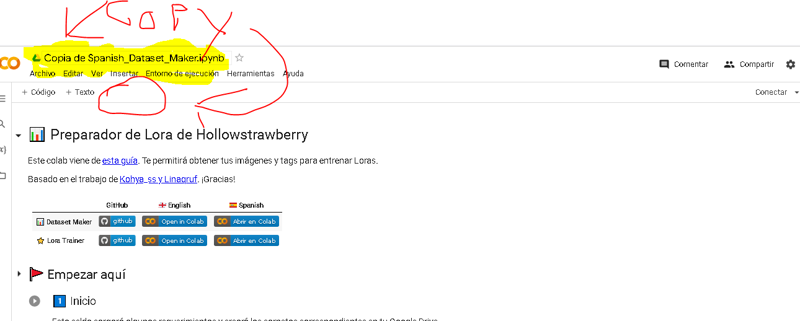
Create an empty folder
And choose how to save the folder, in my case I do it as follows:

Click on the triangle
Connect to google drive

Now you have created the folders in the following format:
In his drive he looks at it as follows:


As you will notice once the format is created, it is not necessary to create folders, you can simply drag a specific one and place the name of the folder as the name of the project, remember that google drive takes time to synchronize so it would be advisable to wait a few minutes for it to be will always synchronizeNow you have an empty folder, fill it with images that you want to train, for example many images of a particular pokemon, try to make it more than 40 and less than 100 for almost everything.
Now that all the images are alive, let's go to step 4, skipping the 3 and 2 of the collab
Click on the triangle and wait for your tags to be created:

Click on the triangle and wait for your tags to be created: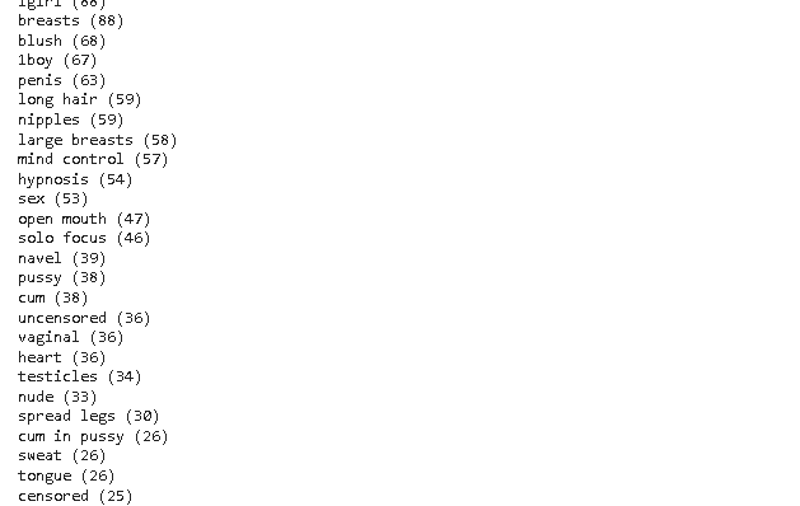
When your folder finishes updating it will look like this, you don't need to wait for it to update in this part to go to the next step: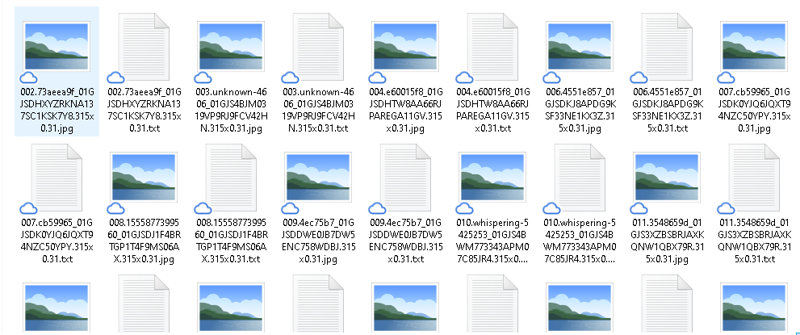
Most important step:
Create an activation tag and delete all the tags that you want to be absorbed by it, for example harry potter has black hair, black eyes, short hair, 1boy, makeup, scars on his face. These are the tags that I always want to be generated with the activator, as you will notice I could also put the spectacles characteristics, but I prefer that they be stored in the tag: spectacles. Since I don't want them to appear all the time, remember to delete only the tags that are obvious, this will greatly affect the lora you are doing so it is most likely that your first Loras will fail because of this, try to use your experience to improve this.
If you don't remember which tags are important to analyze, do the following, scroll down and see the first 30 important tags.
The rest of the tags will have very little influence, so it doesn't matter if you remove them, the important thing is that your activation tag is always in more images than the rest of the tags.
Remember that it is not necessary to use Gpu to do this, you can use a free environment with no usage limit: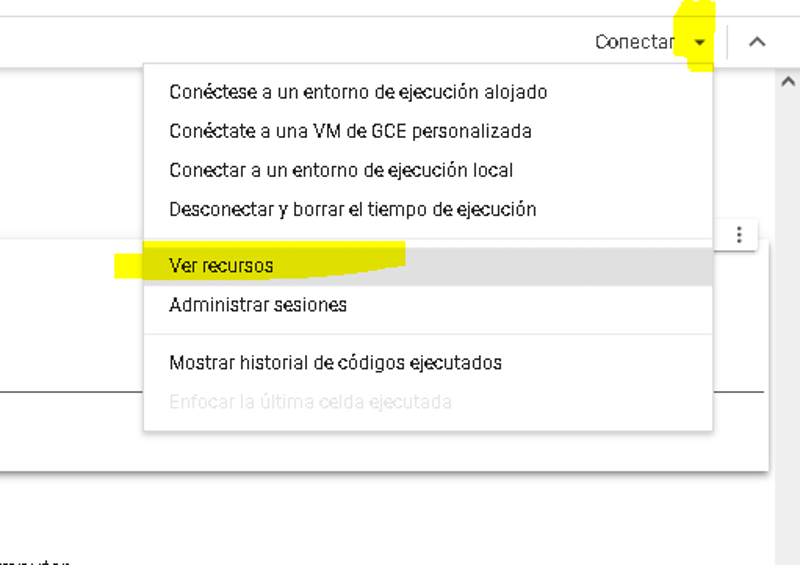


If you want to put tags to many images, it will be faster consuming gpu, but remember that there is a daily limit (with it you can do almost 10 Loras per day if you manage it well)
After doing this you finished preparing your set of images: Congratulations.

Second part:
Open the following link:
https://colab.research.google.com/github/hollowstrawberry/kohya-colab/blob/main/Lora_Trainer.ipynb
Save a copy to your drive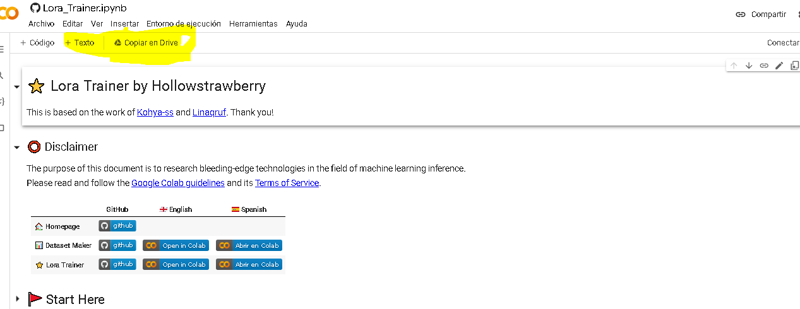
Now that we're working from the safety of our drive, let's start creating the magic.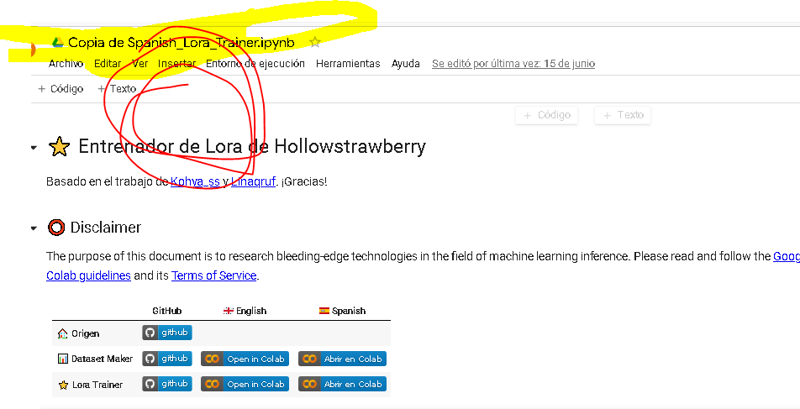
read this: Change the path to be identical to the format you were using before to create the DATASET By default it comes in the other mode, so be careful and change it!
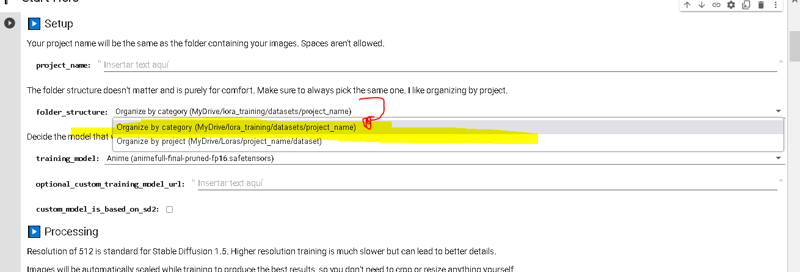
Now put the name of the folder where you saved all the siimages and the tags: for example: Harry
Next step configure the parameters of your lora:
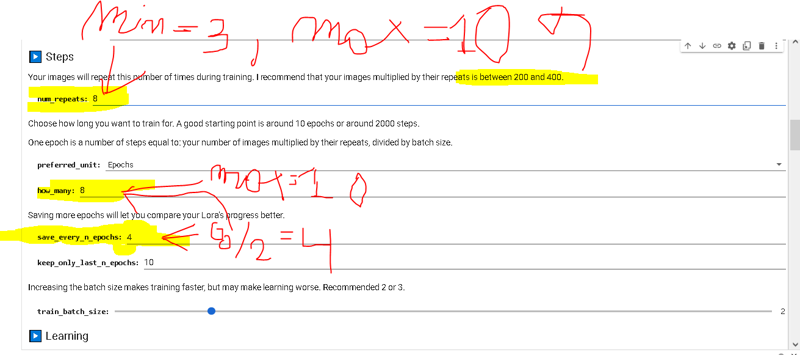
This is the most important part of your Lora, as a basic guide I followed the following rule of good manners:
Maximum: 10 for both
Minimum: 3 for repeats
Epoch: Never touch them, always between 8 and 10.
Repeats: (You always have to modify it, between a value between 3 and 10)
Now always following these considerations you have to create the following:
When you start training the program will count the number of steps you are doing: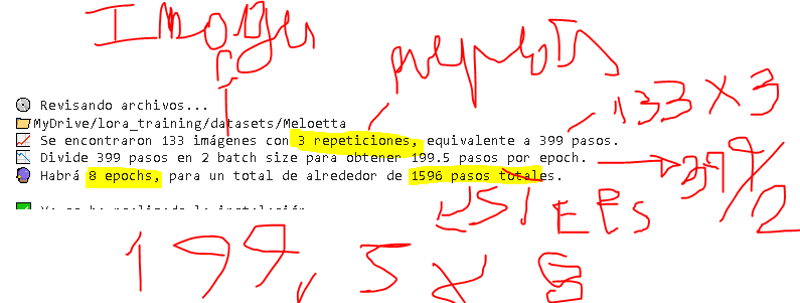
Traducion:
💿 Reviewing files...
📁MyDrive/lora_training/datasets/Meloetta
📈 133 images with 3 repetitions were found, equivalent to 399 steps.
📉 Divide 399 steps into 2 batch sizes to get 199.5 steps per epoch.
🔮 There will be 8 epochs, for a total of around 1596 total steps.
Good counts indicate that a character/backgrounds should be trained between 800-1800 steps (try to make it 1200 or 1000)
Concepts (1000-2000)
The rest is always between 1000 and 2000 as you will notice this takes 16 minutes at most.
Formula: (images x repeats* epoch/2)
Therefore, you must modify the number of repeats until reaching this number, if the number is too high, you can click on the triangle until you force the end of the code, and it appears in red and throws an error, this does not affect nothing, try not to do it and if problems arise restart the execution environment, disconnect and reconnect to your drive
In case you wonder this is the bach (never play it or do it 3, never 4 or 1, don't play it to change the steps):

Go down a little bit back to where we were and you will see the learning rates, you can not touch them and it is better not to touch them
~~~~~~
The batch size is used when you have too many images, and it's recommended to keep it at 2 and use a maximum of 3-4 to stay within the limits. For example, if you try to feed Lora with 300 images, it's better to reduce the workload by using a batch size of 3. It's important to follow the rule of good practice, which suggests having at least 3 repetitions for reliable results. Sending 4000 steps to Lora with just one concept or character is asking for overfitting issues. So, while using a batch size is not entirely useless, it's advisable not to exceed 200 images for Lora. However, if you already have a pre-existing database and you're too lazy to change it, you can simply use a higher batch size (though it means you've gone overboard with the amount of data you're inputting).
~~~~~~
Character learning rates:
(max 2000 steps)

Concept learning rates: (MIn: +1400 stpes)


The dimensions try not to modify them, the larger the dimensions, the lower the learning rate and the more steps necessary. I give you the configuration that never fails for characters:
Between 20 - 100 images:
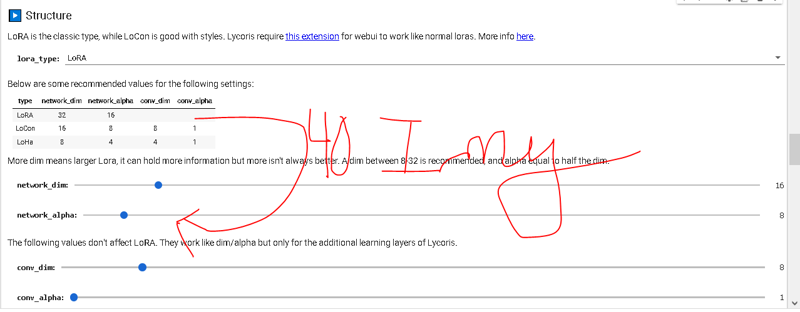
Between 0 - 20 images:
more than +100 images:
That's it, now you can press the button to execute the code on the triangle (verify that the number of steps is within the range of good judgments)
Now that you know the basics, remember that you can play with these parameters and learn your own rules.
After the execution of the code in 20 minutes you will have your Lora, remember to disconnect the execution environment if you do not have more folders to train, if you have more you just have to change the name of the file with the images at the beginning and look for the number of repeats indicated for your number of images to train.Your Lora are saved in the following folder as safestensor:


To check if the LORA works, use the version that finished the training, it is the one with the highest number at the end (this number indicates the number of epochs)
Any questions? Leave it in comments.
~~~~
The flip angle greatly helps in training your Lora, but it discards details that make your artwork more interesting. It emphasizes that anything asymmetric is discarded, which helps a lot in producing cleaner Loras. However, it also creates those crappy Loras you often see from some users where it's evident that the work was generated by AI. Therefore, it's up to you to decide whether or not to sacrifice details in order to increase compression. In general, this option can result in mirrored images when used improperly, which can ruin the quality of Loras. That's why it's better to ditch it and only use it when you're desperate due to a lack of images or when the concept being trained is extremely abstract, and you're trying to maximize the chances of success.
~~~~~~
Read this until the endTo create characters, gather images of the character with different outfits, poses, and interactions with the environment that reflect their characteristics. Collect at least 40 diverse images, and if possible, include interactions with other characters of different characteristics in some of them. By combining these images, you will have a solid foundation for creating your character, and it is unlikely to make mistakes.
To create a variety of outfits, collect images of people wearing different types of clothing. You don't necessarily have to limit yourself to a single type of outfit; you can also consider color schemes. For example, if you include images of people wearing soccer jerseys and then bikinis with the colors of your soccer team, the model will learn that those colors should be present in all outfits. This will allow you to create Batman costumes with the colors of your soccer team. Remember that it's not just about the garments themselves, but also about color, style, and even specific clothing features, such as the use of many buttons. It's important to find different people wearing the same clothing and also consider different artistic styles to avoid reproducing a specific style, such as photorealism. Try not to use the same model all the time and ensure that the model interacts with the clothing in the most diverse way possible.
To create styles, it's important that all the images have the same style. However, this can be more complex than it seems because the style of a digital artist tends to vary in each of their works unless they always use the same color palette and drawing technique. Nevertheless, it is easier to achieve in cases like photorealism, series, anime, movies made by competent individuals, ancient art, paintings, among others. The condition is to maintain a distinctive and consistent appearance. For training styles, everything is useful: dogs, cats, buttons, people, environments—anything that has the same style helps improve the model's generalization ability in future projects. Therefore, in general, it is recommended to have a wide database, although it is not strictly necessary, but convenient. In addition to styles, a specific color palette is also useful, as well as the combination of objects. The important thing is to maintain consistency between the images to achieve optimal results.
To create backgrounds, you should gather many images of the place you want to recreate or portray. From these images, you can build the desired environment. However, the most interesting part is finding images with models interacting with the scene. This will allow the model to learn these interactions. For example, if you are training a bedroom, it would be good to teach the model that the character can sleep in the bed, sit on it, clean the room, play with toys, or engage in any other related activity. Training these interactions is what makes it interesting and challenging. The place itself will be created almost always as long as the images are consistent, meaning that all of them represent different types of bedrooms.
To create concepts, it is necessary to gather various images of the same concept type. However, a problem arises here in that sometimes you may consider an image to belong to a certain concept, but the artificial intelligence may not correctly associate it. In general, beyond the image you are using and its idea, it is important to understand what you are truly representing when observing it. For example, many problems when introducing concepts lie in the program's inability to recognize multiple poses within a concept. If your concept lacks common elements and is very abstract, the program will struggle to generalize that idea. Therefore, it is advisable not to overload the program with too many poses. Another common problem is that the program may not understand the proper dimensions or volume of an object. For instance, if all the headbands in the images are attached to the hair, the program will not be able to distinguish that the headband is not part of the hair, which can cause problems. Therefore, it's important to teach the program how that object interacts with its environment through examples. The same applies to all concepts. The most challenging part is teaching the program to interact correctly with the environment, and the best way to achieve this is to avoid using very disparate images (since, in general, hobbyists don't seek a perfect model, just a non-bad model, so what matters is that the model generalizes and doesn't fail, and it's not important to make an effort to find something perfect, especially since additional tools like prompts, controlnets, inpainting, etc., can influence the generated image). If you do use very disparate images, it is important to include all possible interactions in between so that the program doesn't learn from abrupt jumps or almost random points. In summary, the problem usually lies in the images used to teach the program the desired concept, and that's where your errors may arise.
To create specific objects, such as a car model, a product for your company, or a design you want to show your boss, it is important to teach the program through a collection of images of the product in question. You must emphatically show all angles of the product and, as far as possible, its interactions with the user. For example, if you are creating a motorcycle model, it is important to show how a person sits on the motorcycle, as the program may have difficulty understanding this interaction unless explicitly taught. This problem becomes even more challenging with less common products, where even with the help of specific checkpoints that influence the model, achieving the correct interaction can be complicated. Therefore, it is crucial to try to teach the program about the product and its interaction with the environment. If it involves interaction; otherwise, if we only want it to learn how to present it, we won't add that extra information to the model, and typically, it takes no more than 20 minutes to create a model, so you could easily create more than one model in a workday.
To create assets, icons, and similar items, the most important aspects are usually the color palette, the viewing angle, and the desired interaction. For example, if you want to create thousands of different rings, you simply need to take rings that are different from each other and place them on a simple and easy-to-extract background. Although this can also be achieved using a specific checkpoint or using prompts, the simplest and most organized way is to do it directly in the language model. If you want to create maps, the most interesting thing is to teach the model the dimensions of the objects and the viewing angle so that the program can generalize and create different maps. In this case, it's not so much about the images being input, but rather that all the images are to the same scale and with the same viewing angle to facilitate generalization.
At this point in the text, it is expected that you have grasped the general idea of how to create the impossible using Loras with the help of your vital computing system, that is, what we usually call your brain. I encourage you not to limit yourself solely to the provided examples and to explore new horizons in your creative process. Remember that success is achieved through perseverance and learning from accumulated failures. I wish you the best in all your creations and projects. Additionally, you can always rely on comments to express your doubts and problems when generating images. I will be delighted to offer you solutions and add them to this guide for the benefit of all.
Congratulations, by finishing reading this text you have accomplished the same task that the program you have learned to use with images does. Therefore, you not only know how to use it but also understand how it works. I congratulate you for your effort.~~~~~~~~
To assemble this type of structure, you must follow the following steps (Before executing the code to start training). Before assembling it, it should be clarified that I do not recommend it since it complicates life to obtain very similar results. Similar to an MMORPG player wasting hundreds of hours to obtain armor with 5% better attributes, it's pointless, nothing will change, but there is a mania for doing it. However, it can be useful if you want to explore multiple concepts.

Scroll down to the bottom, and you will come across the following code. In this code, you only need to input the names of the folders and their directories, so you should modify this part: "example/dataset/good_images".
Do not execute the "GO back" option. It is provided in case you are tagging multiple files and want to clear the custom dataset field to return to the normal method.

To activate regularization, which is the reason why this type of configuration is typically used, you need to enter the following line in the following manner.

The truth is, you can always put everything in the same file and then instruct the program that there is more than one activation word. But well, if you want to do it, and making it clear that it's not the best approach for your first attempts, here comes the explanation.

~~~~~~~~~~~~~~\ how to tag images properly - with examples
First of all, every creator of Loras can put the tags however they want, there is no way to put the tags wrong: the Lora will work. However, what usually happens is that the less standardized we are, the more difficult it will be for users to understand our Loras, and we may receive more one-star reviews. But those little stars don't really affect anything, so do what you think is right. There are no rules, and nobody knows how to play the instrument perfectly, so improvise and have fun.
Despite that, the big problem with tags is that sometimes they are so influential that the creator themselves may end up not understanding what the program did, and if the creator doesn't basically understand how tags are assigned, they might discard Loras that are working perfectly fine, but they just don't know how to make them work. This usually happens with overfitting, especially when one uses overly influential checkpoints in the "decisions" to be made when generating the images.
Having said all this, let's start understanding how to create tags without messing it up. Well, as I mentioned before, you can't put the tags wrong, and you can't put them right either, but you can clearly mess it up with the tags.
Ejemplos:

T
Bot Tag:

solo (1)
looking at viewer (1)
short hair (1)
blue eyes (1)
blonde hair (1)
1boy (1)
closed mouth (1)
upper body (1)
male focus (1)
facial mark (1)
spiked hair (1)
whisker markings (1)
forehead protector (1)
Delete Tag: blue eyes,blonde hair,facial mark
Reasons: I am interested in having Naruto's facial markings always appear. I want his eyes to always be blue and his hair to be blond. However, I don't want his forehead protector to appear in every image. Whether his hair is short or not doesn't really matter to me; as long as the blond hair is present, I trust that the AI will understand what I'm looking for.
Personal decision: I could have included or excluded the tags for facial markings. In this case, I knew that if I didn't include them, I had to use [THIS] prompt to specify these facial markings and not, for example, the lightning bolt scar on Harry Potter's forehead. [THIS] would be the invoked mark.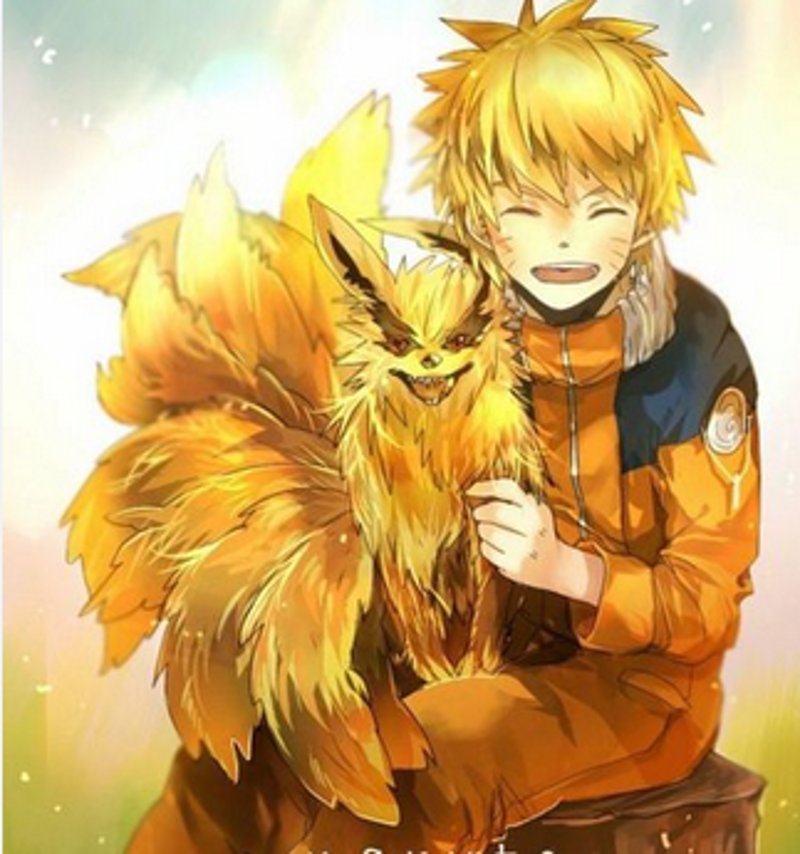
Bot Tag:
smile (1)
open mouth (1)
blonde hair (1)
1boy (1)
sitting (1)
jacket (1)
tail (1)
closed eyes (1)
male focus (1)
animal (1)
facial mark (1)
happy (1)
crossover (1)
spiked hair (1)
multiple tails (1)
whisker markings (1)
fox (1)
kyuubi (1)
tree stump (1)
Delete Tag: blonde hair,facial mark
Reasons: I am interested in having Naruto's facial markings always appear. I want his hair to be blond. Meanwhile, I'm not interested in invoking the Kyuubi in every image. In this case, as a character from Japanese folklore, it has its own specific tag. However, in general, for this type of creature, I could refer to it using the following tag: {animal}. Therefore, I already know that the program considers the Kyuubi as an animal among other animals (not always: the checkpoint will influence this to some extent), but most of the time, I'm confident that I will obtain the Kyuubi in this manner.
Personal decision: I could have included the "jacket" characteristic of Naruto in the eliminated tags, or I could have left it out. However, including that tag would imply that all the images generated would tend to have that specific jacket. But I enjoy creating Loras where I can dress the characters in any clothes I want, so I will not remove this tag. Nevertheless, I know that if I call the "jacket" tag, the first jacket in the list will be the one associated with Naruto. However, it doesn't have to be the only one, as there are checkpoints where multiple jackets were trained and shouldn't be ignored.
Bot Tag:
1girl (1)
long hair (1)
smile (1)
short hair (1)
open mouth (1)
blue eyes (1)
blonde hair (1)
shirt (1)
black hair (1)
long sleeves (1)
jacket (1)
closed eyes (1)
pink hair (1)
short sleeves (1)
:d (1)
multiple boys (1)
teeth (1)
2boys (1)
grin (1)
looking at another (1)
black eyes (1)
hug (1)
headband (1)
facial mark (1)
happy (1)
blue shirt (1)
spiked hair (1)
red shirt (1)
forehead protector (1)
group hug (1)
Delete Tag: blonde hair,facial mark,blue eyes

Reasons: I am interested in having Naruto's facial markings always appear. I want his eyes to always be blue and his hair to be blond. Meanwhile, I'm not interested in creating Sakura and Sasuke. However, as the creator of the Lora, I understand that if I call for a girl with pink hair it will likely result in Sakura. Similarly, if I include a description of a boy with black hair and black eyes in the Lora's prompts, it's clear that Sasuke will be generated. At the same time, I understand that by removing the facial markings from the tag, there is a possibility that some facial markings, like the ones Sasuke has in this image, may appear. However, I am randomly removing them from a set of 100 images, so I try not to include too many images with Sasuke's facial markings.

Personal decision: I could have included the "jacket" characteristic of Naruto in the eliminated tags
Nonetheless, remember that in a set of 100 images, the only tags that matter are the first 30. You should pay attention to which tags to remove in that range. If your (descriptive) tags are not among the first 30, then you should be concerned. Your dataset is in a messy state, and it is likely to fail. If the tag bot couldn't understand what you were looking for, it is highly probable that the training bot will also struggle.At the same time, don't forget to add your keyword: Naruto, which will encompass all these main tags.
And if it doesn't encompass them, what should I do now? I deleted my tags!
Well, there's no need to worry. You can always use the tags "blonde hair" and "blue eyes" to describe Naruto. Ultimately, the model learns through two pathways, and if one fails, the other might have succeeded. You will notice that among a million possibilities, the blond-haired, blue-eyed character you see on the generation screen is Naruto, and coincidentally, he has his facial markings.
As you can see, the tags are not as important. However, it is more convenient for end users to simply write a word, and you cannot assume that they have as much knowledge about tags as you do after reading this guide and as you will after creating your own models.
So if that happens to you, you have two options: either discard the model or simply publish them and send those who give you a star to eat sausages. Ultimately, this is a personal hobby, have fun and let others suck it up, and let them continue sucking it.~~~~~Did you read the examples and still have doubts? Well, let me tell you a little secret.
As I mentioned before, there are many ways to add tags, but we can also resort to another option that is more efficient than the one a bot can propose, and that is to directly rely on the tags provided by the users. In other words, we can use the tags written by the users for each of the images we use to create Loras.
We will use the following program for that purpose:Log page: https://civitai.com/articles/941/rule-34-bot-de-descargas-masivas-gestion-colab
However, I won't provide a tutorial since you should already know how to create Loras. Additionally, the program is in Spanish, and I won't translate it because I don't want it to be widely used for specific reasons (I use it personally for other deep learning projects). Nevertheless, you can always translate the code using Chat GPT or Google Translate. The code is explained in a thorough manner, and I made sure it's easy to read and understand.Just to be safe, always execute the dependencies first. Otherwise, you may encounter errors like "module Rule34 is not defined."
In basic terms, let me explain the following: This is the program for downloading. You need to input the maximum number of images to download and the tags for the Lora character. Now, there's a somewhat complex concept that I'll try to explain in a beginner-friendly way, and that's the concept of data set generalization in machine learning. But in short, it doesn't matter if the training images are "erotic," even if every single image falls into that category. Once the program learns how to "generalize your idea," you can apply it to any concept, even those that were not specifically trained, such as non-erotic images. This is the essence of "generalization," and it is likely to occur in your model.

In summary, by using tags provided by humans (which you use only for downloading the images), you are already applying numerous low-quality filters since you are filtering based on tags.
Furthermore, this is the second program you will be using. Essentially, it is a bot that downloads all the tags from the images and delivers them in a standardized format. Of course, you may need to provide an activation word using the program for data set filtering or tag removal. It might be inconvenient to use two notebooks, so I recommend extracting all the necessary tools from my code or others and putting them into a new notebook. To do that, use the following function to paste a cell in Colab and the following function to create a new notebook.


As you can see, you need to enter the same tags you used to fetch the images and the maximum number of images. Furthermore, you need to specify the folder where the text files will be saved.

Standard format for Loras:
Lastly, there is the program for downloading the folder as images. As you may notice, you don't need to connect to Google Drive to use this notebook, although you have the option to do so. We utilize this code for downloading the images. Furthermore, the code resizes the images to a standard format of 1200 x 1200 and removes very small images in case they were downloaded by error. Keep in mind that in the end, we will use a resizing of (512,512) for training, so there is no point in downloading such large images without resizing them.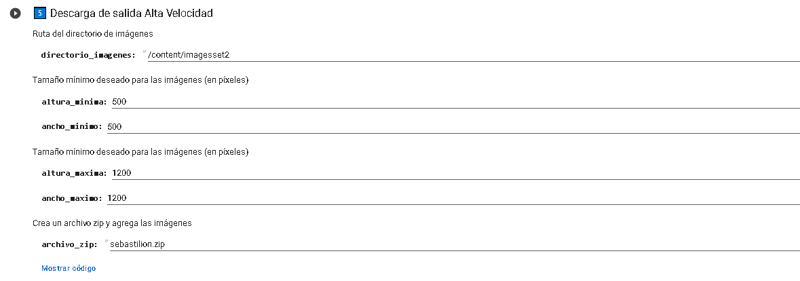
With that, we have everything. The tags from Rule34 are not character-descriptive, so all problematic tags will be removed. It's also not advisable to include too many group photos. However, in general, our desired character will be the most repeated, making it easier to select by specifying their hair color or animal fur. For this purpose, you can use the tag "solo" or "-solo" to narrow down the search. The provided code includes guides and many useful features. Additionally, there are other programs that will eventually prove to be very useful, even if you're unsure of their specific functionalities at the moment.~~~Full Tag Example
All the images are in the following file in case you want to give it a try:

Step 1: We create the dataset. For the example, we will use the following dataset.

Step 2: We start the folder.

Step 3: We use the Bot-Tag.

Step 4: We read the obtained tags.
Finished, Here are the 50 most common tags in your images:
digimon (creature) (39)
solo (37)
no humans (37)
weapon (27)
pants (27)
belt (26)
gun (23)
full body (23)
claws (22)
open mouth (20)
1boy (18)
simple background (17)
smile (16)
facial mark (16)
looking at viewer (14)
male focus (14)
standing (13)
blue pants (13)
arm cannon (12)
white background (12)
horns (11)
:3 (10)
gloves (9)
signature (9)
creature (9)
black eyes (8)
shorts (8)
single horn (8)
:d (6)
brown belt (6)
jeans (6)
teeth (6)
gatling gun (6)
furry (5)
blue background (5)
denim (5)
sky (5)
cloud (5)
artist name (5)
holding (4)
holding weapon (4)
parody (4)
pokemon (creature) (4)
ammunition belt (4)
bandolier (4)
green eyes (4)
arm up (4)
day (4)
blue shorts (3)
forehead jewel (3)
Step 5 : We introduce an activation tag and remove descriptive tags.

We verify that we have removed all problematic descriptive tags that describe body features.

We remove the wrongly extracted tag and finish this stage. Now the folder is ready for training.

Decisions Made, Thought Process, and Chosen Options:
To understand my reasoning, let's take a base "Gargomon," i.e., a representative one from the database.
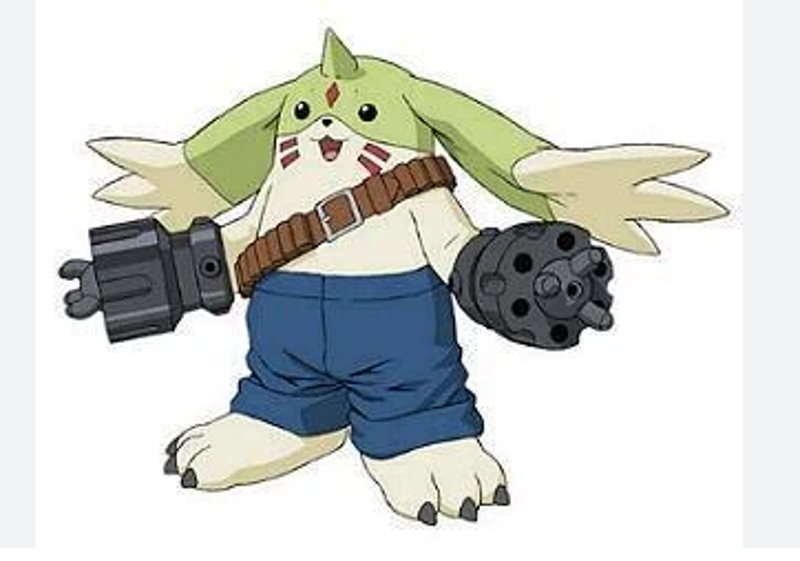
Looking at the image and the tags, we made the following decisions:
Tag to remove: Criteria adopted, all tags describing the character's body features will be removed. These tags include: horns, digimon (creature), solo, no humans, weapon, full body, gun, claws, pokemon (creature), forehead jewel, gatling gun, single horn, gloves, creature, black eyes, arm cannon, facial mark.

Explanation breakdown:

horns, single horn: These tags will be removed because I want the character to always have its unicorn horn. If I don't remove these tags, the model might generate images without the horn unless explicitly specified.

weapon, gatling gun, gloves, arm cannon, gun: These tags will be removed because the character's arms are weapons. If these tags are not removed, the model may ignore generating arms unless these specific tags are used, which can cause issues. How do I know that "gloves" refers to the character's arms? I haven't included any characters wearing gloves in the entire database, especially not in nine images, which represents 25% of the total. Therefore, considering that this tag doesn't make sense and has a significant influence (9 out of 40 images), it needs to be removed to ensure the character always appears with its arm weapons.

facial mark, forehead jewel: These two tags refer to red marks on the character's face and should be removed since I want them to always appear.

black eye: These are the character's eyes, and I want them to always be visible. Hence, I remove this tag to avoid constantly specifying the eyes. (Note: "green eyes" could also be removed, but it only applies to four out of 40 images, so its influence is not as significant. However, it would be more consistent to remove it as well.)

claws: These tags refer to the character's leg claws, and I want the character to always have claws on its legs.

digimon (creature), creature, full body, pokemon (creature), solo, no humans: These tags are the most problematic in this case. If they are left, they may become necessary to describe the character. The most important thing to note is that some of these tags, such as "solo," "digimon (creature)," and "no humans," have more than 90% influence on the overall tags. They are so influential that they can dominate many attributes I want to assign to my activation tag. To make my activation tag more influential, I decide to remove them. One thing to consider is that if a character has two forms, such as a Pokémon with its animal form and the erotic furry form depicted in fan art, it might be beneficial to keep some of these tags to differentiate the forms. However, in this case, the character only has one form, which is the classic form. Therefore, these tags add more noise than I would like, so I apply bias and remove them.
By removing the descriptive tags and focusing on the specific attributes and features that are important for the character, we ensure that the activation tag has a significantly higher influence (around 25%) compared to the rest of the tags. This means that the activation tag becomes redundant and necessary to effectively use the model.

Personal decisions: I could have chosen to remove all the clothing tags, but I decided not to. The reason behind this is that removing the clothing tags would force the character to always appear with that specific clothing, limiting the flexibility of my Lora and making it cumbersome to generate the character with different types of clothing.

Therefore, I retained the following tags: "pants," "belt," "blue pants," "shorts," "brown belt," "jeans," and "denim" (I had to clarify that "denim" refers to clothing).

Explanation breakdown:

"pants," "blue pants," "shorts," "jeans," "denim": These tags refer to the characteristic pants of the character. By keeping these tags, I can reinforce to the AI that these specific pants should appear whenever I choose to use them. Among the hundreds of thousands of possibilities, it will be the pants from the database that appear.

"belt," "brown belt," "ammunition belt": These tags refer to the ammunition belt that the character wears. By keeping these tags, I can reinforce to the AI that this specific belt should appear whenever I choose to use it. Among the hundreds of thousands of possibilities, it will be the belts from the database that appear.
Problematic tags in my decisions: holding (4), holding weapon (4). These tags clearly bring some issues. However, they have such low influence that it was easier for me to leave them there and not worry too much about them. Additionally, if the AI considers that my character is holding a weapon and those are not its actual arms, it might be convenient to isolate those images from my dataset with these tags. In other words, I'm indicating to the program that there's something unusual about those arms, so it should treat them differently and store them under those tags.
Ultimately, these are decisions that may or may not work out. You'll see the results in 15 minutes when you train your Lora and test it.~~~~~~~~~~~~
Given that this dataset is only for creating a simple character, I will follow the specified number of steps, assuming the use of dimensions dim = 8 and alpha = 4.


~~~~~
Financial assistance: Hello everyone!This is Tomas Agilar speaking, and I'm thrilled to have the opportunity to share my work and passion with all of you. If you enjoy what I do and would like to support me, there are a few ways you can do so:
Ko-fi (Dead)
~~~~~~~~~~~~~~
Normal tags to remove:
Pokemon Loras: green hair,red eyes,green skin,antennae,yellow sclera,pink skin,pink hair, 1girl,grey skin,glowing,monster girl,monster girl,monster,extra eyes,body fur,blue skin ,white skin,blue eyes,colored sclera,furry female,tail,lizard tail ,multicolored skin,black skin,two-tone skin,purple eyes ,purple skin ,hetero,pokephilia,pokemon (creature),pokemon (creature) ,furry with non-furry, furry male , furry ,colored skin,monster,tentacles,yellow eyes
