[ Presentation ]
So, you only have 8GB of Vram and 10 images to make a Lora ?
Everyone will tell you that you can't ! it's IMPOSSIBLE !
Nothing is impossible. The word itself says 'I'm possible - Quote from Audrey Hepburn
-> Of course YOU CAN, and I will show you how ! Follow my guide ;)
I assume you have at least 32 GB of RAM (64 GB is preferable for certain parameters).
EDIT : someone told me that it works also with 16 GB of RAM
You should be familiar with Git and know how to open PowerShell or Command Prompt in Windows. You'll need to install a specific version of Python. For more details, refer to the official GitHub page of the tool we will use to train LoRA:
https://github.com/derrian-distro/LoRA_Easy_Training_Scripts.git
[ 1 - What you need to start ]
1) Obviously you'll need the checkpoint base model of pony Diffusion V6 XL, the famous "V6 (start with this one), download the safetensors file on this link :
https://civitai.com/models/257749?modelVersionId=290640
Download also the sdxl_vae, you will need it too.
Here is the official link from stabilityai :
https://huggingface.co/stabilityai/sdxl-vae/tree/main
2) The installation of derrian-distro that you can find on :
https://github.com/derrian-distro/LoRA_Easy_Training_Scripts
Important Installation info : you need to install the DEV branch version.
Here is the command line to clone the repo with the dev branch instead of the main one :
git clone -b dev https://github.com/derrian-distro/LoRA_Easy_Training_Scripts.git
The installation is quite simple : launch the install.bat inside the cloned repo on your local computer. Just answer "y" when prompted if you want to install it locally.
Run the app with run.bat , that's it :D
3) The dataset of the character that you want to make the lora from.
I will use for this demonstration, the Japanese ZUNKO project that you can find on this link : https://zunko.jp/con_illust.html
The dataset_images is available as an attachment on this article for download.
You can direct download it on this link :
https://civitai.com/api/download/attachments/89538
4) The config file (toml file) for config_PDXL_8GB_DEV, zip attached to this article,
You can direct download it on this link :
https://civitai.com/api/download/attachments/89551
You will see that derrian-distro is way more easier than bmaltais version.
If you are interested in a guide about bmaltais, I've made one here :
https://civitai.com/articles/6438
Now time to get step by step into that super tool of derrian-distro : LoRA_Easy_Training_Scripts
[ 2 - Folder Preparation ]
First of all, let's prepare the folders.
It's more like a guideline to have your folder in a tidy way.
(The tool is clever enough to make things work with messy folder).
So for my take, I'll just put all the dataset folder like that :
G:\TRAIN_LORA\zzmel\images (that will contains folders : all_outfit, outfit1)
The dataset is already tagged with captions.txt for each image.
If you are interested in preparing your images and captions, I have shared my comfyui workflow on civitai :
https://civitai.com/articles/6529/comfyui-workflow-to-prepare-images-for-lora-training-preplora
[ 3 - LoRA_Easy_Training_Scripts Tool]
After the installation in the [ 1 - What you need to start ] section.
Run the run.bat file inside the cloned github folder.
I will just give some brief information on what some parameters does.
Tips : hover your mouse on paremeters (checkbox, edit box, etc)
and the program will popup a tooltip. Honestly Read it !
[ 3.1 - Load the toml file provided ]
In order to have 80% configuration done, just load my toml config file.
The file attached to this article : Config_PDXL_8GB_DEV.zip, unzip it to get the toml file inside.
Load the toml file directly into the "LoRA Trainer" App that you just run with run.bat.
File -> Load Toml
[ 3.2 - SUBSET ARGS (TAB on top) ]
Note : I have changed my theme to be purple, just because ^^.
1) Click on the button "ADD ALL SUBFOLDERS FROM FOLDER"
2) Put the "images" folder that contain the 2 folder of the image dataset : all_outfit and outfit1
3) subset will automatically get created (you can also create them manually by entering the Subset Name and then click on the button "ADD SUBSET"
4) Both folders load has their own set of parameters, here are some explanation :
- Input Image Dir : ok that one you know what it is
- Number of repeats : 2 (the number of time the AI will look at the images in the same folder, just like you would look multiple time at something to retain more information)
- Keep tokens : 1 for all_outfit, 2 for outfit1 (The number of tokens that the AI will keep in the same order), look in the captions of each folder, you will see that there is another token for outfit1 that comes next to the name of the character
- Caption Extension : .txt
- Shuffle captions : checked (it will help not overlearn by emphasing the same order of keyword, so it will "shuffle" the captions !)
- flip augment : checked (it will do an horizontaly flip image, so if you have one "left" profile of the character, it will flip horizontally to have another picture of the "right" profile. It's useful when you don't have much image in the dataset).
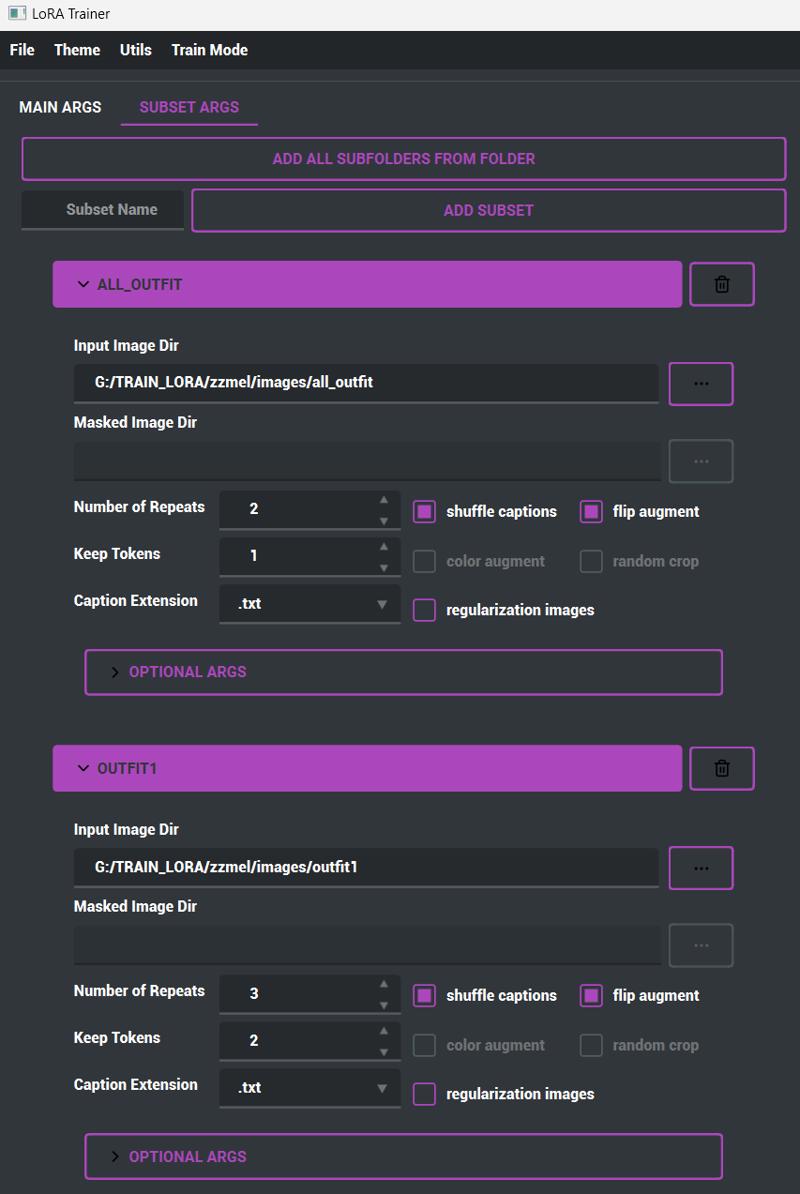
Warning : the Keep tokens = 2 is a bit more tricky than that. It should be used to identify complex things like special effects in the eyes. For example : "ringed eyes, white pupils" for a folder that has cropped face to help the IA train on your character.
In a nutshell, it should be best to use Keep Tokens = 1 most of the time.
[ 3.3 - MAIN ARGS (TAB on top) ]
Now it's getting technical !
As a reminder, if you've loaded my TOML config file, most settings are already correctly configured. However, you'll need to update certain information for redirecting the linking, such as the base model and VAE.
To be honest, if you don't care much about the technical stuff, just modify what is needed and click the button "START TRAINING" !
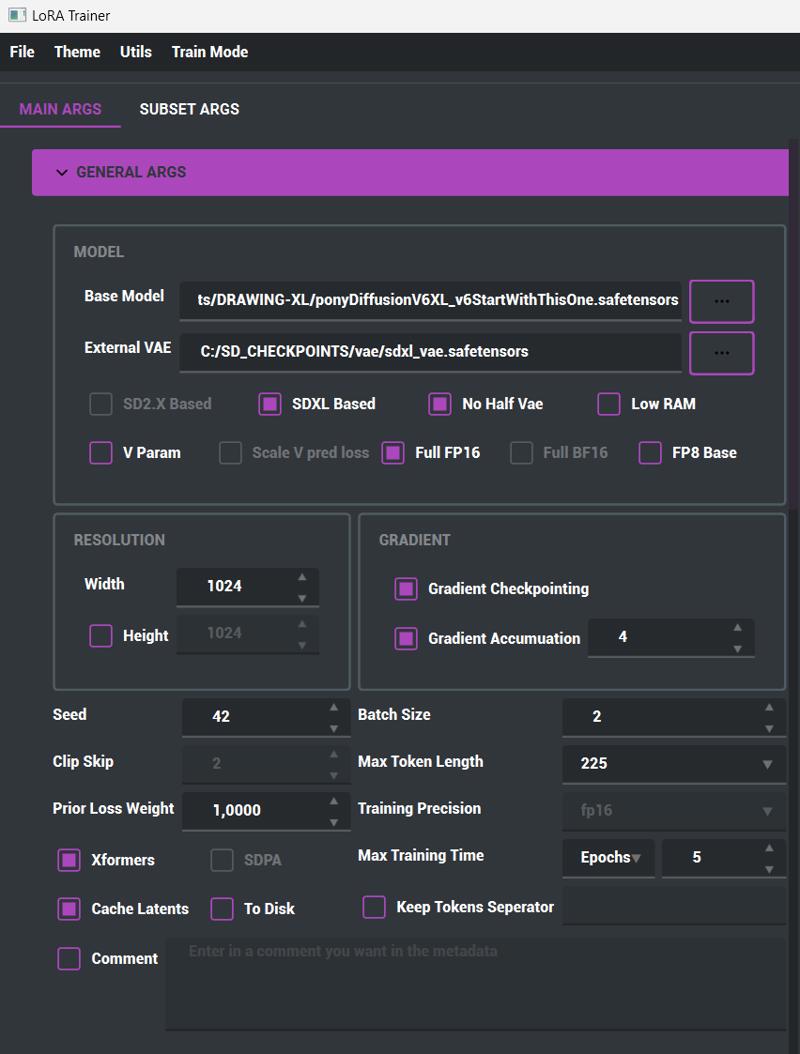
{ GENERAL ARGS }
1) Base Model path : link it to the ponyDiffusionV6XL_v6StartWithThisOne.safetensors
2) External Vae : link it to the sdxl_vae.safetensors
3) SDXL Based : check
4) No Half Vae : check (it will take the full Vae)
5) Low RAM : Uncheck (I don't need this as I have enough computer RAM)
6) Full FP16 : check
7) Resolution width : 1024 (not needed to set the Height as it is optional, read the tooltip)
8) Gradient checkpointing : Check this absolutly !!!
9) Gradient Accumu(l)ation : 4 (It's a funny parameter that can stack the number of time the batch size, for example, in my case, I have batch size of 2 and the gradiant accumulation of 4 => 4 x 2 => 8 batch size. Put something here like 2 at least, you can do it with a 8GB vram card!).
10) Seed : 42 (you know the geek number thing, yeah put whatever you want here, it can be your birthday, whatever)
11) Batch size : 2 (if it's too much for your PC, put 1 here)
12) Clip skip : 2 (default as it should be)
13) Max Token Length : 225 (it's kind of the lengthy prompt that you could do with the lora)
14) Prior Loss Weight : 1,0000 (I don't know, I left like this)
15) Training Precision : fp16
16) Xformers : check (you should choose this one ! at least for the demonstration purpose)
17) Max Training Time : Epochs : 5 (epochs is a bit special to explain, let's ask chatgpt :
"An epoch in training a LoRA model refers to one complete cycle through the entire dataset, where the model learns by adjusting its weights based on the data" - Chatgpt ;)
In a nutshell, the number of epoch is the number of time it will loop thru the whole process of training. Still confused ? Hopefully it will be clearer later on with the output of safetensors.
18) Cache latents : check (unless you have an absurd amount of computer RAM, let it check)
19) To Disk : uncheck (but you could check it if you have very low ram)
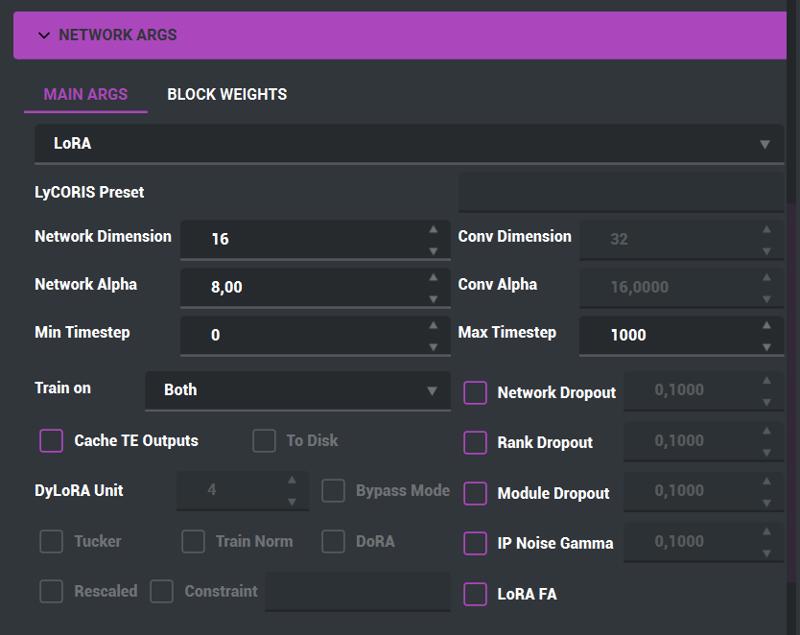
{ NETWORK ARGS }
1) Lora !
2) Network Dimension : 16 (The greater this number, the more information the lora training will retrain detailed information of each image. If you want a fast training, just put 8 instead of 16)
3) Network Alpha : 8 (just divide by 2 the Network Dimension and put the result here. But don't go below 8. Read the tooltip but it will gives you a headache ^^)
4) Train on : Both
5) Cache TE Outputs : Uncheck (it is supposed to help to get faster training but it is not compatible with shuffle captions (that you should keep), so it's unchecked)
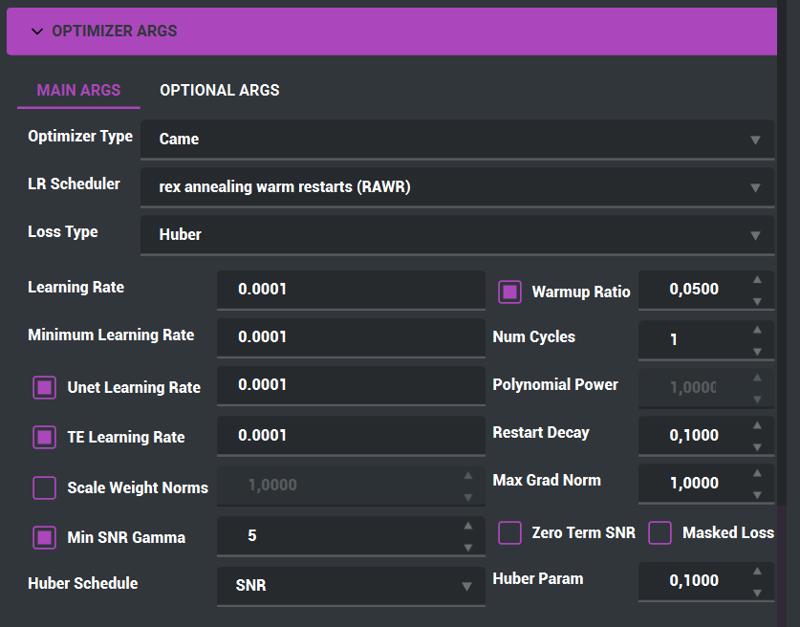
{ OPTIMIZER ARGS (Part 1) }
1) Optimizer Type : Came (just choose this one, it's good)
2) LR Scheduler : rex annealing warm restarts RAWR (T-REX roaring in the dark ! looks cool and of course very good Scheduler)
3) Loss Type : Huber ("Setting the Loss Type to Huber for an optimizer with a Rex scheduler helps balance sensitivity to outliers and robustness, improving model performance and stability" - Chatgpt. It's way too hard to explain how to choose that one, just go with this one first).
4) Learning Rate : 0.0001
5) Minimum Learning Rate ; Unet Learning Rate ; TE (text encoder) Learning Rate : 0.0001 (don't ask me this one, I don't know just copy paste the Learning Rate number)
6) Min SNR Gamme : 5 (default one I guess)
7) Huber Schedule : SNR
8) HuberParam : 0,1000
9) Warmup Ratio : 0,.0500 (it was in another toml file that I got, I just go with that number, as the LR Scheduler has a "warm/warmup" inside the name, you have to put something there)
{ OPTIMIZER ARGS (Part 2) }
Tab Optional ARGS
weight_decay : 0.1 (it was there from another toml file that I got, it kind of work with that value on)
Note : 0.04 can be used for best results, try it by yourself

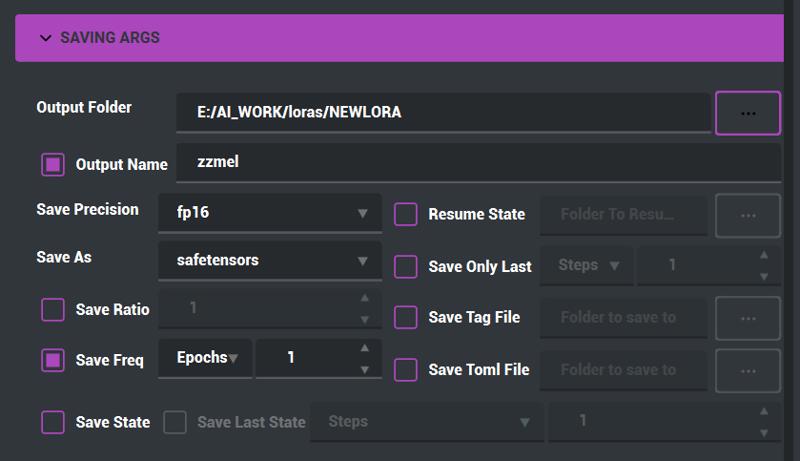
{ SAVING ARGS }
1) Output Folder : indicate the folder where all the Lora trained (safetensors files) will be put during the process. Tips you can declare here the folder where your favorite generating app (comfyui, automatic1111, others) will look at to load lora ;)
2) Output Name : zzmel (you can put whatever name you want for your <name>.safetensors)
3) Save precision : fp16
4) Save freq : Epochs : 1 (Here we are ! that EPOCH again ! Maybe this time it will be easier to understand ! For each epoch, we ask the program to create 1 safetensors file. It can be every 2 epoch or more, for now just leave at 1, it should be clear when you will get your tensor files output).
5) Save only Last : uncheck (you could have this checked and have only 1 safetensors file, the last and the "best" one ? not so shure, chosing the best safetensors lora is the last step that needs your attention).
{ BUCKET ARGS }
1) Be shure to ENABLE this ! With SDXL, you don't need to conform to square 1:1 images for your dataset anymore. BUT you need to check this ENABLE checkbox in the Bucket ARGS !!! So do it !
2) Don't Upscale Images : check (you could uncheck this and let the program do the work, but I prefer to prepare the dataset beforehand instead. And maybe it will save some precious vram too to check this)
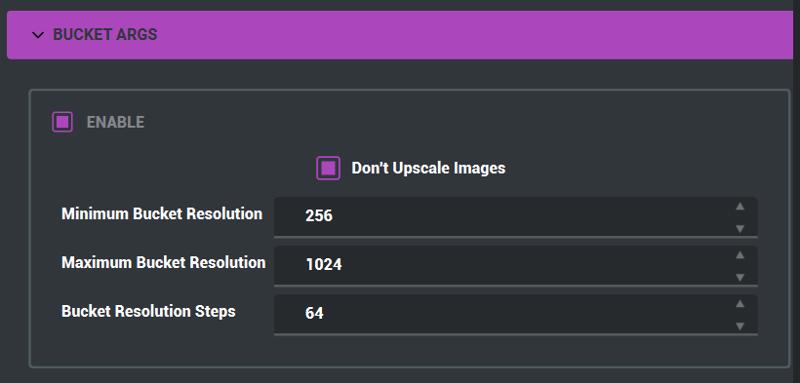
Warning : If you uncheck the "Don't upscale images", be shure to change the values. For example ramp it up to 4096 for max resolution.
{ NOISE OFFSET ARGS }
1) Noise Offset : 0.1 (It was there on another toml file, I kept it)
2) Pyramid Noise Iterations : uncheck (but you might need to check it if you know how to use this)

WARNING : don't use Noise at all if it breaks the training.
[ 3.4 - START TRAINING !!! ]

[ 4 - LORA SAFETENSORS ]
So, you waited and waited ... and waited ! Lorafiles outputing !
! CONGRATULATION ! it was FUN yeah ? (...)
Okay, last step of all : choosing the good lora that will fulfill your most fantasies of your new waifu lora ;D
This is what I have in my output folder : E:\AI_WORK\loras\NEWLORA
- zzmel-000001.safetensors
- zzmel-000002.safetensors
- zzmel-000003.safetensors
- zzmel-000004.safetensors
- zzmel.safetensors
The zzmel.safetensors (you can see it by the last date modified info of the file). You can rename it to zzmel-000005.safetensors
Yep, each of these safetensors is one 'epoch' because we decided to run 5 epochs and asked for one file per epoch.
You might want to up this number to 10 and even 15 epochs, so you will get more safetensors to choose from.
Now try them 1 by 1 with the SDXL checkpoint of your choice.
Here are some prompt to help you with your newly trained lora from the dataset :
Prompt example 1 :
zzmel,outfit1,long_hair, breasts, smile, large_breasts,
thighhighs, cleavage, very_long_hair,green_eyes, ahoge, boots, orange_hair, scarf, high_heels, thigh_strap, bodysuit, thigh_boots, red_footwear, high_heel_boots,
Prompt example 2 :
zzmel,long_hair, breasts, smile, blue_eyes, long_sleeves, dress, closed_mouth, cleavage, very_long_hair, medium_breasts, full_body, ahoge, puffy_sleeves, orange_hair, apron, high_heels, maid, maid_headdress, juliet_sleeves, red_footwear, white_apron, waist_apron, maid_apron, low-tied_long_hair, green_dress,
Prompt example 3 :
zzmel,long_hair, breasts, blue_eyes, shirt, large_breasts, skirt, cleavage, very_long_hair, underwear, full_body, ahoge, pantyhose, red_hair, black_footwear, orange_hair, bra, high_heels, black_bra, pencil_skirt, lab_coat, pen,
Little Tip : don't be stuck with the original pony Diffusion V6 XL checkpoint. It might eventually be quite bad to make images with that one.
Some checkpoint recommendation :
- https://civitai.com/models/314840/mfcg-pdxl
- https://civitai.com/models/314404?modelVersionId=352729
If you work with comfyui, you could load the lora with different strengh parameters :
- strength_model : 0.8
- strength_clip : 0.5
[ XY Plot ]
To help you choose which safetensors file will be best to keep.
You can do an XY Plot. There are a lot of way to do this.
There are already a lot of Automatic1111 tutorials on youtube to show how to do that.
But as I prefer comfyui as my goto AI generator. You can make your own XY plot like this :
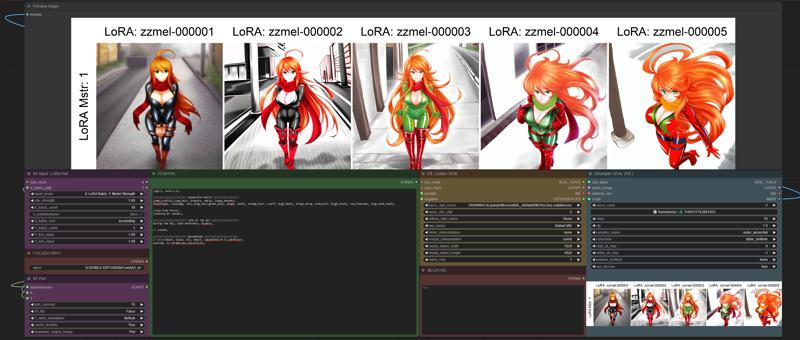
As you can see, the first file is quite bad, the second is also not the best, the third one is getting nice, the 4th is nice, the 5th seems a bit overlearned.
Note : the image on the cover of this article was made with the fifth one.
If you are interested to have this comfyui workflow, it's available on this link :
https://civitai.com/articles/6536
[ Some last tweaking Tips ]
If your video card can support it, try the BF16 instead of FP16 (but always save in FP16 for compatibility reasons)
5 Epoch is not enough to have a good lora file. You should aim for more like 10 or even 15
In the optimizer args part 1, try the "L2" as the loss type instead, it's easier to use.
In the general args, switch xformers to SDPA, some people says having better results with that
Learning Rate (Optimizer args part 1), here are healthy values for characters training :
Learning rate = 1e-4
Minimum learning rate = 1e-6 or 1e-7
Unet learning rate = 1e-4
TENC learning rate = 1e-6 or 1e-7Choosing repeats and epochs related to images_dataset size :
Between 10 to 25 images => 2 repeats, 10 to 15 epochs
Between 25 to 30 images => 1 or 2 repeats, 10 to 15 epochs
More than 40 images => 1 repeat, 10 to 15 epochs
[ Special thanks ]
Big thanks to civitai community and people on civitai who helped me.
(Yeah ChatGPT, you too ;)
I hope that this article will help you a little bit on your Lora Journey.
"Stay Hungry, Stay Foolish" - Steve Jobs

