如果你的电脑上没有安装pillow,请先打开命令提示符,输入pip install pillow安装pillow,安装完成后再启动脚本
If you haven't installed Pillow, please open the command prompt first and type 'pip install pillow' to install Pillow before run "gui.py"
____________________________________________________________________________________________
UpdateV1.2_2024.08.11:
本次更新将模型服务提供商从单一的OpenRouter扩展到了所有兼容openai接口的模型服务提供商。现在,只要你有兼容openai接口的api,都可以使用这个脚本对数据集进行自动打标。
This update has expanded the model service provider from OpenRouter to all model service providers that support Openai-Compatible API. Now, as long as you have an Openai-Compatible API key, you can use this script.
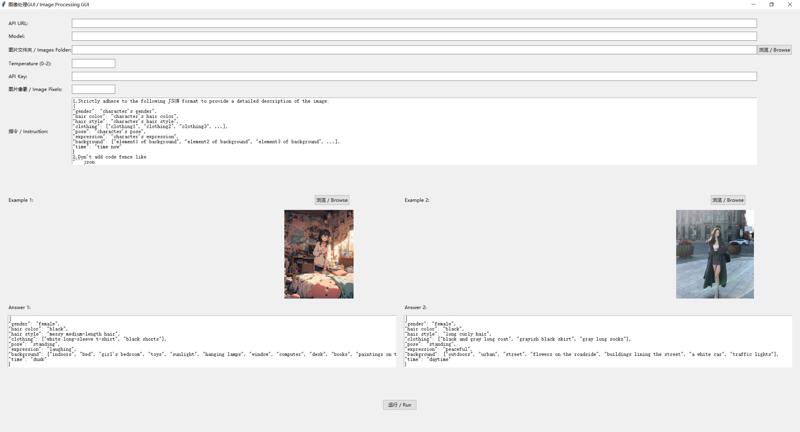
新的脚本的GUI界面如下:
The GUI interface of the new script is as follows:

使用说明:
1.V1.2允许用户填写自定义的API URL,比如说你从OpenRouter那里购买了API服务,那你就需要在API URL输入框中填写:https://openrouter.ai/api/v1/chat/completions(注意:必须要在API URL的末尾添加/v1/chat/completions)
2.之后,你需要在API Key输入框中填写你的API,你购买的哪家服务商的服务,就填写哪家服务商的API
3.V1.2去除了模型菜单栏,所以你需要手动填写模型名称。这里需要注意,填写的模型名称是那种能被服务商识别的标准模型名称,比如说你使用的是OpenRouter的API,现在你想使用gpt4o对数据集打标,那么你就必须填写openai/gpt-4o,而不是GPT4o、Gpt4o或者GPT4O这种不能被服务商识别的模型名。标准的模型名可以去你购买API的服务商那里找到。
4.其它的部分基本没有变化,参考V1.1的使用方法就可以
普通版本也进行了相同的更新,具体脚本和使用说明可以去这个页面下载:Automated Tagger with Openai Competible API || 可使用兼容Openai API接口的的自动打标器 | Civitai
Usage instructions:
1. V1.2 allows users to add a customizable API URL, for example, if you purchased API service from OpenRouter, you need to enter: https://openrouter.ai/api/v1/chat/completions
(Note: You must add /v1/chat/completions at the end of the API URL)
2. Then, you need to fill in your API key in the API Key input box.
3. V1.2 has removed the model menu bar, so you need to manually fill in the model name. It's important to note that the model name you fill in should be the standard model name that can be recognized by the service provider. For example, if you're using OpenRouter's API and want to use gpt4o to tag the dataset, you must fill in openai/gpt-4o, not GPT4o, Gpt4o, or GPT4O, which cannot be recognized by the service provider. You can find the standard model names from the service provider where you purchased the API.
4. Other sections have basically not changed, you can refer to the usage method of V1.1.
None-In-context few-shot learning version has the same update. You can download it and read the instructions from here: Automated Tagger with Openai Competible API || 可使用兼容Openai API接口的的自动打标器 | Civitai
——————————————————————————————————————
Prefece || 前言:
前几天,我写了一篇文章,介绍了如何使用我的自动打标器结合Openrouter API来利用性能强大的闭源多模态大模型给你的数据集进行自动标注。接下来我要讲的内容是这个打标器的一个比较重要的功能更新—短上下文学习功能。因为篇幅较长,所以我将其内容摘取了出来,写成了单独的一篇文章来介绍如何使用新功能—短上下文学习进行数据集的标注。
A few days ago, I wrote an article introducing how to use my OpenRouter API automatic tagger to automatically label your dataset using powerful closed-source multimodal large models. Now, I'm going to talk about an important functional update to that tagger - In-context few-shot learning. Because the content is quite lengthy(for update notes), I extracted the content and wrote this separate article to introduce how to use this new function - In-context few-shot learning to tag your dataset.
这个脚本是我的OpenRouter API自动打标器的变体,所以如果你想使用这个脚本的话,一定要看我的原文,学习自动打标器的基础操作:Automated Tagger with Openrouter API || 使用OpenRouter API的自动打标器 | Civitai
This script is a variant of my OpenRouter API automatic tagger, so if you want to use this script, you'd better read this article of mine to learn the basic operations of my automatic tagger: Automated Tagger with Openrouter API || 使用OpenRouter API的自动打标器 | Civitai
使用说明 || Usage:
本次更新加入了短上下文学习功能,它允许用户选择两张图片作为样板图片,然后你可以根据你填写的指令为它编写“输出模板”,之后大模型就会学习你提供的“输出模板”的回答模式,为你的数据集以这种回答模式打标。短上下文学习功能可以极大地增强大模型的指令遵循能力,让大模型的回答无限接近用户所期望的样子。比如我想用DanBooru的标签格式为我的数据集打标,但是很多大模型并不理解DanBooru标签的具体格式是怎样的,这时候就可以利用大模型的短上下文学习功能,你可以先给大模型看一张样板图片,然后用DanBooru的标签格式为这张样板图片打标,让大模型学习这种打标方式,之后大模型就会用相当标准的DanBooru标签格式为你的数据集打标了,并且成功率和标签的规范性颇高。
This update adds a new feature - In-context few-shot learning, which allows users to select two images as examples, then you can write "output templates" for them based on your instruction, after which the model will learn the format of the "output templates" and label the dataset using this kind of format. In-context few-shot learning can greatly enhance the model's instruction-following ability, making the model's outputs infinitely close to what the users expect. For example, if I want to label my dataset using DanBooru tag format, but many models don't understand how DanBooru tags look, so this is where 'In-context few-shot learning' should come into play. You can first show the model your sample images, then label them using the DanBooru tags, letting the model learn this labeling method. Afterwards, the model will label your dataset using a fairly standard DanBooru tag format with high success rate.
具体示例如下:
An example is as follows:
样板图片:
Sample image:

Instruction(指令):
1. Describe this image;
2. Your description should include the character's pose, appearance (hair color, hairstyle, clothing, etc.), expression, as well as the background where the character is located and all elements contained in the background;
3. You should use DanBooru tags format as the description format;
输出模板(用来教会大模型如何生成这种格式的描述):
Output template (Teach large language models how to generate descriptions in this format):
1girl, black hair, messy medium hair, laughing, white long-sleeves t-shirt, blue shorts, standing, indoors, bedroom, messy bedroom, bed, toys, desk, books, computer, window, sunlights, paintings on the wall
之后,大模型就会学习你提供的输出模板的回答模式,在接下来的任务中用这种回答模式为你的数据集打标。
Subsequently, the large language model will learn the format from the output template you provided. It will then use this format to label your dataset in the following tasks.
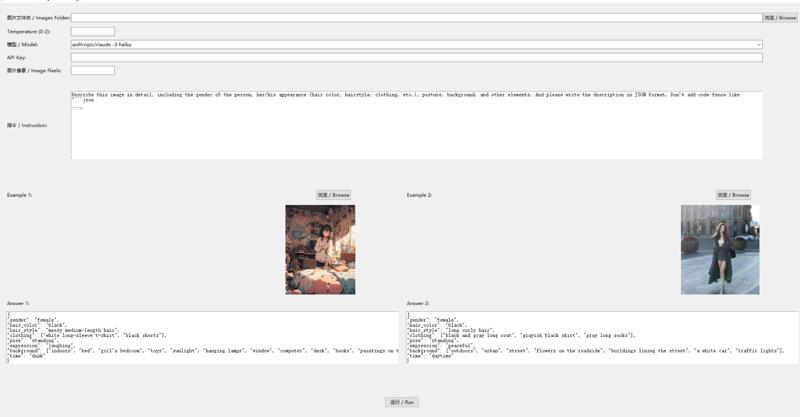
更新后的GUI界面:
GUI after updating:

如图所示,GUI中的下半部分就是新更新的短上下文学习功能,你必须提供两套模板才能较好的保证大模型的学习效果。点击浏览键就可以选择样板图片,之后你就可以在样板图片下方的"Answer"区域内输入你编写的输出模板。比如说你想让大模型将图片描述以Json格式输出,那么你就必须用Json格式手动编写好样板图片的描述,我提供了两套默认的Json格式的模板,如果你想让大模型输出Json格式的描述,直接使用我的模板就可以。
As shown in the image, the lower half of the GUI is the newly updated In-context few-shot learning function. You must provide two sets of templates to ensure good learning effects for the models. Click the browse button to select two sample images, then you can input your output templates in the "Answer" areas below these two sample images. For example, if you want the model to output the description in JSON format, you must manually write descriptions of the sample images in JSON format. I have already provided two sets of JSON format templates.
一些说明及注意事项 || Some explanations and notes:
1.”Tagger_With_OpenRouter_V1.1_In-context few-shot learning“并不是Tagger_With_OpenRouter_V1.1”的升级版,如果你不想使用短上下文学习功能的话,直接使用Tagger_With_OpenRouter_V1.1就可以了
1."Tagger_With_OpenRouter_V1.1_In-context few-shot learning" is not an upgraded version of "Tagger_With_OpenRouter_V1.1". If you don't want to use the In-context few-shot learning function, just use Tagger_With_OpenRouter_V1.1
2.让大模型进行短上下文学习会极大地增加输入tokens。对于同一套数据集,开启短上文学习后,使用大模型的花费将是未开启短上文学习时的两倍左右,所以一定要在真正有需要时再去使用它。
2.Enabling In-context few-shot learning function will significantly increase the input tokens. For the same dataset, the cost of Enabling In-context few-shot learning function will be about 2 times that of not enabling it. So, it is best to use it only when necessary.
3.这几天Claude3 haiku很不稳定,经常无法返回数据,请谨慎使用它
3.In recent days, Claude3 haiku has been very unstable, often failing to return data. so use it with caution.
4.你选择的两张样板图片需要尽可能地有差异性,这样可以让大模型有更好的学习效果,并且你编写的输出模板必须尽可能地准确且规范。
4.The two sample images you choose should be as different as possible. This allows the model to learn better. Additionally, the output templates you write must be as accurate and standardized as possible.
5.当你编写好输出模板并点击“运行”后,它们便会被保存在脚本中,所以你不需要每次启动脚本都重新编写模板,并且脚本会自动加载上一次你选择的样板图片。
5.Once you have written the output templates and clicked "Run", they will be saved in the script. Therefore, you don't need to rewrite the templates every time you start the script. And the script will automatically load the sample images you chose last time.
6.你选择的样板图片的像素数量尽量在40万左右(或大小在100KB以下),如果太大的话,很可能会超过模型的单次最大输入量,从而无法获得反馈结果。(为了防止输入tokens数量高于最高输入限制,我建议无论选择哪个模型,都在"像素数量"那一栏里填写400000)
6. Try to keep the pixel count of the sample image around 400,000(or under 100KB). If it's too large, it may exceed the model's max input, resulting in no feedback. (To prevent the number of input tokens from exceeding the maximum input limit, I suggest that regardless of which model you choose, fill in 400,000 in the "Image Pixels")
7.温度值尽量设置在1以下,这样可以增强模型的指令遵循能力。
7.Try to set the temperature value below 1. This can enhance the model's ability to follow instructions.
8.我的测试显示,经过短上下文学习后,GPT4o、Claude3.5 sonnet、Gemini 1.5 pro等目前最先进的大模型都可以100%完美输出我需要的Json格式的描述,gemini 1.5 flash、Yi Vision等较弱模型的成功率也达到了98%以上。(但是较弱的模型的指令遵循能力依旧很弱势,所以即使开启了上下文学习功能,它们也不一定能在所有任务中均表现良好,如果你对tags的质量要求很苛刻,那还是推荐你使用诸如gpt4o这样的强大模型)
8.My tests show that after enabling In-context few-shot learning function, cutting-edge models such as GPT4o, Claude3.5 sonnet, and Gemini 1.5 pro can output the JSON format descriptions with 100% perfection. The success rate of weaker models like gemini 1.5 flash and Yi Vision have also reached over 98%. (However, weaker models still have relatively poor instruction-following abilities. Therefore, even with the In-context few-shot learning function enabled, it is unlikely that they will perform excellently in all tasks. If you have very strict requirements for the quality of tags, it's recommended to use powerful models like gpt4o)
9.如果模型不能很好地模仿你撰写的“输出模板”,那就降低温度,0.3左右的温度值也是可以的。
9.If the model cannot effectively mimic your "output templates", then lower the temperature. A temperature value around 0.3 is also acceptable.
.jpeg)