Update: Added low vram GPU models.
업데이트: 낮은 vram GPU 모델 추가
更新: 低 VRAM GPU モデルを追加
7zip - http://7zip.org
Download & Install Windows x64 .exe. This is needed for uncompress Forge UI files.
Windows x64 .exe를 다운로드하고 설치하세요. 이것은 Forge UI 파일을 압축 해제하는 데 필요합니다.
Windows x64 .exe をダウンロードしてインストールします。これは Forge UI ファイルを解凍するために必要です。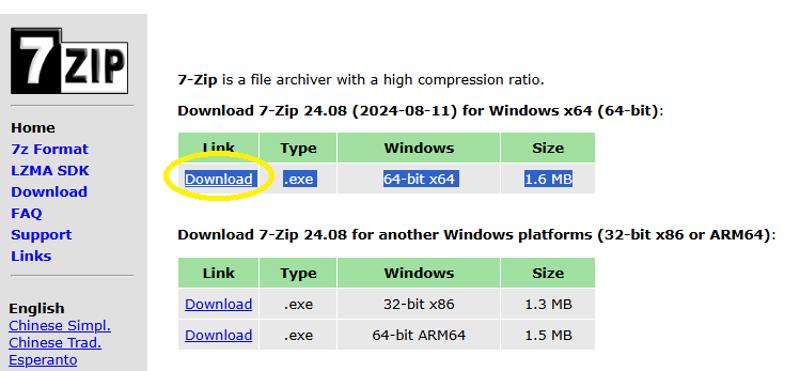
Forge UI - https://github.com/lllyasviel/stable-diffusion-webui-forge
Forge has same style as A1111 Web UI so you don't have to learn Comfy UI workflow. Scroll down until you find the download link for the one package 7z file.
Forge UI는 A1111 WebUI를 기반으로 하므로 Comfy UI 워크플로를 배울 필요가 없습니다. 아래로 스크롤하여 원클릭 패키지 7z 파일의 다운로드 링크를 찾으세요.
Forge UI は A1111 WebUI に基づいているため、Comfy UI ワークフローを学習する必要はありません。ワンクリック パッケージ 7z ファイルのダウンロード リンクが見つかるまで下にスクロールします。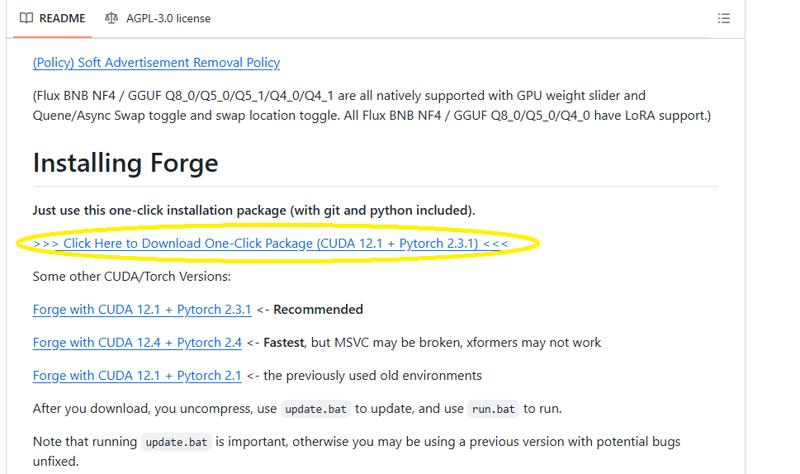
Forge UI Installation
3.1. Unzip webui_forge_cu121_torch231.7z file to C:\forge or other directory of your liking.
3.2. Click Windows's Start button, type Command Prompt, then click on Run as Administrator
3.3. Go to the forge directory, then type "update.bat", press Enter
3.1. webui_forge_cu121_torch231.7z 파일을 C:\forge 또는 원하는 다른 디렉토리에 압축 해제합니다.3.2. Windows의 시작 버튼을 클릭하고 명령 프롬프트를 입력한 다음 관리자 권한으로 실행을 클릭합니다.
3.3. forge 디렉토리로 이동한 다음 "update.bat"를 입력하고 Enter를 누릅니다.
3.1. webui_forge_cu121_torch231.7z ファイルを C:\forge または任意のディレクトリに解凍します。3.2. Windows の [スタート] ボタンをクリックし、「コマンド プロンプト」と入力して、[管理者として実行] をクリックします
3.3. forge ディレクトリに移動し、「update.bat」と入力して Enter キーを押します
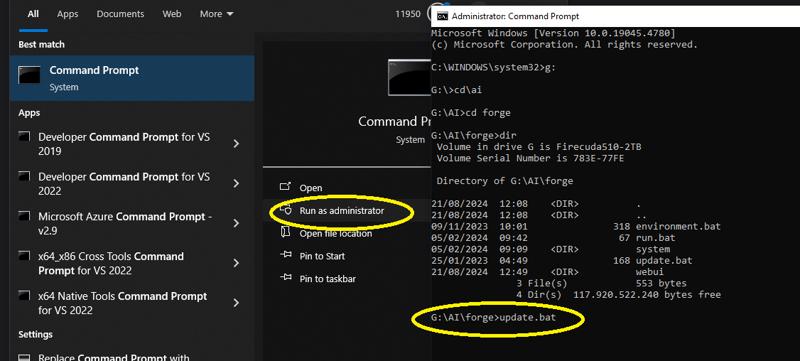
Wait until the process is finished, then next time to start Forge you can type "run" then Enter.
프로세스가 완료될 때까지 기다린 후 다음에 Forge를 시작할 때 "run"을 입력한 후 Enter를 누르세요.
プロセスが完了するまで待機し、次回 Forge を起動するときに「run」と入力して Enter キーを押します。Flux 1 dev fp8: https://huggingface.co/lllyasviel/flux1_dev/blob/main/flux1-dev-fp8.safetensors
Note: If you have low vram GPU, download the alternative Flux dev gguf models at the end of the article.
참고: 낮은 vram GPU가 있는 경우 기사 끝에 있는 대체 Flux dev gguf 모델을 다운로드하세요.
注: VRAM が低い GPU をお持ちの場合は、記事の最後に記載されている代替の Flux dev gguf モデルをダウンロードしてください。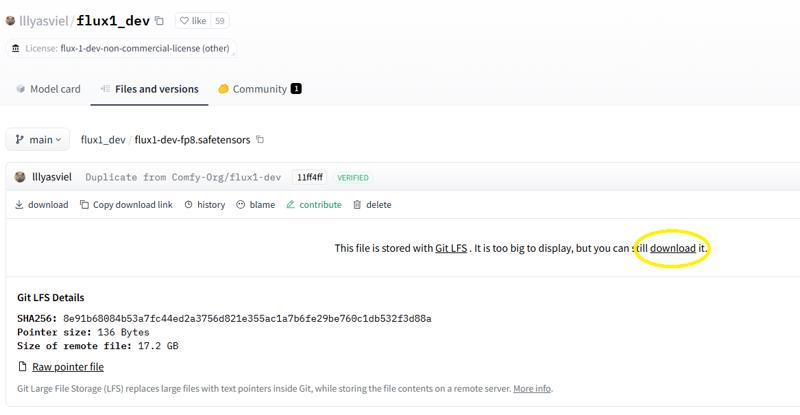
Download this file and put it in forge\webui\models\Stable-diffusion directory.
이 파일을 다운로드하여 forge\webui\models\Stable-diffusion 디렉토리에 넣으세요.
このファイルをダウンロードし、forge\webui\models\Stable-diffusion ディレクトリに配置します。Flux AE: https://huggingface.co/black-forest-labs/FLUX.1-schnell/tree/main
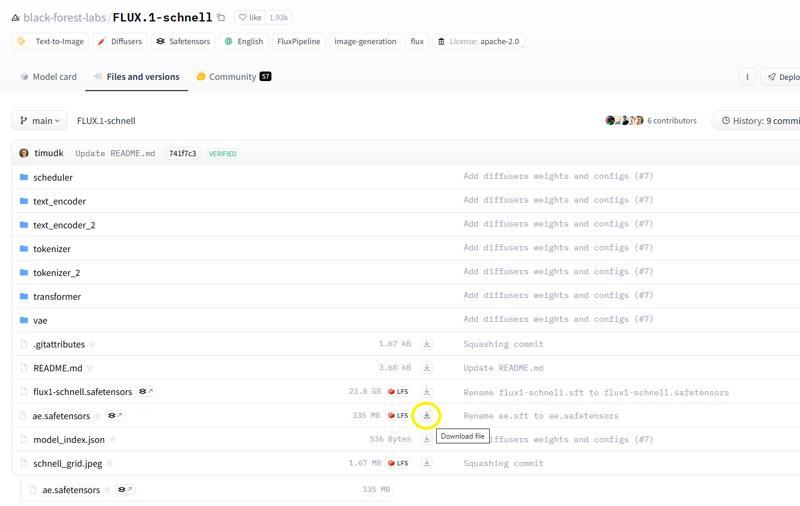
Download ae.safetensors and put it in forge\webui\models\VAE
ae.safetensors를 다운로드하여 forge\webui\models\VAE에 넣으세요.
ae.safetensorsをダウンロードし、forge\webui\models\VAEに配置します。Flux Text Encoder & Clip: https://huggingface.co/comfyanonymous/flux_text_encoders/tree/main

Download these 2 files and put both in forge\webui\models\text_encoder.
이 2개 파일을 다운로드하고 둘 다 forge\webui\models\text_encoder에 넣으세요.
これら2つのファイルをダウンロードし、両方をforge\webui\models\text_encoderに配置します。Flux Realism Lora: https://civitai.com/models/631986/xlabs-flux-realism-lora
This is optional to increase the realistic quality of your generated images. Download this lora and put in forge\webui\models\Lora.
이것은 생성된 이미지의 사실적인 품질을 높이기 위한 선택 사항입니다. 이 lora를 다운로드하여 forge\webui\models\Lora에 넣으세요.
これは、生成された画像のリアルな品質を高めるためのオプションです。この lora をダウンロードして、forge\webui\models\Lora に配置します。Hi-res Fix upscaler: https://huggingface.co/uwg/upscaler/blob/main/ESRGAN/4x_NMKD-Superscale-SP_178000_G.pth
This is also optional. You can use your favourite upscaler from your SD1.5/XL webui or just use R-ESRGAN 4x+. Put in \forge\webui\models\ESRGAN.
이것도 선택 사항입니다. SD1.5/XL webui에서 좋아하는 업스케일러를 사용하거나 R-ESRGAN 4x+를 사용할 수 있습니다. \forge\webui\models\ESRGAN을 넣으세요.
これもオプションです。SD1.5/XL WebUI からお気に入りのアップスケーラーを使用するか、R-ESRGAN 4x+ を使用することもできます。\forge\webui\models\ESRGAN に入力します。Forge UI Settings
Refresh your Forge UI, or execute "run.bat" to start if you haven't.
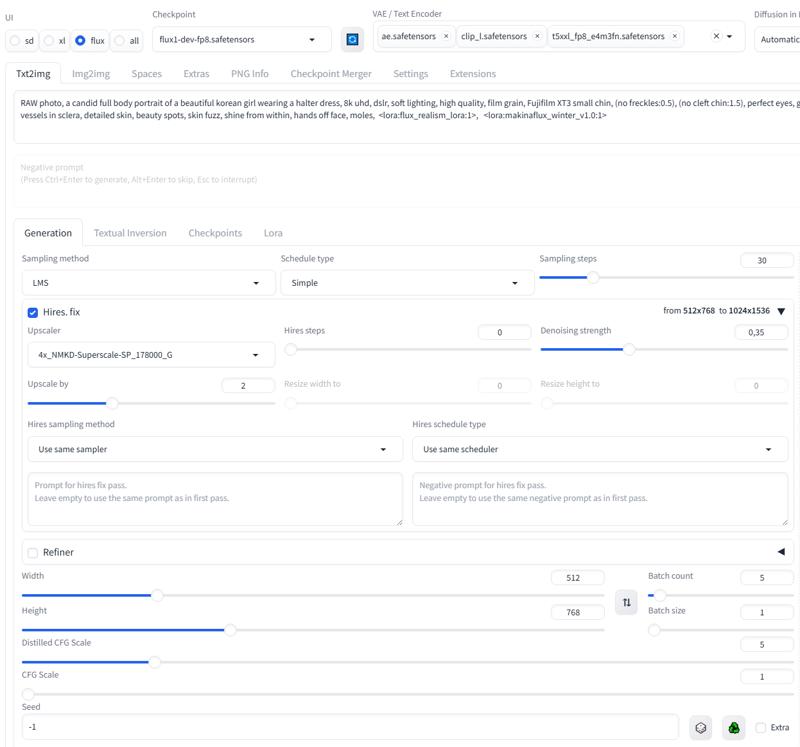
You can follow my usual settings from below screenshot. The best sampling method I found for best realistic skin is LMS. IPNDM is very similar also.
Forge UI를 새로 고치거나, 아직 시작하지 않았다면 "run.bat"을 실행하여 시작하세요.아래 스크린샷에서 내 평소 설정을 따를 수 있습니다. 가장 사실적인 피부를 위해 내가 찾은 가장 좋은 샘플링 방법은 LMS입니다. IPNDM도 매우 유사합니다.
Forge UI を更新するか、まだ実行していない場合は「run.bat」を実行して起動します。以下のスクリーンショットから、私の通常の設定に従うことができます。最もリアルなスキンを実現するための最良のサンプリング方法は LMS です。IPNDM も非常に似ています。
Other tips:
- Flux are smarter with prompts, you can check my short guide at https://ko-fi.com/makina69 to use ChatGPT to extract prompts from sample images.
- Adetailer enhances your small face on full body length images but not as needed as SD1.5.
다른 팁:
- Flux는 프롬프트를 사용하면 더 똑똑합니다. https://ko-fi.com/makina69에서 간단한 가이드를 확인하여 ChatGPT를 사용하여 샘플 이미지에서 프롬프트를 추출할 수 있습니다.
- Adetailer는 전신 길이 이미지에서 작은 얼굴을 향상시키지만 SD1.5만큼 필요하지는 않습니다.
その他のヒント:
- Flux はプロンプトに関してよりスマートです。ChatGPT を使用してサンプル画像からプロンプトを抽出する方法については、https://ko-fi.com/makina69 にある私の短いガイドを参照してください。
- Adetailer は全身画像で小さな顔を強調しますが、SD1.5 ほど必要ではありません。
Alternative Flux dev models for lower vram GPU
Image quality comparison: Q4 vs fp8
https://civitai.com/posts/10930895
Download the Flux.1 GGUF model from the link below. You only need one model from this repo.
https://huggingface.co/city96/FLUX.1-dev-gguf/tree/main
For GPUs with 8GB VRAM: Download the
flux1-dev-Q2_K.ggufmodel.
NOTE: After several reports, I would skip the Q2 model altogether. The result is broken. Just use Q3 as the bare minimumFor GPUs with 8GB to 10GB VRAM: Choose the
Q3orQ4models.For GPUs with 10GB to 12GB VRAM: Opt for the
Q5model.For GPUs with 12GB or more VRAM: Download the
Q6orQ8models.
Use the same ae.safetensors & clip_l.safetensors.
For the text encoder, download the matching file from this link:
https://huggingface.co/city96/t5-v1_1-xxl-encoder-gguf/tree/main
For example if you downloaded flux1-dev-Q4_K_S.gguf, then download t5-v1_1-xxl-encoder-Q4_K_S.gguf.
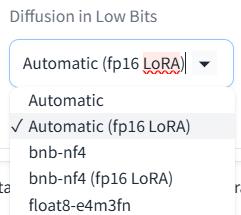
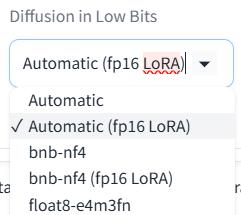
Lastly, set the setting below to Automatic (fp16 Lora)
낮은 vram GPU를 위한 대체 Flux 개발 모델
아래 링크에서 Flux.1 GGUF 모델을 다운로드하세요. 이 리포지토리에서 모델 하나만 있으면 됩니다.
https://huggingface.co/city96/FLUX.1-dev-gguf/tree/main
8GB VRAM GPU의 경우: flux1-dev-Q2_K.gguf 모델을 다운로드하세요.
참고: 몇 가지 보고서를 본 후, 저는 Q2 모델을 완전히 건너뛸 것입니다. 결과는 망가졌습니다. 최소한 Q3만 사용하세요.8GB~10GB VRAM GPU의 경우: Q3 또는 Q4 모델을 선택하세요.
10GB~12GB VRAM GPU의 경우: Q5 모델을 선택하세요.
12GB 이상의 VRAM GPU의 경우: Q6 또는 Q8 모델을 다운로드하세요.
동일한 ae.safetensors 및 clip_l.safetensors를 사용합니다.
텍스트 인코더의 경우 이 링크에서 일치하는 파일을 다운로드합니다.
https://huggingface.co/city96/t5-v1_1-xxl-encoder-gguf/tree/main
예를 들어 flux1-dev-Q4_K_S.gguf를 다운로드한 경우 t5-v1_1-xxl-encoder-Q4_K_S.gguf를 다운로드합니다.
마지막으로 아래 설정을 자동으로 설정합니다(fp16 Lora)
低 VRAM GPU 用の代替 Flux 開発モデル
以下のリンクから Flux.1 GGUF モデルをダウンロードします。このリポジトリから必要なモデルは 1 つだけです。
https://huggingface.co/city96/FLUX.1-dev-gguf/tree/main
8GB VRAM の GPU の場合: flux1-dev-Q2_K.gguf モデルをダウンロードします。
注: 複数のレポートの後、Q2 モデルは完全にスキップします。結果は壊れています。最低限、Q3 を使用してください。8GB ~ 10GB VRAM の GPU の場合: Q3 または Q4 モデルを選択します。
10GB ~ 12GB VRAM の GPU の場合: Q5 モデルを選択します。
12GB 以上の VRAM の GPU の場合: Q6 または Q8 モデルをダウンロードします。
同じ ae.safetensors と clip_l.safetensors を使用します。
テキスト エンコーダーの場合は、次のリンクから対応するファイルをダウンロードします:
https://huggingface.co/city96/t5-v1_1-xxl-encoder-gguf/tree/main
たとえば、flux1-dev-Q4_K_S.gguf をダウンロードした場合は、t5-v1_1-xxl-encoder-Q4_K_S.gguf をダウンロードします。
最後に、以下の設定を [自動 (fp16 Lora)] に設定します。
Adetailer Extension Installation
adetailer (After Detailer) is used to get more detailed face or eyes by detecting face previously generated image from the main prompt, then inpainting it with another run of image generation for just the face area.
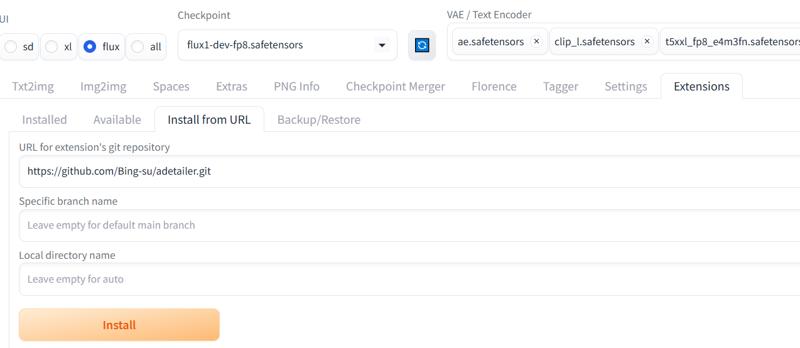
1. Go to Extensions tab in ForgeUI
2. Go to Install from URL tab
3. In the first textbox, type https://github.com/Bing-su/adetailer.git
4. Click Install, after done Refresh the page (CTRL-F5)
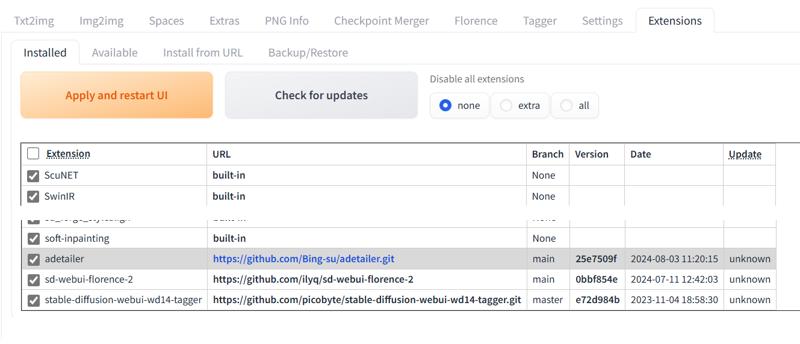
5. Go to Installed tab
6. Scroll down until you find "adetailer", tick the checkbox
7. Click Apply and Restart UI
Notes:
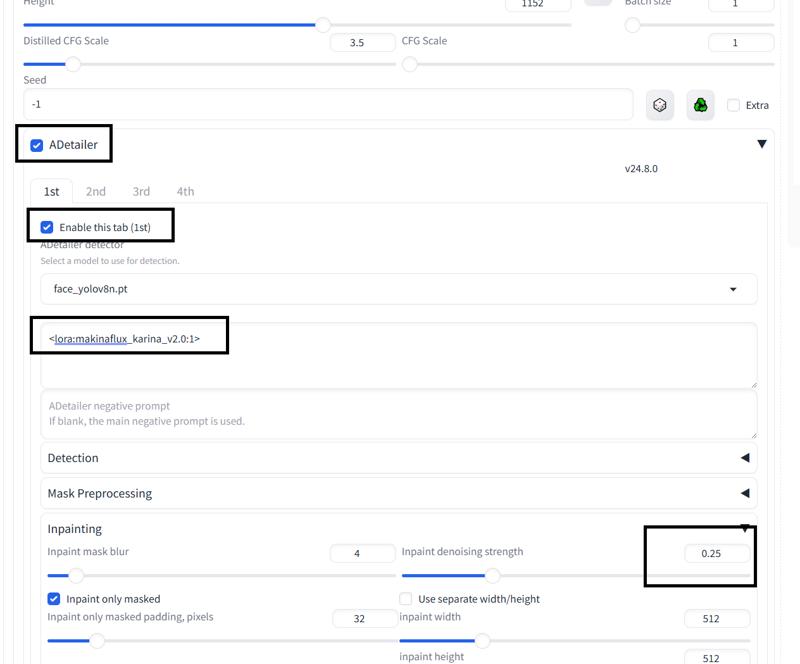
To turn on Adetailer, follow the screenshot above. Make sure Adetailer and Enable 1st tab are ticked.
For adetailer prompt, just paste the face lora name and weight like above.
For face_yolo and mediapipe face, I recommend setting Inpaint denoising strength to 0.2 - 0.3
For mediapipe eyes only, you can set it to 0.4-0.5
Note that using adetailer will make generations take more time. No need to use it for face or bust close up. Use it for halfbody to fullbody shots.
Forge Fix for RTX 50xx Users
Go to your stable diffusion installation directory
cd X:\xxx\xxxxActivate Venv
call venv\Scripts\activate.batUpgrade pip to a fixed version
python -m pip install --upgrade pip==23.3.1
Uninstall xformer
pip uninstall xformers --yes
Install custom torch package optimized for 5000 series GPUs
Install custom torchvision package

